set clock CHEVROLET KODIAK 2004 Owners Manual
[x] Cancel search | Manufacturer: CHEVROLET, Model Year: 2004, Model line: KODIAK, Model: CHEVROLET KODIAK 2004Pages: 366, PDF Size: 6.87 MB
Page 129 of 366

Climate Controls
Climate Control System
With these systems, you can control the heating,
cooling and ventilation for your vehicle.
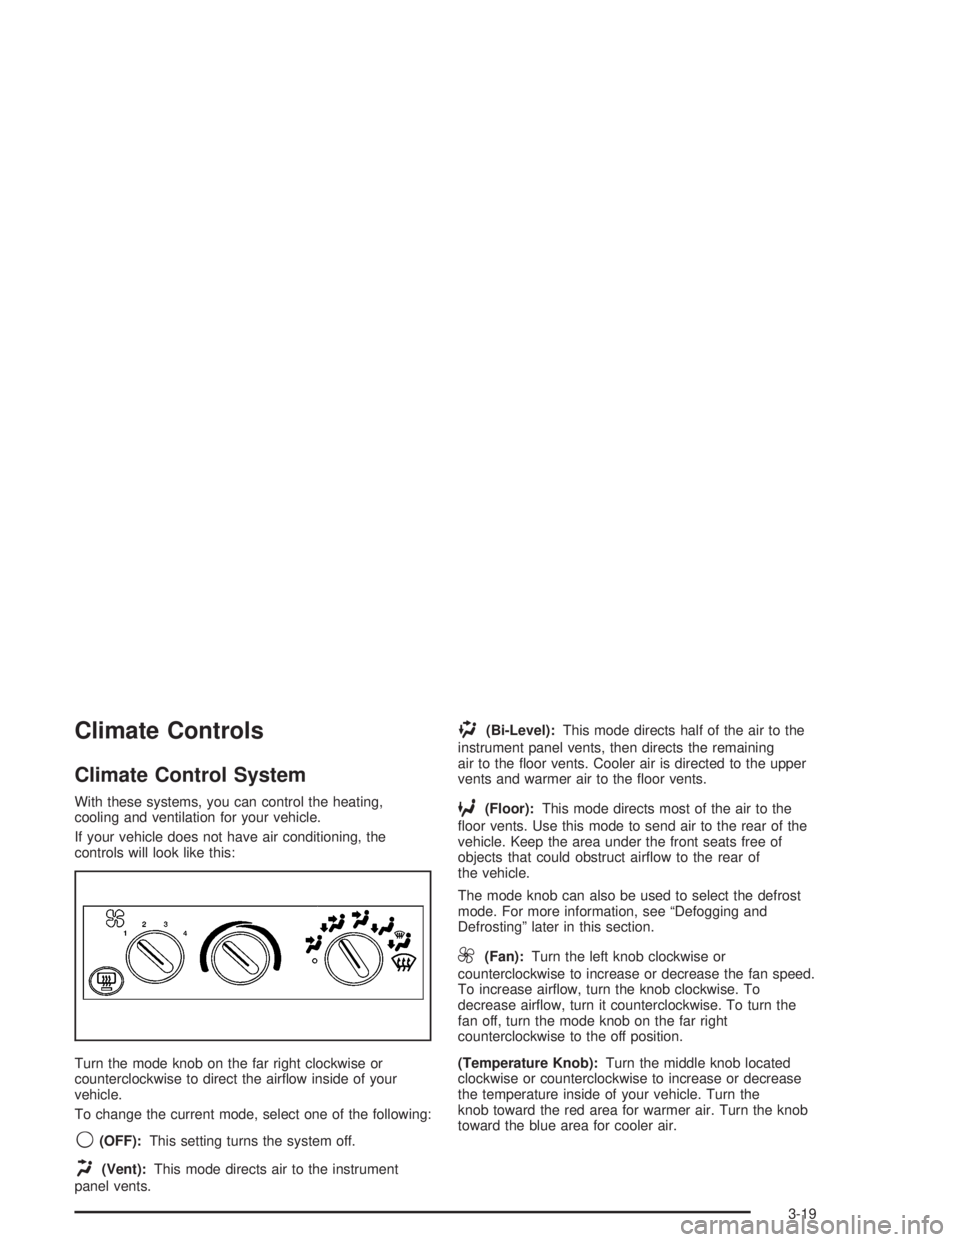
If your vehicle does not have air conditioning, the
controls will look like this:
Turn the mode knob on the far right clockwise or
counterclockwise to direct the airflow inside of your
vehicle.
To change the current mode, select one of the following:
9(OFF):This setting turns the system off.
H(Vent):This mode directs air to the instrument
panel vents.
)(Bi-Level):This mode directs half of the air to the
instrument panel vents, then directs the remaining
air to the floor vents. Cooler air is directed to the upper
vents and warmer air to the floor vents.
6(Floor):This mode directs most of the air to the
floor vents. Use this mode to send air to the rear of the
vehicle. Keep the area under the front seats free of
objects that could obstruct airflow to the rear of
the vehicle.
The mode knob can also be used to select the defrost
mode. For more information, see “Defogging and
Defrosting” later in this section.
9(Fan):Turn the left knob clockwise or
counterclockwise to increase or decrease the fan speed.
To increase airflow, turn the knob clockwise. To
decrease airflow, turn it counterclockwise. To turn the
fan off, turn the mode knob on the far right
counterclockwise to the off position.
(Temperature Knob):Turn the middle knob located
clockwise or counterclockwise to increase or decrease
the temperature inside of your vehicle. Turn the
knob toward the red area for warmer air. Turn the knob
toward the blue area for cooler air.
3-19
Page 160 of 366

To adjust both tone controls and both speaker controls
to the middle position, end out of audio by waiting
for the display to change to the clock display. Then
press and hold AUDIO for more than two seconds until
you hear a beep. CEN will appear on the display.
Adjusting the Speakers (Balance/Fade)
AUDIO:To adjust the balance between the right
and the left speakers, press and release AUDIO until
BAL appears on the display. Then press and hold the up
or the down arrow to move the sound toward the right
or the left speakers.
To adjust the fade between the front and the rear
speakers, press and release AUDIO until FAD appears
on the display. Then press and hold the up or the
down arrow to move the sound toward the front or the
rear speakers.
To adjust balance or fade to the middle position, select
BAL or FAD. Then press and hold AUDIO for more
than two seconds until you hear a beep. L and a zero or
F and a zero will appear on the display.
To adjust both tone controls and both speaker controls
to the middle position, end out of audio by waiting
for the display to change to the time display. Then press
and hold AUDIO for more than two seconds until you
hear a beep. CEN will appear on the display.
Fade may not be available if you have a regular
cab model.
Radio Messages
CAL (Calibration):Your audio system has been
calibrated for your vehicle from the factory. If CAL
appears on the display it means that your radio has not
been configured properly for your vehicle and must
be returned to the dealership for service.
LOC (Locked):This message is displayed when the
Theftlock
®system has locked up. Your vehicle must be
returned to the dealership for service.
Playing a Cassette
Your tape player is built to work best with tapes that are
up to 30 to 45 minutes long on each side. Tapes
longer than that are so thin they may not work well in
this player. The longer side with the tape visible should
face to the right. If the ignition is on, but the radio is
off, the tape can be inserted and will begin playing. If
you hear nothing but a garbled sound, the tape may not
be in squarely. Press the eject button to remove the
tape and start over.
While the tape is playing, use the VOL, AUDIO and
SEEK controls just as you do for the radio. The radio will
display UP if the top side of the tape is playing.
DN (Down) will appear if the bottom side is playing.
If you want to insert a tape while the ignition is off, first
press the eject button or the RCL knob.
3-50
Page 247 of 366

{CAUTION:
Adding only plain water to your cooling
system can be dangerous. Plain water, or
some other liquid such as alcohol, can boil
before the proper coolant mixture will. Your
vehicle’s coolant warning system is set for the
proper coolant mixture. With plain water or the
wrong mixture, your engine could get too hot
but you would not get the overheat warning.
Your engine could catch �re and you or others
could be burned. Use a 50/50 mixture of clean,
drinkable water and DEX-COOL
®coolant.
Notice:In cold weather, water can freeze and crack
the engine, radiator, heater core and other parts.
Use the recommended coolant and the proper
coolant mixture.
{CAUTION:
You can be burned if you spill coolant on hot
engine parts. Coolant contains ethylene glycol
and it will burn if the engine parts are hot
enough. Do not spill coolant on a hot engine.
1. Park the vehicle on a level surface. You can
remove the coolant surge tank pressure cap
when the cooling system, including the coolant
surge tank pressure cap and upper radiator hose, is
no longer hot. Turn the pressure cap slowly
counterclockwise (left) about one full turn. If you
hear a hiss, wait for that to stop. A hiss means there
is still some pressure left.
2. Then keep turning the pressure cap slowly, and
remove it.
5-41
Page 277 of 366

Proper front wheel alignment must be maintained in
order to ensure efficient steering, good directional
stability, and prevent abnormal tire wear. If you notice
unusual tire wear or your vehicle is pulling one way
or the other, the alignment may need to be reset. If you
notice your vehicle vibrating when driving on a smooth
road, your wheels may need to be balanced.
Tightening the Wheel Nuts
{CAUTION:
Wheel nuts that are not tight can work loose. If
all the nuts on a wheel come off, the wheel can
come off the vehicle, causing a crash. All
wheel nuts must be properly tightened. Follow
the rules in this section to be sure they are.
This section lets you know how often to check the
tightness of the wheel nuts on your vehicle and how tight
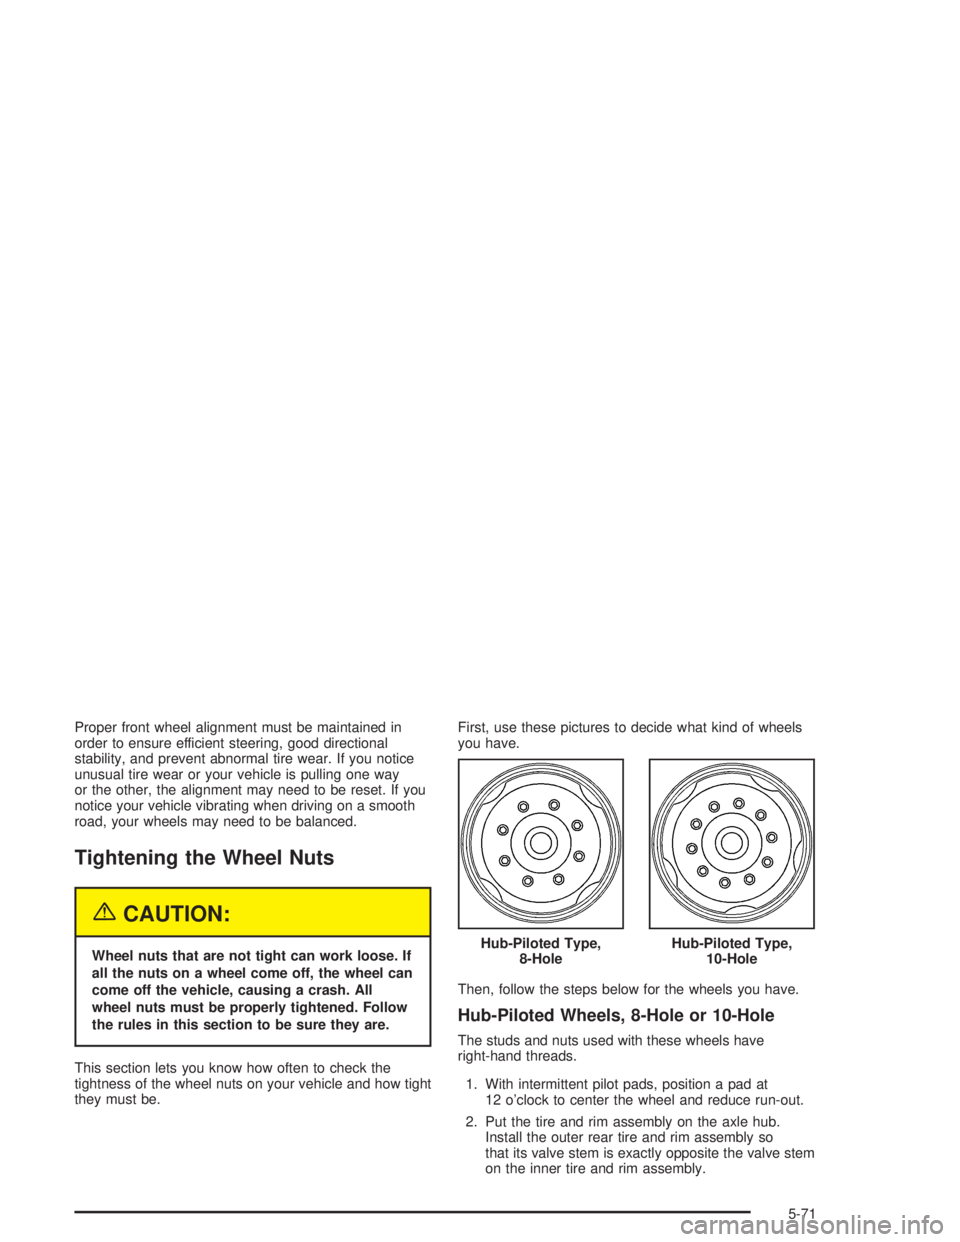
they must be.First, use these pictures to decide what kind of wheels
you have.
Then, follow the steps below for the wheels you have.
Hub-Piloted Wheels, 8-Hole or 10-Hole
The studs and nuts used with these wheels have
right-hand threads.
1. With intermittent pilot pads, position a pad at
12 o’clock to center the wheel and reduce run-out.
2. Put the tire and rim assembly on the axle hub.
Install the outer rear tire and rim assembly so
that its valve stem is exactly opposite the valve stem
on the inner tire and rim assembly. Hub-Piloted Type,
8-Hole
Hub-Piloted Type,
10-Hole
5-71