warning CHEVROLET KODIAK 2009 Owners Manual
[x] Cancel search | Manufacturer: CHEVROLET, Model Year: 2009, Model line: KODIAK, Model: CHEVROLET KODIAK 2009Pages: 376, PDF Size: 5.39 MB
Page 1 of 376
Seats and Restraint System............................. 1-1
Front Seats
............................................... 1-2
Rear Seats
..............................................1-10
Safety Belts
.............................................1-11
Child Restraints
.......................................1-28
Airbag System
.........................................1-48
Restraint System Check
............................1-59
Features and Controls..................................... 2-1
Keys
........................................................ 2-2
Doors and Locks
....................................... 2-6
Windows
.................................................. 2-8
Starting and Operating Your Vehicle
...........2-10
Mirrors
....................................................2-51
Storage Areas
.........................................2-53
Instrument Panel............................................. 3-1
Instrument Panel Overview
.......................... 3-4
Climate Controls
......................................3-20
Warning Lights, Gages, and Indicators
........3-23
Audio System(s)
.......................................3-48
Driving Your Vehicle....................................... 4-1
Your Driving, the Road, and the Vehicle
....... 4-2
Towing
...................................................4-23Service and Appearance Care.......................... 5-1
Service
..................................................... 5-3
Fuel
......................................................... 5-6
Checking Things Under the Hood
...............5-22
Rear Axle
...............................................5-67
Four-Wheel Drive
.....................................5-68
Front Axle
...............................................5-69
Noise Control System
...............................5-70
Bulb Replacement
....................................5-71
Windshield Wiper Blade Replacement
.........5-71
Other Service Items
..................................5-72
Tires
......................................................5-76
Appearance Care
.....................................5-87
Vehicle Identification
.................................5-94
Electrical System
......................................5-95
Capacities and Specifications
...................5-102
Normal Maintenance Replacement Parts
....5-108
Maintenance Schedule..................................... 6-1
Maintenance Schedule
................................ 6-2
Customer Assistance Information.................... 7-1
Customer Assistance and Information
........... 7-2
Reporting Safety Defects
............................ 7-9
Vehicle Data Recording and Privacy
...........7-11
Index................................................................ 1
2009 Chevrolet Kodiak Owner ManualM
Page 2 of 376
GENERAL MOTORS, GM, the GM Emblem,
CHEVROLET, the CHEVROLET Emblem, and the
name KODIAK are registered trademarks of General
Motors Corporation.
This manual includes the latest information at the time it
was printed. GM reserves the right to make changes
after that time without further notice.
This manual describes features that may or may not be
on your specific vehicle.
Read this manual from beginning to end to learn about
the vehicle’s features and controls. Pictures, symbols,
and words work together to explain vehicle operation.
Keep this manual in the vehicle for quick reference.
Index
To quickly locate information about the vehicle use the
Index in the back of the manual. It is an alphabetical
list of what is in the manual and the page number where
it can be found.
Safety Warnings and Symbols
A circle with a slash
through it is a safety
symbol which means
“Do Not,” “Do not do
this” or “Do not let this
happen.”
A box with the word CAUTION is used to tell about
things that could hurt you or others if you were to ignore
the warning.
Litho in U.S.A.
Part No. 25778612 A First Printing
©2008 General Motors Corporation. All Rights Reserved.
ii
Page 3 of 376
{CAUTION:
These mean there is something that could hurt
you or other people.
Cautions tell what the hazard is and what to do to avoid
or reduce the hazard. Read these cautions.
A notice tells about something that can damage the
vehicle.
Notice:These mean there is something that could
damage your vehicle.
Many times, this damage would not be covered by the
vehicle’s warranty, and it could be costly. The notice
tells what to do to help avoid the damage.
There are also warning labels on the vehicle which use
the same words, CAUTION or Notice.
Vehicle Symbols
The vehicle has components and labels that use
symbols instead of text. Symbols are shown along
with the text describing the operation or information
relating to a specific component, control, message,
gage, or indicator.
M:This symbol is shown when you need to see your
owner manual for additional instructions or information.
*:This symbol is shown when you need to see a
service manual for additional instructions or information.
iii
Page 4 of 376
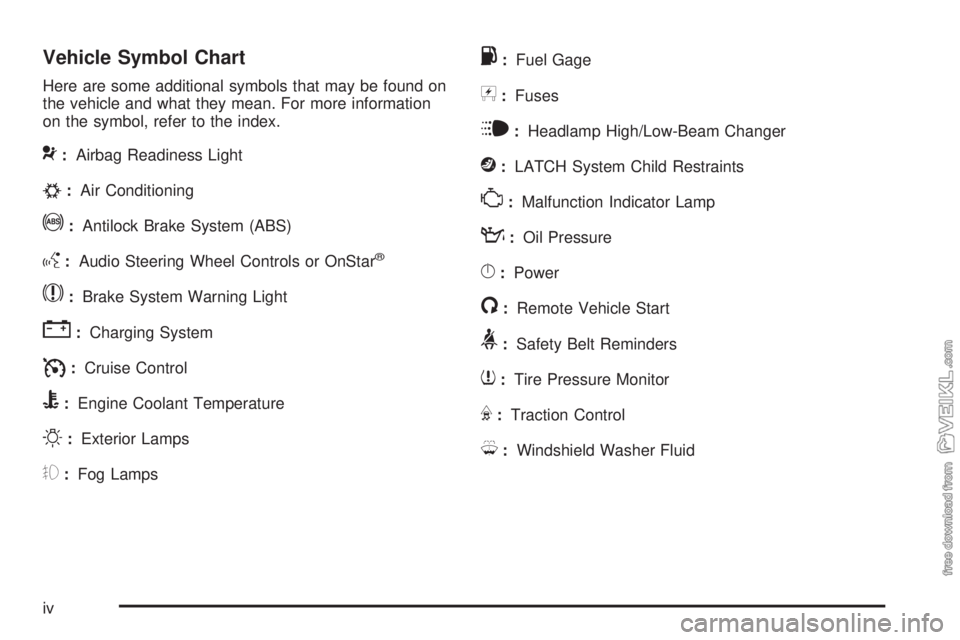
Vehicle Symbol Chart
Here are some additional symbols that may be found on
the vehicle and what they mean. For more information
on the symbol, refer to the index.
9:Airbag Readiness Light
#:Air Conditioning
!:Antilock Brake System (ABS)
g:Audio Steering Wheel Controls or OnStar®
$:Brake System Warning Light
":Charging System
I:Cruise Control
B:Engine Coolant Temperature
O:Exterior Lamps
#:Fog Lamps
.:Fuel Gage
+:Fuses
i:Headlamp High/Low-Beam Changer
j:LATCH System Child Restraints
*:Malfunction Indicator Lamp
::Oil Pressure
}:Power
/:Remote Vehicle Start
>:Safety Belt Reminders
7:Tire Pressure Monitor
F:Traction Control
M:Windshield Washer Fluid
iv
Page 75 of 376
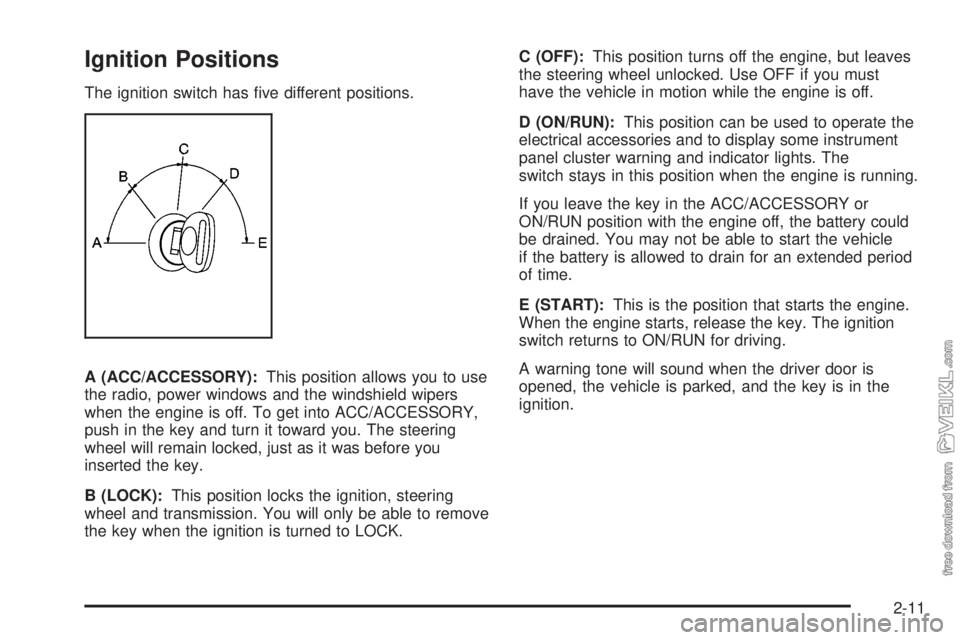
Ignition Positions
The ignition switch has five different positions.
A (ACC/ACCESSORY):This position allows you to use
the radio, power windows and the windshield wipers
when the engine is off. To get into ACC/ACCESSORY,
push in the key and turn it toward you. The steering
wheel will remain locked, just as it was before you
inserted the key.
B (LOCK):This position locks the ignition, steering
wheel and transmission. You will only be able to remove
the key when the ignition is turned to LOCK.C (OFF):This position turns off the engine, but leaves
the steering wheel unlocked. Use OFF if you must
have the vehicle in motion while the engine is off.
D (ON/RUN):This position can be used to operate the
electrical accessories and to display some instrument
panel cluster warning and indicator lights. The
switch stays in this position when the engine is running.
If you leave the key in the ACC/ACCESSORY or
ON/RUN position with the engine off, the battery could
be drained. You may not be able to start the vehicle
if the battery is allowed to drain for an extended period
of time.
E (START):This is the position that starts the engine.
When the engine starts, release the key. The ignition
switch returns to ON/RUN for driving.
A warning tone will sound when the driver door is
opened, the vehicle is parked, and the key is in the
ignition.
2-11
Page 82 of 376
Engine Alarm and Automatic
Shutdown
The check gages warning light will come on if the
system senses high engine temperature, and a low or
high engine oil pressure. If high engine temperature,
low engine oil pressure or high engine oil pressure
is detected, you will hear a tone alarm at two beats per
second. The alarm and the light will remain on until
the condition is fixed. If the engine temperature or oil
pressure condition worsens, the tone alarm will go to
five beats per second.
If the system senses low engine coolant, the five beat
per second alarm and the low coolant warning light
will come on.
The five beats per second tone alarm means that the
engine will shut down in about 25 to 30 seconds. There
is also an engine shutdown light to indicate that the
engine will shut down. SeeEngine Shutdown Warning
Light on page 3-40.
Pull off the road and shut off the engine. Do not start it
until the reason for the problem is known, and the
problem is fixed. If the engine shuts down when you are
still in traffic, you can restart the engine and get another25 to 30 seconds of operation. Do this only if you have to,
since there is a problem that can harm the engine if it is
not fixed. Engine automatic shutdown, for gasoline
engines, requires activation by your dealer/retailer.
Notice:If you try to operate the vehicle after the
engine automatically shuts down, you may damage
the vehicle. Have the vehicle repaired as soon as
possible.
Ambulance, Fire, and Rescue Packages
The check gages warning light will come on if the
system senses high engine temperature or low engine
oil pressure. If high engine temperature or low engine oil
pressure is detected, you will also hear a tone alarm
at two beats per second. The alarm and the light
will remain on until the condition is fixed. If the engine
temperature or oil pressure condition worsens, the
tone alarm will go to five beats per second.
If the system senses low engine coolant, the five beat
per second alarm and the low coolant warning light
will come on.
The engine will not shutdown, but you should have the
vehicle checked as soon as you can. SeeCheck
Gages Warning Light on page 3-43for more information.
2-18
Page 84 of 376
The ENGINE SHUTDOWN WARNING LIGHT will come
on and a continuous chime will alert the driver
30 seconds before the engine goes into idle shutdown
mode. The engine shutdown warning light and chime will
stay on for the entire duration of the idle shutdown
event to inform the driver that the engine is in idle
shutdown mode. SeeEngine Shutdown Warning Light
on page 3-40for more information.
After the engine shutdown occurs, the engine is no
longer running, and the ignition is still in the ON/RUN
position, all accessories can be used. Turn the ignition
switch to START to restart the engine or turn it to
LOCK or OFF to prevent the battery from draining.High Idle System
High Idle System with Switch
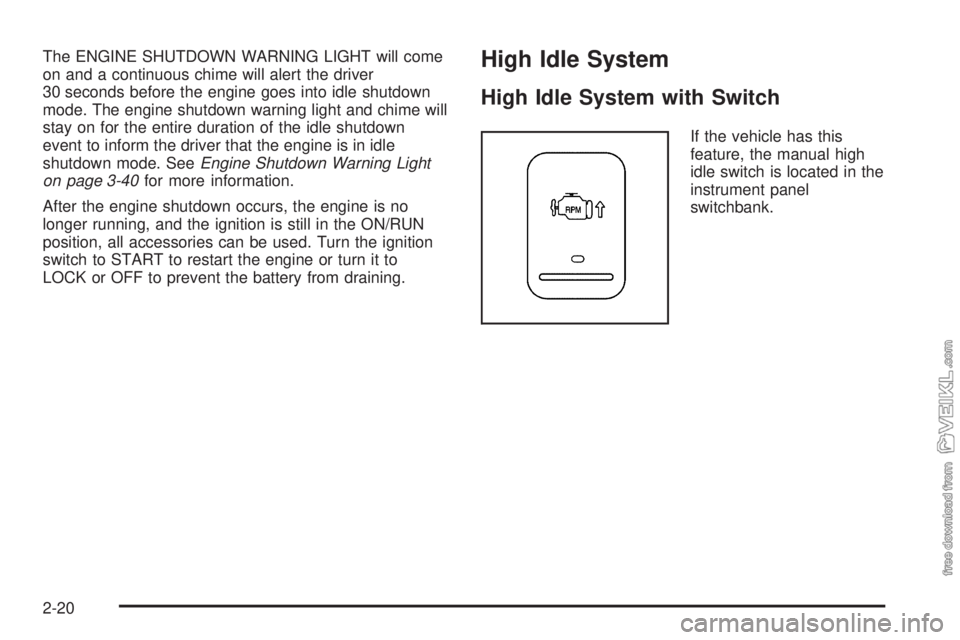
If the vehicle has this
feature, the manual high
idle switch is located in the
instrument panel
switchbank.
2-20
Page 88 of 376
During this warm-up period, check the warning lights
and gages:
•If oil pressure does not begin to rise within
15 seconds of starting, stop the engine and find the
cause. SeeOil Pressure Gage on page 3-38for
more information.
•If the engine coolant temperature gage needle goes
into the hot area on the gage, stop the engine and
find the cause of the overheating. SeeEngine
Coolant Temperature Gage on page 3-34for more
information.
•If you have air brakes, the dual-needle air pressure
gage should read at least 115 psi (790 kPa) for both
service systems before you try to move the vehicle.
When air pressure is below 60 psi (420 kPa), the
LOW AIR light will come on and you will hear a
tone alarm. SeeBrake System Warning Light on
page 3-31for more information. If the pressure does
not build up or drops during warm-up, stop the
engine and find the cause before you try to move the
vehicle. Recommended air pressure before driving is
120 psi (830 kPa). SeeAir Pressure Gage on
page 3-47for more information.
•The charging system light should come on when the
ignition key is turned to ON/RUN or START and
should go out when the engine is running above idle.
If the light does not go out or comes back on during
normal engine operation, have the charging system
checked right away. (This light tells you if the
generator is not charging; it does not reflect the
condition of the battery.) SeeCharging System Light
on page 3-29for more information.
•The voltmeter charge indicator gage tells you the
condition of the battery’s charge. The gage should be
in the center area during engine operation. The red
area on the left indicates an undercharge condition;
the red area on the right indicates an overcharge.
If the gage is in either red area, have the battery and
charging system checked right away. SeeVoltmeter
Gage on page 3-30for more information.
Notice:Do not allow the engine to operate at low
idle for more than five minutes. This can cause low
engine operating temperatures which can affect
engine operation and reduce engine life. Engine idle
speed should be increased to 1200 rpm whenever
extended idle is required. Once started, the engine
should be placed under load to allow the engine
coolant temperature to reach 150°F (66°C) before
shutting off the engine.
2-24
Page 99 of 376
Shifting Out of Neutral
To shift the transfer case out of N (Neutral), do the
following:
1. Set the parking brake. SeeParking Brake (With
Hydraulic Brakes) on page 2-38orParking Brake
(With Air Brakes) on page 2-41for parking
brake apply procedure.
2. Apply the regular brake pedal.
3. Turn the ignition to ON/RUN with the engine off.
4. Put the transmission in N (Neutral).
5. Turn the transfer case knob to the desired shift
position (Two-Wheel High, Four-Wheel High,
Four-Wheel Low).
6. After the transfer case has shifted out of N (Neutral),
the indicator light goes out.
Notice:Driving with the parking brake on can
overheat the brake system and cause premature
wear or damage to brake system parts. Verify that
the parking brake is fully released and the brake
warning light is off before driving.
7. Release the parking brake.
8. Start the engine and shift the transmission lever to
the desired position.Excessively shifting the transfer case into or out of the
different modes can cause the transfer case to enter the
shift protection mode. This protects the transfer case from
possible damage and only allows the transfer case to
respond to one shift per 10 seconds. The transfer case
can stay in this mode for up to three minutes.
Parking
{CAUTION:
If you do not park the vehicle properly, it can roll.
If you have left the engine running, it can move
very quickly. You or others could be injured. To be
sure the vehicle will not move, even when you are
on level ground, follow the steps below.
2-35
Page 103 of 376
{CAUTION:
It can be dangerous to get out of the vehicle
without the parking brake firmly set. The vehicle
can roll. If you have left the engine running, the
vehicle can move suddenly. You or others could
be injured. To be sure the vehicle will not move,
even when you are on fairly level ground, always
set the parking brake.
To set the hand lever parking brake, hold the regular
brake pedal down, then pull up on the handle, until
it stops.
If the ignition is on when the parking brake is set, the
brake system warning light will come on.Once the parking brake is applied, slowly remove your
foot from the regular brake pedal, while checking to
see if the vehicle moves. If the vehicle does start
to move, press the regular brake pedal and adjust the
parking brake holding force. See “Parking Brake
Adjustment” later in this section.
If the parking brake still does not set, take the vehicle to
your dealer/retailer for service.
To release the foot pedal parking brake, hold the
regular brake pedal down. Pull the brake release handle,
located just above the parking brake pedal.
To release the hand lever parking brake, hold the
regular brake pedal down and push down on the handle
until it stops.
If the ignition is on when the parking brake is released,
the brake system warning light will go off.
2-39