ECO mode CHEVROLET LOW CAB FORWARD 2017 User Guide
[x] Cancel search | Manufacturer: CHEVROLET, Model Year: 2017, Model line: LOW CAB FORWARD, Model: CHEVROLET LOW CAB FORWARD 2017Pages: 414, PDF Size: 7.97 MB
Page 112 of 414
Chevrolet Low Cab Forward Owner Manual (GMNA-Localizing-U.S.-
10716700) - 2017 - crc - 12/6/16
Infotainment System 111
2. Press the "TUNE/TRACK"button ("
y z") while the
clock display (hours) is blinking
to adjust the time (hours).
y: Time (hours) will increase
every time the button is
pressed.
z: Time (hours) will decrease
every time the button is
pressed.
Setting the Minutes 1. Press the "FUNC" button to display "CLK" and make the
clock display (minutes) blink.
2. Press the "TUNE/TRACK" button ("
y z") while the
clock display (minutes) is
blinking to adjust the time
(minutes).
y: Time (minutes) will
increase every time the button
is pressed.
z: Time (minutes) will
decrease every time the button
is pressed.
Tuner Mode Operations
Tuning
1. Press the "MODE" button when the power is on to select either
AM radio or FM radio.
It is switched to AM radio when
"AM" is displayed, and FM
radio when "FM" is displayed.
2. Press the "TUNE" button ("
y
z
") for less than 2 seconds to
select a radio station manually.
The display should be checked
in order to adjust the frequency
because AM radio frequency
will range from 10 kHz or FM
radio frequency will range from
0.2 MHz.
Press the "TUNE" button ("
y
z
") for 2 seconds or longer to
select a radio station
automatically. The automatic
tuning will stop after detecting
a receivable station. Press the
"TUNE" button ("
y z") again
to cancel this function. When the displayed frequency
reaches the highest frequency, it will
return to the lowest frequency.
When the lowest frequency has
been reached, it will return to the
highest frequency.
Program your preferred radio
stations to the preset channels in
advance to conveniently use while
driving.
Reception frequency :
AM 530 - 1710 kHz (10 kHz step)
FM 87.7 - 107.9 MHz (0.2
MHz step)
Calling Out Preset Channels
A maximum of 6 stations can be
programmed and called out in the
"Preset" channels for each of the
FM radio and AM radio.
1. Press the "CH" button for less than 2 seconds.
2. Press the "TUNE" button ("
y
z
") and select the station
programmed in the preset
channels.
Page 115 of 414
Chevrolet Low Cab Forward Owner Manual (GMNA-Localizing-U.S.-
10716700) - 2017 - crc - 12/6/16
114 Infotainment System
Audio Players
CD Player
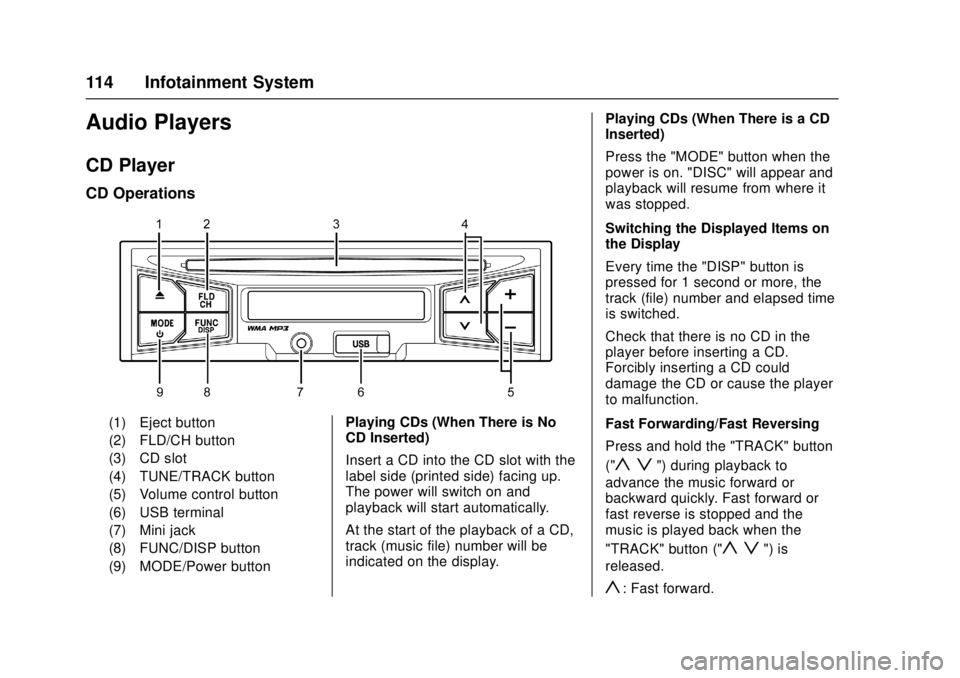
CD Operations
(1) Eject button
(2) FLD/CH button
(3) CD slot
(4) TUNE/TRACK button
(5) Volume control button
(6) USB terminal
(7) Mini jack
(8) FUNC/DISP button
(9) MODE/Power buttonPlaying CDs (When There is No
CD Inserted)
Insert a CD into the CD slot with the
label side (printed side) facing up.
The power will switch on and
playback will start automatically.
At the start of the playback of a CD,
track (music file) number will be
indicated on the display. Playing CDs (When There is a CD
Inserted)
Press the "MODE" button when the
power is on. "DISC" will appear and
playback will resume from where it
was stopped.
Switching the Displayed Items on
the Display
Every time the "DISP" button is
pressed for 1 second or more, the
track (file) number and elapsed time
is switched.
Check that there is no CD in the
player before inserting a CD.
Forcibly inserting a CD could
damage the CD or cause the player
to malfunction.
Fast Forwarding/Fast Reversing
Press and hold the "TRACK" button
("
y z") during playback to
advance the music forward or
backward quickly. Fast forward or
fast reverse is stopped and the
music is played back when the
"TRACK" button ("
y z") is
released.
y: Fast forward.
Page 117 of 414
Chevrolet Low Cab Forward Owner Manual (GMNA-Localizing-U.S.-
10716700) - 2017 - crc - 12/6/16
116 Infotainment System
"RDM OFF": Random playback
is off.
"RDM ON": Files in the disc are
randomly played back.
"FLD RDM ON": The files
stored inside the folder are
randomly played back.
Root Directory
For CD (MP3/WMA):
When the "FLD" button is pressed
for 1 second or more, the first folder
in the disc is selected to start
playback.
Ejecting the CD
Press the “Eject”button ("
X") to
stop playback and eject the CD.
Stopping CD Playback
To stop the playback of a CD:
. Eject the CD.
. Switch to another audio mode.
. Turn off the power. If an Error Appears in the Display
If a problem occurs with the CD
during playback, an error appears in
the display.
Message/Description
E1 This message appears
when the disc is stained or
damaged.
Check if the inserted disc is
stained or upside-down.
When the disc is dirty, clean
the disc. The upside-down
disc must be taken out and
inserted correctly. Do not
use a scratched or
bent disc.
E2 This message appears
when the player cannot be
operated because of some
problems.
The disc must be ejected
from the player. Message/Description
E6 This message appears
when there is no playable
music data recorded on the
CD-R/RW disc or it is
recorded in a format that is
not playable.
Insert a CD-R/RW disc that
contains playable
music data.
Page 119 of 414
Chevrolet Low Cab Forward Owner Manual (GMNA-Localizing-U.S.-
10716700) - 2017 - crc - 12/6/16
118 Infotainment System
CD, C-thru Disc with transparent or
translucent recorded parts may not
be inserted and ejected accurately.
Please do not use them.
SACD (Super Audio CD) can only
be played in the CD level of a
hybrid disc.
CCCD (Copy Control CD) may not
play as it does not meet the
standard CD requirements.
CD-EXTRA can be played as a
music CD. The sound of a data
track of a Mixed Mode CD cannot
be played. Only music tracks can be
played. A Mixed Mode CD mixed
with DTS can also not be played
accurately. This device accepts
8 cm (3 in) CD. Plug in the device
directly without using an adapter,
etc. to avoid damage.
When Removing a Disc
Do not leave discs inside the player
or partially inserted for a long time.
This may scratch the discs and
make them unusable. Remove the
disc horizontally from the main
device. Do not pull it violently
towards the top.Also do not pull it down hard while
removing. The disc may become
damaged and the audio may skip.
Do not insert objects other than
discs into the disc slot or insert
more than one disc at a time.
Handling a Disc
Avoid exposing the disc to direct
sunlight and always keep it in a
case. Otherwise, the disc will bend
and become unusable.
Do not stick any paper tape to the
recording side or the label side as it
may lead the disc to malfunction.
Do not use a disc with cracks or if it
is severely bent as it may lead to
damage.
Hold the disc without touching the
recording side as this may make the
disc dirty and lead to the audio
skipping.
Using benzene, record disc cleaner,
or anti-static fluids may damage the
disc. Using a dirty disc will damage
the disc and lead to audio skipping.
When the disc is dirty, use a
commercial disc cleaner to gently
clean it from the inside to the
outside. Do not use lens cleaner.
Do not use the types of disc
described below because such
discs may cause a breakdown.
.
Adapters or discs with special
properties, such as Dual Discs
and printable discs.
. Discs with transparent or
semitransparent sections on the
recording side.
. Discs with copy protection.
New Disc
Some new discs may have burrs
found in the center hole or at the
edges. Remove these burrs with a
ballpoint pen, etc. before using
the disc.
If they are not removed, the disc
may not be read accurately and
cause improper operation.
Rental Discs
Do not use any disc that has
cellophane tape or any rental disc
that has glue from the label exposed
Page 120 of 414
Chevrolet Low Cab Forward Owner Manual (GMNA-Localizing-U.S.-
10716700) - 2017 - crc - 12/6/16
Infotainment System 119
or some of the removed label still
attached to it. Using the disc like
this may cause the disc to not eject
properly and damage the disc.
Discs with Special Shapes
Heart-shaped or octagon-shaped
discs cannot be played. Do not use
them as they may cause damage.
Disc Accessories
Do not use commercially available
accessories (such as stabilizers,
protective seals, etc.) that are said
to improve sound quality or protect
the discs, and CD labels, etc. They
may change the thickness of the
disc and external specifications and
lead to damage.
Do not use commercially available
accessories (such as CD rings,
protectors) that are said to improve
sound quality or are effective
against vibrations. They may come
off inside the device, causing the
disc to become unplayable or
unretrievable and lead to
malfunction.Supported MP3/WMA File
Standards
MP3 (MPEG Audio LAYER 3) is a
standard format for sound
compression technology.
MP3 can compress a file to
one-tenth of its original size.
WMA (Windows Media™
Audio) is a
Microsoft sound compression
format. It can compress sounds to a
smaller size than the MP3.
MP3/WMA files recorded in the
CD-ROM, CD-R, and CD-RW can
be played.
Discs formatted in the ISO9660
level 1 and 2, Romeo and Joliet file
system can be used.
Files with extensions compatible to
MP3 and WMA can be played
(.mp3, .wma).
CD-R and CD-RW compatible to
multisessions and also have MP3/
WMA files can be played.
Compatible with ID3 tag ver.1.0,
ver.1.1, ver.2.2 and ver.2.3.
Compatible to WMA tag. The sampling frequency and bit rate
corresponds as follows.
MP3 file:
.
MPEG1 LAYER3 - 32/44.1/
48(kHz).
. MPEG2 LAYER3 - 16/22.05/
24(kHz).
. MPEG2.5 LAYER3 - 8/11.025/
12(kHz).
. MPEG1 LAYER3 - 32/40/48/56/
64/80/96/112/128/160/192/224/
256/320 kbps.
. MPEG2/2.5 LAYER3 - 16/24/32/
40/48/56/64/80/96/112/128/
160 kbps.
WMA file:
. 32/44.1/48 (kHz).
. Ver.7,8,9 - 48/64/80/96/128/160/
192 kbps.
WMA files are only compatible with
2ch playback.
MP3 files are compatible to the
respective modes of stereo, joint
stereo, dual channel, monaural.
Page 122 of 414

Chevrolet Low Cab Forward Owner Manual (GMNA-Localizing-U.S.-
10716700) - 2017 - crc - 12/6/16
Infotainment System 121
USB Port
USB Memory Operations
Playing Music Downloaded in USB
Flash Memory
Insert the USB device that stores
music data into the USB terminal.
After the music data is recognized,
the playback will start.
Connect the USB device in a way
that will not impede your driving.
The improper way of connecting the
device may disturb your driving and
cause a traffic accident.
Do not connect, disconnect,
or operate the USB device while
driving. Stop the vehicle in a safe
location and perform these
operations.When removing the USB flash
memory, turn off ("LOCK") the
engine control switch or select the
other mode (e.g. FM or AM mode).
Selecting the USB Mode
Pressing the "MODE" button and
displaying "USB" when the USB
device is connected allows you to
switch from another audio mode to
the USB mode.
When playback of the music file is
started, the file number in the folder
being played back is shown on the
display.
When switching to another mode
from the USB mode, then returning
to the USB mode, it allows you to
return to the music file that was
played last.
Fast Forwarding/Fast Reversing
Press and hold the "TRACK" button
("
y z") during playback to
advance the file forward or
backward quickly. Fast forward or
fast reverse is stopped and the file
is played back when the "TRACK"
button ("
y z") is released.
y: Fast forward.
z: Fast reverse.
Replaying the Same File
Press the "TRACK" button ("
z") for
less than 1 second to start playback
of the current file from the
beginning.
File Selection
Press the "TRACK" button ("
y z")
for less than 1 second to select the
desired file number.
y: Advance to the next file.
z(press twice or more): Return to
a previous file.
Selecting a Track Inside a Folder
1. Press the "FLD" button for less than 1 second. Folder number
is displayed. As an example,
"F100" for folder number 100.
2. Press the "TRACK" button ("
y z") to select the folder
number.
y: Increase folder number.
Page 124 of 414

Chevrolet Low Cab Forward Owner Manual (GMNA-Localizing-U.S.-
10716700) - 2017 - crc - 12/6/16
Infotainment System 123
Message/Description
E5 This message appears
when there is no file
recorded or no playable
music file on the USB
device.
Connect a USB device that
contains playable
music data.
E7 This message appears
when there is a music file
that is not in a playable
format recorded on the USB
device.
Connect a USB device that
contains playable
music data.
USB Devices
USB Memory Standards
Supported file formats:
FAT 12/16/32
.
Supported audio formats:
MP3/WMA.
. Maximum current: 1 A. .
Compatibility: USB 1.1/2.0
(maximum transfer speed is
same as USB 1.1).
. Mass memory support: Supports
USB mass storage class.
. Does not support USB hubs or
multi card readers.
Supported MP3/WMA File
Standards
Discs formatted in the FAT 12/16/32
file system can be used.
Files with extensions compatible to
MP3 and WMA can be played
(.mp3, .wma).
Compatible with ID3 tag ver.1.0,
ver.1.1, ver.2.2 and ver.2.3.
Compatible to WMA tag.
The sampling frequency
corresponds as follows.
MP3 file:
. MPEG1 LAYER3 - 32/44.1/
48(kHz).
. MPEG2 LAYER3 - 16/22.05/
24(kHz). .
MPEG2.5 LAYER3 - 8/11.025/
12(kHz).
. MPEG1 LAYER3 - 32/40/48/56/
64/80/96/112/128/160/192/224/
256/320(kbps).
. MPEG2/2.5 LAYER3 - 16/24/32/
40/48/56/64/80/96/112/128/
160(kbps).
WMA file:
. 32/ 44.1/48 (kHz).
. Ver.7,8,9 - 48/64/80/96/128/160/
192 kbps.
WMA files are only compatible with
2ch playback.
MP3 files are compatible to the
respective modes of stereo, joint
stereo, dual channel, monaural.
MP3 files are compatible to VBR
(variable bit rate).
Not compatible to M3u playlists.
When the FAST UP/DOWN
functions on the MP3 file recorded
on the VBR are operated, the
playback time may not synchronize.
Page 125 of 414
Chevrolet Low Cab Forward Owner Manual (GMNA-Localizing-U.S.-
10716700) - 2017 - crc - 12/6/16
124 Infotainment System
MP3/WMA files are compatible with
up to 8 levels of folders. However,
when there are many levels, it may
take some time before the first file is
played. Therefore, a two-level folder
is recommended.
Maximum characters for a folder/file
name: 64 (including extension).
A maximum of 700 folders and
3,000 files can be played in a single
memory device.
Auxiliary Devices
AUX Operations
Connecting Your Portable Audio
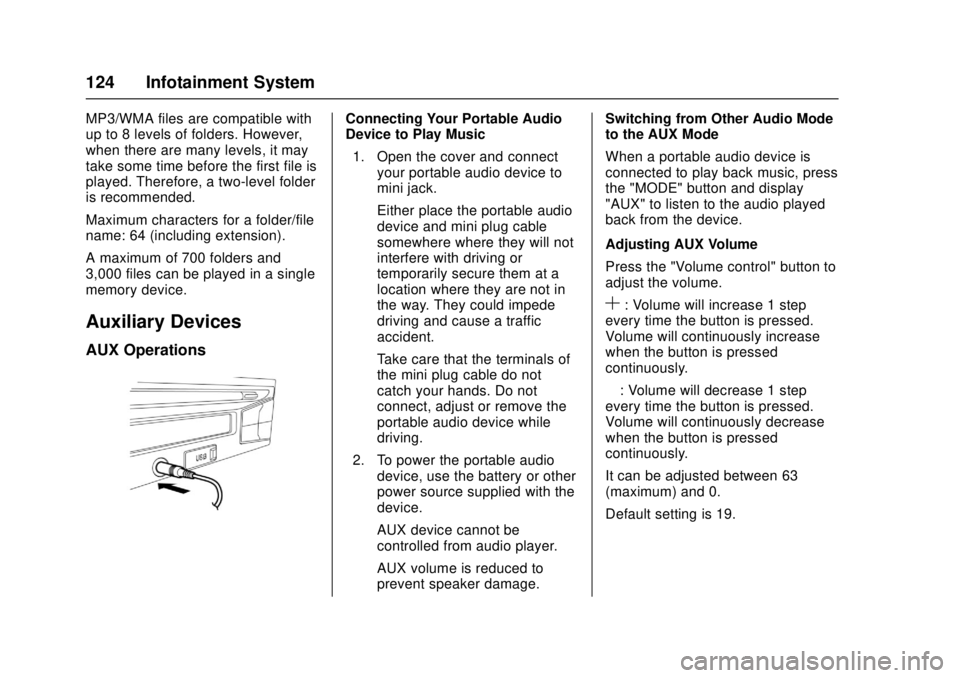
Device to Play Music1. Open the cover and connect your portable audio device to
mini jack.
Either place the portable audio
device and mini plug cable
somewhere where they will not
interfere with driving or
temporarily secure them at a
location where they are not in
the way. They could impede
driving and cause a traffic
accident.
Take care that the terminals of
the mini plug cable do not
catch your hands. Do not
connect, adjust or remove the
portable audio device while
driving.
2. To power the portable audio device, use the battery or other
power source supplied with the
device.
AUX device cannot be
controlled from audio player.
AUX volume is reduced to
prevent speaker damage. Switching from Other Audio Mode
to the AUX Mode
When a portable audio device is
connected to play back music, press
the "MODE" button and display
"AUX" to listen to the audio played
back from the device.
Adjusting AUX Volume
Press the "Volume control" button to
adjust the volume.
S: Volume will increase 1 step
every time the button is pressed.
Volume will continuously increase
when the button is pressed
continuously.
—: Volume will decrease 1 step
every time the button is pressed.
Volume will continuously decrease
when the button is pressed
continuously.
It can be adjusted between 63
(maximum) and 0.
Default setting is 19.
Page 134 of 414

Chevrolet Low Cab Forward Owner Manual (GMNA-Localizing-U.S.-
10716700) - 2017 - crc - 12/6/16
Driving and Operating 133
Driving Information
Driver Behavior
Napping in the Vehicle
{Warning
Before taking a nap in the vehicle,
be sure to shut off the engine and
place the engine control switch in
the "LOCK" position. Otherwise,
any unintended contact with the
accelerator pedal while you are
asleep could cause the vehicle to
move, resulting in an accident.. If you leave the engine
running and unintentionally
keep the accelerator pedal
pressed while asleep, the
engine and exhaust pipe
could become abnormally
hot, resulting in a fire.
. If you leave the engine
running while taking a nap
with the vehicle parked in a
place where exhaust gases
(Continued)
Warning (Continued)
could get into the cab (for
example, a place that is
poorly ventilated), you could
suffer carbon monoxide
poisoning.
. You and others could be
seriously injured.
Distracted Driving
Do Not Use a Mobile Phone
While Driving
{Warning
Drivers should never use mobile
telephones or car phones in any
mode other than Hands Free
while driving. Doing so is
dangerous. Using a mobile
telephone while driving could
result in an accident because you
would not be paying full attention
to your surroundings. If you are
(Continued)
Warning (Continued)
driving and you wish to use a
mobile telephone, first stop the
vehicle in a safe place.
You and others could be seriously
injured.
Control of a Vehicle
Warnings for Driving
{Warning
Concentrate on driving safely,
obeying all legally designated
speed limits, road signs and
traffic signals.
If you notice any abnormal noise,
abnormal smell or abnormal
vibration from any part of the
vehicle, immediately stop the
vehicle in a safe place and
perform checks.(Continued)
Page 139 of 414

Chevrolet Low Cab Forward Owner Manual (GMNA-Localizing-U.S.-
10716700) - 2017 - crc - 12/6/16
138 Driving and Operating
Stopping Distance
The stopping distance of a vehicle
involves reaction time and braking
distance. Deciding to push the
brake pedal is reaction time.
Applying the brake pedal until the
vehicle comes to a complete stop is
braking distance. Average reaction
time is about three-fourths of a
second. But that is only an average.
It might be less with one driver and
as long as two or three seconds or
more with another. Age, physical
condition, alertness, coordination
and eyesight all play a part. Braking
distance will vary based reaction
time, the amount of force applied to
the brake pedal and the speed of
the vehicle.When driving, bear the stopping
distance in mind. Maintain a speed
and headway distance that allow
you to stop safely even if a hazard
occurs.
Overriding Accelerator with
Brakes (Gasoline Only)
In the unlikely event the accelerator
pedal becomes stuck, apply the
brakes firmly and steadily to reduce
engine power and bring your vehicle
to a safe stop. Turn the engine off,
move the selector lever to the
“P”
(Park) position, and apply the
parking brake. In a safe location,
inspect the accelerator pedal for any
interference and remove the item
causing the interference, if any is
found. If none is found and the
condition persists, have your vehicle
towed.
Braking Techniques
For the most effective braking and
for maximum life from brake system
components, follow these
suggestions when possible: .
Apply the brakes gradually as
road and load conditions permit.
Reduce pedal pressure as
speed drops so that a very light
pressure is used at the end of
the stop.
. Do not pump the brake pedal as
this will only deplete the vacuum
reserve or the hydraulic brake
booster (HBB) accumulator
reserve.
. To get maximum braking while
maintaining vehicle control, use
a "squeeze" braking technique.
Do this by pushing on the brake
pedal with steadily increasing
pressure. If possible, steer
around obstacles when there is
not enough room to stop.
Brake System Warning Light
Caution
If brake low vacuum warning light
(4500HD, 4500XD models), brake
booster warning light (5500HD,
5500XD models), or brake system (Continued)