CHEVROLET MALIBU 2003 5.G Owners Manual
MALIBU 2003 5.G
CHEVROLET
CHEVROLET
https://www.carmanualsonline.info/img/24/8218/w960_8218-0.png
CHEVROLET MALIBU 2003 5.G Owners Manual
Trending: trailer, change time, fold seats, sport mode, spare wheel, oil pressure, audio
Page 271 of 326

Fuses and Circuit Breakers
The wiring circuits in your vehicle are protected from
short circuits by a combination of fuses, circuit breakers
and fusible thermal links in the wiring itself.
Look at the silver-colored band inside the fuse. If the
band is broken or melted, replace the fuse. Be sure you
replace a bad fuse with a new one of the identical
size and rating.
If you ever have a problem on the road and don't have
a spare fuse, you can borrow one that has the same
amperage. Just pick a feature of your vehicle that
you can get along without ± like the radio or cigarette
lighter ± and use its fuse, if it is the correct amperage.
Replace it as soon as you can.
There are three fuse blocks in your vehicle: two
instrument panel fuse blocks and the engine
compartment fuse block.
There is a fuse puller located on the engine
compartment fuse block. It can be used to easily
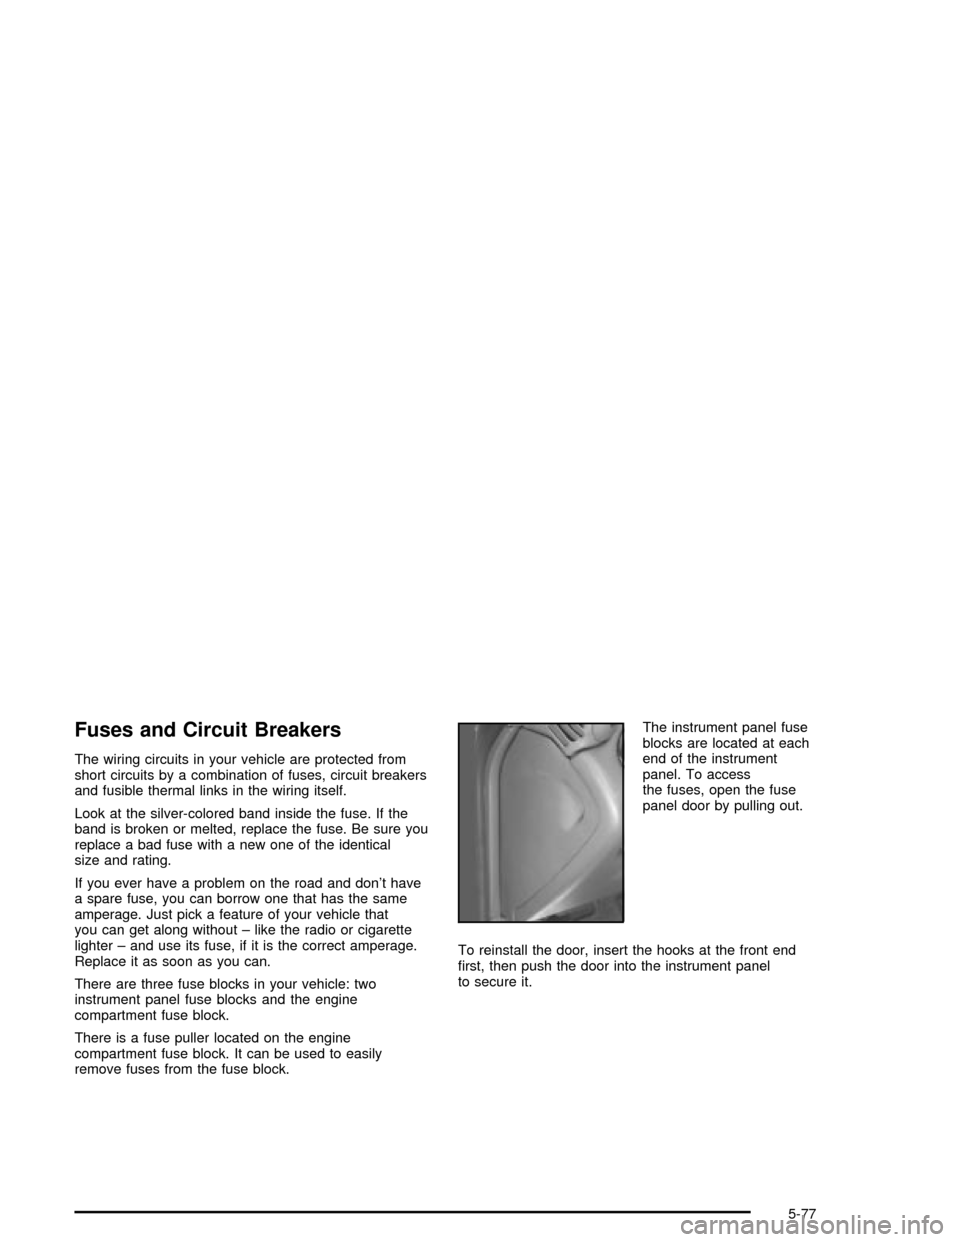
remove fuses from the fuse block.The instrument panel fuse
blocks are located at each
end of the instrument
panel. To access
the fuses, open the fuse
panel door by pulling out.
To reinstall the door, insert the hooks at the front end
®rst, then push the door into the instrument panel
to secure it.
5-77
Page 272 of 326
Instrument Panel Fuse Block
(Driver's Side)
Fuses Usage
A Wipers
BTrunk Release and Remote Keyless
Entry
C Turn Signals
D Power MirrorsFuses Usage
E Air Bag
F Body Function Control Module
G Powertrain Control Module (PCM)
H Door Locks
JBody Function Control
Module/Instrument Panel Cluster
MICRO RELAY
TRUNK RELRemote Trunk Release
CIRCUIT
BRKR
PWR SEATSPower Seats
MICRO RELAY
DR UNLOCKDoor Locks
MICRO RELAY
DR LOCKDoor Locks
MICRO RELAY
DRIVERS
DR UNLOCKDoor Locks
STOP LPS Stoplamps
HAZARD LPS Hazard Lamps
IPC/HVAC
BATTInstrument Panel Cluster,
Climate Control
5-78
Page 273 of 326
Instrument Panel Fuse Block
(Passenger's Side)Fuses Usage
AInstrument Panel Lights,
Brightness Control
B Cruise Control Switches
C Climate Control System
D Cruise Control
E Fog Lamps
FInterior Lamps, Body Function
Control Module
G Radio
H Sunroof
CIRCUIT BRKR
PWR WNDWSPower Windows
MICRO RELAY
FOG LPSFog Lamps
5-79
Page 274 of 326
Engine Compartment Fuse Block
The engine compartment fuse block is located on the
driver's side of the vehicle, near the engine air
cleaner/®lter. See
Engine Compartment Overview on
page 5-12for more information on location.
Fuses Usage
1 Ignition Switch
2Right Electrical Center-Fog Lamps,
Radio, Body Function Control
Module, Interior LampsFuses Usage
3Left Electrical Center-Stoplamps,
Hazard Lamps, Body Function
Control Module, Cluster, Climate
Control System
4 Anti-Lock Brakes
5 Ignition Switch
6 Not Used
7Left Electrical Center-Power Seats,
Power Mirrors, Door Locks, Trunk
Release and Remote Lock Control
8 Cooling Fan #1
Relays Usage
9 Rear Defogger
10 Not Used
11 Not Used
12 Cooling Fan #1
13 HVAC Blower (Climate Control)
14 Cooling Fan #2
15 Cooling Fan
16 Air Conditioning Compressor
17 Not Used
18 Fuel Pump
19 Automatic Headlamp System
5-80
Page 275 of 326
Relays Usage
20 Automatic Headlamp System
21 Horn
22 Daytime Running Lamps (DRL)
Fuses Usage
23±32 Spare Fuse Holder
33 Rear Defogger
34Accessory Power Outlets,
Cigar Lighter
35 Generator
36 Not Used
37Air Conditioning Compressor,
Body Function Control Module
38 Automatic Transaxle
39Powertrain Control Module (PCM),
Ignition
40 Anti-Lock Brakes (ABS)
41 Ignition System
42Back-Up Lamps, Automatic
Transaxle Shift Lock Control SystemFuses Usage
43 Horn
44 PCM
45 Parking Lamps
46 Climate Control System
47Canister Purge Valve, PCM, Exhaust
Gas Recirculation, Heated Oxygen
Sensor
48 Fuel Pump Injectors
49 Not Used
50 Right Headlamp
51 Left Headlamp
52 Cooling Fan
53 HVAC Blower (Climate Control)
54 Not Used
55 Cooling Fan #2 Ground
56 Fuse Puller
57 Not Used
5-81
Page 276 of 326
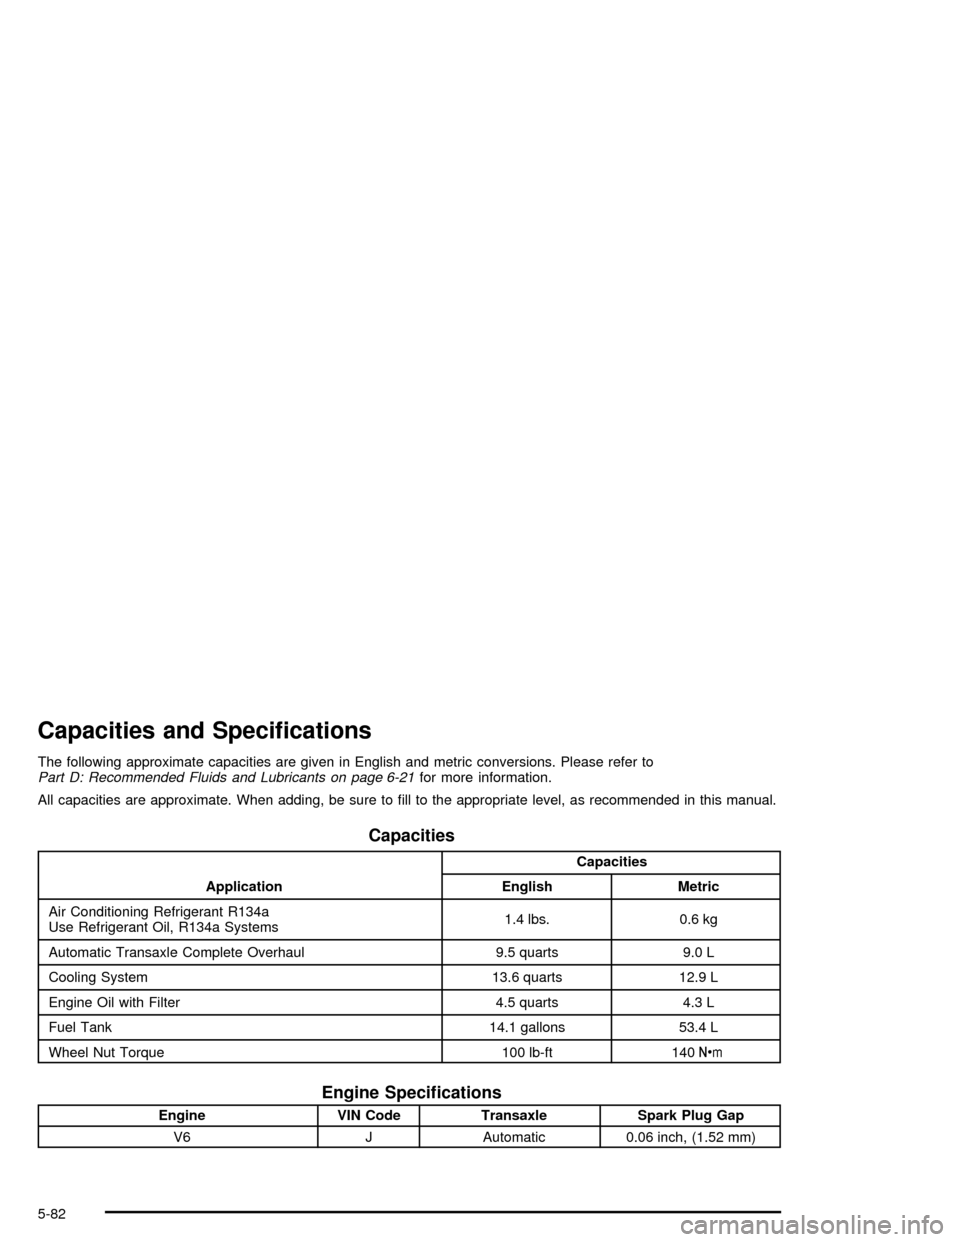
Capacities and Speci®cations
The following approximate capacities are given in English and metric conversions. Please refer toPart D: Recommended Fluids and Lubricants on page 6-21for more information.
All capacities are approximate. When adding, be sure to ®ll to the appropriate level, as recommended in this manual.
Capacities
ApplicationCapacities
English Metric
Air Conditioning Refrigerant R134a
Use Refrigerant Oil, R134a Systems1.4 lbs. 0.6 kg
Automatic Transaxle Complete Overhaul 9.5 quarts 9.0 L
Cooling System 13.6 quarts 12.9 L
Engine Oil with Filter 4.5 quarts 4.3 L
Fuel Tank 14.1 gallons 53.4 L
Wheel Nut Torque 100 lb-ft 140Y
Engine Speci®cations
Engine VIN Code Transaxle Spark Plug Gap
V6 J Automatic 0.06 inch, (1.52 mm)
5-82
Page 277 of 326
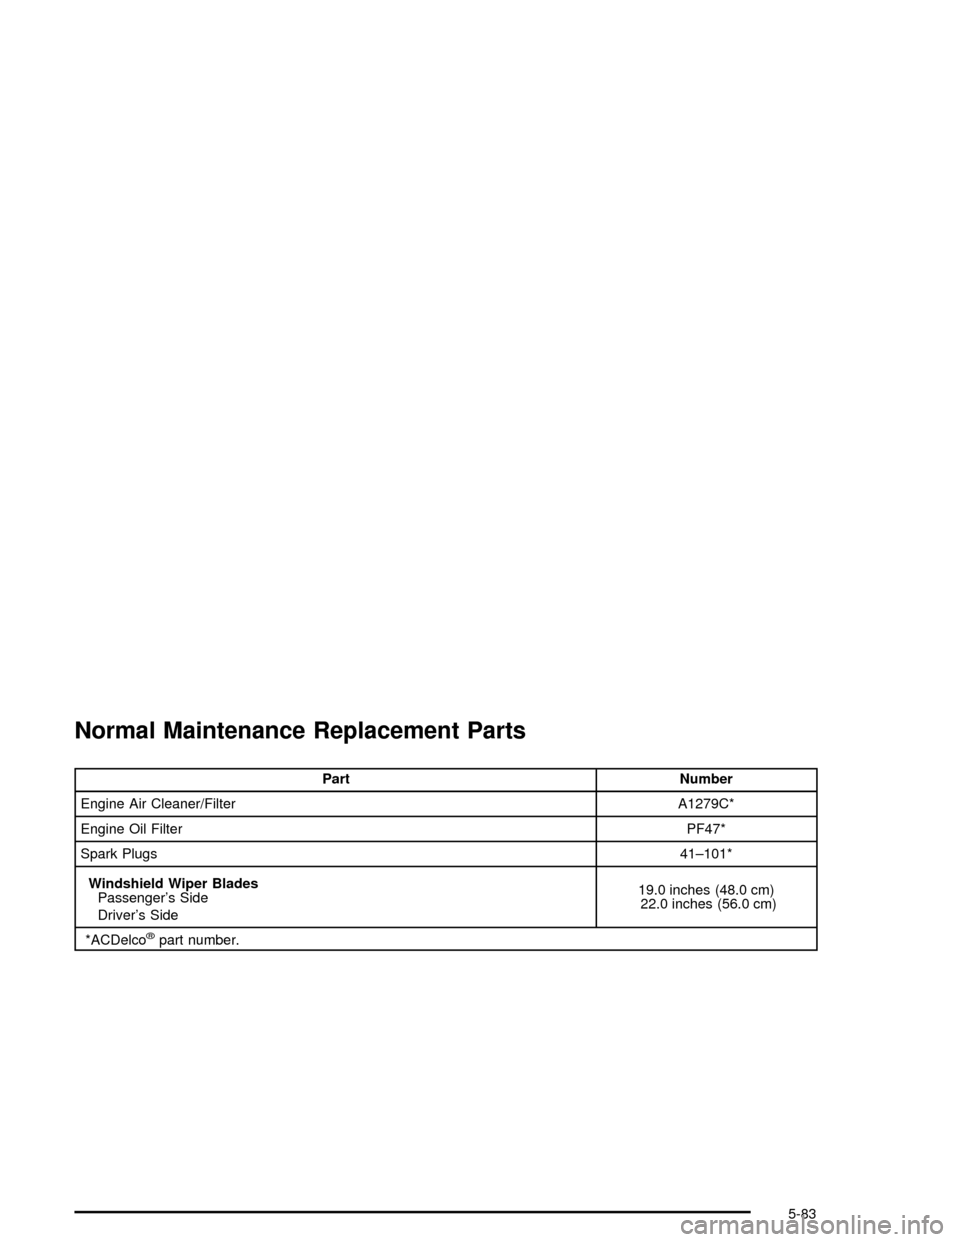
Normal Maintenance Replacement Parts
Part Number
Engine Air Cleaner/Filter A1279C*
Engine Oil FilterPF47*
Spark Plugs41±101*
Windshield Wiper Blades
Passenger's Side
Driver's Side19.0 inches (48.0 cm)
22.0 inches (56.0 cm)
*ACDelco
žpart number.
5-83
Page 278 of 326
Page 279 of 326

Maintenance Schedule......................................6-2
Introduction...................................................6-2
Your Vehicle and the Environment....................6-2
Maintenance Requirements..............................6-2
How This Section is Organized.........................6-3
Part A: Scheduled Maintenance Services...........6-4
Using Your Maintenance Schedule....................6-4
Selecting the Right Schedule...........................6-4
Short Trip/City Scheduled Maintenance..............6-6
Long Trip/Highway Scheduled Maintenance......6-11
Part B: Owner Checks and Services................6-15
At Each Fuel Fill..........................................6-15
At Least Once a Month.................................6-15At Least Twice a Year...................................6-16
At Least Once a Year...................................6-16
Part C: Periodic MaintenanceInspections.........6-19
Steering, Suspension and Front Drive Axle
Boot and Seal Inspection............................6-19
Exhaust System Inspection............................6-19
Fuel System Inspection..................................6-19
Engine Cooling System Inspection...................6-20
Throttle System Inspection.............................6-20
Brake System Inspection................................6-20
Part D: Recommended Fluids and Lubricants. . . .6-21
Part E: Maintenance Record...........................6-22
Section 6 Maintenance Schedule
6-1
Page 280 of 326

Maintenance Schedule
Introduction
Important: Keep engine oil at the proper level and
change as recommended.
Have you purchased the GM Protection Plan? The Plan
supplements your new vehicle warranties. See your
Warranty and Owner Assistance booklet or your dealer
for details.
Your Vehicle and the Environment
Proper vehicle maintenance not only helps to keep your
vehicle in good working condition, but also helps the
environment. Improper vehicle maintenance can
even affect the quality of the air we breathe. Improper
¯uid levels or the wrong tire in¯ation can increase
the level of emissions from your vehicle. To help protect
our environment, and to keep your vehicle in good
condition, be sure to maintain your vehicle properly.
Maintenance Requirements
Maintenance intervals, checks, inspections and
recommended ¯uids and lubricants as prescribed in this
manual are necessary to keep your vehicle in good
working condition. Any damage caused by failure
to follow scheduled maintenance may not be covered by
warranty.
6-2
Trending: night vision, engine, hood release, oil reset, windshield wipers, transmission oil, radio


