fuel cap CHEVROLET MALIBU 2003 5.G Owners Manual
[x] Cancel search | Manufacturer: CHEVROLET, Model Year: 2003, Model line: MALIBU, Model: CHEVROLET MALIBU 2003 5.GPages: 326, PDF Size: 2.41 MB
Page 1 of 326

Seats and Restraint Systems........................... 1-1
Front Seats
............................................... 1-2
Rear Seats
............................................... 1-5
Safety Belts
.............................................. 1-6
Child Restraints
.......................................1-28
Supplemental Restraint System (SRS)
.........1-48
Restraint System Check
............................1-54
Features and Controls..................................... 2-1
Keys
........................................................ 2-2
Doors and Locks
....................................... 2-7
Windows
.................................................2-14
Theft-Deterrent Systems
............................2-15
Starting and Operating Your Vehicle
...........2-16
Mirrors
....................................................2-28
Storage Areas
.........................................2-30
Sunroof
..................................................2-31
Instrument Panel............................................. 3-1
Instrument Panel Overview
.......................... 3-2
Climate Controls
......................................3-17
Warning Lights, Gages and Indicators
.........3-22
Audio System(s)
.......................................3-36Driving Your Vehicle....................................... 4-1
Your Driving, the Road, and Your Vehicle
..... 4-2
Towing
...................................................4-28
Service and Appearance Care.......................... 5-1
Service
..................................................... 5-3
Fuel
......................................................... 5-4
Checking Things Under the Hood
................. 5-9
Bulb Replacement
....................................5-42
Windshield Wiper Blade Replacement
.........5-48
Tires
......................................................5-48
Appearance Care
.....................................5-67
Vehicle Identi®cation
.................................5-75
Electrical System
......................................5-76
Capacities and Speci®cations
.....................5-82
Normal Maintenance Replacement Parts
......5-83
Maintenance Schedule..................................... 6-1
Maintenance Schedule
................................ 6-2
Customer Assistance Information.................... 7-1
Customer Assistance Information
.................. 7-2
Reporting Safety Defects
............................ 7-8
Index................................................................ 1
2003 Chevy Malibu Owner ManualM
Page 125 of 326

If the Light Is Flashing
The following may prevent more serious damage to
your vehicle:
·Reducing vehicle speed.
·Avoiding hard accelerations.
·Avoiding steep uphill grades.
·If you are towing a trailer, reduce the amount of
cargo being hauled as soon as it is possible.
If the light stops ¯ashing and remains on steady,
see ªIf the Light Is On Steadyº following.
If the light continues to ¯ash, when it is safe to do so,
stop the vehicle.
Find a safe place to park your vehicle. Turn the key
off, wait at least 10 seconds and restart the engine.
If the light remains on steady, see ªIf the Light Is
On Steadyº following. If the light is still ¯ashing, follow
the previous steps, and see your dealer for service
as soon as possible.
If the Light Is on Steady
You also may be able to correct the emission system
malfunction by considering the following:
Did you recently put fuel into your vehicle?
If so, reinstall the fuel cap, making sure to fully install
the cap. See
Filling Your Tank on page 5-6. The
diagnostic system can determine if the fuel cap has
been left off or improperly installed. A loose or missing
fuel cap will allow fuel to evaporate into the atmosphere.
A few driving trips with the cap properly installed
should turn the light off.
Did you just drive through a deep puddle of water?
If so, your electrical system may be wet. The condition
will usually be corrected when the electrical system
dries out. A few driving trips should turn the light off.
Have you recently changed brands of fuel?
If so, be sure to fuel your vehicle with quality fuel. See
Gasoline Octane on page 5-4. Poor fuel quality will
cause your engine not to run as efficiently as designed.
You may notice this as stalling after start-up, stalling
when you put the vehicle into gear, mis®ring, hesitation
on acceleration or stumbling on acceleration. (These
conditions may go away once the engine is warmed up.)
This will be detected by the system and cause the
light to turn on.
3-31
Page 130 of 326

Here are four things that some owners ask about.
None of these show a problem with your fuel gage:
·At the service station, the gas pump shuts off before
the gage reads full.
·It takes a little more or less fuel to ®ll up than the
gage indicated. For example, the gage may have
indicated the tank was half full, but it actually took a
little more or less than half the tank's capacity to
®ll the tank.
·The indicator moves a little when you turn a corner
or speed up.
·The gage goes back to empty when you turn off
the ignition.
Audio System(s)
Notice:Before you add any sound equipment to
your vehicle Ð like a tape player, CB radio, mobile
telephone or two-way radio Ð be sure you can add
what you want. If you can, it's very important to do it
properly. Added sound equipment may interfere with
the operation of your vehicle's engine, radio or other
systems, and even damage them. Your vehicle's
systems may interfere with the operation of sound
equipment that has been added improperly.
So, before adding sound equipment, check with
your dealer and be sure to check federal rules
covering mobile radio and telephone units.Your audio system has been designed to operate easily
and to give years of listening pleasure. You will get
the most enjoyment out of it if you acquaint yourself with
it ®rst. Figure out which radio you have in your vehicle,
®nd out what your audio system can do and how to
operate all of its controls to be sure you're getting the
most out of the advanced engineering that went into it.
Your vehicle has a feature called Retained Accessory
Power (RAP). With RAP, you can play your audio
system even after the ignition is turned off. See
ªRetained Accessory Power (RAP)º under
Ignition
Positions on page 2-17.
Setting the Time for Radios without
Radio Data Systems (RDS)
Press and hold the HR or MIN arrow for two seconds.
Then press the HR arrow until the correct hour appears
on the display. Press and hold the MIN arrow until
the correct minute appears. The time may be set with
the ignition on or off.
3-36
Page 186 of 326

Loading Your Vehicle
Two labels on your vehicle show how much weight it
may properly carry. The Tire-Loading Information
label found on the rear edge of the driver's door tells
you the proper size, speed rating and recommended
in¯ation pressures for the tires on your vehicle. It also
gives you important information about the number
of people that can be in your vehicle and the total weight
that you can carry. This weight is called the Vehicle
Capacity Weight, and includes the weight of all
occupants, cargo and all nonfactory-installed options.The other label is the Certi®cation label, found on the
rear edge of the driver's door. It tells you the gross
weight capacity of your vehicle, called the Gross Vehicle
Weight Rating (GVWR). The GVWR includes the
weight of the vehicle, all occupants, fuel and cargo.
Never exceed the GVWR for your vehicle, or the Gross
Axle Weight Rating (GAWR) for either the front or
rear axle.
And, if you do have a heavy load, you should spread it
out. Don't carry more than 132 lbs. (60 kg) in your trunk.
4-32
Page 188 of 326
Towing a Trailer
{CAUTION:
If you do not use the correct equipment and
drive properly, you can lose control when you
pull a trailer. For example, if the trailer is too
heavy, the brakes may not work well Ð or
even at all. You and your passengers could be
seriously injured. You may also damage your
vehicle; the resulting repairs would not be
covered by your warranty. Pull a trailer only if
you have followed all the steps in this section.
Ask your dealer for advice and information
about towing a trailer with your vehicle.Your vehicle can tow a trailer if it is equipped with the
proper trailer towing equipment. To identify what
the vehicle trailering capacity is for your vehicle, you
should read the information in ªWeight of the Trailerº that
appears later in this section. But trailering is different
than just driving your vehicle by itself. Trailering means
changes in handling, durability and fuel economy.
Successful, safe trailering takes correct equipment, and
it has to be used properly.
That's the reason for this part. In it are many time-tested,
important trailering tips and safety rules. Many of
these are important for your safety and that of your
passengers. So please read this section carefully before
you pull a trailer.
Load-pulling components such as the engine, transaxle,
wheel assemblies and tires are forced to work harder
against the drag of the added weight. The engine
is required to operate at relatively higher speeds and
under greater loads, generating extra heat. What's more,
the trailer adds considerably to wind resistance,
increasing the pulling requirements.
4-34
Page 195 of 326

Service............................................................5-3
Doing Your Own Service Work.........................5-3
Adding Equipment to the Outside of
Your Vehicle..............................................5-4
Fuel................................................................5-4
Gasoline Octane............................................5-4
Gasoline Speci®cations....................................5-4
California Fuel...............................................5-5
Additives.......................................................5-5
Fuels in Foreign Countries...............................5-6
Filling Your Tank............................................5-6
Filling a Portable Fuel Container.......................5-9
Checking Things Under the Hood.....................5-9
Hood Release..............................................5-10
Engine Compartment Overview.......................5-12
Engine Oil...................................................5-13
Engine Air Cleaner/Filter................................5-17
Automatic Transaxle Fluid..............................5-18
Engine Coolant.............................................5-19
Coolant Surge Tank Pressure Cap..................5-21
Engine Overheating.......................................5-22
Cooling System............................................5-24
Power Steering Fluid.....................................5-30
Windshield Washer Fluid................................5-31Brakes........................................................5-32
Battery........................................................5-36
Jump Starting...............................................5-36
Bulb Replacement..........................................5-42
Halogen Bulbs..............................................5-42
Headlamps..................................................5-42
Front Turn Signal Lamps...............................5-44
Center High-Mounted Stoplamp (CHMSL).........5-44
Taillamps, Turn Signal, Stoplamps and
Back-up Lamps.........................................5-45
Replacement Bulbs.......................................5-47
Windshield Wiper Blade Replacement..............5-48
Tires..............................................................5-48
In¯ation -- Tire Pressure................................5-49
Tire Inspection and Rotation...........................5-50
When It Is Time for New Tires.......................5-51
Buying New Tires.........................................5-52
Uniform Tire Quality Grading..........................5-53
Wheel Alignment and Tire Balance..................5-54
Wheel Replacement......................................5-54
Tire Chains..................................................5-55
If a Tire Goes Flat........................................5-56
Changing a Flat Tire.....................................5-57
Compact Spare Tire......................................5-66
Section 5 Service and Appearance Care
5-1
Page 201 of 326
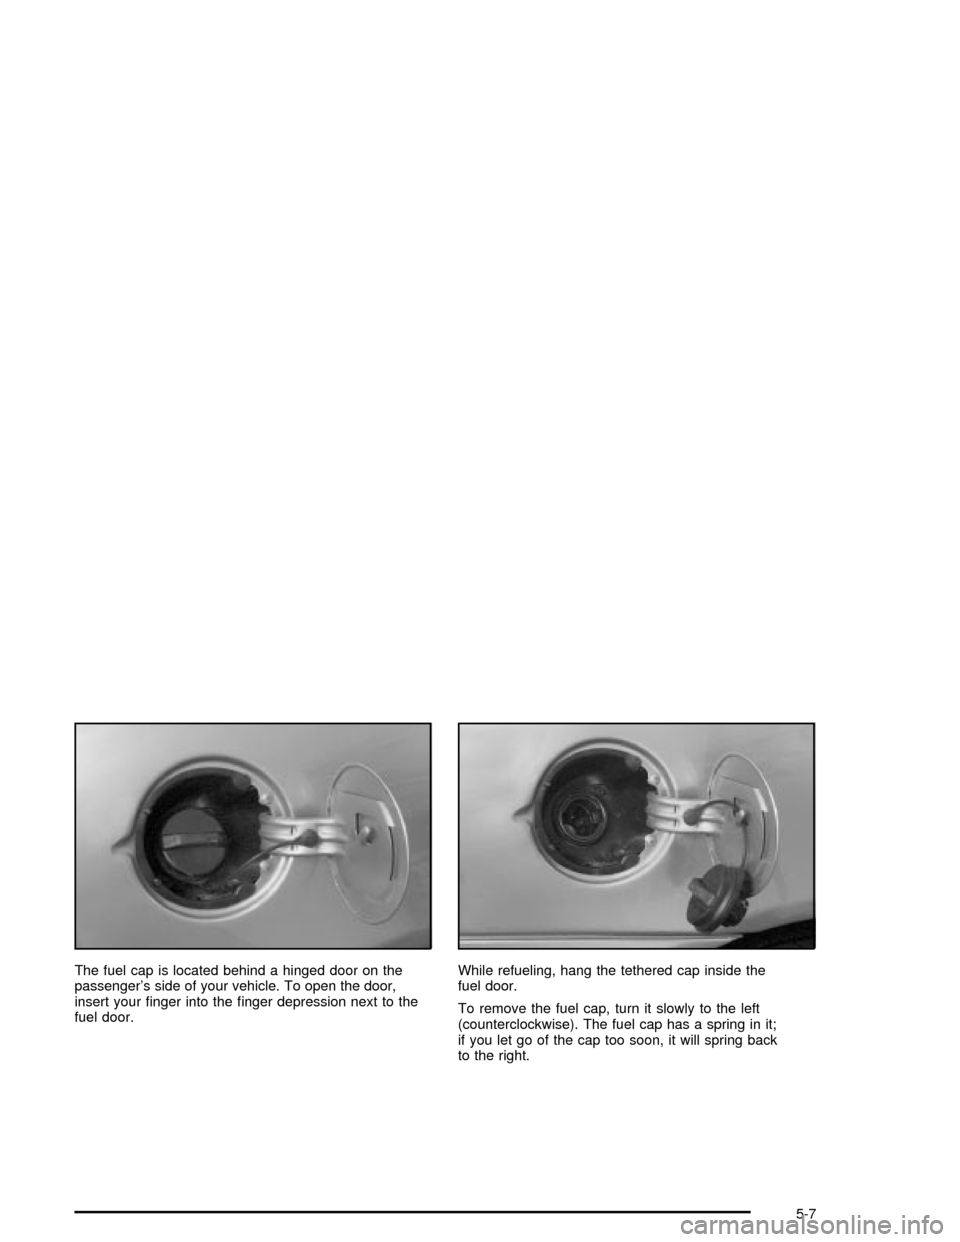
The fuel cap is located behind a hinged door on the
passenger's side of your vehicle. To open the door,
insert your ®nger into the ®nger depression next to the
fuel door.While refueling, hang the tethered cap inside the
fuel door.
To remove the fuel cap, turn it slowly to the left
(counterclockwise). The fuel cap has a spring in it;
if you let go of the cap too soon, it will spring back
to the right.
5-7
Page 202 of 326
{CAUTION:
If you get fuel on yourself and then something
ignites it, you could be badly burned. Fuel can
spray out on you if you open the fuel cap too
quickly. This spray can happen if your tank is
nearly full, and is more likely in hot weather.
Open the fuel cap slowly and wait for any ªhissº
noise to stop. Then unscrew the cap all the way.
Be careful not to spill fuel. Clean fuel from painted
surfaces as soon as possible. See
Cleaning the Outside
of Your Vehicle on page 5-71.When you put the fuel cap back on, turn it to the right
(clockwise) until you hear a clicking sound. Make
sure you fully install the cap. The diagnostic system can
determine if the fuel cap has been left off or improperly
installed. This would allow fuel to evaporate into the
atmosphere. See
Malfunction Indicator Lamp on
page 3-30.
Notice:If you need a new fuel cap, be sure to get
the right type. Your dealer can get one for you.
If you get the wrong type, it may not ®t properly.
This may cause your malfunction indicator lamp to
light and may damage your fuel tank and emissions
system. See ªMalfunction Indicator Lampº in the
Index.
5-8
Page 207 of 326
A. Engine Coolant Surge Tank
B. Power Steering Fluid Reservoir
C. Engine Oil Fill Cap
D. Engine Oil Dipstick
E. Brake Fluid Reservoir
F. Engine Compartment Fuse Block
G. Engine Air Cleaner/Filter
H. Battery
I. Windshield Washer Fluid Reservoir
Engine Oil
Checking Engine Oil
It's a good idea to check your engine oil every time you
get fuel. In order to get an accurate reading, the oil
must be warm and the vehicle must be on level ground.The engine oil dipstick is
located in the front of the
engine compartment.
The top of the dipstick is a
round, yellow loop. See
Engine Compartment
Overview on page 5-12for
more information on
location.
Turn off the engine and give the oil several minutes to
drain back into the oil pan. If you don't, the oil
dipstick might not show the actual level.
5-13
Page 276 of 326
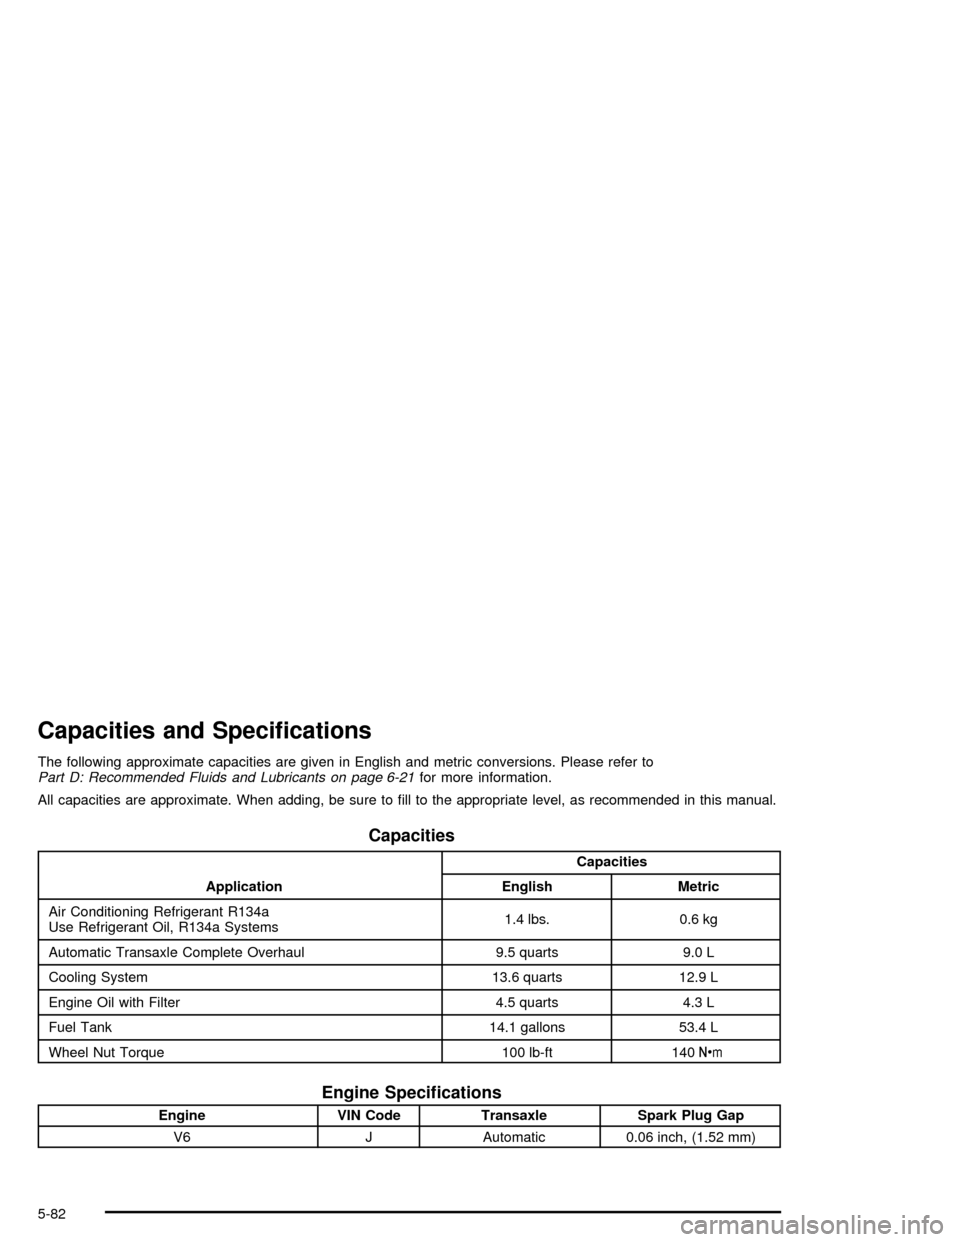
Capacities and Speci®cations
The following approximate capacities are given in English and metric conversions. Please refer toPart D: Recommended Fluids and Lubricants on page 6-21for more information.
All capacities are approximate. When adding, be sure to ®ll to the appropriate level, as recommended in this manual.
Capacities
ApplicationCapacities
English Metric
Air Conditioning Refrigerant R134a
Use Refrigerant Oil, R134a Systems1.4 lbs. 0.6 kg
Automatic Transaxle Complete Overhaul 9.5 quarts 9.0 L
Cooling System 13.6 quarts 12.9 L
Engine Oil with Filter 4.5 quarts 4.3 L
Fuel Tank 14.1 gallons 53.4 L
Wheel Nut Torque 100 lb-ft 140Y
Engine Speci®cations
Engine VIN Code Transaxle Spark Plug Gap
V6 J Automatic 0.06 inch, (1.52 mm)
5-82