AUX CHEVROLET MALIBU 2004 5.G Owners Manual
[x] Cancel search | Manufacturer: CHEVROLET, Model Year: 2004, Model line: MALIBU, Model: CHEVROLET MALIBU 2004 5.GPages: 426, PDF Size: 3.98 MB
Page 136 of 426
Cargo Lamp
If your vehicle is the MAXX model, it has a cargo lamp.
The cargo lamp comes on when the liftgate is opened.
If you want to leave the liftgate open you can turn off the
cargo lamp by pushing on the lens.
Battery Run-Down Protection
Your vehicle has a battery run-down protection feature
designed to protect your vehicle’s battery.
When any interior lamp (trunk, reading, or visor vanity)
is left on while the ignition is turned off, the battery
run-down protection system will automatically shut the
lamp(s) off after 20 minutes. This will avoid draining
the battery.
To reactivate the interior lamps, do one of the following:
Turn on the ignition.
Turn the exterior lamp control off and then on.
Open a door.
Press any remote keyless entry transmitter button
(if equipped).
Press the remote trunk release button.
Press the power door lock switch.The battery run-down feature will also be activated
when any door on the vehicle is left open and the
ignition is in OFF.
Accessory Power Outlets
With accessory power outlets you can plug in auxiliary
electrical equipment such as a cellular telephone.
For vehicles with anti-lock brake system (ABS), the
accessory power outlets are located on the front of the
center console storage area and also inside the
console storage compartment. Vehicles without ABS,
both outlets are located on the front of the center
console storage area. The compartment has notches
that allow power cords to be routed outside of the
console while the lid is closed. There is also an outlet in
the rear cargo area of the MAXX.
Notice:Leaving electrical equipment on for
extended periods will drain the battery. Always turn
off electrical equipment when not in use and do
not plug in equipment that exceeds the maximum
amperage rating.
3-20
Page 214 of 426
Battery Replacement
To change the batteries, do the following:
1. Loosen the screw on the battery compartment door
located on the left side of the headphone earpiece.
2. Replace the two AAA batteries in the compartment.
Make sure that they are installed correctly using the
diagram on the inside of the battery compartment.
3. Replace the battery compartment door and tighten
the screw.
If the headphones are to be stored for a long period of
time, remove the batteries, and keep them in a cool,
dry place.
Stereo RCA Jacks
The RCA jacks are located on the DVD faceplate on the
�oor console. The RCA jacks allow you to connect audio
and video signals from an auxiliary device such as a
camcorder or a video game unit to your RSE just as you
would to a standard television. The yellow RCA jack is
used for video, the red RCA jack for right audio, and the
white RCA jack for left audio inputs. The system requires
standard RCA cables (not included) to connect your
auxiliary device to the RCA jacks. Refer to the
manufacturer’s instructions for proper usage.To use the auxiliary audio and video inputs on the
entertainment system, connect an external auxiliary
device such as a camcorder to the RCA jacks and turn
on both the auxiliary device power and the power on
the front of the RSE system. Press the play and source
buttons at the same time or the AUX button on the
remote control to switch to the auxiliary device.
See “DVD Player”, and “Remote Control” later in this
section for more information.
Audio Speakers
Audio from the DVD player or auxiliary devices can
be heard through the following possible sources:
Wireless Headphones
Vehicle’s Speakers
Wired Headphones (not included)
Only one audio source can be heard through the
vehicles speakers at a time.
You can listen to the entertainment system or an
auxiliary device through all of the vehicles speakers
when the following occurs:
The RSE system is off
a DVD or auxiliary device is playing
the front audio system is on and the SRCE button
is pressed to enable the rear seat entertainment
system
3-98
Page 215 of 426
The front audio system will display the headphone icon
when the entertainment system is on and the headphone
icon will disappear from the display when it is off.
To turn the vehicles rear speakers on and off, press the
power button on the RSE or on the remote control.
When the rear speakers are off, the audio from the
entertainment system can be heard through both the
wireless headphones and the vehicles front speakers
at the same time.
You can listen to the entertainment system through the
wired headphones (not included) on the RSE system
when the following occurs:
The RSE system is on
a DVD or auxiliary device is playing
The volume on the audio system may vary when
switching between a radio station, CD, DVD, cassette,
or auxiliary device.
If there is a decreased audio signal during CD or
DVD play, you may hear a low “hissing” noise through
the speakers and/or headphones. If the hissing sound
in the wireless headphones seems excessive, make
sure that the headphone batteries are fully charged.
Some amount of hissing is normal.
Video Screen
The video screen is located on the back of the �oor
console. Open the video screen by rotating the screen
up and adjust its position as desired.
The video screen may not be able to be rotated up if
the rear seat is too far forward. See “Rear Sliding Seat
(MAXX Only)” underRear Seat Operation on page 1-7
for more information.
When the video screen is not in use, push it down into
its stored position.
The DVD player and display will continue to operate
when the video screen is in either the up or down
positions.
The transmitters from the wireless headphones and the
receiver for the remote control are behind the window
on the RSE system. If the screen is in the closed
position, the signals will not be available for the
operation of the headphones or the remote control.
Notice:Directly touching the video screen may
damage it. Do not touch the screen. SeeCleaning the
Video Screen on page 3-118for more information.
3-99
Page 220 of 426
z(Set-up Menu):Press this button to adjust the
color, tint, brightness, contrast, and display mode
(normal, full, or zoom). The dynamic range compression
feature can be used to reduce loud audio and increase
low audio produced by some DVDs.
e(Audio):Press this button to display a menu that
will only appear when a DVD is being played. The format
and content of this function is dependent on the disc.
r(Fast Reverse):Press this button to fast reverse
the DVD or CD. To stop fast reversing, press this button
again. This button may not work when the DVD is
playing the copyright information or the previews.
SRCE (Source):Press this button to toggle between
the DVD player and an auxiliary source.
c(Stop):Press this button to stop playing, rewinding,
or fast forwarding a DVD or CD. Press this button
twice to return to the beginning of the DVD.
t(Previous Track/Chapter):Press this button to
return to the start of the current track or chapter. Press
this button again to return to the previous track or
chapter. This button may not work when the DVD is
playing the copyright information or the previews.
1 through 0 (Numeric Keypad):The remote control
numeric keypad provides you with the capability of direct
chapter, title, and track number selection.
\:Press this button, within 3 seconds after inputting
a numeric selection to clear all numeric inputs. Press
this button before inputting the number.
}10:Press the button, to select chapter, title, and
track numbers greater than 9. Press this button before
inputting the number.
P(Illumination):Press this button to turn the remote
control backlight on. The backlight will time out after
about 7 to 10 seconds if no other button is pressed while
the backlight is on.
y(Main DVD Menu):Press this button to access
the DVD menu. The DVD menu is different on every
DVD. Use the up, down, left, and right arrow buttons to
move the cursor around the DVD menu. After making
a selection press the enter button. This button only
operates when using a DVD.
r(Enter):Press this button to select the choices
that are highlighted in any menu.
q(Return):Press this button to exit the current
active menu and return to the previous menu. This
button will operate only when a DVD is being played
and a menu is active.
3-104
Page 224 of 426
Time Search:The user can jump to different areas of
a DVD by using the remote control arrow and enter
buttons to select a speci�c time position.
Not all DVDs support all of the feature defaults in the
setup menus. In the event a feature is not supported,
defaults will be provided by the DVD media.
Exit the setup menu by pressing the return button on
the remote control. If you make changes to the
setup menu, the DVD will resume play from the
beginning.
Battery Replacement
To change the remote control batteries, do the following:
1. Unclip the battery door located on the back of the
remote control.
2. Remove the batteries from the compartment.
3. Replace the two AA batteries. Make sure that they
are installed correctly, using the diagram on the
inside of the battery compartment.
If the remote control is to be stored for a long period
of time, remove the batteries and keep them in a cool,
dry place.
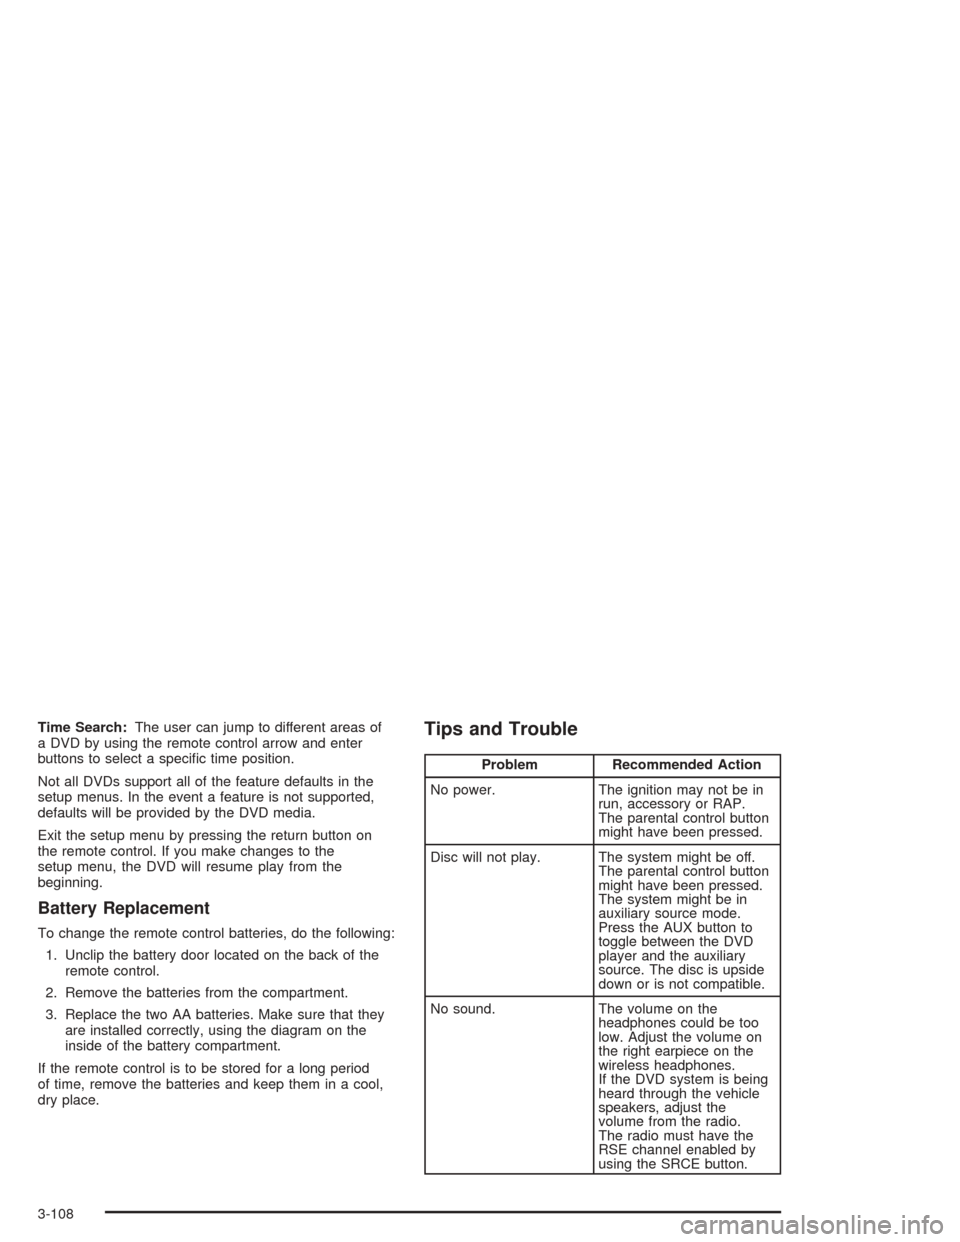
Tips and Trouble
Problem Recommended Action
No power. The ignition may not be in
run, accessory or RAP.
The parental control button
might have been pressed.
Disc will not play. The system might be off.
The parental control button
might have been pressed.
The system might be in
auxiliary source mode.
Press the AUX button to
toggle between the DVD
player and the auxiliary
source. The disc is upside
down or is not compatible.
No sound. The volume on the
headphones could be too
low. Adjust the volume on
the right earpiece on the
wireless headphones.
If the DVD system is being
heard through the vehicle
speakers, adjust the
volume from the radio.
The radio must have the
RSE channel enabled by
using the SRCE button.
3-108
Page 225 of 426
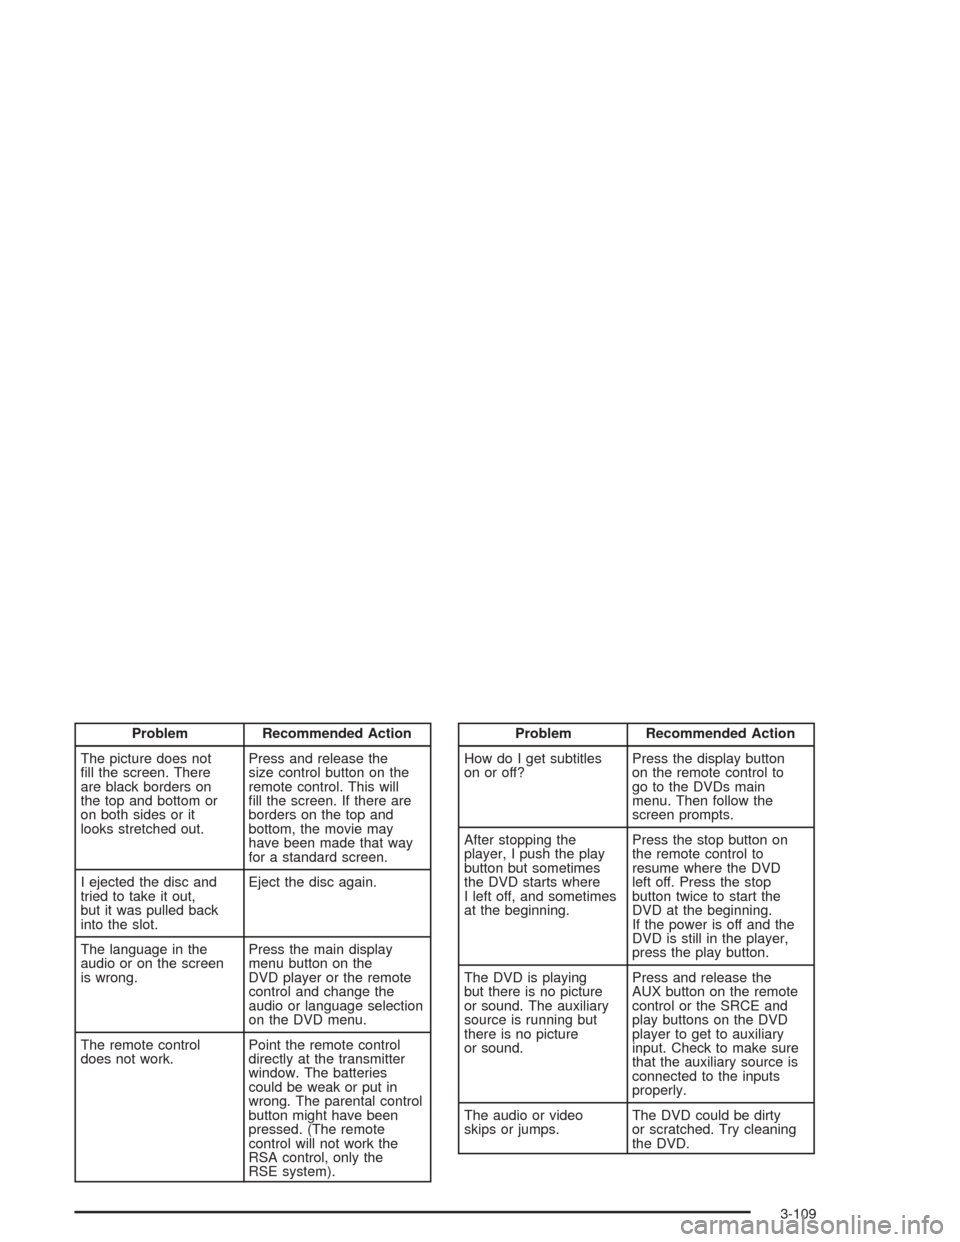
Problem Recommended Action
The picture does not
�ll the screen. There
are black borders on
the top and bottom or
on both sides or it
looks stretched out.Press and release the
size control button on the
remote control. This will
�ll the screen. If there are
borders on the top and
bottom, the movie may
have been made that way
for a standard screen.
I ejected the disc and
tried to take it out,
but it was pulled back
into the slot.Eject the disc again.
The language in the
audio or on the screen
is wrong.Press the main display
menu button on the
DVD player or the remote
control and change the
audio or language selection
on the DVD menu.
The remote control
does not work.Point the remote control
directly at the transmitter
window. The batteries
could be weak or put in
wrong. The parental control
button might have been
pressed. (The remote
control will not work the
RSA control, only the
RSE system).Problem Recommended Action
How do I get subtitles
on or off?Press the display button
on the remote control to
go to the DVDs main
menu. Then follow the
screen prompts.
After stopping the
player, I push the play
button but sometimes
the DVD starts where
I left off, and sometimes
at the beginning.Press the stop button on
the remote control to
resume where the DVD
left off. Press the stop
button twice to start the
DVD at the beginning.
If the power is off and the
DVD is still in the player,
press the play button.
The DVD is playing
but there is no picture
or sound. The auxiliary
source is running but
there is no picture
or sound.Press and release the
AUX button on the remote
control or the SRCE and
play buttons on the DVD
player to get to auxiliary
input. Check to make sure
that the auxiliary source is
connected to the inputs
properly.
The audio or video
skips or jumps.The DVD could be dirty
or scratched. Try cleaning
the DVD.
3-109
Page 227 of 426
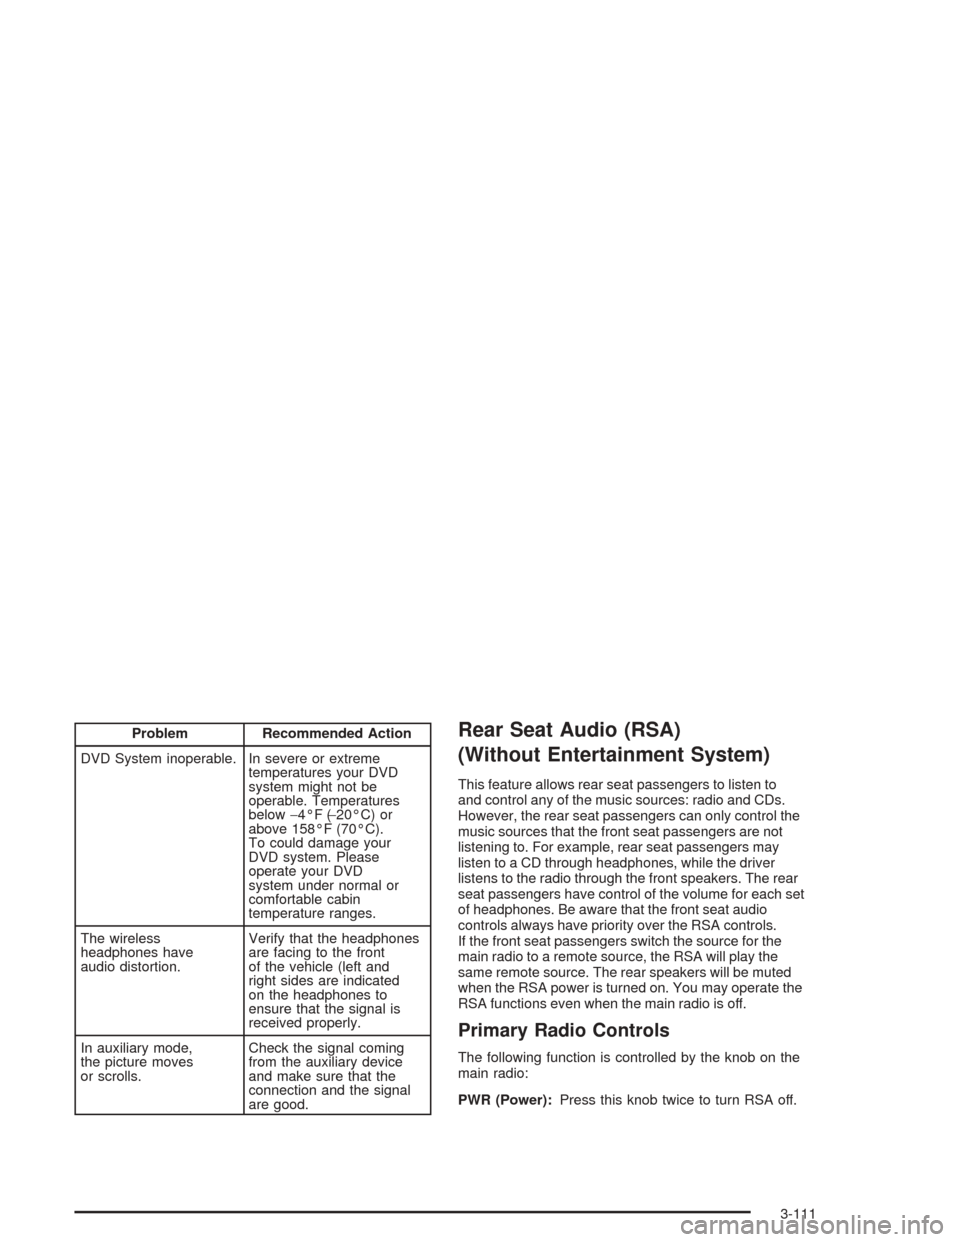
Problem Recommended Action
DVD System inoperable. In severe or extreme
temperatures your DVD
system might not be
operable. Temperatures
below−4°F (−20°C) or
above 158°F (70°C).
To could damage your
DVD system. Please
operate your DVD
system under normal or
comfortable cabin
temperature ranges.
The wireless
headphones have
audio distortion.Verify that the headphones
are facing to the front
of the vehicle (left and
right sides are indicated
on the headphones to
ensure that the signal is
received properly.
In auxiliary mode,
the picture moves
or scrolls.Check the signal coming
from the auxiliary device
and make sure that the
connection and the signal
are good.Rear Seat Audio (RSA)
(Without Entertainment System)
This feature allows rear seat passengers to listen to
and control any of the music sources: radio and CDs.
However, the rear seat passengers can only control the
music sources that the front seat passengers are not
listening to. For example, rear seat passengers may
listen to a CD through headphones, while the driver
listens to the radio through the front speakers. The rear
seat passengers have control of the volume for each set
of headphones. Be aware that the front seat audio
controls always have priority over the RSA controls.
If the front seat passengers switch the source for the
main radio to a remote source, the RSA will play the
same remote source. The rear speakers will be muted
when the RSA power is turned on. You may operate the
RSA functions even when the main radio is off.
Primary Radio Controls
The following function is controlled by the knob on the
main radio:
PWR (Power):Press this knob twice to turn RSA off.
3-111
Page 377 of 426
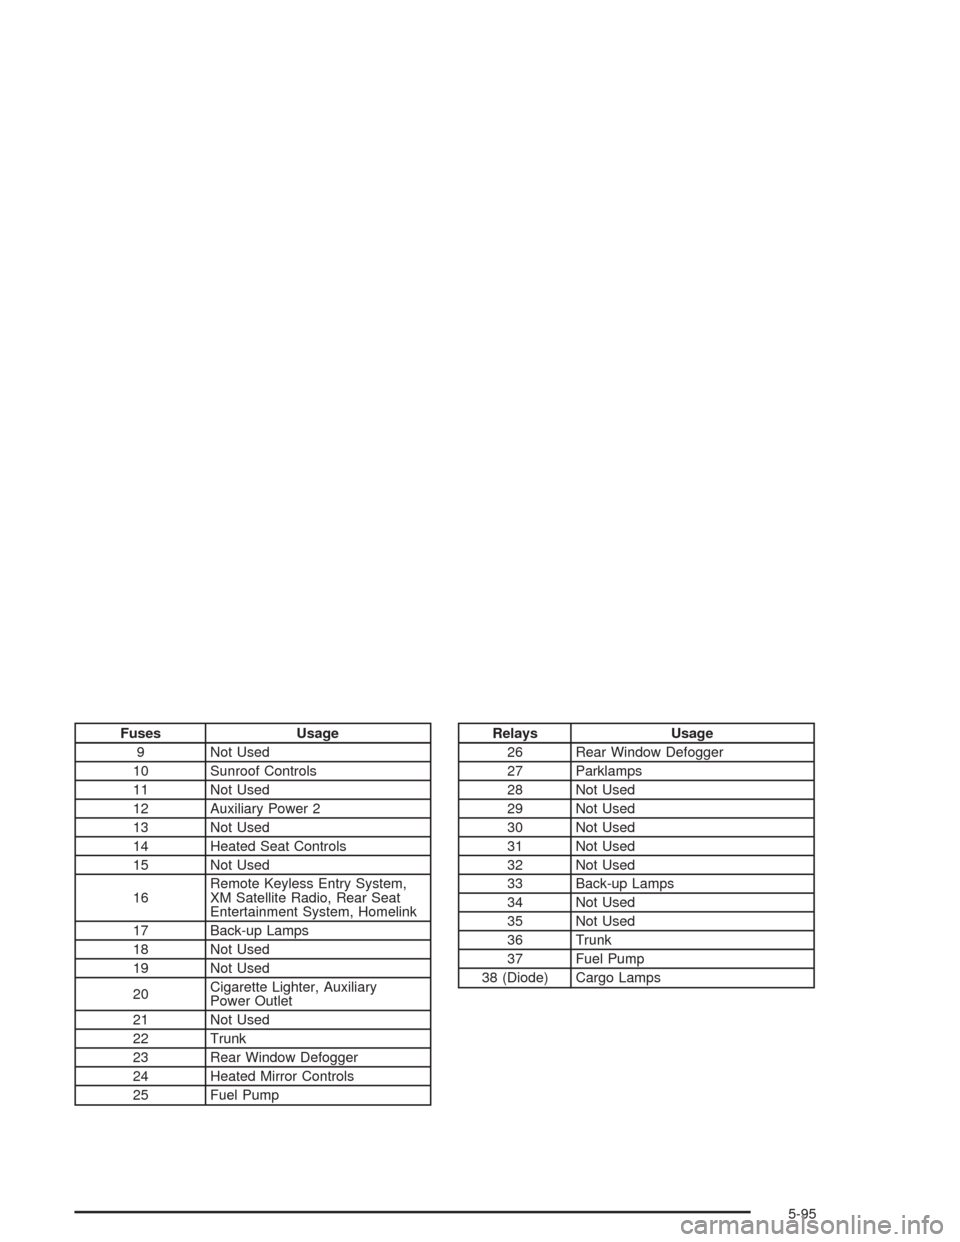
Fuses Usage
9 Not Used
10 Sunroof Controls
11 Not Used
12 Auxiliary Power 2
13 Not Used
14 Heated Seat Controls
15 Not Used
16Remote Keyless Entry System,
XM Satellite Radio, Rear Seat
Entertainment System, Homelink
17 Back-up Lamps
18 Not Used
19 Not Used
20Cigarette Lighter, Auxiliary
Power Outlet
21 Not Used
22 Trunk
23 Rear Window Defogger
24 Heated Mirror Controls
25 Fuel PumpRelays Usage
26 Rear Window Defogger
27 Parklamps
28 Not Used
29 Not Used
30 Not Used
31 Not Used
32 Not Used
33 Back-up Lamps
34 Not Used
35 Not Used
36 Trunk
37 Fuel Pump
38 (Diode) Cargo Lamps
5-95