rear entertainment CHEVROLET MALIBU 2004 5.G Owners Manual
[x] Cancel search | Manufacturer: CHEVROLET, Model Year: 2004, Model line: MALIBU, Model: CHEVROLET MALIBU 2004 5.GPages: 426, PDF Size: 3.98 MB
Page 15 of 426
{CAUTION:
If the seatback isn’t locked, it could move
forward in a sudden stop or crash. That could
cause injury to the person sitting there. Always
press rearward on the seatback to be sure it is
locked.
{CAUTION:
A safety belt that is improperly routed, not
properly attached, or twisted won’t provide the
protection needed in a crash. The person
wearing the belt could be seriously injured.
After raising the rear seatback, always check
to be sure that the safety belts are properly
routed and attached, and are not twisted.
To return the seatback to the upright position, push the
seatback up until you hear a click. Then pull on the
seatback to make sure it is secure.
Rear Sliding Seat (MAXX Only)
If your vehicle is the MAXX model your rear seat will
slide forward or rearward to allow more cargo space in
the rear.
Lift the bar located under the front of the seat to unlock
the seat. Slide the seat to where you want it and
release the bar. Try to move the seat back and forth to
be sure the seat is locked in place.
If your vehicle has the rear seat entertainment system,
the rear seat should only be moved forward to a
certain point in order to use the DVD player properly.
Slide the rear seat up so the front edge of the seat
cushion is lined up with the mark on the carpet retainer
trim on the oor of the driver’s side rear seat. If the
rear seat is up past the mark, you will not be able
to open the DVD screen.
1-9
Page 117 of 426
Instrument Panel Overview...............................3-4
Hazard Warning Flashers................................3-6
Other Warning Devices...................................3-7
Horn.............................................................3-7
Tilt Wheel.....................................................3-7
Turn Signal/Multifunction Lever.........................3-8
Exterior Lamps.............................................3-14
Interior Lamps..............................................3-19
Accessory Power Outlets...............................3-20
Climate Controls............................................3-21
Climate Control System.................................3-21
Automatic Climate Control System...................3-25
Outlet Adjustment.........................................3-30
Warning Lights, Gages, and Indicators............3-31
Instrument Panel Cluster................................3-32
Speedometer and Odometer...........................3-33
Tachometer.................................................3-33
Safety Belt Reminder Light.............................3-34
Air Bag Readiness Light................................3-34
Charging System Light..................................3-35
Brake System Warning Light..........................3-36
Anti-Lock Brake System
Warning Light...........................................3-37
Enhanced Traction System
Warning Light...........................................3-37
Enhanced Traction System Active Light............3-38Engine Coolant Temperature Warning Light......3-38
Engine Coolant Temperature Gage..................3-39
Malfunction Indicator Lamp.............................3-39
Oil Pressure Light.........................................3-42
Security Light...............................................3-43
Cruise Control Light......................................3-43
Service Vehicle Soon Light............................3-44
Fuel Gage...................................................3-44
Driver Information Center (DIC).......................3-45
DIC Operation and Displays...........................3-46
DIC Warnings and Messages.........................3-50
Audio System(s).............................................3-52
Setting the Time for Radios without Radio
Data Systems (RDS)..................................3-52
Setting the Time for Radios with Radio Data
Systems (RDS).........................................3-53
Radio with CD (Base Level)...........................3-53
Radio with CD (Up Level)..............................3-58
Radio with Cassette and CD..........................3-69
Radio with Six-Disc CD.................................3-82
Rear Seat Entertainment System....................3-96
Rear Seat Audio (RSA)
(Without Entertainment System).................3-111
Rear Seat Audio (RSA)
(With Entertainment System).....................3-113
Theft-Deterrent Feature................................3-115
Section 3 Instrument Panel
3-1
Page 212 of 426
CD Messages
CHECK CD:If this message appears on the display or
the CD comes out, it could be for one of the following
reasons:
It is very hot. When the temperature returns to
normal, the CD should play.
You are driving on a very rough road. When the
road becomes smooth, the CD should play.
The CD is dirty, scratched, wet, or upside down.
The air is very humid. If so, wait about an hour
and try again.
There may have been a problem while burning
the CD.
The label may be caught in the CD player.
If the CD is not playing correctly, for any other reason,
try a known good CD.
If any error occurs repeatedly or if an error cannot be
corrected, contact your dealer. If your radio displays
an error message, write it down and provide it to your
dealer when reporting the problem.
Rear Seat Entertainment System
Your vehicle may have a Digital Versatile Disc (DVD)
system. The Rear Seat Entertainment (RSE) includes a
DVD player, a video display screen, two sets of wireless
headphones and a remote control.
This system also functions as a rear seat audio (RSA)
system. SeeRear Seat Audio (RSA) (Without
Entertainment System) on page 3-111orRear Seat
Audio (RSA) (With Entertainment System) on
page 3-113in the Index for more information.
Parental Control
The RSE system may be disabled from the driver’s
seat by pressing the power button on the radio twice.
To resume use of the RSE system press the RSE
power button.
3-96
Page 213 of 426
Before You Drive
The RSE is designed for rear seat passengers only.
The driver cannot safely view the video screen
while driving and should not try to do so.
Your DVD system is designed to be inoperable when
the vehicle is exposed to extremely low or high
temperatures, in order to protect your system from
damage. Operate your DVD system under normal or
comfortable cabin temperature ranges.
Headphones
The entertainment system includes two wireless
headphones.
The wireless headphones have an ON/OFF button,
and a volume control. To use the headphones press the
ON/OFF button. An indicator light on the headphones
will illuminate. If the light does not illuminate, the
batteries may need to be replaced. See “Battery
Replacement” later in this section for more information.
Press the button to turn the headphones OFF when
not in use.If the RSE system is shut off, or if the headphones are
out of range of the transmitters, located at the top of
the DVD player, for more than three minutes, the
headphones will shut off automatically to save the
battery power. If you move too far forward or step out of
the vehicle, the headphones will lose the audio signal.
To adjust the volume on the wireless headphones,
use the volume control.
Make sure that the headphones are worn correctly,
left to right, to ensure the signal is received properly.
Notice:Do not store the headphones in heat or
direct sunlight. This could damage the headphones
and repairs would not be covered by your warranty.
Keep the headphones stored in a cool, dry place.
If there is a decreased audio signal during CD or
DVD play, you may hear a low “hissing” noise through
the speakers and/or headphones. If the hissing sound
in the wireless headphones seems excessive, make
sure that the headphone batteries are fully charged.
Some amount of hissing is normal.
3-97
Page 214 of 426
Battery Replacement
To change the batteries, do the following:
1. Loosen the screw on the battery compartment door
located on the left side of the headphone earpiece.
2. Replace the two AAA batteries in the compartment.
Make sure that they are installed correctly using the
diagram on the inside of the battery compartment.
3. Replace the battery compartment door and tighten
the screw.
If the headphones are to be stored for a long period of
time, remove the batteries, and keep them in a cool,
dry place.
Stereo RCA Jacks
The RCA jacks are located on the DVD faceplate on the
oor console. The RCA jacks allow you to connect audio
and video signals from an auxiliary device such as a
camcorder or a video game unit to your RSE just as you
would to a standard television. The yellow RCA jack is
used for video, the red RCA jack for right audio, and the
white RCA jack for left audio inputs. The system requires
standard RCA cables (not included) to connect your
auxiliary device to the RCA jacks. Refer to the
manufacturer’s instructions for proper usage.To use the auxiliary audio and video inputs on the
entertainment system, connect an external auxiliary
device such as a camcorder to the RCA jacks and turn
on both the auxiliary device power and the power on
the front of the RSE system. Press the play and source
buttons at the same time or the AUX button on the
remote control to switch to the auxiliary device.
See “DVD Player”, and “Remote Control” later in this
section for more information.
Audio Speakers
Audio from the DVD player or auxiliary devices can
be heard through the following possible sources:
Wireless Headphones
Vehicle’s Speakers
Wired Headphones (not included)
Only one audio source can be heard through the
vehicles speakers at a time.
You can listen to the entertainment system or an
auxiliary device through all of the vehicles speakers
when the following occurs:
The RSE system is off
a DVD or auxiliary device is playing
the front audio system is on and the SRCE button
is pressed to enable the rear seat entertainment
system
3-98
Page 215 of 426
The front audio system will display the headphone icon
when the entertainment system is on and the headphone
icon will disappear from the display when it is off.
To turn the vehicles rear speakers on and off, press the
power button on the RSE or on the remote control.
When the rear speakers are off, the audio from the
entertainment system can be heard through both the
wireless headphones and the vehicles front speakers
at the same time.
You can listen to the entertainment system through the
wired headphones (not included) on the RSE system
when the following occurs:
The RSE system is on
a DVD or auxiliary device is playing
The volume on the audio system may vary when
switching between a radio station, CD, DVD, cassette,
or auxiliary device.
If there is a decreased audio signal during CD or
DVD play, you may hear a low “hissing” noise through
the speakers and/or headphones. If the hissing sound
in the wireless headphones seems excessive, make
sure that the headphone batteries are fully charged.
Some amount of hissing is normal.
Video Screen
The video screen is located on the back of the oor
console. Open the video screen by rotating the screen
up and adjust its position as desired.
The video screen may not be able to be rotated up if
the rear seat is too far forward. See “Rear Sliding Seat
(MAXX Only)” underRear Seat Operation on page 1-7
for more information.
When the video screen is not in use, push it down into
its stored position.
The DVD player and display will continue to operate
when the video screen is in either the up or down
positions.
The transmitters from the wireless headphones and the
receiver for the remote control are behind the window
on the RSE system. If the screen is in the closed
position, the signals will not be available for the
operation of the headphones or the remote control.
Notice:Directly touching the video screen may
damage it. Do not touch the screen. SeeCleaning the
Video Screen on page 3-118for more information.
3-99
Page 219 of 426
Remote Control
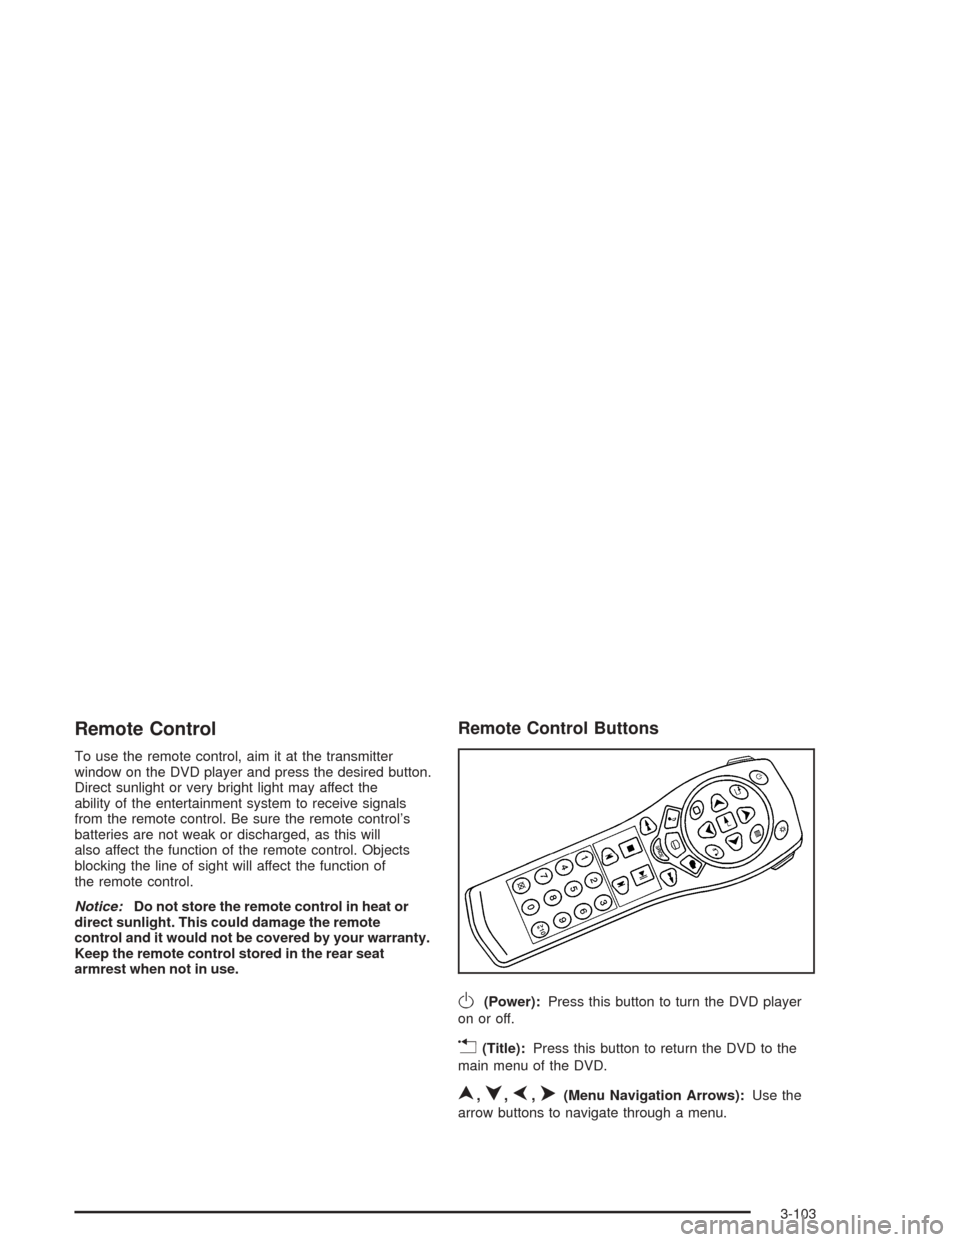
To use the remote control, aim it at the transmitter
window on the DVD player and press the desired button.
Direct sunlight or very bright light may affect the
ability of the entertainment system to receive signals
from the remote control. Be sure the remote control’s
batteries are not weak or discharged, as this will
also affect the function of the remote control. Objects
blocking the line of sight will affect the function of
the remote control.
Notice:Do not store the remote control in heat or
direct sunlight. This could damage the remote
control and it would not be covered by your warranty.
Keep the remote control stored in the rear seat
armrest when not in use.
Remote Control Buttons
O(Power):Press this button to turn the DVD player
on or off.
v(Title):Press this button to return the DVD to the
main menu of the DVD.
n,q,p,o(Menu Navigation Arrows):Use the
arrow buttons to navigate through a menu.
3-103
Page 227 of 426
Problem Recommended Action
DVD System inoperable. In severe or extreme
temperatures your DVD
system might not be
operable. Temperatures
below−4°F (−20°C) or
above 158°F (70°C).
To could damage your
DVD system. Please
operate your DVD
system under normal or
comfortable cabin
temperature ranges.
The wireless
headphones have
audio distortion.Verify that the headphones
are facing to the front
of the vehicle (left and
right sides are indicated
on the headphones to
ensure that the signal is
received properly.
In auxiliary mode,
the picture moves
or scrolls.Check the signal coming
from the auxiliary device
and make sure that the
connection and the signal
are good.Rear Seat Audio (RSA)
(Without Entertainment System)
This feature allows rear seat passengers to listen to
and control any of the music sources: radio and CDs.
However, the rear seat passengers can only control the
music sources that the front seat passengers are not
listening to. For example, rear seat passengers may
listen to a CD through headphones, while the driver
listens to the radio through the front speakers. The rear
seat passengers have control of the volume for each set
of headphones. Be aware that the front seat audio
controls always have priority over the RSA controls.
If the front seat passengers switch the source for the
main radio to a remote source, the RSA will play the
same remote source. The rear speakers will be muted
when the RSA power is turned on. You may operate the
RSA functions even when the main radio is off.
Primary Radio Controls
The following function is controlled by the knob on the
main radio:
PWR (Power):Press this knob twice to turn RSA off.
3-111
Page 229 of 426
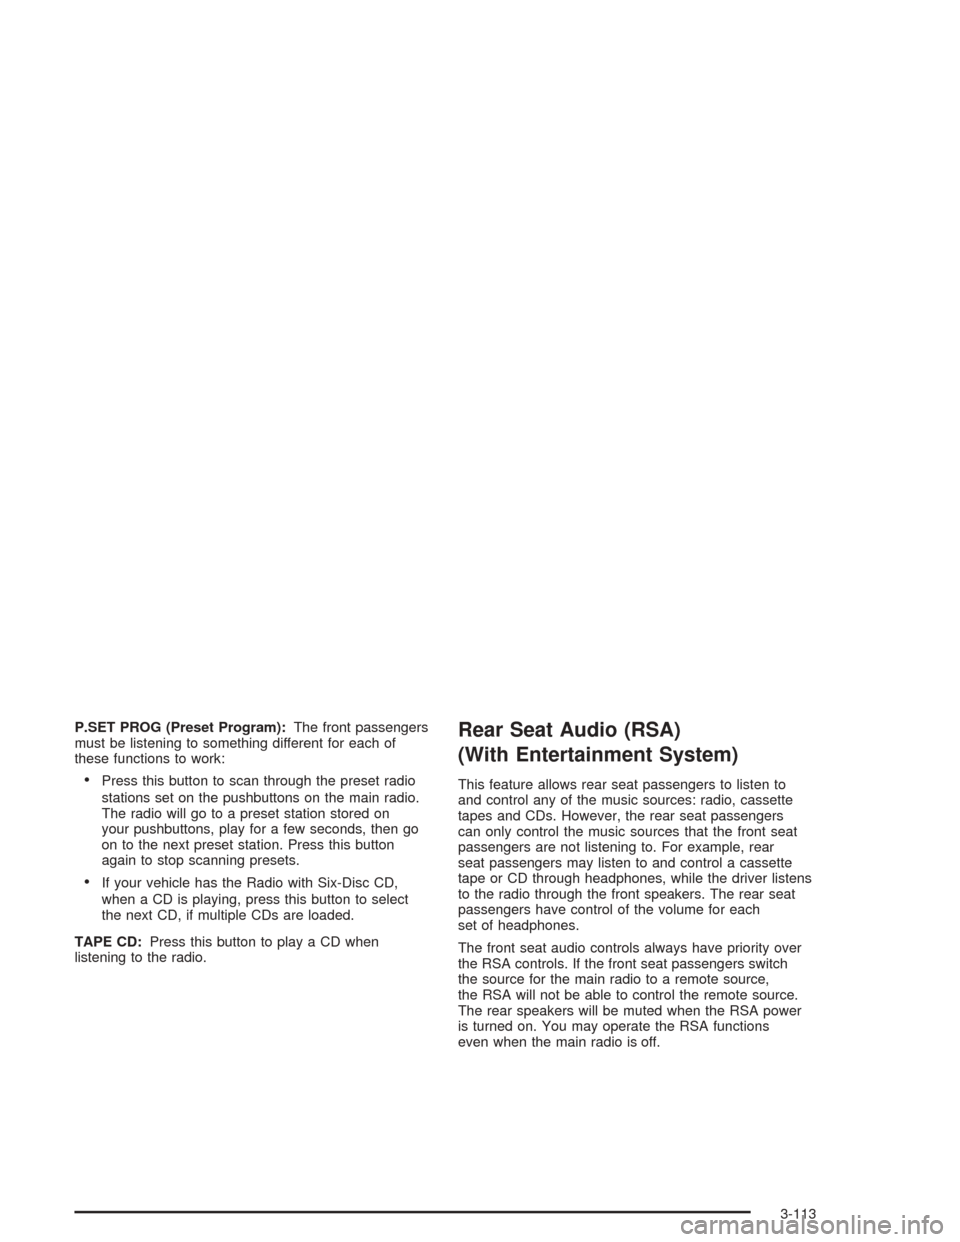
P.SET PROG (Preset Program):The front passengers
must be listening to something different for each of
these functions to work:
Press this button to scan through the preset radio
stations set on the pushbuttons on the main radio.
The radio will go to a preset station stored on
your pushbuttons, play for a few seconds, then go
on to the next preset station. Press this button
again to stop scanning presets.
If your vehicle has the Radio with Six-Disc CD,
when a CD is playing, press this button to select
the next CD, if multiple CDs are loaded.
TAPE CD:Press this button to play a CD when
listening to the radio.
Rear Seat Audio (RSA)
(With Entertainment System)
This feature allows rear seat passengers to listen to
and control any of the music sources: radio, cassette
tapes and CDs. However, the rear seat passengers
can only control the music sources that the front seat
passengers are not listening to. For example, rear
seat passengers may listen to and control a cassette
tape or CD through headphones, while the driver listens
to the radio through the front speakers. The rear seat
passengers have control of the volume for each
set of headphones.
The front seat audio controls always have priority over
the RSA controls. If the front seat passengers switch
the source for the main radio to a remote source,
the RSA will not be able to control the remote source.
The rear speakers will be muted when the RSA power
is turned on. You may operate the RSA functions
even when the main radio is off.
3-113
Page 377 of 426
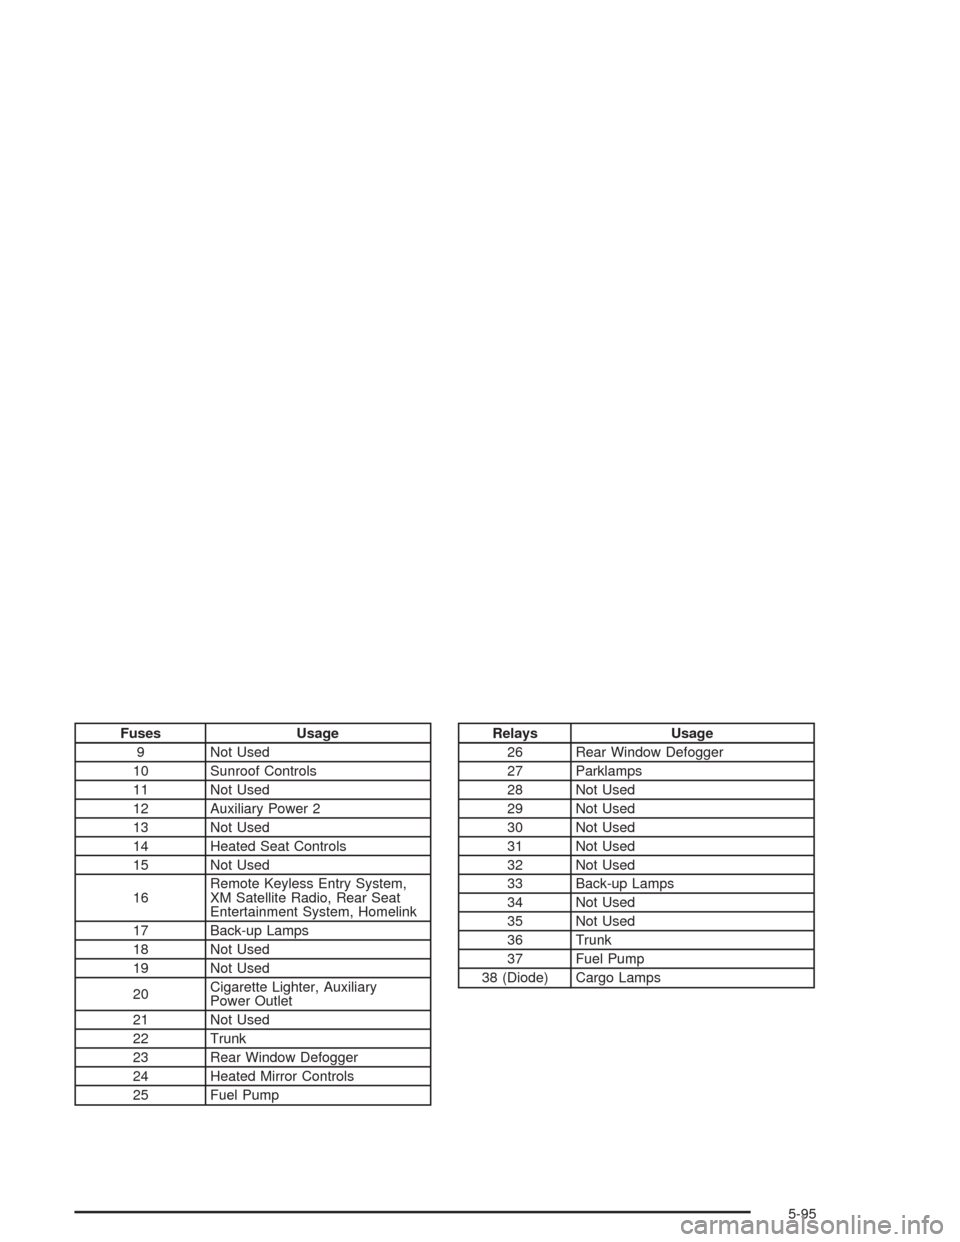
Fuses Usage
9 Not Used
10 Sunroof Controls
11 Not Used
12 Auxiliary Power 2
13 Not Used
14 Heated Seat Controls
15 Not Used
16Remote Keyless Entry System,
XM Satellite Radio, Rear Seat
Entertainment System, Homelink
17 Back-up Lamps
18 Not Used
19 Not Used
20Cigarette Lighter, Auxiliary
Power Outlet
21 Not Used
22 Trunk
23 Rear Window Defogger
24 Heated Mirror Controls
25 Fuel PumpRelays Usage
26 Rear Window Defogger
27 Parklamps
28 Not Used
29 Not Used
30 Not Used
31 Not Used
32 Not Used
33 Back-up Lamps
34 Not Used
35 Not Used
36 Trunk
37 Fuel Pump
38 (Diode) Cargo Lamps
5-95