CHEVROLET MALIBU 2009 7.G Owners Manual
Manufacturer: CHEVROLET, Model Year: 2009, Model line: MALIBU, Model: CHEVROLET MALIBU 2009 7.GPages: 420, PDF Size: 2.27 MB
Page 301 of 420
Jump Starting
If the battery has run down, you may want to use
another vehicle and some jumper cables to start your
vehicle. Be sure to use the following steps to do it safely.
{CAUTION:
Batteries can hurt you. They can be dangerous
because:
They contain acid that can burn you.
They contain gas that can explode or ignite.
They contain enough electricity to burn you.
If you do not follow these steps exactly, some or
all of these things can hurt you.
Notice:Ignoring these steps could result in costly
damage to the vehicle that would not be covered
by the warranty.
Trying to start the vehicle by pushing or pulling it
will not work, and it could damage the vehicle.
1. Check the other vehicle. It must have a 12-volt
battery with a negative ground system.Notice:If the other vehicle’s system is not a 12-volt
system with a negative ground, both vehicles can
be damaged. Only use vehicles with 12-volt systems
with negative grounds to jump start your vehicle.
2. Get the vehicles close enough so the jumper cables
can reach, but be sure the vehicles are not touching
each other. If they are, it could cause a ground
connection you do not want. You would not be able
to start your vehicle, and the bad grounding could
damage the electrical systems.
To avoid the possibility of the vehicles rolling,
set the parking brake �rmly on both vehicles involved
in the jump start procedure. Put an automatic
transmission in P (Park) or a manual transmission
in N (Neutral) before setting the parking brake.
Notice:If you leave the radio or other accessories
on during the jump starting procedure, they could
be damaged. The repairs would not be covered by
the warranty. Always turn off the radio and other
accessories when jump starting the vehicle.
3. Turn off the ignition on both vehicles. Unplug
unnecessary accessories plugged into the cigarette
lighter or the accessory power outlet. Turn off the
radio and all lamps that are not needed. This will
avoid sparks and help save both batteries. And it
could save the radio!
5-43
Page 302 of 420
4. Open the hoods and locate the batteries. Find the
positive (+) and negative (−) terminal locations on
each vehicle. Your vehicle’s positive (+) terminal is
located under a red tethered cap on the battery.
The negative (–) terminal is located under a
black tethered cap on the battery. SeeEngine
Compartment Overview on page 5-16for more
information on location. Flip the caps up to access
the positive (+) and negative (–) terminals.
{CAUTION:
An electric fan can start up even when the engine
is not running and can injure you. Keep hands,
clothing and tools away from any underhood
electric fan.
{CAUTION:
Using a match near a battery can cause battery
gas to explode. People have been hurt doing this,
and some have been blinded. Use a �ashlight if
you need more light.
Be sure the battery has enough water. You do not
need to add water to the battery installed in your
new vehicle. But if a battery has �ller caps, be
sure the right amount of �uid is there. If it is low,
add water to take care of that �rst. If you don’t,
explosive gas could be present.
Battery �uid contains acid that can burn you.
Do not get it on you. If you accidentally get it in
your eyes or on your skin, �ush the place with
water and get medical help immediately.
5-44
Page 303 of 420
{CAUTION:
Fans or other moving engine parts can injure you
badly. Keep your hands away from moving parts
once the engine is running.
5. Check that the jumper cables do not have loose
or missing insulation. If they do, you could get a
shock. The vehicles could be damaged too.
Before you connect the cables, here are some
things you should know. Positive (+) will go to
positive (+) or to a remote positive (+) terminal if
the vehicle has one. Negative (−) will go to a
heavy, unpainted metal engine part or to a remote
negative (−) terminal if the vehicle has one.
Do not connect positive (+) to negative (−)oryou
will get a short that would damage the battery and
maybe other parts too. And do not connect the
negative (−) cable to the negative (−) terminal on
the dead battery because this can cause sparks.6. Connect the red positive (+) cable to the positive (+)
terminal of the dead battery. Use a remote
positive (+) terminal if the vehicle has one.
7. Do not let the other end touch metal. Connect it to
the positive (+) terminal of the good battery. Use a
remote positive (+) terminal if the vehicle has one.
8. Now connect the black negative (−) cable to the
negative (−) terminal of the good battery. Use a
remote negative (−) terminal if the vehicle has one.
Do not let the other end touch anything until the
next step. The other end of the negative (−) cable
does notgo to the dead battery. It goes to a heavy,
unpainted metal engine part or to a remote
negative (−) terminal on the vehicle with the
dead battery.
5-45
Page 304 of 420
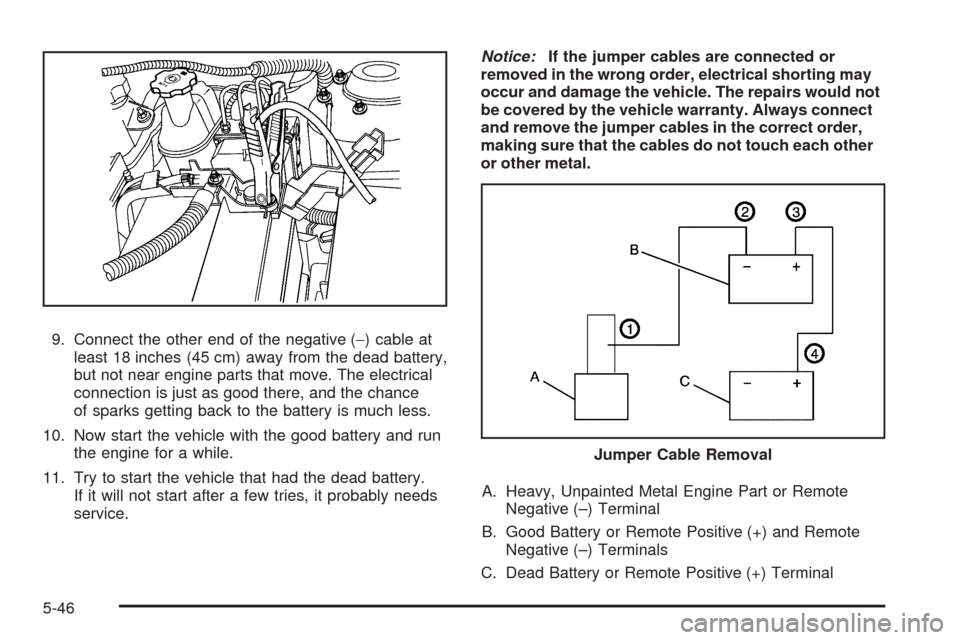
9. Connect the other end of the negative (−) cable at
least 18 inches (45 cm) away from the dead battery,
but not near engine parts that move. The electrical
connection is just as good there, and the chance
of sparks getting back to the battery is much less.
10. Now start the vehicle with the good battery and run
the engine for a while.
11. Try to start the vehicle that had the dead battery.
If it will not start after a few tries, it probably needs
service.Notice:If the jumper cables are connected or
removed in the wrong order, electrical shorting may
occur and damage the vehicle. The repairs would not
be covered by the vehicle warranty. Always connect
and remove the jumper cables in the correct order,
making sure that the cables do not touch each other
or other metal.
A. Heavy, Unpainted Metal Engine Part or Remote
Negative (–) Terminal
B. Good Battery or Remote Positive (+) and Remote
Negative (–) Terminals
C. Dead Battery or Remote Positive (+) Terminal
Jumper Cable Removal
5-46
Page 305 of 420
To disconnect the jumper cables from both vehicles, do
the following:
1. Disconnect the black negative (−) cable from the
vehicle that had the dead battery.
2. Disconnect the black negative (−) cable from the
vehicle with the good battery.
3. Disconnect the red positive (+) cable from the
vehicle with the good battery.
4. Disconnect the red positive (+) cable from the other
vehicle.
5. Return the caps over the positive (+) and
negative (−) terminals to their original positions.
Headlamp Aiming
Headlamp aim has been preset at the factory and
should need no further adjustment.
However, if your vehicle is damaged in a crash, the
headlamp aim may be affected. Aim adjustment to the
low-beam headlamps may be necessary if oncoming
drivers �ash their high-beam headlamps at you
(for vertical aim).
If the headlamps need to be re-aimed, it is
recommended that you take the vehicle to your
dealer/retailer for service.
Bulb Replacement
For the proper type of replacement bulbs, see
Replacement Bulbs on page 5-50.
For any bulb changing procedure not listed in this
section, contact your dealer/retailer.
Halogen Bulbs
{CAUTION:
Halogen bulbs have pressurized gas inside and
can burst if you drop or scratch the bulb. You or
others could be injured. Be sure to read and follow
the instructions on the bulb package.
5-47
Page 306 of 420
Taillamps, Turn Signal, and
Stoplamps
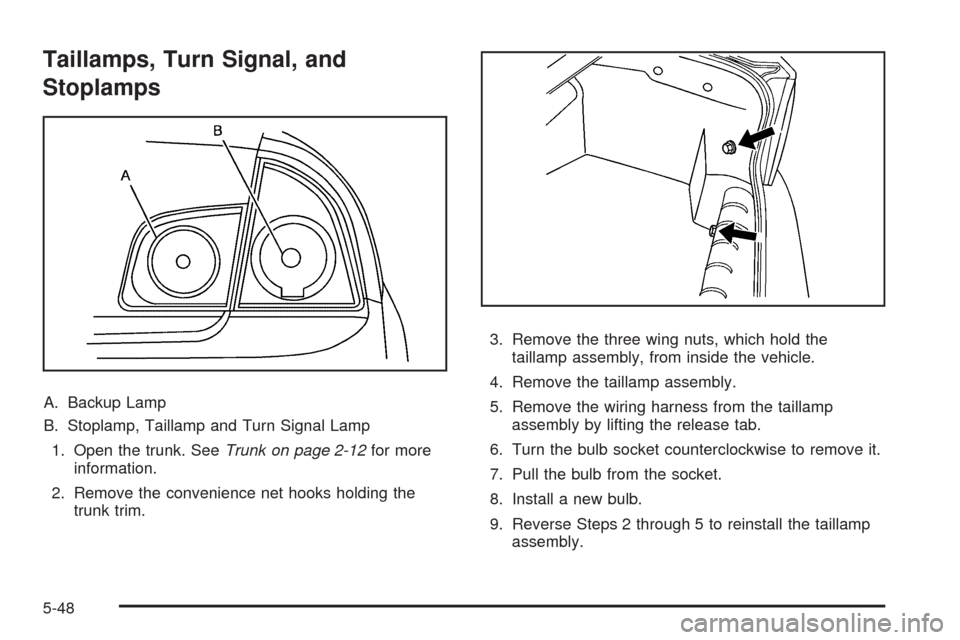
A. Backup Lamp
B. Stoplamp, Taillamp and Turn Signal Lamp
1. Open the trunk. SeeTrunk on page 2-12for more
information.
2. Remove the convenience net hooks holding the
trunk trim.3. Remove the three wing nuts, which hold the
taillamp assembly, from inside the vehicle.
4. Remove the taillamp assembly.
5. Remove the wiring harness from the taillamp
assembly by lifting the release tab.
6. Turn the bulb socket counterclockwise to remove it.
7. Pull the bulb from the socket.
8. Install a new bulb.
9. Reverse Steps 2 through 5 to reinstall the taillamp
assembly.
5-48
Page 307 of 420
Back-up Lamp
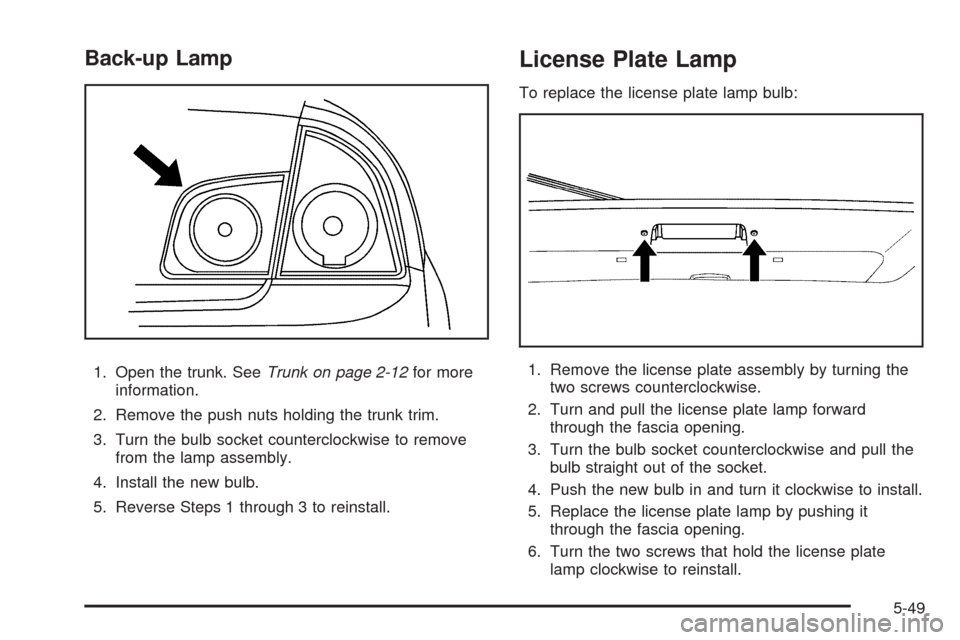
1. Open the trunk. SeeTrunk on page 2-12for more
information.
2. Remove the push nuts holding the trunk trim.
3. Turn the bulb socket counterclockwise to remove
from the lamp assembly.
4. Install the new bulb.
5. Reverse Steps 1 through 3 to reinstall.
License Plate Lamp
To replace the license plate lamp bulb:
1. Remove the license plate assembly by turning the
two screws counterclockwise.
2. Turn and pull the license plate lamp forward
through the fascia opening.
3. Turn the bulb socket counterclockwise and pull the
bulb straight out of the socket.
4. Push the new bulb in and turn it clockwise to install.
5. Replace the license plate lamp by pushing it
through the fascia opening.
6. Turn the two screws that hold the license plate
lamp clockwise to reinstall.
5-49
Page 308 of 420
Replacement Bulbs
Exterior Lamp Bulb Number
Back-up Lamp and Taillamp 921
License Plate Lamp 168
Turn Signal Lamp 3156
For replacement bulbs not listed here, contact your
dealer/retailer.
Windshield Wiper Blade
Replacement
Inspect the windshield wiper blades for wear or cracking.
SeeScheduled Maintenance on page 6-4.
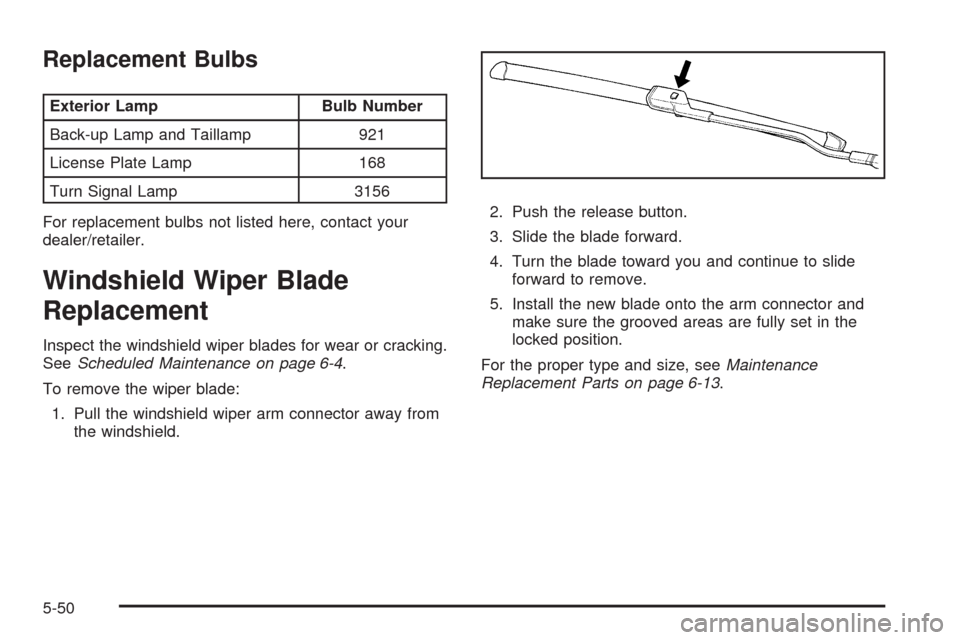
To remove the wiper blade:
1. Pull the windshield wiper arm connector away from
the windshield.2. Push the release button.
3. Slide the blade forward.
4. Turn the blade toward you and continue to slide
forward to remove.
5. Install the new blade onto the arm connector and
make sure the grooved areas are fully set in the
locked position.
For the proper type and size, seeMaintenance
Replacement Parts on page 6-13.
5-50
Page 309 of 420
Tires
Your new vehicle comes with high-quality tires
made by a leading tire manufacturer. If you ever
have questions about your tire warranty and where
to obtain service, see your vehicle Warranty booklet
for details. For additional information refer to the tire
manufacturer.
{CAUTION:
Poorly maintained and improperly used
tires are dangerous.
Overloading your tires can cause
overheating as a result of too much
�exing. You could have an air-out and
a serious accident. SeeLoading the
Vehicle on page 4-20.
CAUTION: (Continued)
CAUTION: (Continued)
Underin�ated tires pose the same
danger as overloaded tires. The resulting
accident could cause serious injury.
Check all tires frequently to maintain the
recommended pressure. Tire pressure
should be checked when your tires are
cold. SeeInflation - Tire Pressure on
page 5-59.
Overin�ated tires are more likely to be
cut, punctured, or broken by a sudden
impact — such as when you hit a pothole.
Keep tires at the recommended pressure.
Worn, old tires can cause accidents.
If your tread is badly worn, or if your tires
have been damaged, replace them.
SeeHigh-Speed Operation on page 5-60for
in�ation pressure adjustment for high speed
driving.
5-51
Page 310 of 420
Low-Pro�le Performance Tire
If your vehicle has P225/50R18 or P225/50R17
size tires, they are classi�ed as low-pro�le
performance tires. These tires are designed for
very responsive driving on wet or dry pavement.
You may also notice more road noise with
low-pro�le performance tires and that they
tend to wear faster.
Notice:If the vehicle has low-pro�le tires,
they are more susceptible to damage from road
hazards or curb impact than standard pro�le
tires. Tire and/or wheel assembly damage can
occur when coming into contact with road
hazards like, potholes, or sharp edged objects,
or when sliding into a curb. The vehicle
warranty does not cover this type of damage.
Keep tires set to the correct in�ation pressure
and, when possible avoid contact with curbs,
potholes, and other road hazards.
Winter Tires
If you expect to drive on snow or ice covered roads
often, you may want to get winter tires for your vehicle.
All season tires provide good overall performance
on most surfaces but they may not offer the traction
you would like or the same level of performance
as winter tires on snow or ice covered roads.
Winter tires, in general, are designed for increased
traction on snow and ice covered roads. With winter tires,
there may be decreased dry road traction, increased road
noise, and shorter tread life. After switching to winter
tires, be alert for changes in vehicle handling and braking.
See your dealer/retailer for details regarding winter tire
availability and proper tire selection. Also, seeBuying
New Tires on page 5-68.
If you choose to use winter tires:
Use tires of the same brand and tread type on all
four wheel positions.
Use only radial ply tires of the same size, load
range, and speed rating as the original equipment
tires.
Winter tires with the same speed rating as your original
equipment tires may not be available for H, V, W, Y,
and ZR speed rated tires. If you choose winter tires with
a lower speed rating, never exceed the tire’s maximum
speed capability.
5-52