headlamp CHEVROLET MALIBU 2011 7.G Owners Manual
[x] Cancel search | Manufacturer: CHEVROLET, Model Year: 2011, Model line: MALIBU, Model: CHEVROLET MALIBU 2011 7.GPages: 382, PDF Size: 5.81 MB
Page 1 of 382

Black plate (1,1)Chevrolet Malibu Owner Manual - 2011
2011 Chevrolet Malibu Owner ManualM
In Brief. . . . . . . . . . . . . . . . . . . . . . . . 1-1
Instrument Panel . . . . . . . . . . . . . . 1-2
Initial Drive Information . . . . . . . . 1-4
Vehicle Features . . . . . . . . . . . . . 1-14
Performance and Maintenance . . . . . . . . . . . . . . . . 1-18
Keys, Doors and Windows . . . 2-1
Keys and Locks . . . . . . . . . . . . . . . 2-2
Doors . . . . . . . . . . . . . . . . . . . . . . . . 2-10
Vehicle Security . . . . . . . . . . . . . . 2-12
Exterior Mirrors . . . . . . . . . . . . . . . 2-14
Interior Mirrors . . . . . . . . . . . . . . . . 2-15
Windows . . . . . . . . . . . . . . . . . . . . . 2-16
Roof . . . . . . . . . . . . . . . . . . . . . . . . . . 2-19
Seats and Restraints . . . . . . . . . 3-1
Head Restraints . . . . . . . . . . . . . . . 3-2
Front Seats . . . . . . . . . . . . . . . . . . . . 3-3
Rear Seats . . . . . . . . . . . . . . . . . . . . 3-7
Safety Belts . . . . . . . . . . . . . . . . . . . . 3-8
Airbag System . . . . . . . . . . . . . . . . 3-23
Child Restraints . . . . . . . . . . . . . . 3-38 Storage
. . . . . . . . . . . . . . . . . . . . . . . 4-1
Storage Compartments . . . . . . . . 4-1
Additional Storage Features . . . 4-2
Instruments and Controls . . . . 5-1
Controls . . . . . . . . . . . . . . . . . . . . . . . 5-2
Warning Lights, Gauges, and
Indicators . . . . . . . . . . . . . . . . . . . . 5-9
Information Displays . . . . . . . . . . 5-23
Vehicle Messages . . . . . . . . . . . . 5-26
Vehicle Personalization . . . . . . . 5-31
Lighting . . . . . . . . . . . . . . . . . . . . . . . 6-1
Exterior Lighting . . . . . . . . . . . . . . . 6-1
Interior Lighting . . . . . . . . . . . . . . . . 6-5
Lighting Features . . . . . . . . . . . . . . 6-6
Infotainment System . . . . . . . . . 7-1
Introduction . . . . . . . . . . . . . . . . . . . . 7-1
Radio . . . . . . . . . . . . . . . . . . . . . . . . . . 7-6
Audio Players . . . . . . . . . . . . . . . . 7-14
Phone . . . . . . . . . . . . . . . . . . . . . . . . 7-23 Climate Controls
. . . . . . . . . . . . . 8-1
Climate Control Systems . . . . . . 8-1
Air Vents . . . . . . . . . . . . . . . . . . . . . . . 8-9
Driving and Operating . . . . . . . . 9-1
Driving Information . . . . . . . . . . . . . 9-2
Starting and Operating . . . . . . . 9-17
Engine Exhaust . . . . . . . . . . . . . . 9-24
Automatic Transmission . . . . . . 9-25
Brakes . . . . . . . . . . . . . . . . . . . . . . . 9-28
Ride Control Systems . . . . . . . . 9-30
Cruise Control . . . . . . . . . . . . . . . . 9-34
Fuel . . . . . . . . . . . . . . . . . . . . . . . . . . 9-37
Towing . . . . . . . . . . . . . . . . . . . . . . . 9-43
Conversions and Add-Ons . . . 9-48
Vehicle Care . . . . . . . . . . . . . . . . . 10-1
General Information . . . . . . . . . . 10-2
Vehicle Checks . . . . . . . . . . . . . . . 10-4
Headlamp Aiming . . . . . . . . . . . 10-27
Bulb Replacement . . . . . . . . . . 10-28
Electrical System . . . . . . . . . . . . 10-30
Wheels and Tires . . . . . . . . . . . 10-38
Jump Starting . . . . . . . . . . . . . . . 10-78
Towing . . . . . . . . . . . . . . . . . . . . . . 10-83
Appearance Care . . . . . . . . . . . 10-85
Page 5 of 382

Black plate (5,1)Chevrolet Malibu Owner Manual - 2011
Introduction v
Vehicle Symbol Chart
Here are some additional symbols
that may be found on the vehicle
and what they mean. For more
information on the symbol, refer to
the Index.
9:Airbag Readiness Light
#:Air Conditioning
!:Antilock Brake System (ABS)
g:Audio Steering Wheel Controls
or OnStar®
$: Brake System Warning Light
":Charging System
I:Cruise Control
B: Engine Coolant Temperature
O:Exterior Lamps
#:Fog Lamps
.: Fuel Gauge
+:Fuses
3: Headlamp High/Low-Beam
Changer
j: LATCH System Child
Restraints
*: Malfunction Indicator Lamp
::Oil Pressure
}:Power
/:Remote Vehicle Start
>:Safety Belt Reminders
7:Tire Pressure Monitor
F:Traction Control
M:Windshield Washer Fluid
Page 16 of 382
Black plate (10,1)Chevrolet Malibu Owner Manual - 2011
1-10 In Brief
2. Press one of the four arrowslocated on the control pad to
move the mirror to the desired
direction.
Keep the selector switch in the
center position when not adjusting
either outside mirror.
See Power Mirrors on page 2‑15.
Interior Mirror
Vehicles with an automatic dimming
rearview mirror will automatically
reduce the glare from the
headlamps of the vehicle behind.
The dimming feature comes on and
the indicator light illuminates each
time the ignition is turned to start.
SeeManual Rearview Mirror
on
page 2‑15.
Steering Wheel
Adjustment
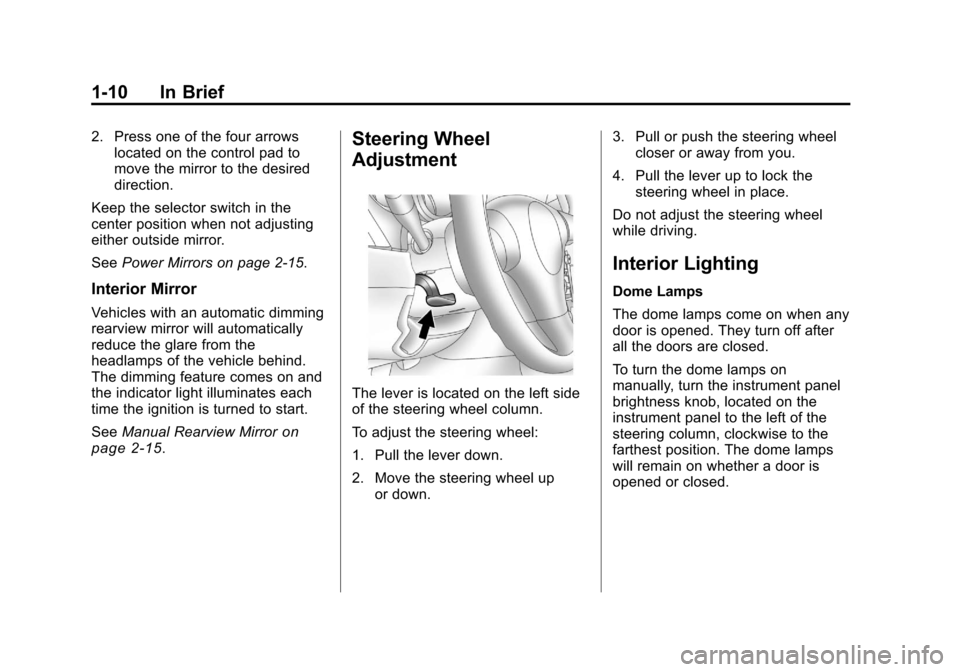
The lever is located on the left side
of the steering wheel column.
To adjust the steering wheel:
1. Pull the lever down.
2. Move the steering wheel up or down. 3. Pull or push the steering wheel
closer or away from you.
4. Pull the lever up to lock the steering wheel in place.
Do not adjust the steering wheel
while driving.
Interior Lighting
Dome Lamps
The dome lamps come on when any
door is opened. They turn off after
all the doors are closed.
To turn the dome lamps on
manually, turn the instrument panel
brightness knob, located on the
instrument panel to the left of the
steering column, clockwise to the
farthest position. The dome lamps
will remain on whether a door is
opened or closed.
Page 17 of 382
Black plate (11,1)Chevrolet Malibu Owner Manual - 2011
In Brief 1-11
Reading Lamps
The front reading lamps are located
in the front overhead console. The
rear reading lamps are near the
dome lamp overhead near the rear
passenger seats.
For vehicles with front and/or rear
reading lamps, press the lens to
turn the lamp on and off, while the
doors are closed. These lamps
come on automatically when any
door is opened.
For more information on interior
lighting, see:
.Instrument Panel Illumination
Control on page 6‑5.
.Entry/Exit Lighting on page 6‑6.
.Parade Dimming on page 6‑6.
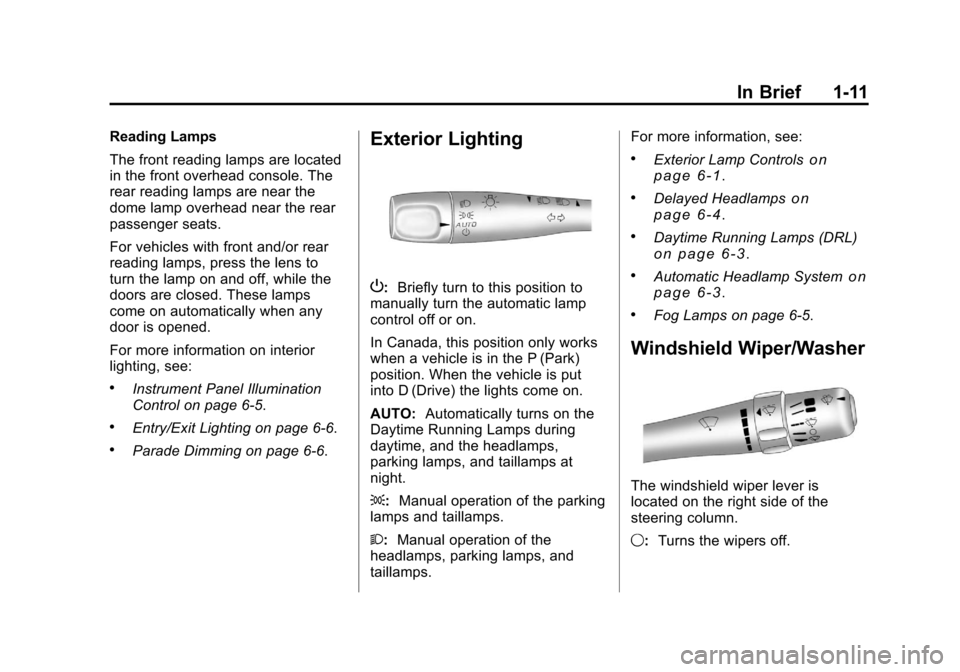
Exterior Lighting
P:Briefly turn to this position to
manually turn the automatic lamp
control off or on.
In Canada, this position only works
when a vehicle is in the P (Park)
position. When the vehicle is put
into D (Drive) the lights come on.
AUTO: Automatically turns on the
Daytime Running Lamps during
daytime, and the headlamps,
parking lamps, and taillamps at
night.
;: Manual operation of the parking
lamps and taillamps.
2: Manual operation of the
headlamps, parking lamps, and
taillamps. For more information, see:
.Exterior Lamp Controlson
page 6‑1.
.Delayed Headlampson
page 6‑4.
.Daytime Running Lamps (DRL)on page 6‑3.
.Automatic Headlamp Systemon
page 6‑3.
.Fog Lamps on page 6‑5.
Windshield Wiper/Washer
The windshield wiper lever is
located on the right side of the
steering column.
9: Turns the wipers off.
Page 32 of 382
Black plate (4,1)Chevrolet Malibu Owner Manual - 2011
2-4 Keys, Doors and Windows
The high‐beam headlamps, parking
lamps, and back‐up lamps may
come on each time
Kis pressed.
See “EXT (Exterior) LIGHTS” under
Vehicle Personalization
on
page 5‑31for additional
information.
Pressing
Kon the RKE transmitter
disarms the anti-theft alarm system.
See Anti-Theft Alarm System
on
page 2‑12.
V(Remote Trunk Release):
Press and hold for about
one second to unlock the trunk.
The trunk can be opened with the
transmitter when the vehicle speed
is less than 3 km/h (2 mph) or when
the ignition is off.
L(Vehicle Locator/Panic
Alarm): Press and release to
locate the vehicle. The horn sounds
three times and the headlamps and
turn signals flash three times.
Press and hold
Lfor more than
two seconds to initiate the panic
alarm. The horn sounds and the headlamps and turn signals flash
for 30 seconds. Press
Lagain to
cancel the panic alarm.
Programming Transmitters to
the Vehicle
Only RKE transmitters programmed
to the vehicle will work. If a
transmitter is lost or stolen, a
replacement can be purchased and
programmed through your dealer.
When the replacement transmitter is
programmed to the vehicle, all
remaining transmitters must also be
programmed. Any lost or stolen
transmitters no longer work once the
new transmitter is programmed.
Each vehicle can have up to four
transmitters programmed to it.
Battery Replacement
Replace the battery if the KEY FOB
BATT (Battery) LOW message
displays in the DIC. See “KEY FOB
BATT (Battery) LOW” underKey
and Lock Messages
on page 5‑28for additional information. Notice:
When replacing the
battery, do not touch any of the
circuitry on the transmitter. Static
from your body could damage the
transmitter.
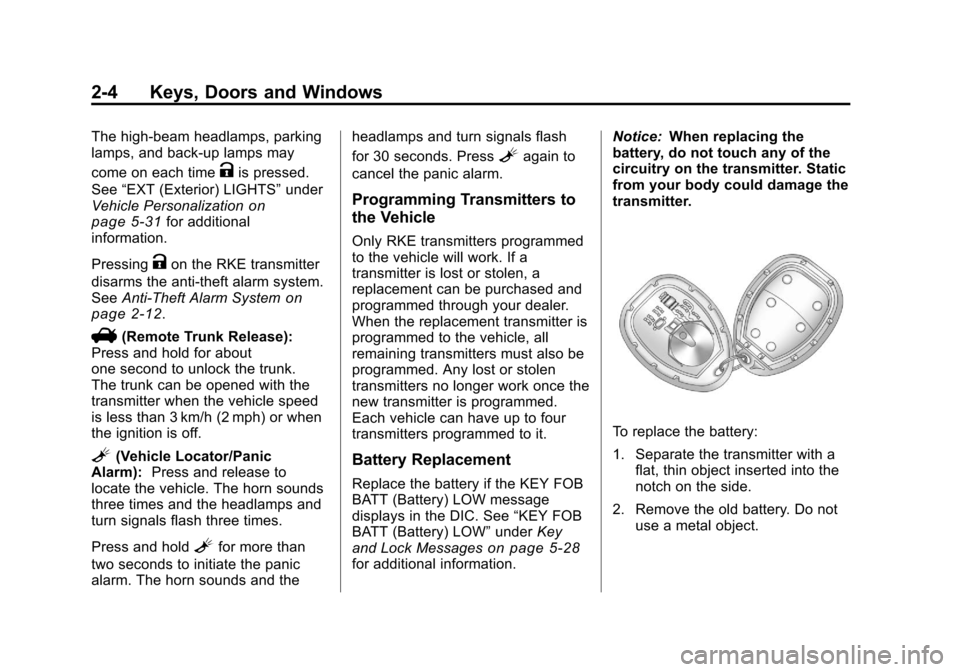
To replace the battery:
1. Separate the transmitter with a flat, thin object inserted into the
notch on the side.
2. Remove the old battery. Do not use a metal object.
Page 43 of 382
Black plate (15,1)Chevrolet Malibu Owner Manual - 2011
Keys, Doors and Windows 2-15
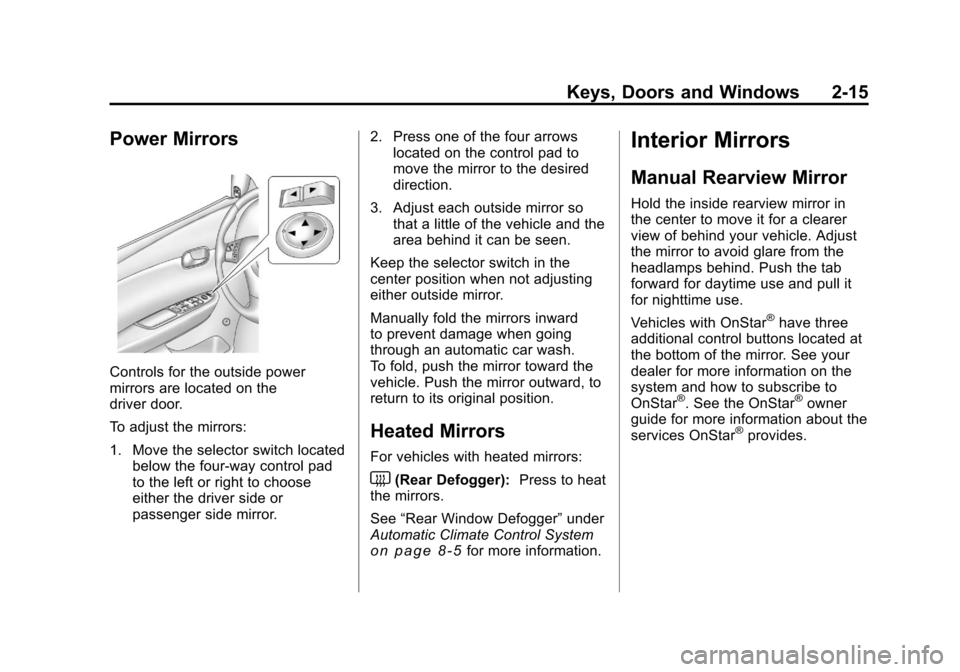
Power Mirrors
Controls for the outside power
mirrors are located on the
driver door.
To adjust the mirrors:
1. Move the selector switch locatedbelow the four-way control pad
to the left or right to choose
either the driver side or
passenger side mirror. 2. Press one of the four arrows
located on the control pad to
move the mirror to the desired
direction.
3. Adjust each outside mirror so that a little of the vehicle and the
area behind it can be seen.
Keep the selector switch in the
center position when not adjusting
either outside mirror.
Manually fold the mirrors inward
to prevent damage when going
through an automatic car wash.
To fold, push the mirror toward the
vehicle. Push the mirror outward, to
return to its original position.
Heated Mirrors
For vehicles with heated mirrors:
<(Rear Defogger): Press to heat
the mirrors.
See “Rear Window Defogger” under
Automatic Climate Control System
on page 8‑5for more information.
Interior Mirrors
Manual Rearview Mirror
Hold the inside rearview mirror in
the center to move it for a clearer
view of behind your vehicle. Adjust
the mirror to avoid glare from the
headlamps behind. Push the tab
forward for daytime use and pull it
for nighttime use.
Vehicles with OnStar
®have three
additional control buttons located at
the bottom of the mirror. See your
dealer for more information on the
system and how to subscribe to
OnStar
®. See the OnStar®owner
guide for more information about the
services OnStar
®provides.
Page 114 of 382
Black plate (4,1)Chevrolet Malibu Owner Manual - 2011
5-4 Instruments and Controls
Windshield Wiper/Washer
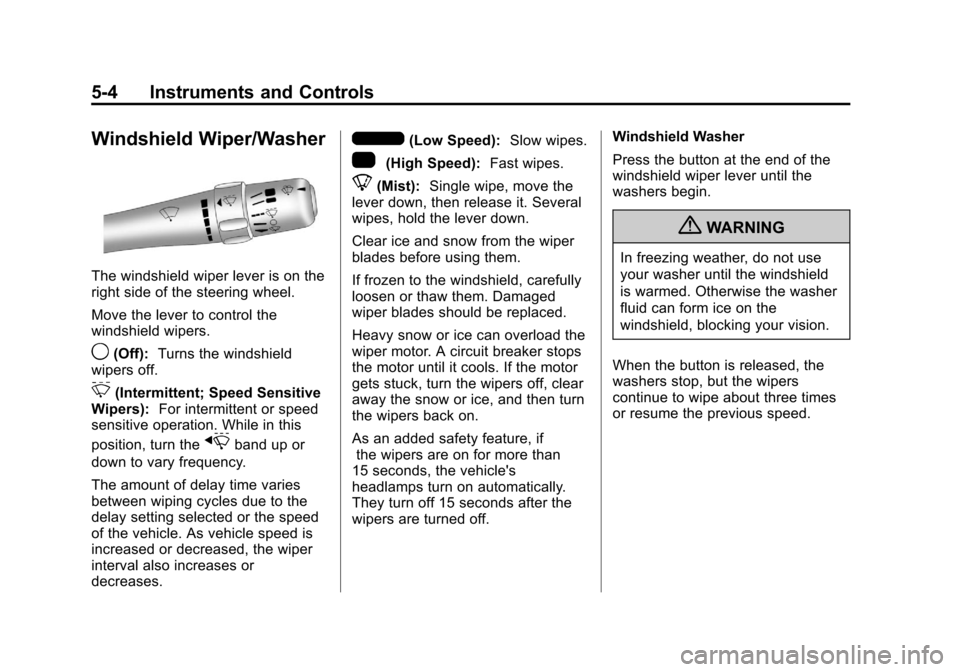
The windshield wiper lever is on the
right side of the steering wheel.
Move the lever to control the
windshield wipers.
9(Off):Turns the windshield
wipers off.
&(Intermittent; Speed Sensitive
Wipers): For intermittent or speed
sensitive operation. While in this
position, turn the
xband up or
down to vary frequency.
The amount of delay time varies
between wiping cycles due to the
delay setting selected or the speed
of the vehicle. As vehicle speed is
increased or decreased, the wiper
interval also increases or
decreases.
6(Low Speed): Slow wipes.
1(High Speed): Fast wipes.
8(Mist):Single wipe, move the
lever down, then release it. Several
wipes, hold the lever down.
Clear ice and snow from the wiper
blades before using them.
If frozen to the windshield, carefully
loosen or thaw them. Damaged
wiper blades should be replaced.
Heavy snow or ice can overload the
wiper motor. A circuit breaker stops
the motor until it cools. If the motor
gets stuck, turn the wipers off, clear
away the snow or ice, and then turn
the wipers back on.
As an added safety feature, if
the wipers are on for more than
15 seconds, the vehicle's
headlamps turn on automatically.
They turn off 15 seconds after the
wipers are turned off. Windshield Washer
Press the button at the end of the
windshield wiper lever until the
washers begin.
{WARNING
In freezing weather, do not use
your washer until the windshield
is warmed. Otherwise the washer
fluid can form ice on the
windshield, blocking your vision.
When the button is released, the
washers stop, but the wipers
continue to wipe about three times
or resume the previous speed.
Page 133 of 382
Black plate (23,1)Chevrolet Malibu Owner Manual - 2011
Instruments and Controls 5-23
High-Beam on Light
The high-beam on light comes on
when the high-beam headlamps are
in use.
SeeHeadlamp High/Low-Beam
Changer
on page 6‑2for more
information.
Cruise Control Light
The cruise control light comes on
whenever the cruise control is set.
The light goes out when the cruise
control is turned off. See Cruise
Control
on page 9‑34for more
information.
Information Displays
Driver Information
Center (DIC)
Your vehicle has a Driver
Information Center (DIC). The DIC
display gives you the status of many
of your vehicle's systems. The DIC
is also used to display driver
personalization menu modes and
warning/status messages. All
messages will appear in the DIC
display, located at the bottom of the
instrument panel cluster.
Page 138 of 382
Black plate (28,1)Chevrolet Malibu Owner Manual - 2011
5-28 Instruments and Controls
Fuel System Messages
CHECK GAS CAP
This message displays if the fuel
cap has not been fully tightened.
Recheck the fuel cap to make sure
that it is on properly. A few driving
trips with the cap properly installed
should turn the message off.
LOW FUEL
This message displays when your
vehicle is low on fuel. Refill the fuel
tank as soon as possible. SeeFuel
Gauge
on page 5‑11, Fuelon
page 9‑37, and Filling the Tankon
page 9‑41for more information.
Key and Lock Messages
KEY FOB BATT (Battery) LOW
This message displays if the
Remote Keyless Entry (RKE)
transmitter battery is low. Replace
the battery in the transmitter. See
“Battery Replacement” under
Remote Keyless Entry (RKE)
System Operation on page 2‑3.
Lamp Messages
AUTO (Automatic)
LIGHTS OFF
This message displays if the
automatic headlamp system is
disabled with the headlamp switch.
See Automatic Headlamp System
on page 6‑3for more information.
AUTO (Automatic) LIGHTS ON
This message displays if the
automatic headlamp system is
enabled with the headlamp switch.
SeeAutomatic Headlamp System
on page 6‑3for more information.
Ride Control System
Messages
ESC (Electronic Stability
Control) ACTIVE
If your vehicle has Electronic
Stability Control (ESC), this
message displays and the ESC/TCS
light on the instrument panel cluster
flashes when ESC is assisting you with directional control of the
vehicle. You may feel or hear the
system working and see this
message displayed in the DIC.
Slippery road conditions may exist
when this message is displayed, so
adjust your driving accordingly. This
message may stay on for a few
seconds after ESC stops assisting
you with directional control of the
vehicle. This is normal when the
system is operating. See
Electronic
Stability Control (ESC)
on
page 9‑32and Electronic Stability
Control (ESC)/Traction Control
System (TCS) Indicator/Warning
Light
on page 5‑20for more
information.
ESC (Electronic Stability
Control) OFF
If your vehicle has Electronic
Stability Control (ESC), this
message displays and the ESC/TCS
light on the instrument panel cluster
comes on solid when ESC is turned
off. Adjust your driving accordingly.
Page 141 of 382
Black plate (31,1)Chevrolet Malibu Owner Manual - 2011
Instruments and Controls 5-31
Vehicle Reminder
Messages
ICE POSSIBLE
This message displays when the
outside air temperature is cold
enough to create icy road
conditions. Adjust your driving
accordingly.
Washer Fluid Messages
LOW WASHER FLUID
This message displays when the
vehicle's windshield washer fluid is
low. Fill the windshield washer fluid
reservoir to the proper level as soon
as possible. SeeWasher Fluid
on
page 10‑22.
Vehicle
Personalization
Your vehicle has personalization
capabilities that allow you to
program certain features to a
preferred setting. All of the features
listed may not be available on your
vehicle. Only the features available
will be displayed on the DIC.
The default settings for the features
were set when your vehicle left the
factory, but may have been changed
from their default state since
that time. To change feature settings, use the
following procedure:Entering Personalization Menu
1. Turn the ignition on while the
vehicle is stopped.
To avoid excessive drain on the
battery, it is recommended that
the headlamps are turned off.
2. Press and hold the information and reset buttons at the same
time for one second, then
release to enter the
personalization menu.
If the vehicle speed is greater
than 3 km/h (2 mph), only the
UNITS menu will be accessible.