window CHEVROLET MALIBU 2011 7.G Owners Manual
[x] Cancel search | Manufacturer: CHEVROLET, Model Year: 2011, Model line: MALIBU, Model: CHEVROLET MALIBU 2011 7.GPages: 382, PDF Size: 5.81 MB
Page 1 of 382

Black plate (1,1)Chevrolet Malibu Owner Manual - 2011
2011 Chevrolet Malibu Owner ManualM
In Brief. . . . . . . . . . . . . . . . . . . . . . . . 1-1
Instrument Panel . . . . . . . . . . . . . . 1-2
Initial Drive Information . . . . . . . . 1-4
Vehicle Features . . . . . . . . . . . . . 1-14
Performance and Maintenance . . . . . . . . . . . . . . . . 1-18
Keys, Doors and Windows . . . 2-1
Keys and Locks . . . . . . . . . . . . . . . 2-2
Doors . . . . . . . . . . . . . . . . . . . . . . . . 2-10
Vehicle Security . . . . . . . . . . . . . . 2-12
Exterior Mirrors . . . . . . . . . . . . . . . 2-14
Interior Mirrors . . . . . . . . . . . . . . . . 2-15
Windows . . . . . . . . . . . . . . . . . . . . . 2-16
Roof . . . . . . . . . . . . . . . . . . . . . . . . . . 2-19
Seats and Restraints . . . . . . . . . 3-1
Head Restraints . . . . . . . . . . . . . . . 3-2
Front Seats . . . . . . . . . . . . . . . . . . . . 3-3
Rear Seats . . . . . . . . . . . . . . . . . . . . 3-7
Safety Belts . . . . . . . . . . . . . . . . . . . . 3-8
Airbag System . . . . . . . . . . . . . . . . 3-23
Child Restraints . . . . . . . . . . . . . . 3-38 Storage
. . . . . . . . . . . . . . . . . . . . . . . 4-1
Storage Compartments . . . . . . . . 4-1
Additional Storage Features . . . 4-2
Instruments and Controls . . . . 5-1
Controls . . . . . . . . . . . . . . . . . . . . . . . 5-2
Warning Lights, Gauges, and
Indicators . . . . . . . . . . . . . . . . . . . . 5-9
Information Displays . . . . . . . . . . 5-23
Vehicle Messages . . . . . . . . . . . . 5-26
Vehicle Personalization . . . . . . . 5-31
Lighting . . . . . . . . . . . . . . . . . . . . . . . 6-1
Exterior Lighting . . . . . . . . . . . . . . . 6-1
Interior Lighting . . . . . . . . . . . . . . . . 6-5
Lighting Features . . . . . . . . . . . . . . 6-6
Infotainment System . . . . . . . . . 7-1
Introduction . . . . . . . . . . . . . . . . . . . . 7-1
Radio . . . . . . . . . . . . . . . . . . . . . . . . . . 7-6
Audio Players . . . . . . . . . . . . . . . . 7-14
Phone . . . . . . . . . . . . . . . . . . . . . . . . 7-23 Climate Controls
. . . . . . . . . . . . . 8-1
Climate Control Systems . . . . . . 8-1
Air Vents . . . . . . . . . . . . . . . . . . . . . . . 8-9
Driving and Operating . . . . . . . . 9-1
Driving Information . . . . . . . . . . . . . 9-2
Starting and Operating . . . . . . . 9-17
Engine Exhaust . . . . . . . . . . . . . . 9-24
Automatic Transmission . . . . . . 9-25
Brakes . . . . . . . . . . . . . . . . . . . . . . . 9-28
Ride Control Systems . . . . . . . . 9-30
Cruise Control . . . . . . . . . . . . . . . . 9-34
Fuel . . . . . . . . . . . . . . . . . . . . . . . . . . 9-37
Towing . . . . . . . . . . . . . . . . . . . . . . . 9-43
Conversions and Add-Ons . . . 9-48
Vehicle Care . . . . . . . . . . . . . . . . . 10-1
General Information . . . . . . . . . . 10-2
Vehicle Checks . . . . . . . . . . . . . . . 10-4
Headlamp Aiming . . . . . . . . . . . 10-27
Bulb Replacement . . . . . . . . . . 10-28
Electrical System . . . . . . . . . . . . 10-30
Wheels and Tires . . . . . . . . . . . 10-38
Jump Starting . . . . . . . . . . . . . . . 10-78
Towing . . . . . . . . . . . . . . . . . . . . . . 10-83
Appearance Care . . . . . . . . . . . 10-85
Page 7 of 382
Black plate (1,1)Chevrolet Malibu Owner Manual - 2011
In Brief 1-1
In Brief
Instrument Panel
Instrument Panel . . . . . . . . . . . . . . 1-2
Initial Drive Information
Initial Drive Information . . . . . . . . 1-4
Remote Keyless Entry (RKE)System . . . . . . . . . . . . . . . . . . . . . . 1-4
Remote Vehicle Start . . . . . . . . . 1-4
Door Locks . . . . . . . . . . . . . . . . . . . 1-5
Trunk Release . . . . . . . . . . . . . . . . 1-5
Windows . . . . . . . . . . . . . . . . . . . . . . 1-6
Seat Adjustment . . . . . . . . . . . . . . 1-6
Second Row Seats . . . . . . . . . . . 1-7
Heated Seats . . . . . . . . . . . . . . . . . 1-8
Head Restraint Adjustment . . . . 1-8
Safety Belt . . . . . . . . . . . . . . . . . . . . 1-8
Sensing System for Passenger Airbag . . . . . . . . . . . . . . . . . . . . . . . 1-9 Mirror Adjustment . . . . . . . . . . . . . 1-9
Steering Wheel
Adjustment . . . . . . . . . . . . . . . . . 1-10
Interior Lighting . . . . . . . . . . . . . . 1-10
Exterior Lighting . . . . . . . . . . . . . 1-11
Windshield Wiper/Washer . . . . 1-11
Climate Controls . . . . . . . . . . . . . 1-12
Transmission . . . . . . . . . . . . . . . . 1-13
Vehicle Features
Radio(s) . . . . . . . . . . . . . . . . . . . . . 1-14
Satellite Radio . . . . . . . . . . . . . . . 1-15
Portable Audio Devices (Auxiliary Input or
USB Port) . . . . . . . . . . . . . . . . . . 1-15
Bluetooth
®. . . . . . . . . . . . . . . . . . . 1-16
Steering Wheel Controls . . . . . 1-16
Cruise Control . . . . . . . . . . . . . . . 1-16
Driver Information
Center (DIC) . . . . . . . . . . . . . . . 1-17
Power Outlets . . . . . . . . . . . . . . . 1-18
Performance and Maintenance
Traction Control System (TCS) . . . . . . . . . . . . . . 1-18
Electronic Stability Control (ESC) . . . . . . . . . . . . . . 1-18
Tire Pressure Monitor . . . . . . . . 1-19
Tire Sealant and
Compressor Kit . . . . . . . . . . . . . 1-19
Engine Oil Life System . . . . . . 1-19
Fuel E85 (85% Ethanol) . . . . . 1-20
Driving for Better Fuel Economy . . . . . . . . . . . . . . . . . . . 1-20
Roadside Assistance Program . . . . . . . . . . . . . . . . . . . . 1-20
OnStar
®. . . . . . . . . . . . . . . . . . . . . 1-21
Page 12 of 382
Black plate (6,1)Chevrolet Malibu Owner Manual - 2011
1-6 In Brief
Windows
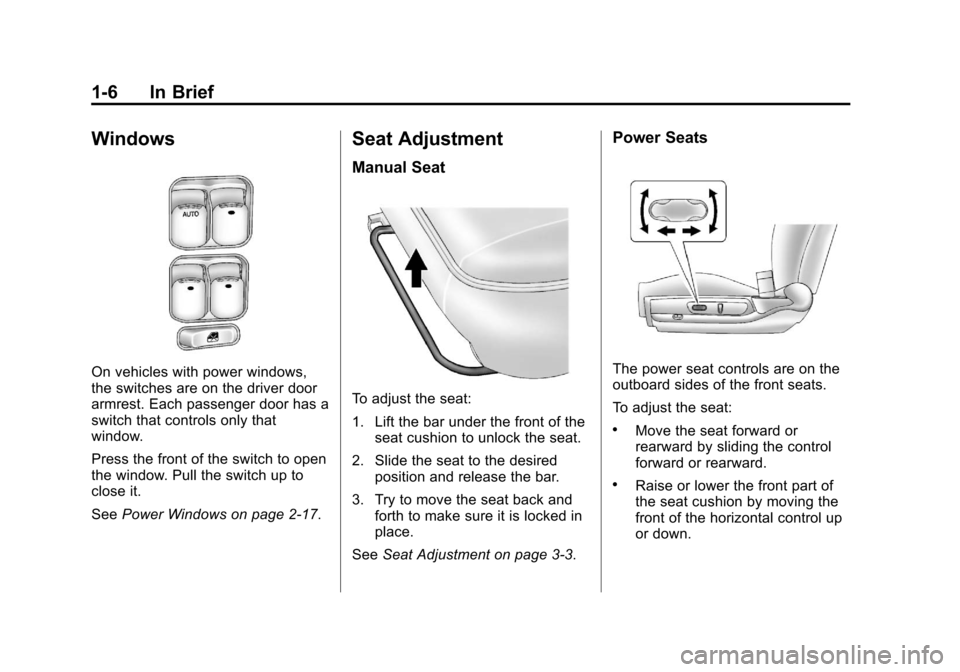
On vehicles with power windows,
the switches are on the driver door
armrest. Each passenger door has a
switch that controls only that
window.
Press the front of the switch to open
the window. Pull the switch up to
close it.
SeePower Windows on page 2‑17.
Seat Adjustment
Manual Seat
To adjust the seat:
1. Lift the bar under the front of the
seat cushion to unlock the seat.
2. Slide the seat to the desired position and release the bar.
3. Try to move the seat back and forth to make sure it is locked in
place.
See Seat Adjustment on page 3‑3.
Power Seats
The power seat controls are on the
outboard sides of the front seats.
To adjust the seat:
.Move the seat forward or
rearward by sliding the control
forward or rearward.
.Raise or lower the front part of
the seat cushion by moving the
front of the horizontal control up
or down.
Page 18 of 382
Black plate (12,1)Chevrolet Malibu Owner Manual - 2011
1-12 In Brief
&:For intermittent or speed
sensitive operation. While in this
position, turn the
xband up or
down to vary frequency.
The amount of delay time varies
between wiping cycles due to the
delay setting selected or the speed
of the vehicle. As vehicle speed is
increased or decreased, the wiper
interval also increases or
decreases.
6 :Slow wipes.
1 :Fast wipes.
8: Use for a single wiping cycle.
Windshield Washer: Press the
button at the end of the lever until
the washers begin.
See Windshield Wiper/Washer
on
page 5‑4.
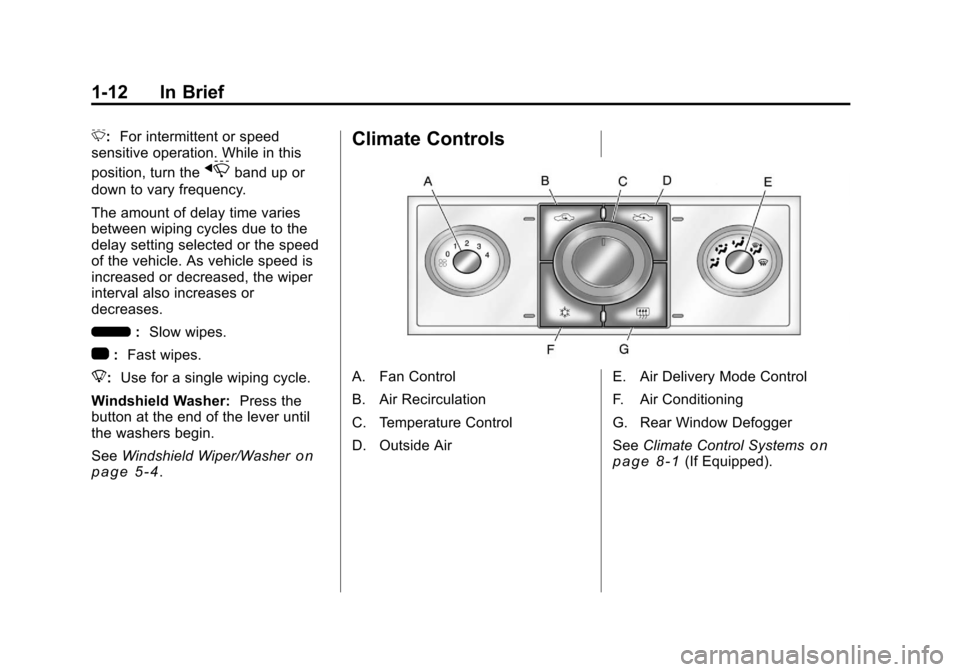
Climate Controls
A. Fan Control
B. Air Recirculation
C. Temperature Control
D. Outside Air E. Air Delivery Mode Control
F. Air Conditioning
G. Rear Window Defogger
See
Climate Control Systems
on
page 8‑1(If Equipped).
Page 19 of 382
Black plate (13,1)Chevrolet Malibu Owner Manual - 2011
In Brief 1-13
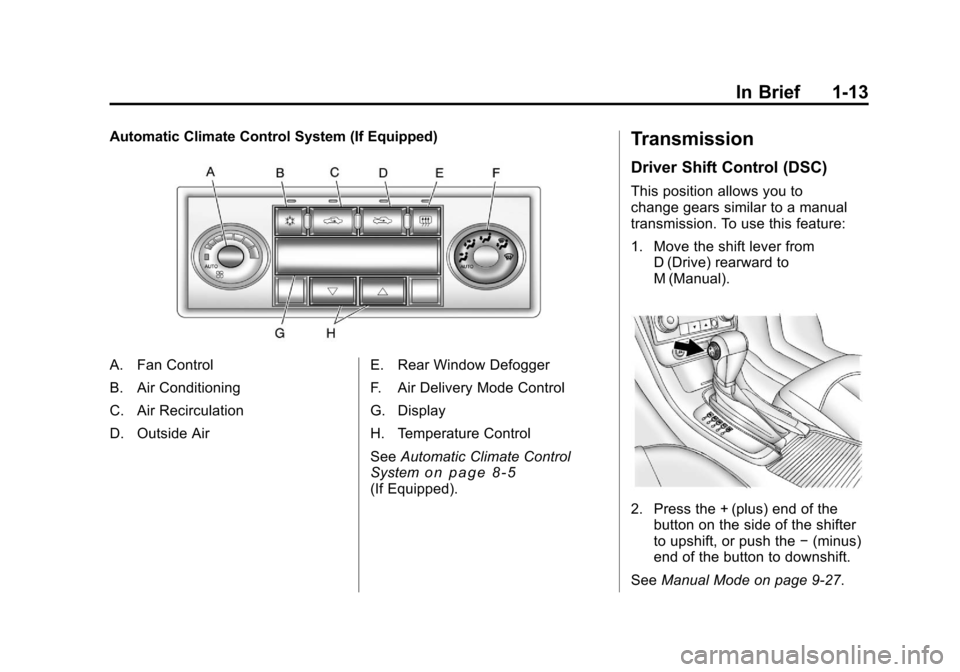
Automatic Climate Control System (If Equipped)
A. Fan Control
B. Air Conditioning
C. Air Recirculation
D. Outside AirE. Rear Window Defogger
F. Air Delivery Mode Control
G. Display
H. Temperature Control
See
Automatic Climate Control
System
on page 8‑5(If Equipped).
Transmission
Driver Shift Control (DSC)
This position allows you to
change gears similar to a manual
transmission. To use this feature:
1. Move the shift lever from D (Drive) rearward to
M (Manual).
2. Press the + (plus) end of thebutton on the side of the shifter
to upshift, or push the −(minus)
end of the button to downshift.
See Manual Mode on page 9‑27.
Page 29 of 382
Black plate (1,1)Chevrolet Malibu Owner Manual - 2011
Keys, Doors and Windows 2-1
Keys, Doors and
Windows
Keys and Locks
Keys . . . . . . . . . . . . . . . . . . . . . . . . . . 2-2
Remote Keyless Entry (RKE)System . . . . . . . . . . . . . . . . . . . . . . 2-2
Remote Keyless Entry (RKE) System Operation . . . . . . . . . . . 2-3
Remote Vehicle Start . . . . . . . . . 2-5
Door Locks . . . . . . . . . . . . . . . . . . . 2-7
Power Door Locks . . . . . . . . . . . . 2-8
Door Ajar Reminder . . . . . . . . . . . 2-8
Delayed Locking . . . . . . . . . . . . . . 2-8
Automatic Door Locks . . . . . . . . . 2-9
Lockout Protection . . . . . . . . . . . . 2-9
Safety Locks . . . . . . . . . . . . . . . . . . 2-9
Doors
Trunk . . . . . . . . . . . . . . . . . . . . . . . . 2-10
Vehicle Security
Vehicle Security . . . . . . . . . . . . . . 2-12
Anti-Theft Alarm System . . . . . 2-12
Immobilizer . . . . . . . . . . . . . . . . . . 2-13
Immobilizer Operation . . . . . . . 2-13
Exterior Mirrors
Convex Mirrors . . . . . . . . . . . . . . 2-14
Power Mirrors . . . . . . . . . . . . . . . . 2-15
Heated Mirrors . . . . . . . . . . . . . . . 2-15
Interior Mirrors
Manual Rearview Mirror . . . . . . 2-15
Automatic Dimming Rearview Mirror . . . . . . . . . . . . . . . . . . . . . . . 2-16
Windows
Windows . . . . . . . . . . . . . . . . . . . . . 2-16
Power Windows . . . . . . . . . . . . . 2-17
Sun Visors . . . . . . . . . . . . . . . . . . . 2-19
Roof
Sunroof . . . . . . . . . . . . . . . . . . . . . . 2-19
Page 30 of 382
Black plate (2,1)Chevrolet Malibu Owner Manual - 2011
2-2 Keys, Doors and Windows
Keys and Locks
Keys
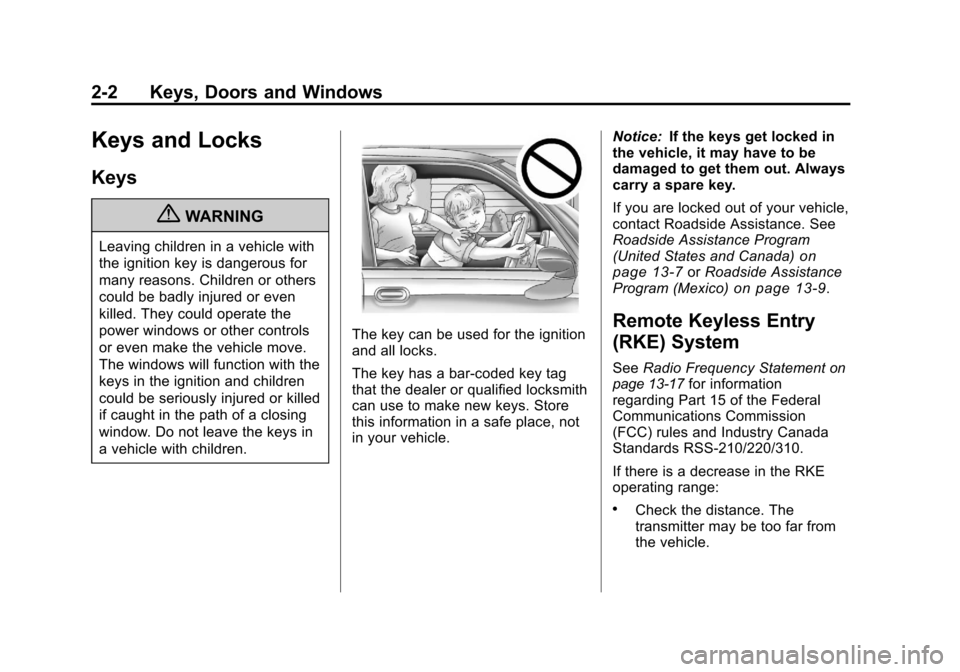
{WARNING
Leaving children in a vehicle with
the ignition key is dangerous for
many reasons. Children or others
could be badly injured or even
killed. They could operate the
power windows or other controls
or even make the vehicle move.
The windows will function with the
keys in the ignition and children
could be seriously injured or killed
if caught in the path of a closing
window. Do not leave the keys in
a vehicle with children.
The key can be used for the ignition
and all locks.
The key has a bar-coded key tag
that the dealer or qualified locksmith
can use to make new keys. Store
this information in a safe place, not
in your vehicle.Notice:
If the keys get locked in
the vehicle, it may have to be
damaged to get them out. Always
carry a spare key.
If you are locked out of your vehicle,
contact Roadside Assistance. See
Roadside Assistance Program
(United States and Canada)
on
page 13‑7or Roadside Assistance
Program (Mexico)on page 13‑9.
Remote Keyless Entry
(RKE) System
See Radio Frequency Statementon
page 13‑17for information
regarding Part 15 of the Federal
Communications Commission
(FCC) rules and Industry Canada
Standards RSS-210/220/310.
If there is a decrease in the RKE
operating range:
.Check the distance. The
transmitter may be too far from
the vehicle.
Page 31 of 382
Black plate (3,1)Chevrolet Malibu Owner Manual - 2011
Keys, Doors and Windows 2-3
.Check the location. Other
vehicles or objects may be
blocking the signal.
.Check the transmitter's battery.
See“Battery Replacement” later
in this section.
.If the transmitter is still not
working correctly, see your
dealer or a qualified technician
for service.
Remote Keyless Entry
(RKE) System Operation
The Remote Keyless Entry (RKE)
transmitter functions work up to
60 m (195 feet) away from the
vehicle.
Keep in mind that other conditions,
such as those previously stated, can
impact the performance of the
transmitter.
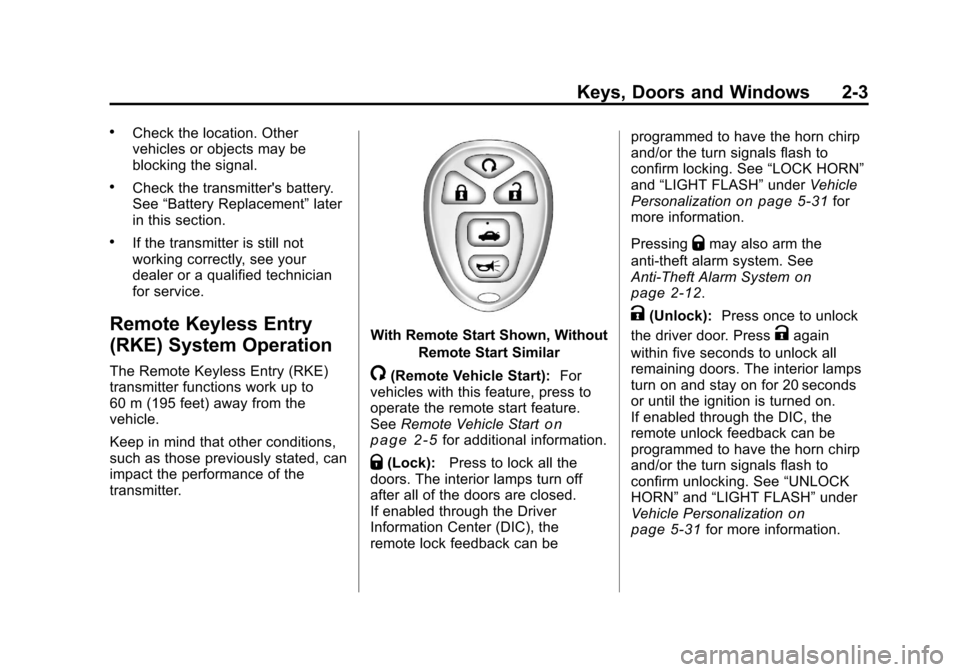
With Remote Start Shown, Without
Remote Start Similar
/(Remote Vehicle Start): For
vehicles with this feature, press to
operate the remote start feature.
See Remote Vehicle Start
on
page 2‑5for additional information.
Q(Lock): Press to lock all the
doors. The interior lamps turn off
after all of the doors are closed.
If enabled through the Driver
Information Center (DIC), the
remote lock feedback can be programmed to have the horn chirp
and/or the turn signals flash to
confirm locking. See
“LOCK HORN”
and “LIGHT FLASH” underVehicle
Personalization
on page 5‑31for
more information.
Pressing
Qmay also arm the
anti-theft alarm system. See
Anti-Theft Alarm System
on
page 2‑12.
K(Unlock): Press once to unlock
the driver door. Press
Kagain
within five seconds to unlock all
remaining doors. The interior lamps
turn on and stay on for 20 seconds
or until the ignition is turned on.
If enabled through the DIC, the
remote unlock feedback can be
programmed to have the horn chirp
and/or the turn signals flash to
confirm unlocking. See “UNLOCK
HORN” and“LIGHT FLASH” under
Vehicle Personalization
on
page 5‑31for more information.
Page 32 of 382
Black plate (4,1)Chevrolet Malibu Owner Manual - 2011
2-4 Keys, Doors and Windows
The high‐beam headlamps, parking
lamps, and back‐up lamps may
come on each time
Kis pressed.
See “EXT (Exterior) LIGHTS” under
Vehicle Personalization
on
page 5‑31for additional
information.
Pressing
Kon the RKE transmitter
disarms the anti-theft alarm system.
See Anti-Theft Alarm System
on
page 2‑12.
V(Remote Trunk Release):
Press and hold for about
one second to unlock the trunk.
The trunk can be opened with the
transmitter when the vehicle speed
is less than 3 km/h (2 mph) or when
the ignition is off.
L(Vehicle Locator/Panic
Alarm): Press and release to
locate the vehicle. The horn sounds
three times and the headlamps and
turn signals flash three times.
Press and hold
Lfor more than
two seconds to initiate the panic
alarm. The horn sounds and the headlamps and turn signals flash
for 30 seconds. Press
Lagain to
cancel the panic alarm.
Programming Transmitters to
the Vehicle
Only RKE transmitters programmed
to the vehicle will work. If a
transmitter is lost or stolen, a
replacement can be purchased and
programmed through your dealer.
When the replacement transmitter is
programmed to the vehicle, all
remaining transmitters must also be
programmed. Any lost or stolen
transmitters no longer work once the
new transmitter is programmed.
Each vehicle can have up to four
transmitters programmed to it.
Battery Replacement
Replace the battery if the KEY FOB
BATT (Battery) LOW message
displays in the DIC. See “KEY FOB
BATT (Battery) LOW” underKey
and Lock Messages
on page 5‑28for additional information. Notice:
When replacing the
battery, do not touch any of the
circuitry on the transmitter. Static
from your body could damage the
transmitter.
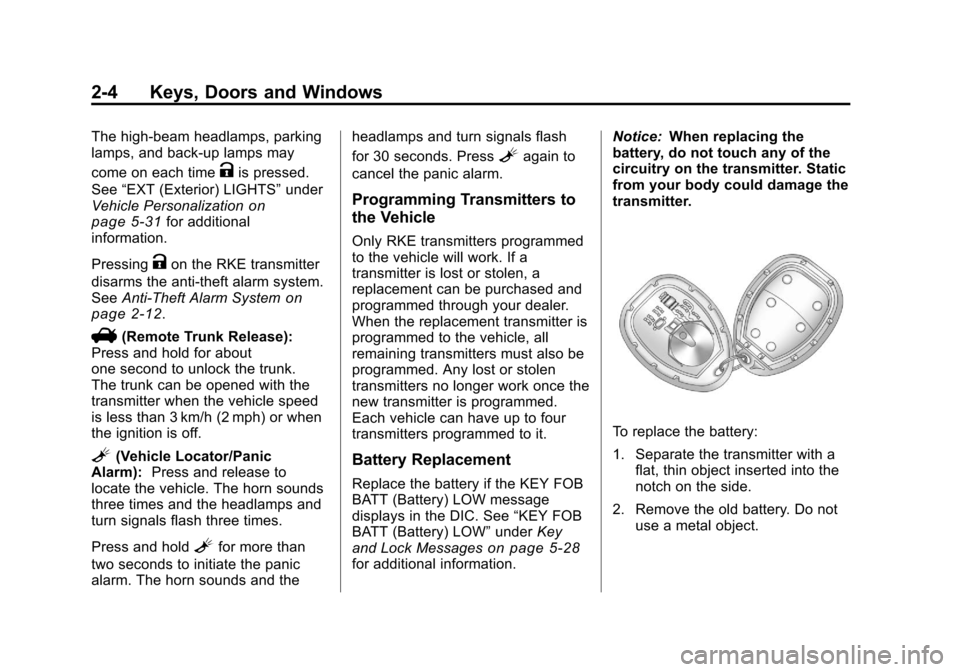
To replace the battery:
1. Separate the transmitter with a flat, thin object inserted into the
notch on the side.
2. Remove the old battery. Do not use a metal object.
Page 33 of 382
Black plate (5,1)Chevrolet Malibu Owner Manual - 2011
Keys, Doors and Windows 2-5
3. Insert the new battery, positiveside facing up. Replace with a
CR2032 or equivalent battery.
4. Snap the transmitter back together.
Remote Vehicle Start
Your vehicle may have a remote
starting feature that allows you to
start the engine from outside the
vehicle. It may also start the
vehicle's heating or air conditioning
systems and rear window defogger.
When the remote start system is
active and the vehicle has an
automatic climate control system, it
will automatically regulate the inside
temperature. Normal operation of
these systems will return after the
ignition key is turned to ON/RUN.
Laws in some communities may
restrict the use of remote starters.
For example, some laws may
require a person using remote start to have the vehicle in view when
doing so. Check local regulations for
any requirements on remote starting
of vehicles.
Do not use the remote start feature
if your vehicle is low on fuel. Your
vehicle may run out of fuel.
If your vehicle has the remote start
feature, the RKE transmitter
functions will have an increased
range of operation. However, the
range may be less while the vehicle
is running.
There are other conditions which
can affect the performance of the
transmitter, see
Remote Keyless
Entry (RKE) System
on page 2‑2for additional information.
/ (Remote Start): This button will
be on the RKE transmitter if the
vehicle has remote start. To start the vehicle using the remote
start feature:
1. Aim the transmitter at the
vehicle.
2. Press and release the transmitter's lock button, then
immediately press and hold the
transmitter's remote start button
for about four seconds or until
the vehicle's turn signal lamps
flash. The doors will lock.
When the vehicle starts, the
parking lamps turn on and
remain on while the engine is
running.
The remote start feature provides
two separate starts per ignition
cycle, each with 10 minutes of
engine running time, or one start
with a time extension. The first start
must expire or be canceled to get
two separate 10 minute starts.