climate control CHEVROLET MALIBU 2012 7.G Owners Manual
[x] Cancel search | Manufacturer: CHEVROLET, Model Year: 2012, Model line: MALIBU, Model: CHEVROLET MALIBU 2012 7.GPages: 398, PDF Size: 6.06 MB
Page 1 of 398

Black plate (1,1)Chevrolet Malibu Owner Manual - 2012
2012 Chevrolet Malibu Owner ManualM
In Brief. . . . . . . . . . . . . . . . . . . . . . . . 1-1
Instrument Panel . . . . . . . . . . . . . . 1-2
Initial Drive Information . . . . . . . . 1-4
Vehicle Features . . . . . . . . . . . . . 1-16
Performance and Maintenance . . . . . . . . . . . . . . . . 1-20
Keys, Doors, and Windows . . . . . . . . . . . . . . . . . . . . 2-1
Keys and Locks . . . . . . . . . . . . . . . 2-2
Doors . . . . . . . . . . . . . . . . . . . . . . . . . . 2-9
Vehicle Security . . . . . . . . . . . . . . 2-11
Exterior Mirrors . . . . . . . . . . . . . . . 2-13
Interior Mirrors . . . . . . . . . . . . . . . . 2-14
Windows . . . . . . . . . . . . . . . . . . . . . 2-15
Roof . . . . . . . . . . . . . . . . . . . . . . . . . . 2-18
Seats and Restraints . . . . . . . . . 3-1
Head Restraints . . . . . . . . . . . . . . . 3-2
Front Seats . . . . . . . . . . . . . . . . . . . . 3-3
Rear Seats . . . . . . . . . . . . . . . . . . . . 3-8 Safety Belts . . . . . . . . . . . . . . . . . . . . 3-9
Airbag System . . . . . . . . . . . . . . . . 3-19
Child Restraints . . . . . . . . . . . . . . 3-33
Storage . . . . . . . . . . . . . . . . . . . . . . . 4-1
Storage Compartments . . . . . . . . 4-1
Additional Storage Features . . . . . . . . . . . . . . . . . . . . . 4-3
Instruments and Controls . . . . 5-1
Controls . . . . . . . . . . . . . . . . . . . . . . . 5-2
Warning Lights, Gauges, and Indicators . . . . . . . . . . . . . . . . . . . . 5-9
Information Displays . . . . . . . . . . 5-24
Vehicle Messages . . . . . . . . . . . . 5-26
Vehicle Personalization . . . . . . . 5-31
Lighting . . . . . . . . . . . . . . . . . . . . . . . 6-1
Exterior Lighting . . . . . . . . . . . . . . . 6-1
Interior Lighting . . . . . . . . . . . . . . . . 6-5
Lighting Features . . . . . . . . . . . . . . 6-6 Infotainment System
. . . . . . . . . 7-1
Introduction . . . . . . . . . . . . . . . . . . . . 7-1
Radio . . . . . . . . . . . . . . . . . . . . . . . . . . 7-6
Audio Players . . . . . . . . . . . . . . . . 7-15
Phone . . . . . . . . . . . . . . . . . . . . . . . . 7-25
Climate Controls . . . . . . . . . . . . . 8-1
Climate Control Systems . . . . . . 8-1
Air Vents . . . . . . . . . . . . . . . . . . . . . . . 8-9
Driving and Operating . . . . . . . . 9-1
Driving Information . . . . . . . . . . . . . 9-2
Starting and Operating . . . . . . . 9-16
Engine Exhaust . . . . . . . . . . . . . . 9-23
Automatic Transmission . . . . . . 9-24
Brakes . . . . . . . . . . . . . . . . . . . . . . . 9-28
Ride Control Systems . . . . . . . . 9-30
Cruise Control . . . . . . . . . . . . . . . . 9-33
Fuel . . . . . . . . . . . . . . . . . . . . . . . . . . 9-36
Towing . . . . . . . . . . . . . . . . . . . . . . . 9-42
Conversions and Add-Ons . . . 9-48
Page 7 of 398
Black plate (1,1)Chevrolet Malibu Owner Manual - 2012
In Brief 1-1
In Brief
Instrument Panel
Instrument Panel . . . . . . . . . . . . . . 1-2
Initial Drive Information
Initial Drive Information . . . . . . . . 1-4
Remote Keyless Entry (RKE)System . . . . . . . . . . . . . . . . . . . . . . 1-4
Remote Vehicle Start . . . . . . . . . 1-4
Door Locks . . . . . . . . . . . . . . . . . . . 1-5
Trunk Release . . . . . . . . . . . . . . . . 1-5
Windows . . . . . . . . . . . . . . . . . . . . . . 1-6
Seat Adjustment . . . . . . . . . . . . . . 1-7
Second Row Seats . . . . . . . . . . . 1-9
Heated Seats . . . . . . . . . . . . . . . . . 1-9
Head Restraint Adjustment . . . . . . . . . . . . . . . . . 1-10
Safety Belts . . . . . . . . . . . . . . . . . . 1-10
Passenger Sensing System . . . . . . . . . . . . . . . . . . . . . 1-10 Mirror Adjustment . . . . . . . . . . . . 1-11
Steering Wheel
Adjustment . . . . . . . . . . . . . . . . . 1-12
Interior Lighting . . . . . . . . . . . . . . 1-12
Exterior Lighting . . . . . . . . . . . . . 1-13
Windshield Wiper/Washer . . . . 1-13
Climate Controls . . . . . . . . . . . . . 1-14
Transmission . . . . . . . . . . . . . . . . 1-15
Vehicle Features
Radio(s) . . . . . . . . . . . . . . . . . . . . . 1-16
Satellite Radio . . . . . . . . . . . . . . . 1-17
Portable Audio Devices (Auxiliary Input or
USB Port) . . . . . . . . . . . . . . . . . . 1-18
Bluetooth
®. . . . . . . . . . . . . . . . . . . 1-18
Steering Wheel Controls . . . . . 1-18
Cruise Control . . . . . . . . . . . . . . . 1-19
Driver Information
Center (DIC) . . . . . . . . . . . . . . . 1-19
Power Outlets . . . . . . . . . . . . . . . 1-20
Performance and Maintenance
Traction Control System (TCS) . . . . . . . . . . . . . . 1-20
Electronic Stability Control (ESC) . . . . . . . . . . . . . . 1-20
Tire Pressure Monitor . . . . . . . . 1-21
Tire Sealant and
Compressor Kit . . . . . . . . . . . . . 1-21
Engine Oil Life System . . . . . . 1-22
Fuel E85 (85% Ethanol) . . . . . 1-22
Driving for Better Fuel Economy . . . . . . . . . . . . . . . . . . . 1-22
Roadside Assistance Program . . . . . . . . . . . . . . . . . . . . 1-23
OnStar
®. . . . . . . . . . . . . . . . . . . . . 1-23
Page 9 of 398

Black plate (3,1)Chevrolet Malibu Owner Manual - 2012
In Brief 1-3
A.Air Vents on page 8‑9.
B. Turn and Lane‐Change Lever. See Turn and Lane-Change
Signals on page 6‑4.
C. Instrument Cluster on
page 5‑10.
D. Windshield Wiper/Washer on
page 5‑4.
E. Instrument Panel Storage on
page 4‑1.
F. Infotainment on page 7‑1.
G. Instrument Panel Illumination
Control on page 6‑5.
H. Driver Compartment Storage. See Front Storage on page 4‑2.
I. Hood Release. See Hood on
page 10‑4. J.
Cruise Control on page 9‑33.
Driver Information Center (DIC)
Buttons. See Driver Information
Center (DIC) on page 5‑24.
K. Data Link Connector (DLC) (Out of View). See Malfunction
Indicator Lamp on page 5‑16.
L. Steering Wheel Adjustment on
page 5‑2 (Out of View).
M. Horn on page 5‑3.
N. Steering Wheel Controls on
page 5‑2 (If Equipped).
O. Ignition Positions on page 9‑16.
P. Climate Control Systems on
page 8‑1 (If Equipped).
Automatic Climate Control
System on page 8‑5
(If Equipped). Q.
Hazard Warning Flashers on
page 6‑4.
R. Shift Lever. See Automatic
Transmission on page 9‑24.
S. Front Storage on page 4‑2.
Power Outlets on page 5‑7.
T. Passenger Sensing System on
page 3‑26.
U. Traction Control System (TCS)
on page 9‑30.
Page 11 of 398
Black plate (5,1)Chevrolet Malibu Owner Manual - 2012
In Brief 1-5
The doors will be locked and the
climate control system may
come on.
The engine will continue to run for
10 minutes. Repeat the steps for a
10-minute time extension. Remote
start can be extended only once.
Canceling a Remote Start
To cancel a remote start:
.Aim the RKE transmitter at the
vehicle and press and hold
/
until the parking lamps turn off.
.Turn on the hazard warning
flashers.
.Turn the ignition on and then
back off.
See Remote Vehicle Start on
page 2‑5.
Door Locks
Manual Locks
From inside the vehicle, move the
manual lock control to unlock or lock
a door.
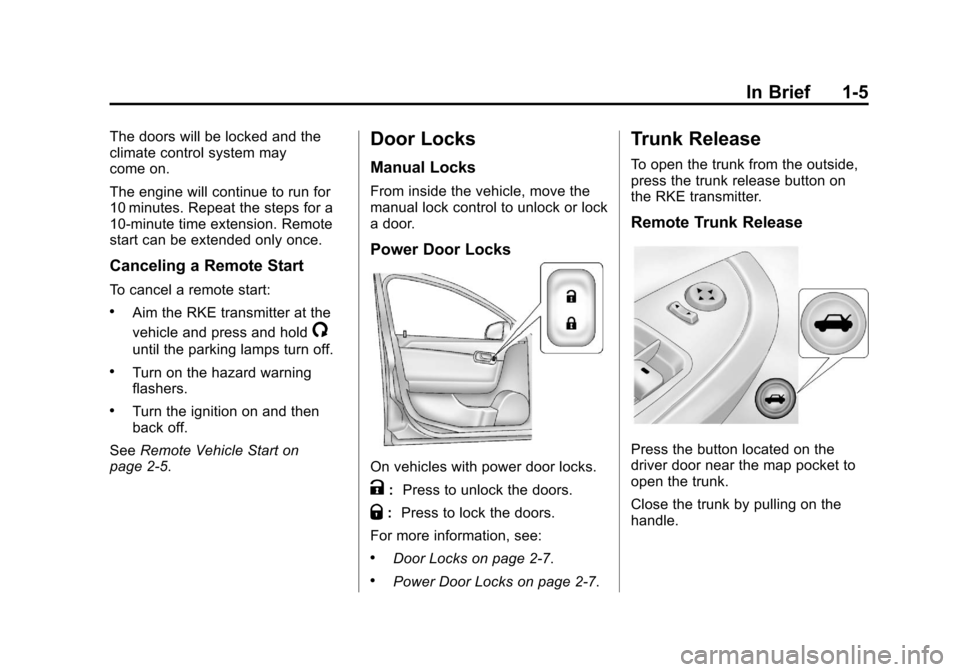
Power Door Locks
On vehicles with power door locks.
K: Press to unlock the doors.
Q:Press to lock the doors.
For more information, see:
.Door Locks on page 2‑7.
.Power Door Locks on page 2‑7.
Trunk Release
To open the trunk from the outside,
press the trunk release button on
the RKE transmitter.
Remote Trunk Release
Press the button located on the
driver door near the map pocket to
open the trunk.
Close the trunk by pulling on the
handle.
Page 20 of 398
Black plate (14,1)Chevrolet Malibu Owner Manual - 2012
1-14 In Brief
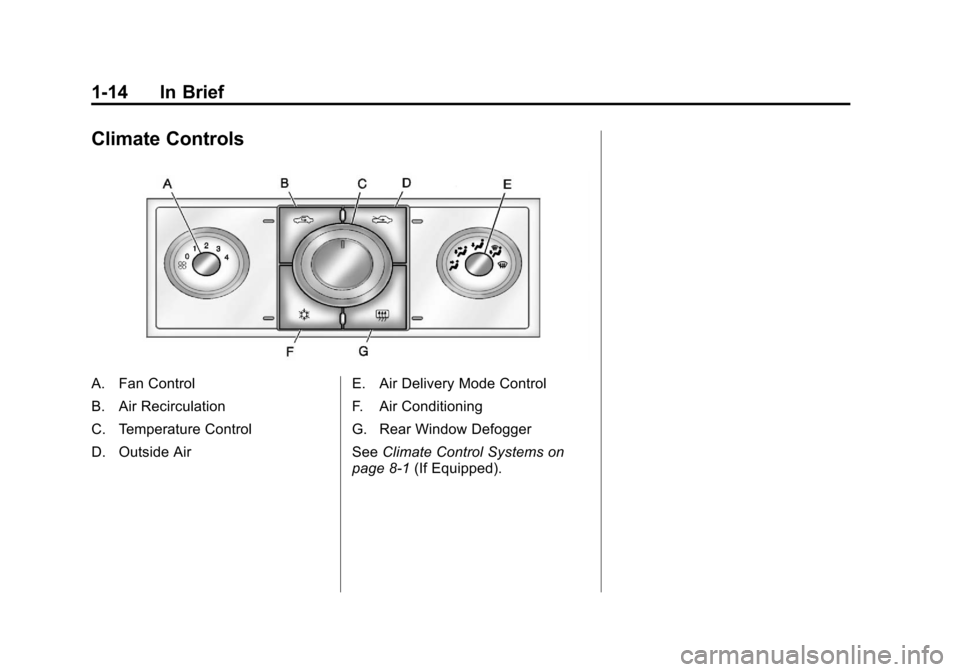
Climate Controls
A. Fan Control
B. Air Recirculation
C. Temperature Control
D. Outside AirE. Air Delivery Mode Control
F. Air Conditioning
G. Rear Window Defogger
See
Climate Control Systems on
page 8‑1 (If Equipped).
Page 21 of 398
Black plate (15,1)Chevrolet Malibu Owner Manual - 2012
In Brief 1-15
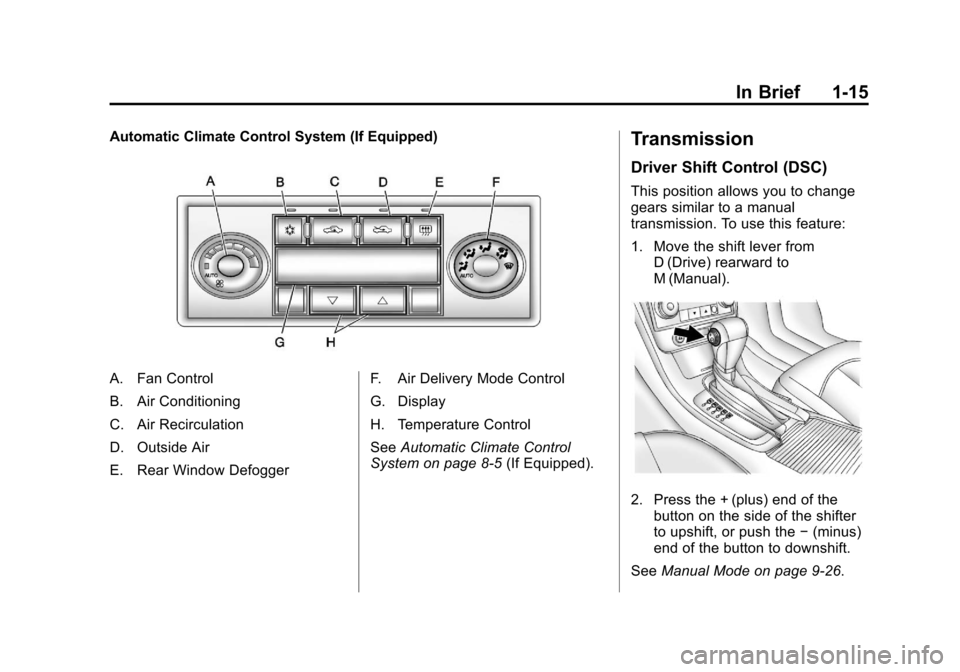
Automatic Climate Control System (If Equipped)
A. Fan Control
B. Air Conditioning
C. Air Recirculation
D. Outside Air
E. Rear Window DefoggerF. Air Delivery Mode Control
G. Display
H. Temperature Control
See
Automatic Climate Control
System on page 8‑5 (If Equipped).
Transmission
Driver Shift Control (DSC)
This position allows you to change
gears similar to a manual
transmission. To use this feature:
1. Move the shift lever from
D (Drive) rearward to
M (Manual).
2. Press the + (plus) end of thebutton on the side of the shifter
to upshift, or push the −(minus)
end of the button to downshift.
See Manual Mode on page 9‑26.
Page 26 of 398
Black plate (20,1)Chevrolet Malibu Owner Manual - 2012
1-20 In Brief
Power Outlets
Accessory power outlets can be
used to plug in electrical equipment,
such as a cell phone or MP3 player.
There are two accessory power
outlets. One accessory power outlet
is located inside the storage bin
below the climate controls and the
other outlet is on the rear of the
center storage console.
Remove the cover to access and
replace when not in use.
SeePower Outlets on page 5‑7.
Performance and
Maintenance
Traction Control
System (TCS)
The traction control system limits
wheel spin. The system turns on
automatically every time the vehicle
is started.
.To turn off traction control,
press and release
ton the
center console.
4illuminates
and the appropriate DIC
message is displayed. See Ride
Control System Messages on
page 5‑28.
.Press and release the button
again to turn on traction control.
For more information, see Traction
Control System (TCS) on
page 9‑30.
Electronic Stability
Control (ESC)
The Electronic Stability Control
system assists with directional
control of the vehicle in difficult
driving conditions. The system turns
on automatically every time the
vehicle is started.
.To turn off both traction control
and Electronic Stability Control,
press and hold
tuntil4andg
illuminate and the appropriate
DIC messages are displayed.
See Ride Control System
Messages on page 5‑28.
.Press and release the button
again to turn on both systems.
For more information, see
Electronic Stability Control (ESC) on
page 9‑32.
Page 35 of 398
Black plate (5,1)Chevrolet Malibu Owner Manual - 2012
Keys, Doors, and Windows 2-5
Remote Vehicle Start
Your vehicle may have a remote
starting feature that allows you to
start the engine from outside the
vehicle. It may also start the
vehicle's heating or air conditioning
systems and rear window defogger.
When the remote start system is
active and the vehicle has an
automatic climate control system,
it will automatically regulate the
inside temperature. Normal
operation of these systems will
return after the ignition key is
turned to ON/RUN.
Laws in some communities may
restrict the use of remote starters.
For example, some laws may
require a person using remote start
to have the vehicle in view when
doing so. Check local regulations for
any requirements on remote starting
of vehicles.Do not use the remote start feature
if your vehicle is low on fuel.
Your vehicle may run out of fuel.
If your vehicle has the remote start
feature, the RKE transmitter
functions will have an increased
range of operation. However, the
range may be less while the vehicle
is running.
There are other conditions which
can affect the performance of the
transmitter, see
Remote Keyless
Entry (RKE) System on page 2‑2 for
additional information.
/ (Remote Start): This button will
be on the RKE transmitter if the
vehicle has remote start.
To start the vehicle using the remote
start feature:
1. Aim the transmitter at the vehicle.
2. Press and release the transmitter's lock button, then
immediately press and hold the
transmitter's remote start button for about four seconds or until
the vehicle's turn signal lamps
flash. The doors will lock.
When the vehicle starts, the
parking lamps turn on and
remain on while the engine is
running.
The remote start feature provides
two separate starts per ignition
cycle, each with 10 minutes of
engine running time, or one start
with a time extension. The first start
must expire or be canceled to get
two separate 10 minute starts.
If it is the first remote start since the
vehicle has been driven, repeat the
previous steps, while the engine is
still running, to extend the engine
running time by 10 minutes from the
time you repeat the steps for remote
starting. The remote start running
time can be extended one time and
only after the first remote start.
After entering the vehicle during a
remote start, insert and turn the key
to ON/RUN to drive the vehicle.
Page 39 of 398
Black plate (9,1)Chevrolet Malibu Owner Manual - 2012
Keys, Doors, and Windows 2-9
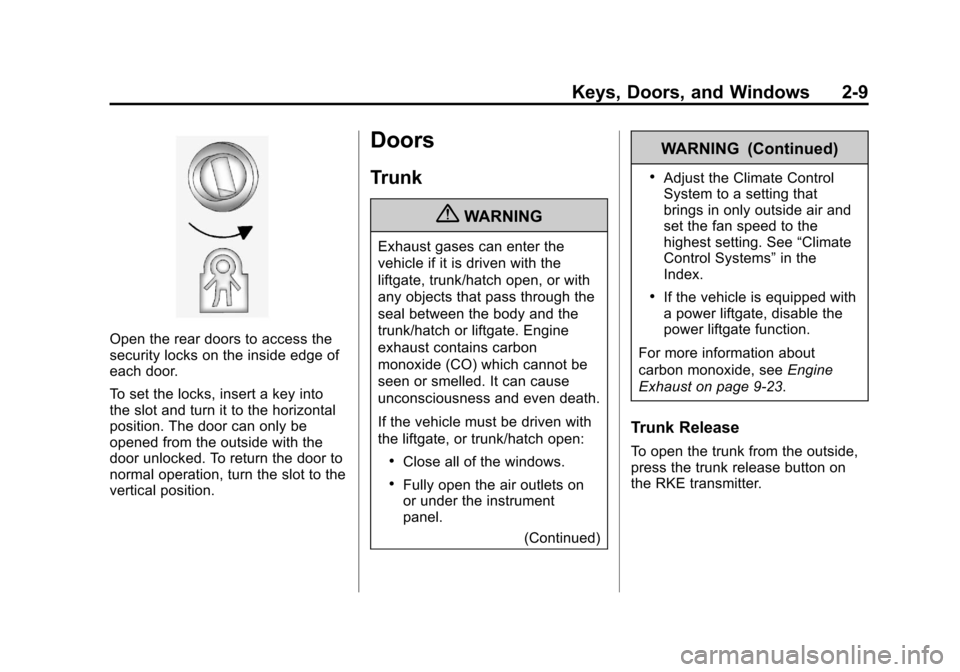
Open the rear doors to access the
security locks on the inside edge of
each door.
To set the locks, insert a key into
the slot and turn it to the horizontal
position. The door can only be
opened from the outside with the
door unlocked. To return the door to
normal operation, turn the slot to the
vertical position.
Doors
Trunk
{WARNING
Exhaust gases can enter the
vehicle if it is driven with the
liftgate, trunk/hatch open, or with
any objects that pass through the
seal between the body and the
trunk/hatch or liftgate. Engine
exhaust contains carbon
monoxide (CO) which cannot be
seen or smelled. It can cause
unconsciousness and even death.
If the vehicle must be driven with
the liftgate, or trunk/hatch open:
.Close all of the windows.
.Fully open the air outlets on
or under the instrument
panel.(Continued)
WARNING (Continued)
.Adjust the Climate Control
System to a setting that
brings in only outside air and
set the fan speed to the
highest setting. See “Climate
Control Systems” in the
Index.
.If the vehicle is equipped with
a power liftgate, disable the
power liftgate function.
For more information about
carbon monoxide, see Engine
Exhaust on page 9‑23.
Trunk Release
To open the trunk from the outside,
press the trunk release button on
the RKE transmitter.
Page 44 of 398
Black plate (14,1)Chevrolet Malibu Owner Manual - 2012
2-14 Keys, Doors, and Windows
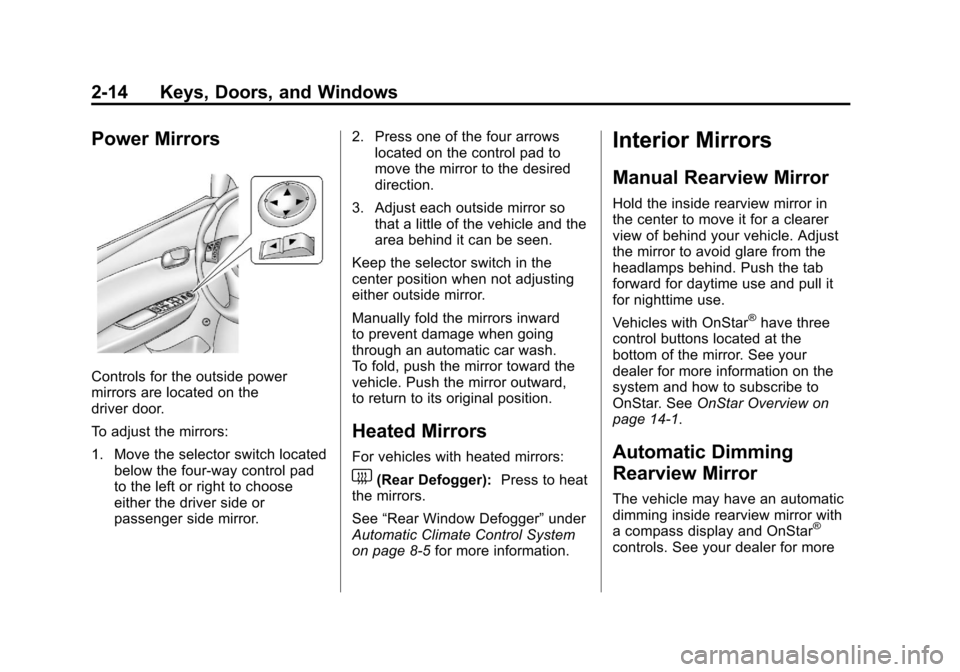
Power Mirrors
Controls for the outside power
mirrors are located on the
driver door.
To adjust the mirrors:
1. Move the selector switch locatedbelow the four-way control pad
to the left or right to choose
either the driver side or
passenger side mirror. 2. Press one of the four arrows
located on the control pad to
move the mirror to the desired
direction.
3. Adjust each outside mirror so that a little of the vehicle and the
area behind it can be seen.
Keep the selector switch in the
center position when not adjusting
either outside mirror.
Manually fold the mirrors inward
to prevent damage when going
through an automatic car wash.
To fold, push the mirror toward the
vehicle. Push the mirror outward,
to return to its original position.
Heated Mirrors
For vehicles with heated mirrors:
1(Rear Defogger): Press to heat
the mirrors.
See “Rear Window Defogger” under
Automatic Climate Control System
on page 8‑5 for more information.
Interior Mirrors
Manual Rearview Mirror
Hold the inside rearview mirror in
the center to move it for a clearer
view of behind your vehicle. Adjust
the mirror to avoid glare from the
headlamps behind. Push the tab
forward for daytime use and pull it
for nighttime use.
Vehicles with OnStar
®have three
control buttons located at the
bottom of the mirror. See your
dealer for more information on the
system and how to subscribe to
OnStar. See OnStar Overview on
page 14‑1.
Automatic Dimming
Rearview Mirror
The vehicle may have an automatic
dimming inside rearview mirror with
a compass display and OnStar
®
controls. See your dealer for more