light CHEVROLET MALIBU 2012 7.G Owners Manual
[x] Cancel search | Manufacturer: CHEVROLET, Model Year: 2012, Model line: MALIBU, Model: CHEVROLET MALIBU 2012 7.GPages: 398, PDF Size: 6.06 MB
Page 1 of 398

Black plate (1,1)Chevrolet Malibu Owner Manual - 2012
2012 Chevrolet Malibu Owner ManualM
In Brief. . . . . . . . . . . . . . . . . . . . . . . . 1-1
Instrument Panel . . . . . . . . . . . . . . 1-2
Initial Drive Information . . . . . . . . 1-4
Vehicle Features . . . . . . . . . . . . . 1-16
Performance and Maintenance . . . . . . . . . . . . . . . . 1-20
Keys, Doors, and Windows . . . . . . . . . . . . . . . . . . . . 2-1
Keys and Locks . . . . . . . . . . . . . . . 2-2
Doors . . . . . . . . . . . . . . . . . . . . . . . . . . 2-9
Vehicle Security . . . . . . . . . . . . . . 2-11
Exterior Mirrors . . . . . . . . . . . . . . . 2-13
Interior Mirrors . . . . . . . . . . . . . . . . 2-14
Windows . . . . . . . . . . . . . . . . . . . . . 2-15
Roof . . . . . . . . . . . . . . . . . . . . . . . . . . 2-18
Seats and Restraints . . . . . . . . . 3-1
Head Restraints . . . . . . . . . . . . . . . 3-2
Front Seats . . . . . . . . . . . . . . . . . . . . 3-3
Rear Seats . . . . . . . . . . . . . . . . . . . . 3-8 Safety Belts . . . . . . . . . . . . . . . . . . . . 3-9
Airbag System . . . . . . . . . . . . . . . . 3-19
Child Restraints . . . . . . . . . . . . . . 3-33
Storage . . . . . . . . . . . . . . . . . . . . . . . 4-1
Storage Compartments . . . . . . . . 4-1
Additional Storage Features . . . . . . . . . . . . . . . . . . . . . 4-3
Instruments and Controls . . . . 5-1
Controls . . . . . . . . . . . . . . . . . . . . . . . 5-2
Warning Lights, Gauges, and Indicators . . . . . . . . . . . . . . . . . . . . 5-9
Information Displays . . . . . . . . . . 5-24
Vehicle Messages . . . . . . . . . . . . 5-26
Vehicle Personalization . . . . . . . 5-31
Lighting . . . . . . . . . . . . . . . . . . . . . . . 6-1
Exterior Lighting . . . . . . . . . . . . . . . 6-1
Interior Lighting . . . . . . . . . . . . . . . . 6-5
Lighting Features . . . . . . . . . . . . . . 6-6 Infotainment System
. . . . . . . . . 7-1
Introduction . . . . . . . . . . . . . . . . . . . . 7-1
Radio . . . . . . . . . . . . . . . . . . . . . . . . . . 7-6
Audio Players . . . . . . . . . . . . . . . . 7-15
Phone . . . . . . . . . . . . . . . . . . . . . . . . 7-25
Climate Controls . . . . . . . . . . . . . 8-1
Climate Control Systems . . . . . . 8-1
Air Vents . . . . . . . . . . . . . . . . . . . . . . . 8-9
Driving and Operating . . . . . . . . 9-1
Driving Information . . . . . . . . . . . . . 9-2
Starting and Operating . . . . . . . 9-16
Engine Exhaust . . . . . . . . . . . . . . 9-23
Automatic Transmission . . . . . . 9-24
Brakes . . . . . . . . . . . . . . . . . . . . . . . 9-28
Ride Control Systems . . . . . . . . 9-30
Cruise Control . . . . . . . . . . . . . . . . 9-33
Fuel . . . . . . . . . . . . . . . . . . . . . . . . . . 9-36
Towing . . . . . . . . . . . . . . . . . . . . . . . 9-42
Conversions and Add-Ons . . . 9-48
Page 5 of 398
Black plate (5,1)Chevrolet Malibu Owner Manual - 2012
Introduction v
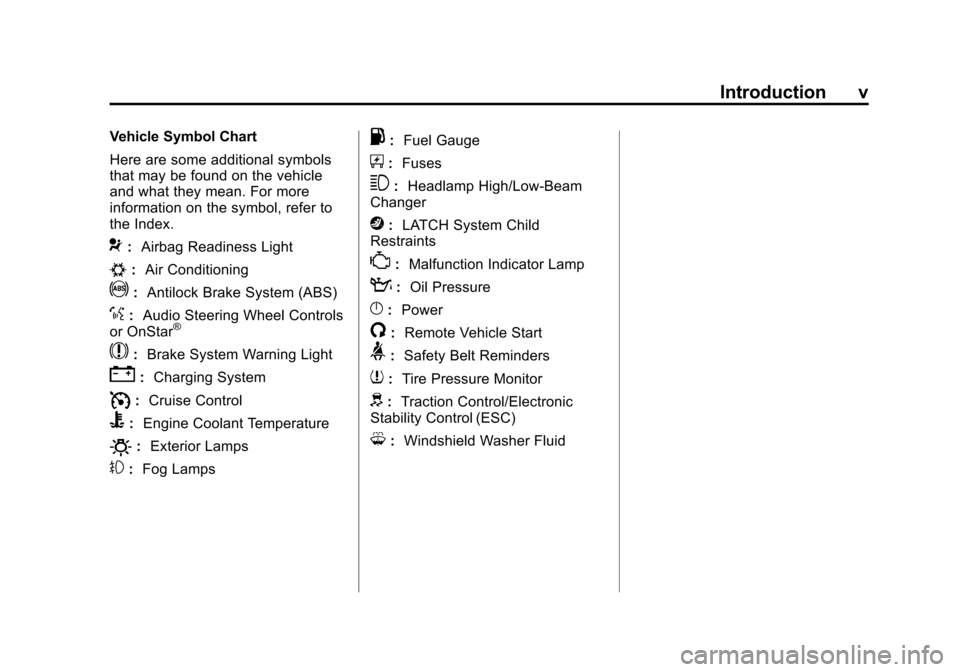
Vehicle Symbol Chart
Here are some additional symbols
that may be found on the vehicle
and what they mean. For more
information on the symbol, refer to
the Index.
9:Airbag Readiness Light
#:Air Conditioning
!:Antilock Brake System (ABS)
%:Audio Steering Wheel Controls
or OnStar®
$: Brake System Warning Light
":Charging System
I:Cruise Control
B: Engine Coolant Temperature
O:Exterior Lamps
#:Fog Lamps
.: Fuel Gauge
+:Fuses
3: Headlamp High/Low-Beam
Changer
j: LATCH System Child
Restraints
*: Malfunction Indicator Lamp
::Oil Pressure
}:Power
/:Remote Vehicle Start
>:Safety Belt Reminders
7:Tire Pressure Monitor
d:Traction Control/Electronic
Stability Control (ESC)
M: Windshield Washer Fluid
Page 7 of 398
Black plate (1,1)Chevrolet Malibu Owner Manual - 2012
In Brief 1-1
In Brief
Instrument Panel
Instrument Panel . . . . . . . . . . . . . . 1-2
Initial Drive Information
Initial Drive Information . . . . . . . . 1-4
Remote Keyless Entry (RKE)System . . . . . . . . . . . . . . . . . . . . . . 1-4
Remote Vehicle Start . . . . . . . . . 1-4
Door Locks . . . . . . . . . . . . . . . . . . . 1-5
Trunk Release . . . . . . . . . . . . . . . . 1-5
Windows . . . . . . . . . . . . . . . . . . . . . . 1-6
Seat Adjustment . . . . . . . . . . . . . . 1-7
Second Row Seats . . . . . . . . . . . 1-9
Heated Seats . . . . . . . . . . . . . . . . . 1-9
Head Restraint Adjustment . . . . . . . . . . . . . . . . . 1-10
Safety Belts . . . . . . . . . . . . . . . . . . 1-10
Passenger Sensing System . . . . . . . . . . . . . . . . . . . . . 1-10 Mirror Adjustment . . . . . . . . . . . . 1-11
Steering Wheel
Adjustment . . . . . . . . . . . . . . . . . 1-12
Interior Lighting . . . . . . . . . . . . . . 1-12
Exterior Lighting . . . . . . . . . . . . . 1-13
Windshield Wiper/Washer . . . . 1-13
Climate Controls . . . . . . . . . . . . . 1-14
Transmission . . . . . . . . . . . . . . . . 1-15
Vehicle Features
Radio(s) . . . . . . . . . . . . . . . . . . . . . 1-16
Satellite Radio . . . . . . . . . . . . . . . 1-17
Portable Audio Devices (Auxiliary Input or
USB Port) . . . . . . . . . . . . . . . . . . 1-18
Bluetooth
®. . . . . . . . . . . . . . . . . . . 1-18
Steering Wheel Controls . . . . . 1-18
Cruise Control . . . . . . . . . . . . . . . 1-19
Driver Information
Center (DIC) . . . . . . . . . . . . . . . 1-19
Power Outlets . . . . . . . . . . . . . . . 1-20
Performance and Maintenance
Traction Control System (TCS) . . . . . . . . . . . . . . 1-20
Electronic Stability Control (ESC) . . . . . . . . . . . . . . 1-20
Tire Pressure Monitor . . . . . . . . 1-21
Tire Sealant and
Compressor Kit . . . . . . . . . . . . . 1-21
Engine Oil Life System . . . . . . 1-22
Fuel E85 (85% Ethanol) . . . . . 1-22
Driving for Better Fuel Economy . . . . . . . . . . . . . . . . . . . 1-22
Roadside Assistance Program . . . . . . . . . . . . . . . . . . . . 1-23
OnStar
®. . . . . . . . . . . . . . . . . . . . . 1-23
Page 12 of 398
Black plate (6,1)Chevrolet Malibu Owner Manual - 2012
1-6 In Brief
Emergency Trunk Release
Handle
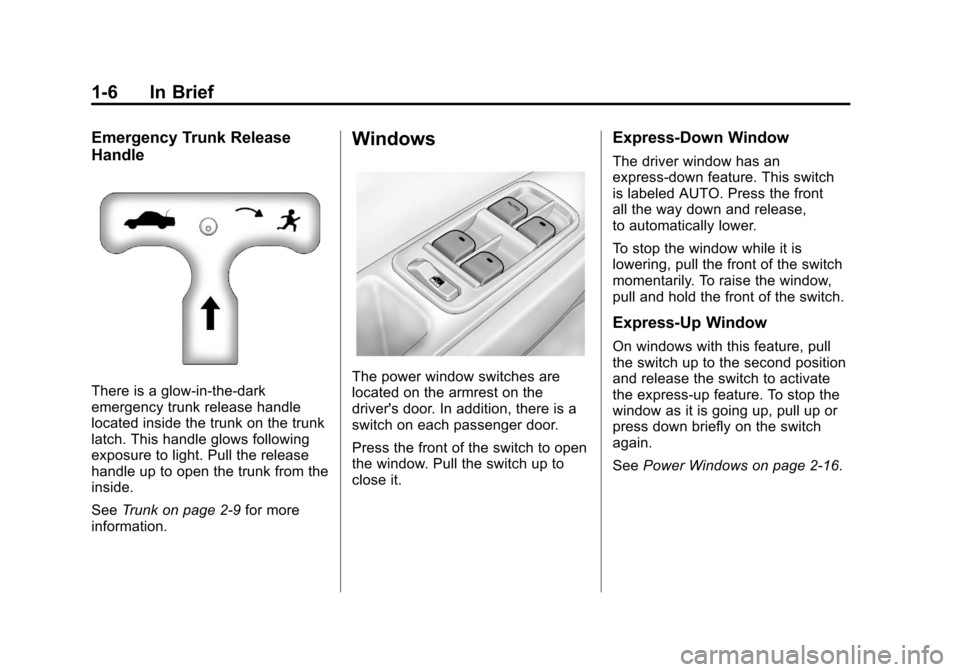
There is a glow-in-the-dark
emergency trunk release handle
located inside the trunk on the trunk
latch. This handle glows following
exposure to light. Pull the release
handle up to open the trunk from the
inside.
SeeTrunk on page 2‑9 for more
information.
Windows
The power window switches are
located on the armrest on the
driver's door. In addition, there is a
switch on each passenger door.
Press the front of the switch to open
the window. Pull the switch up to
close it.
Express-Down Window
The driver window has an
express-down feature. This switch
is labeled AUTO. Press the front
all the way down and release,
to automatically lower.
To stop the window while it is
lowering, pull the front of the switch
momentarily. To raise the window,
pull and hold the front of the switch.
Express-Up Window
On windows with this feature, pull
the switch up to the second position
and release the switch to activate
the express-up feature. To stop the
window as it is going up, pull up or
press down briefly on the switch
again.
See Power Windows on page 2‑16.
Page 15 of 398
Black plate (9,1)Chevrolet Malibu Owner Manual - 2012
In Brief 1-9
Lumbar Adjustment
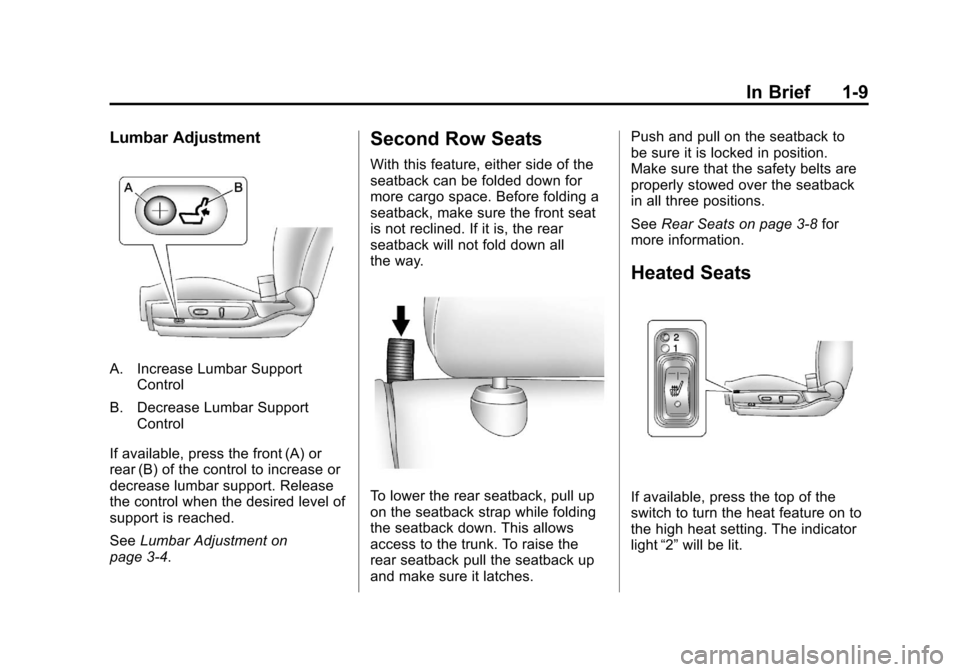
A. Increase Lumbar SupportControl
B. Decrease Lumbar Support Control
If available, press the front (A) or
rear (B) of the control to increase or
decrease lumbar support. Release
the control when the desired level of
support is reached.
See Lumbar Adjustment on
page 3‑4.
Second Row Seats
With this feature, either side of the
seatback can be folded down for
more cargo space. Before folding a
seatback, make sure the front seat
is not reclined. If it is, the rear
seatback will not fold down all
the way.
To lower the rear seatback, pull up
on the seatback strap while folding
the seatback down. This allows
access to the trunk. To raise the
rear seatback pull the seatback up
and make sure it latches. Push and pull on the seatback to
be sure it is locked in position.
Make sure that the safety belts are
properly stowed over the seatback
in all three positions.
See
Rear Seats on page 3‑8 for
more information.
Heated Seats
If available, press the top of the
switch to turn the heat feature on to
the high heat setting. The indicator
light “2”will be lit.
Page 16 of 398
Black plate (10,1)Chevrolet Malibu Owner Manual - 2012
1-10 In Brief
Press the top of the switch again
to go to the low heat setting.
The indicator light“1”will be lit.
Press the bottom of the switch to
turn the feature off.
The heated seats are canceled
when the ignition is turned off.
For more information, see Heated
Front Seats on page 3‑7.
Head Restraint
Adjustment
Do not drive until the head restraints
for all occupants are installed and
adjusted properly.
To achieve a comfortable seating
position, change the seatback
recline angle as little as necessary
while keeping the seat and the head
restraint height in the proper
position.
For more information see Head
Restraints on page 3‑2 andSeat
Adjustment on page 3‑3.
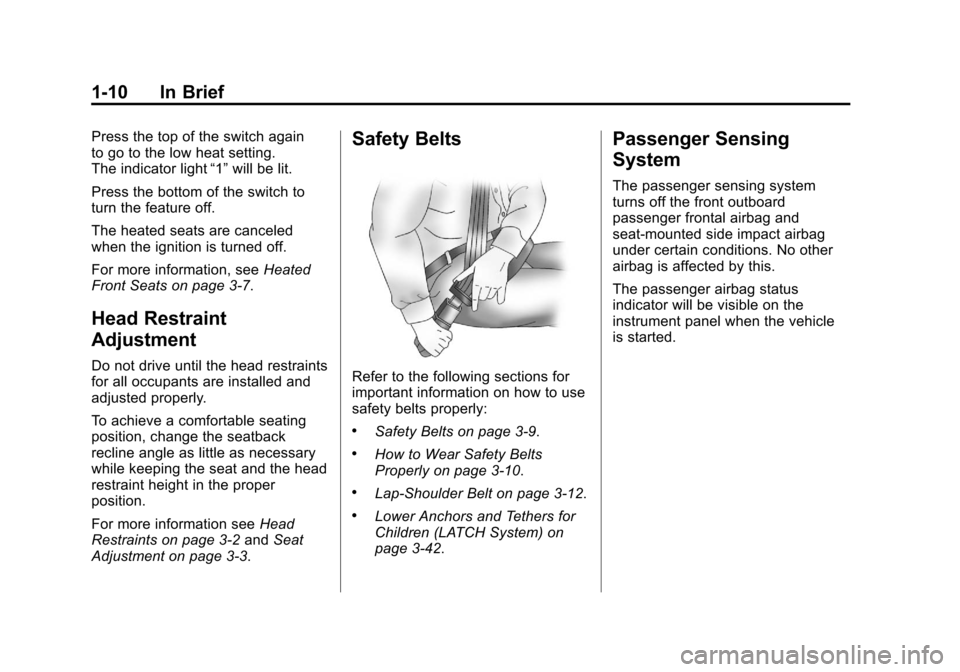
Safety Belts
Refer to the following sections for
important information on how to use
safety belts properly:
.Safety Belts on page 3‑9.
.How to Wear Safety Belts
Properly on page 3‑10.
.Lap-Shoulder Belt on page 3‑12.
.Lower Anchors and Tethers for
Children (LATCH System) on
page 3‑42.
Passenger Sensing
System
The passenger sensing system
turns off the front outboard
passenger frontal airbag and
seat-mounted side impact airbag
under certain conditions. No other
airbag is affected by this.
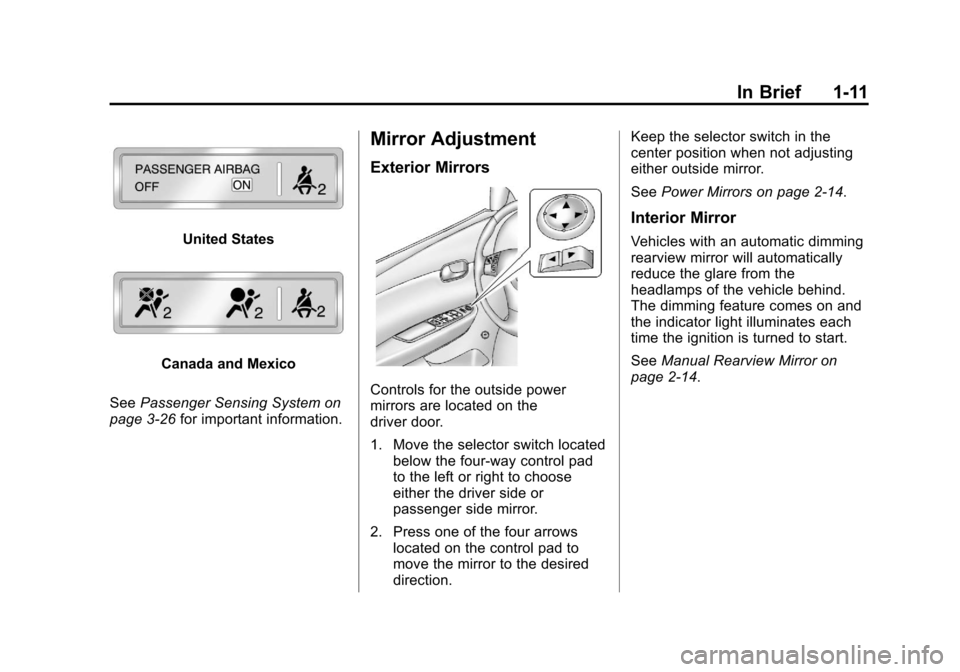
The passenger airbag status
indicator will be visible on the
instrument panel when the vehicle
is started.
Page 17 of 398
Black plate (11,1)Chevrolet Malibu Owner Manual - 2012
In Brief 1-11
United States
Canada and Mexico
See Passenger Sensing System on
page 3‑26 for important information.
Mirror Adjustment
Exterior Mirrors
Controls for the outside power
mirrors are located on the
driver door.
1. Move the selector switch located
below the four-way control pad
to the left or right to choose
either the driver side or
passenger side mirror.
2. Press one of the four arrows located on the control pad to
move the mirror to the desired
direction. Keep the selector switch in the
center position when not adjusting
either outside mirror.
See
Power Mirrors on page 2‑14.
Interior Mirror
Vehicles with an automatic dimming
rearview mirror will automatically
reduce the glare from the
headlamps of the vehicle behind.
The dimming feature comes on and
the indicator light illuminates each
time the ignition is turned to start.
SeeManual Rearview Mirror on
page 2‑14.
Page 18 of 398
Black plate (12,1)Chevrolet Malibu Owner Manual - 2012
1-12 In Brief
Steering Wheel
Adjustment
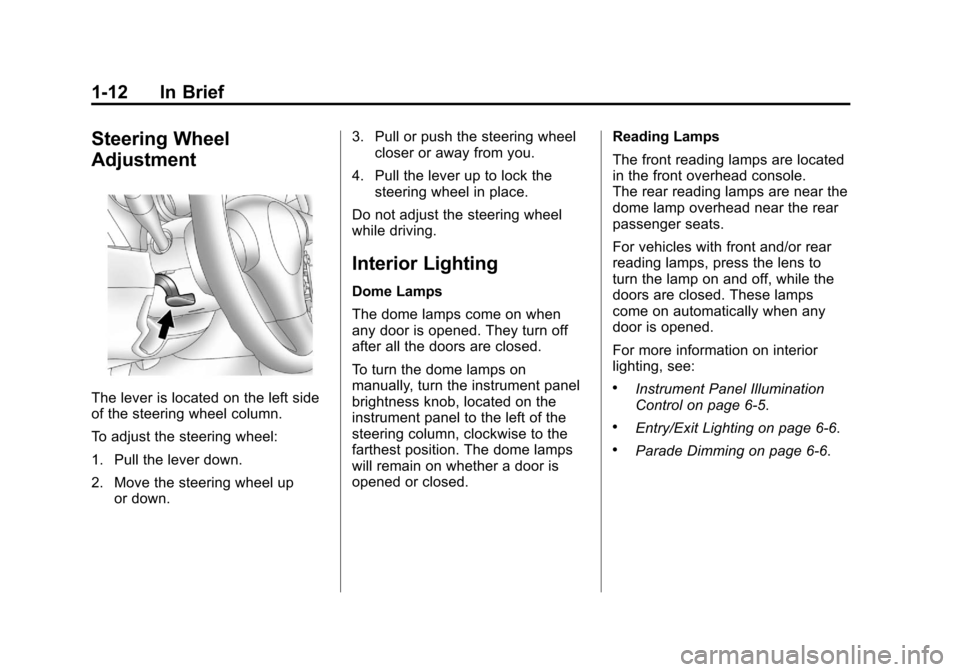
The lever is located on the left side
of the steering wheel column.
To adjust the steering wheel:
1. Pull the lever down.
2. Move the steering wheel upor down. 3. Pull or push the steering wheel
closer or away from you.
4. Pull the lever up to lock the steering wheel in place.
Do not adjust the steering wheel
while driving.
Interior Lighting
Dome Lamps
The dome lamps come on when
any door is opened. They turn off
after all the doors are closed.
To turn the dome lamps on
manually, turn the instrument panel
brightness knob, located on the
instrument panel to the left of the
steering column, clockwise to the
farthest position. The dome lamps
will remain on whether a door is
opened or closed. Reading Lamps
The front reading lamps are located
in the front overhead console.
The rear reading lamps are near the
dome lamp overhead near the rear
passenger seats.
For vehicles with front and/or rear
reading lamps, press the lens to
turn the lamp on and off, while the
doors are closed. These lamps
come on automatically when any
door is opened.
For more information on interior
lighting, see:
.Instrument Panel Illumination
Control on page 6‑5.
.Entry/Exit Lighting on page 6‑6.
.Parade Dimming on page 6‑6.
Page 19 of 398
Black plate (13,1)Chevrolet Malibu Owner Manual - 2012
In Brief 1-13
Exterior Lighting
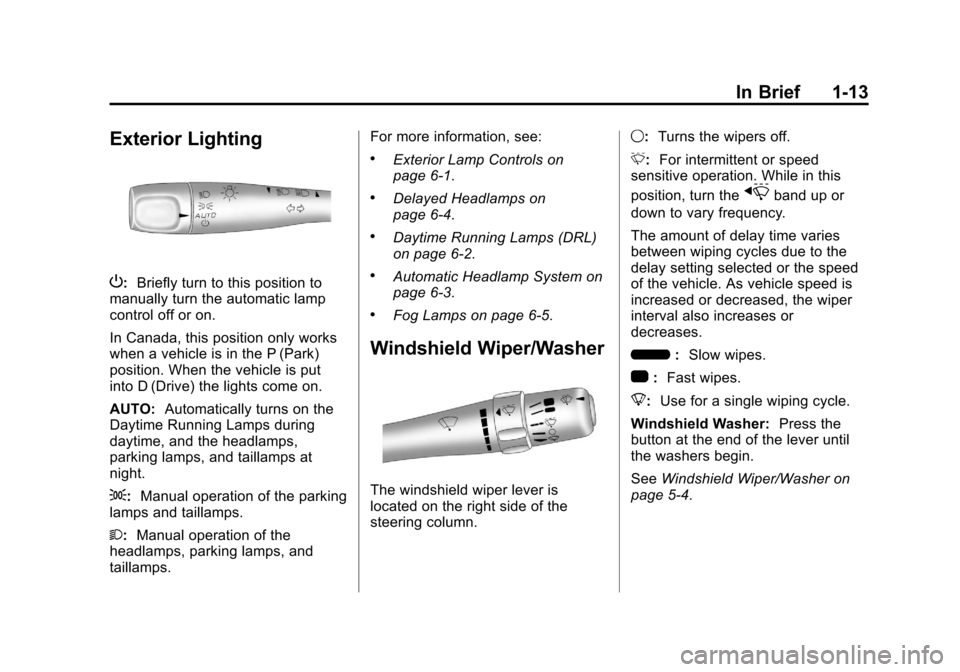
P:Briefly turn to this position to
manually turn the automatic lamp
control off or on.
In Canada, this position only works
when a vehicle is in the P (Park)
position. When the vehicle is put
into D (Drive) the lights come on.
AUTO: Automatically turns on the
Daytime Running Lamps during
daytime, and the headlamps,
parking lamps, and taillamps at
night.
;: Manual operation of the parking
lamps and taillamps.
2: Manual operation of the
headlamps, parking lamps, and
taillamps. For more information, see:
.Exterior Lamp Controls on
page 6‑1.
.Delayed Headlamps on
page 6‑4.
.Daytime Running Lamps (DRL)
on page 6‑2.
.Automatic Headlamp System on
page 6‑3.
.Fog Lamps on page 6‑5.
Windshield Wiper/Washer
The windshield wiper lever is
located on the right side of the
steering column.
9:
Turns the wipers off.
3: For intermittent or speed
sensitive operation. While in this
position, turn the
xband up or
down to vary frequency.
The amount of delay time varies
between wiping cycles due to the
delay setting selected or the speed
of the vehicle. As vehicle speed is
increased or decreased, the wiper
interval also increases or
decreases.
6 :Slow wipes.
1 :Fast wipes.
8: Use for a single wiping cycle.
Windshield Washer: Press the
button at the end of the lever until
the washers begin.
See Windshield Wiper/Washer on
page 5‑4.
Page 27 of 398
Black plate (21,1)Chevrolet Malibu Owner Manual - 2012
In Brief 1-21
Tire Pressure Monitor
This vehicle may have a Tire
Pressure Monitor System (TPMS).
The TPMS warning light alerts you
to a significant loss in pressure of
one of the vehicle's tires. If the
warning light comes on, stop as
soon as possible and inflate the
tires to the recommended pressure
shown on the Tire and Loading
Information label. SeeVehicle Load
Limits on page 9‑11. The warning
light will remain on until the tire
pressure is corrected. During cooler conditions, the low tire
pressure warning light may appear
when the vehicle is first started and
then turn off. This may be an early
indicator that the tire pressures are
getting low and the tires need to be
inflated to the proper pressure.
The TPMS does not replace normal
monthly tire maintenance. It is the
driver
’s responsibility to maintain
correct tire pressures.
See Tire Pressure Monitor System
on page 10‑52.
Tire Sealant and
Compressor Kit
This vehicle may come with a spare
tire and tire changing equipment or
a tire sealant and compressor kit.
The kit can be used to temporarily
seal small punctures in the tread
area of the tire.
See Tire Sealant and Compressor
Kit on page 10‑67 for complete
operating information.
If the vehicle came with a spare tire
and tire changing equipment, see
If a Tire Goes Flat on page 10‑65.