trunk CHEVROLET MALIBU 2013 8.G User Guide
[x] Cancel search | Manufacturer: CHEVROLET, Model Year: 2013, Model line: MALIBU, Model: CHEVROLET MALIBU 2013 8.GPages: 436, PDF Size: 7.43 MB
Page 137 of 436
Black plate (29,1)Chevrolet Malibu Owner Manual - 2013 - CRC - 6/6/12
Instruments and Controls 5-29
SERVICE PARKING BRAKE
This message is displayed when
there is a problem with the Electric
Parking Brake (EPB). SeeParking
Brake on page 9‑29. Take the
vehicle to your dealer.
STEP ON BRAKE TO
RELEASE PARK BRAKE
This message is displayed if you
attempt to release the Electric
Parking Brake (EPB) without the
brake pedal applied. See Parking
Brake on page 9‑29.
Compass Messages
CAL
This message is displayed when the
compass needs to be calibrated.
See Compass on page 5‑4.
– –
Dashes will be displayed if the
compass needs service. See your
dealer for service.
Cruise Control Messages
CRUISE SET TO XXX
This message displays when the
cruise control is set and shows the
speed it was set to. See Cruise
Control on page 9‑34.
Door Ajar Messages
DRIVER DOOR OPEN
This message will display when the
driver door is open. Close the door
completely.
HOOD OPEN
This message will display when the
hood is open. Close the hood
completely.
LEFT REAR DOOR OPEN
This message will display when the
driver side rear door is open. Close
the door completely.
PASSENGER DOOR OPEN
This message will display when the
front passenger door is open. Close
the door completely.
RIGHT REAR DOOR OPEN
This message will display when the
passenger side rear door is open.
Close the door completely.
TRUNK OPEN
This message will display when the
trunk is open. Close the trunk
completely.
Engine Cooling System
Messages
A/C OFF DUE TO HIGH
ENGINE TEMP
This message displays when the
engine coolant becomes hotter than
the normal operating temperature.
To avoid added strain on a hot
engine, the air conditioning
compressor automatically turns off.
Page 255 of 436
Black plate (39,1)Chevrolet Malibu Owner Manual - 2013 - CRC - 6/6/12
Driving and Operating 9-39
Consider traffic and weather
conditions when selecting the alert
timing. The range of selectable alert
timing may not be appropriate for all
drivers and driving conditions.
Unnecessary Alerts
FCA may provide unnecessary
alerts to turning vehicles, vehicles in
other lanes, objects that are not
vehicles, or shadows. These alerts
are normal operation and the
vehicle does not need service.
Other Messages
There are messages that may
appear on the Driver Information
Center (DIC) in the instrument
cluster to provide information about
FCA. SeeObject Detection System
Messages on page 5‑31.
Cleaning the System
If the FCA system does not seem to
operate properly, clean the outside
of the windshield area in front of the
camera sensor before considering
taking the vehicle in for service.
Ultrasonic Parking Assist
If available, the Ultrasonic Rear
Parking Assist (URPA) system
assists the driver with parking
and avoiding objects while in
R (Reverse). URPA operates at
speeds less than 8 km/h (5 mph).
The sensors on the rear bumper
detect objects up to 2.5 m (8 ft)
behind the vehicle, and at least
20 cm (8 in) off the ground.
{WARNING
The URPA system does not
detect children, pedestrians,
bicyclists, animals, or objects
below the bumper or that are too
close or too far from the vehicle.
It is not available at speeds
greater than 8 km/h (5 mph). To
prevent injury, death, or vehicle
damage, even with URPA, always
check the area around the vehicle
and check all mirrors before
backing.
How the System Works
URPA comes on automatically
when the shift lever is moved into
R (Reverse). A single tone sounds
to indicate the system is working.
URPA operates only at speeds less
than 8 km/h (5 mph).
An obstacle is indicated by audible
beeps. The interval between the
beeps becomes shorter as the
vehicle gets closer to the obstacle.
When the distance is less than
30 cm (12 in) the beeping is a
continuous tone for five seconds.
To be detected, objects must be at
least 20 cm (8 in) off the ground and
below trunk level. Objects must also
be within 2.5 m (8 ft) from the rear
bumper. The distance at which
objects can be detected may be
less during warmer or humid
weather.
Page 256 of 436
Black plate (40,1)Chevrolet Malibu Owner Manual - 2013 - CRC - 6/6/12
9-40 Driving and Operating
Turning the System On and Off
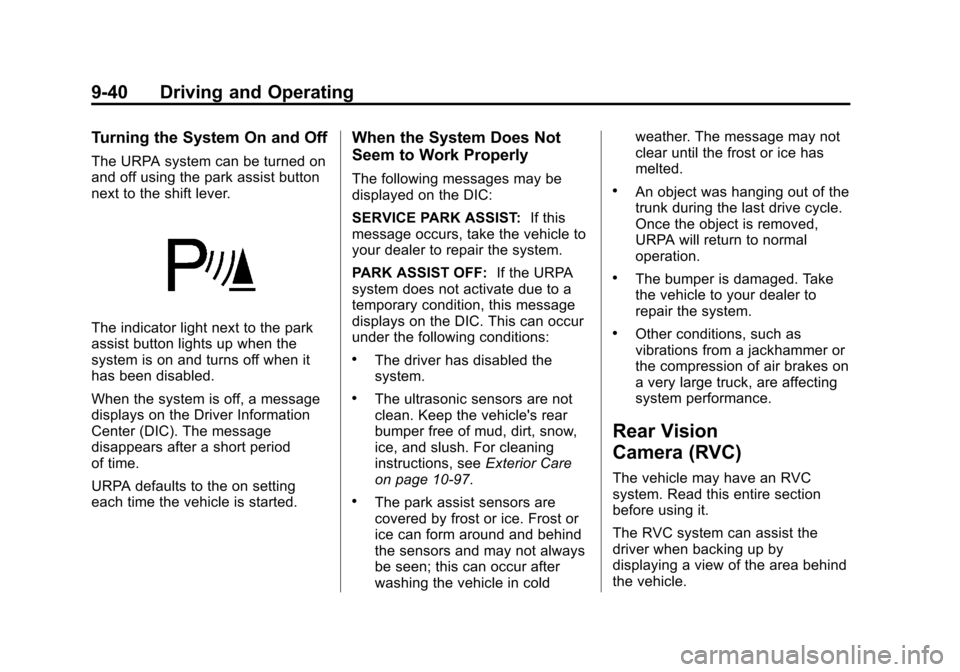
The URPA system can be turned on
and off using the park assist button
next to the shift lever.
The indicator light next to the park
assist button lights up when the
system is on and turns off when it
has been disabled.
When the system is off, a message
displays on the Driver Information
Center (DIC). The message
disappears after a short period
of time.
URPA defaults to the on setting
each time the vehicle is started.
When the System Does Not
Seem to Work Properly
The following messages may be
displayed on the DIC:
SERVICE PARK ASSIST:If this
message occurs, take the vehicle to
your dealer to repair the system.
PARK ASSIST OFF: If the URPA
system does not activate due to a
temporary condition, this message
displays on the DIC. This can occur
under the following conditions:
.The driver has disabled the
system.
.The ultrasonic sensors are not
clean. Keep the vehicle's rear
bumper free of mud, dirt, snow,
ice, and slush. For cleaning
instructions, see Exterior Care
on page 10‑97.
.The park assist sensors are
covered by frost or ice. Frost or
ice can form around and behind
the sensors and may not always
be seen; this can occur after
washing the vehicle in cold weather. The message may not
clear until the frost or ice has
melted.
.An object was hanging out of the
trunk during the last drive cycle.
Once the object is removed,
URPA will return to normal
operation.
.The bumper is damaged. Take
the vehicle to your dealer to
repair the system.
.Other conditions, such as
vibrations from a jackhammer or
the compression of air brakes on
a very large truck, are affecting
system performance.
Rear Vision
Camera (RVC)
The vehicle may have an RVC
system. Read this entire section
before using it.
The RVC system can assist the
driver when backing up by
displaying a view of the area behind
the vehicle.
Page 265 of 436
Black plate (49,1)Chevrolet Malibu Owner Manual - 2013 - CRC - 6/6/12
Driving and Operating 9-49
{WARNING
If a fire starts while you are
refueling, do not remove the
nozzle. Shut off the flow of fuel by
shutting off the pump or by
notifying the station attendant.
Leave the area immediately.
Notice: If a new fuel cap is
needed, be sure to get the right
type of cap from your dealer. The
wrong type of fuel cap might not
fit properly, might cause the
malfunction indicator lamp to
light, and could damage the fuel
tank and emissions system. See
Malfunction Indicator Lamp on
page 5‑14.
Filling a Portable Fuel
Container
{WARNING
Filling a portable fuel container
while it is in the vehicle can cause
fuel vapors that can ignite either
by static electricity or other
means. You or others could be
badly burned and the vehicle
could be damaged. Always:
.Use approved fuel
containers.
.Remove container from
vehicle, trunk, or pickup bed
before filling.
(Continued)
WARNING (CONTINUED)
.Place container on the
ground.
.Place the nozzle inside the fill
opening of the container
before dispensing fuel, and
keep it in contact with the fill
opening until filling is
complete.
.Do not smoke while
pumping fuel.
Page 299 of 436
Black plate (33,1)Chevrolet Malibu Owner Manual - 2013 - CRC - 6/6/12
Vehicle Care 10-33
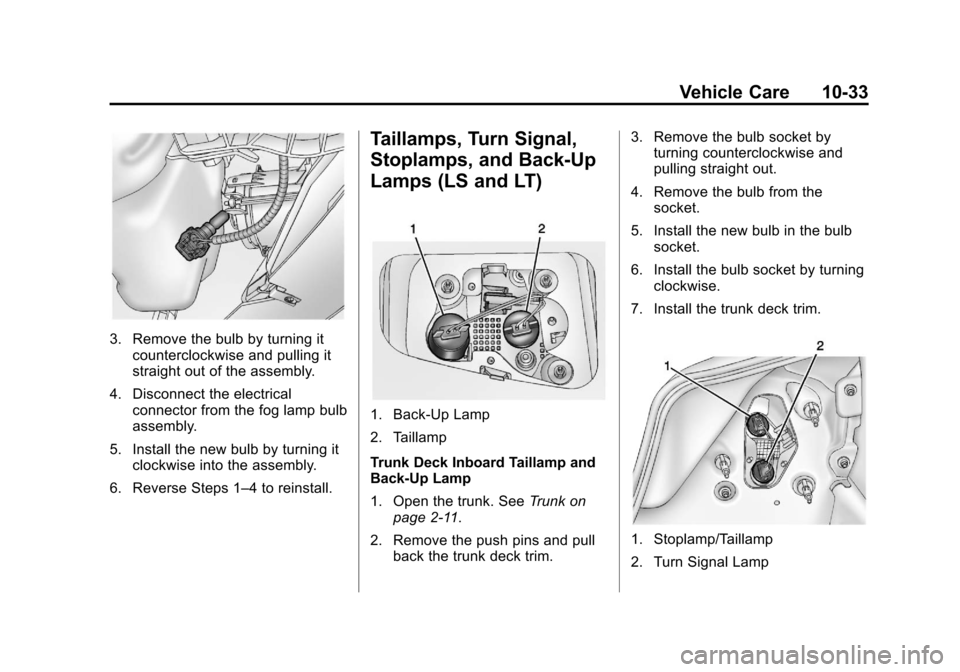
3. Remove the bulb by turning itcounterclockwise and pulling it
straight out of the assembly.
4. Disconnect the electrical connector from the fog lamp bulb
assembly.
5. Install the new bulb by turning it clockwise into the assembly.
6. Reverse Steps 1–4 to reinstall.
Taillamps, Turn Signal,
Stoplamps, and Back-Up
Lamps (LS and LT)
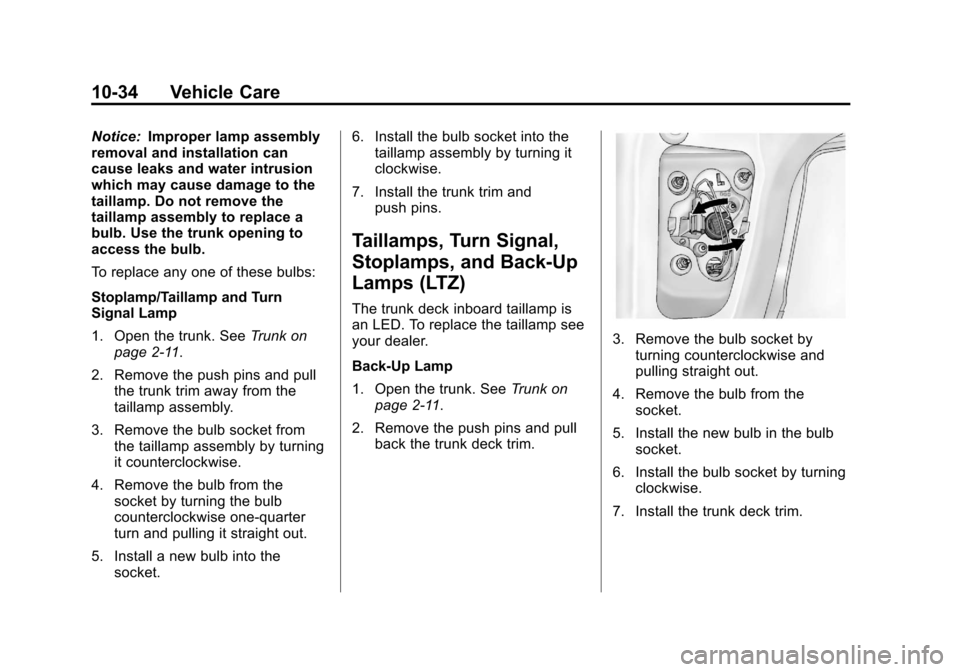
1. Back-Up Lamp
2. Taillamp
Trunk Deck Inboard Taillamp and
Back-Up Lamp
1. Open the trunk. See Trunk on
page 2‑11.
2. Remove the push pins and pull back the trunk deck trim. 3. Remove the bulb socket by
turning counterclockwise and
pulling straight out.
4. Remove the bulb from the socket.
5. Install the new bulb in the bulb socket.
6. Install the bulb socket by turning clockwise.
7. Install the trunk deck trim.
1. Stoplamp/Taillamp
2. Turn Signal Lamp
Page 300 of 436
Black plate (34,1)Chevrolet Malibu Owner Manual - 2013 - CRC - 6/6/12
10-34 Vehicle Care
Notice:Improper lamp assembly
removal and installation can
cause leaks and water intrusion
which may cause damage to the
taillamp. Do not remove the
taillamp assembly to replace a
bulb. Use the trunk opening to
access the bulb.
To replace any one of these bulbs:
Stoplamp/Taillamp and Turn
Signal Lamp
1. Open the trunk. See Trunk on
page 2‑11.
2. Remove the push pins and pull the trunk trim away from the
taillamp assembly.
3. Remove the bulb socket from the taillamp assembly by turning
it counterclockwise.
4. Remove the bulb from the socket by turning the bulb
counterclockwise one-quarter
turn and pulling it straight out.
5. Install a new bulb into the socket. 6. Install the bulb socket into the
taillamp assembly by turning it
clockwise.
7. Install the trunk trim and push pins.
Taillamps, Turn Signal,
Stoplamps, and Back-Up
Lamps (LTZ)
The trunk deck inboard taillamp is
an LED. To replace the taillamp see
your dealer.
Back-Up Lamp
1. Open the trunk. See Trunk on
page 2‑11.
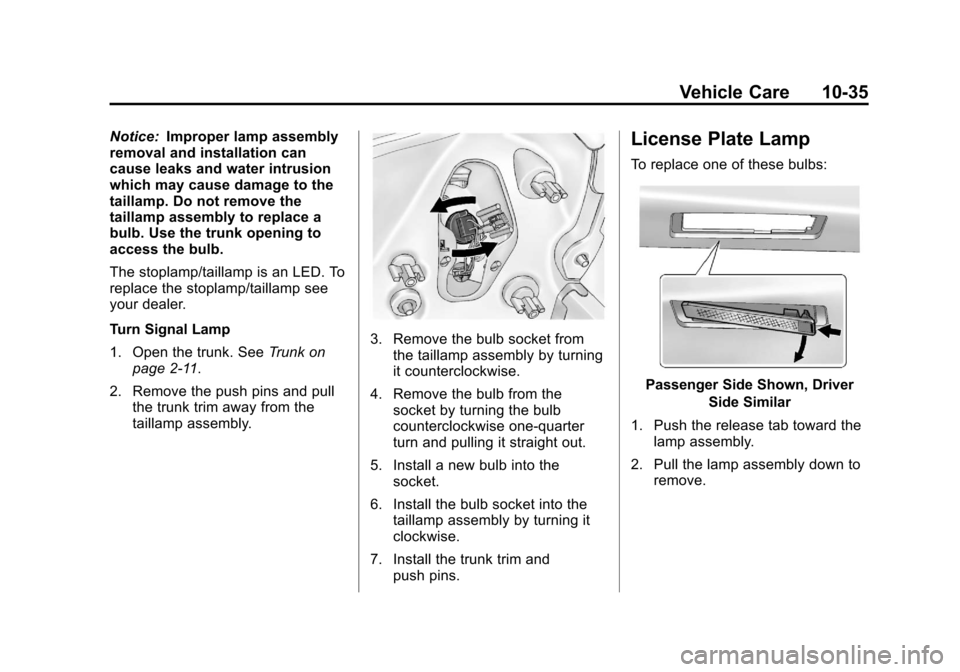
2. Remove the push pins and pull back the trunk deck trim.
3. Remove the bulb socket byturning counterclockwise and
pulling straight out.
4. Remove the bulb from the socket.
5. Install the new bulb in the bulb socket.
6. Install the bulb socket by turning clockwise.
7. Install the trunk deck trim.
Page 301 of 436
Black plate (35,1)Chevrolet Malibu Owner Manual - 2013 - CRC - 6/6/12
Vehicle Care 10-35
Notice:Improper lamp assembly
removal and installation can
cause leaks and water intrusion
which may cause damage to the
taillamp. Do not remove the
taillamp assembly to replace a
bulb. Use the trunk opening to
access the bulb.
The stoplamp/taillamp is an LED. To
replace the stoplamp/taillamp see
your dealer.
Turn Signal Lamp
1. Open the trunk. See Trunk on
page 2‑11.
2. Remove the push pins and pull the trunk trim away from the
taillamp assembly.
3. Remove the bulb socket fromthe taillamp assembly by turning
it counterclockwise.
4. Remove the bulb from the socket by turning the bulb
counterclockwise one-quarter
turn and pulling it straight out.
5. Install a new bulb into the socket.
6. Install the bulb socket into the taillamp assembly by turning it
clockwise.
7. Install the trunk trim and push pins.
License Plate Lamp
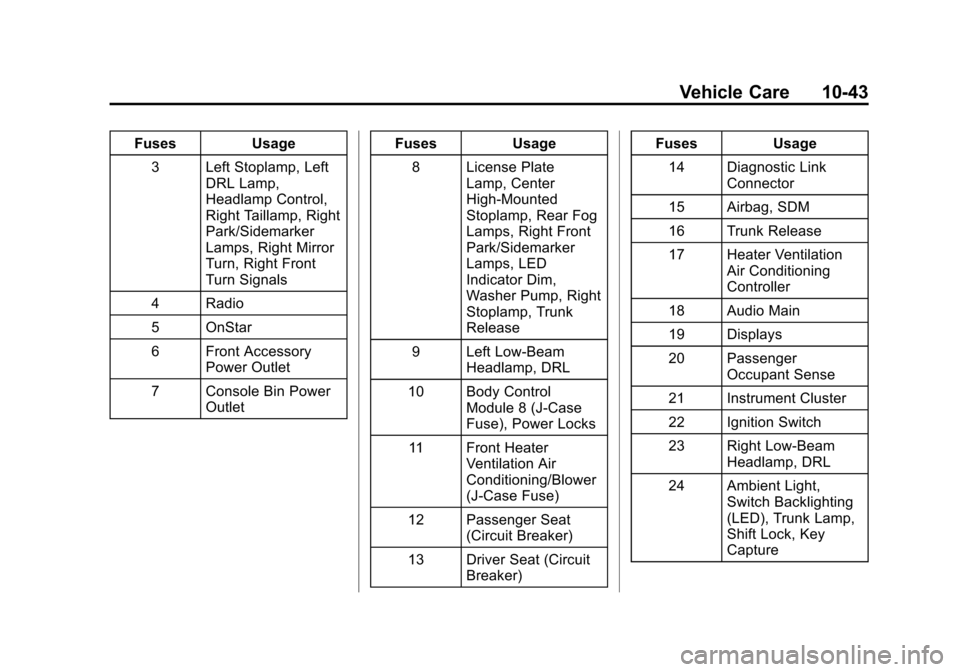
To replace one of these bulbs:
Passenger Side Shown, Driver
Side Similar
1. Push the release tab toward the lamp assembly.
2. Pull the lamp assembly down to remove.
Page 309 of 436
Black plate (43,1)Chevrolet Malibu Owner Manual - 2013 - CRC - 6/6/12
Vehicle Care 10-43
FusesUsage
3 Left Stoplamp, Left DRL Lamp,
Headlamp Control,
Right Taillamp, Right
Park/Sidemarker
Lamps, Right Mirror
Turn, Right Front
Turn Signals
4 Radio
5 OnStar
6 Front Accessory Power Outlet
7 Console Bin Power Outlet Fuses
Usage
8 License Plate Lamp, Center
High-Mounted
Stoplamp, Rear Fog
Lamps, Right Front
Park/Sidemarker
Lamps, LED
Indicator Dim,
Washer Pump, Right
Stoplamp, Trunk
Release
9 Left Low-Beam Headlamp, DRL
10 Body Control Module 8 (J-Case
Fuse), Power Locks
11 Front Heater Ventilation Air
Conditioning/Blower
(J-Case Fuse)
12 Passenger Seat (Circuit Breaker)
13 Driver Seat (Circuit Breaker) Fuses
Usage
14 Diagnostic Link Connector
15 Airbag, SDM
16 Trunk Release
17 Heater Ventilation Air Conditioning
Controller
18 Audio Main
19 Displays
20 Passenger Occupant Sense
21 Instrument Cluster
22 Ignition Switch
23 Right Low-Beam Headlamp, DRL
24 Ambient Light, Switch Backlighting
(LED), Trunk Lamp,
Shift Lock, Key
Capture
Page 310 of 436
Black plate (44,1)Chevrolet Malibu Owner Manual - 2013 - CRC - 6/6/12
10-44 Vehicle Care
FusesUsage
25 110V AC
26 Spare
Relays Usage
K1 Trunk Release
K2 Not Used
K3 Power Outlet RelayWheels and Tires
Tires
Every new GM vehicle has
high-quality tires made by a
leading tire manufacturer. See
the warranty manual for
information regarding the tire
warranty and where to get
service. For additional
information refer to the tire
manufacturer.
{WARNING
.Poorly maintained and
improperly used tires are
dangerous.
.Overloading the tires can
cause overheating as a result
of too much flexing. There
could be a blowout and a
serious crash. See Vehicle
Load Limits on page 9‑10.
(Continued)
WARNING (CONTINUED)
.Underinflated tires pose the
same danger as overloaded
tires. The resulting crash
could cause serious injury.
Check all tires frequently to
maintain the recommended
pressure. Tire pressure
should be checked when the
tires are cold.
.Overinflated tires are more
likely to be cut, punctured,
or broken by a sudden
impact—such as when
hitting a pothole. Keep tires at
the recommended pressure.
.Worn or old tires can cause a
crash. If the tread is badly
worn, replace them.
.Replace any tires that have
been damaged by impacts
with potholes, curbs, etc.
(Continued)
Page 349 of 436
Black plate (83,1)Chevrolet Malibu Owner Manual - 2013 - CRC - 6/6/12
Vehicle Care 10-83
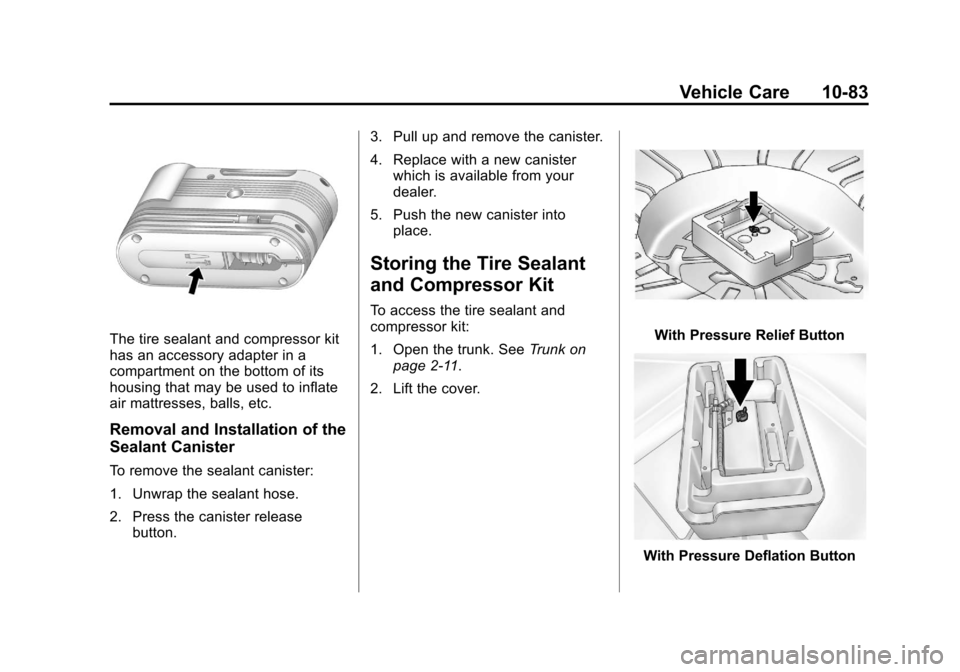
The tire sealant and compressor kit
has an accessory adapter in a
compartment on the bottom of its
housing that may be used to inflate
air mattresses, balls, etc.
Removal and Installation of the
Sealant Canister
To remove the sealant canister:
1. Unwrap the sealant hose.
2. Press the canister releasebutton. 3. Pull up and remove the canister.
4. Replace with a new canister
which is available from your
dealer.
5. Push the new canister into place.
Storing the Tire Sealant
and Compressor Kit
To access the tire sealant and
compressor kit:
1. Open the trunk. See Trunk on
page 2‑11.
2. Lift the cover.
With Pressure Relief Button
With Pressure Deflation Button