mirror CHEVROLET MALIBU 2013 8.G Owners Manual
[x] Cancel search | Manufacturer: CHEVROLET, Model Year: 2013, Model line: MALIBU, Model: CHEVROLET MALIBU 2013 8.GPages: 436, PDF Size: 7.43 MB
Page 1 of 436

Black plate (1,1)Chevrolet Malibu Owner Manual - 2013 - CRC - 6/6/12
2013 Chevrolet Malibu Owner ManualM
In Brief. . . . . . . . . . . . . . . . . . . . . . . . 1-1
Instrument Panel . . . . . . . . . . . . . . 1-2
Initial Drive Information . . . . . . . . 1-4
Vehicle Features . . . . . . . . . . . . . 1-17
eAssist Features . . . . . . . . . . . . . 1-22
Performance and
Maintenance . . . . . . . . . . . . . . . . 1-24
Keys, Doors, and Windows . . . . . . . . . . . . . . . . . . . . 2-1
Keys and Locks . . . . . . . . . . . . . . . 2-2
Doors . . . . . . . . . . . . . . . . . . . . . . . . . 2-11
Vehicle Security . . . . . . . . . . . . . . 2-13
Exterior Mirrors . . . . . . . . . . . . . . . 2-15
Interior Mirrors . . . . . . . . . . . . . . . . 2-16
Windows . . . . . . . . . . . . . . . . . . . . . 2-17
Roof . . . . . . . . . . . . . . . . . . . . . . . . . . 2-19
Seats and Restraints . . . . . . . . . 3-1
Head Restraints . . . . . . . . . . . . . . . 3-2
Front Seats . . . . . . . . . . . . . . . . . . . . 3-3
Rear Seats . . . . . . . . . . . . . . . . . . . . 3-9
Safety Belts . . . . . . . . . . . . . . . . . . 3-11
Airbag System . . . . . . . . . . . . . . . . 3-19
Child Restraints . . . . . . . . . . . . . . 3-32 Storage
. . . . . . . . . . . . . . . . . . . . . . . 4-1
Storage Compartments . . . . . . . . 4-1
Additional Storage Features . . . 4-3
Instruments and Controls . . . . 5-1
Controls . . . . . . . . . . . . . . . . . . . . . . . 5-2
Warning Lights, Gauges, and
Indicators . . . . . . . . . . . . . . . . . . . . 5-7
Information Displays . . . . . . . . . . 5-24
Vehicle Messages . . . . . . . . . . . . 5-28
Vehicle Personalization . . . . . . . 5-35
Universal Remote System . . . . 5-40
Lighting . . . . . . . . . . . . . . . . . . . . . . . 6-1
Exterior Lighting . . . . . . . . . . . . . . . 6-1
Interior Lighting . . . . . . . . . . . . . . . . 6-5
Lighting Features . . . . . . . . . . . . . . 6-6
Infotainment System . . . . . . . . . 7-1
Introduction . . . . . . . . . . . . . . . . . . . . 7-1
Radio . . . . . . . . . . . . . . . . . . . . . . . . . 7-14
Audio Players . . . . . . . . . . . . . . . . 7-22
Phone . . . . . . . . . . . . . . . . . . . . . . . . 7-35 Climate Controls
. . . . . . . . . . . . . 8-1
Climate Control Systems . . . . . . 8-1
Air Vents . . . . . . . . . . . . . . . . . . . . . . . 8-7
Maintenance . . . . . . . . . . . . . . . . . . . 8-8
Driving and Operating . . . . . . . . 9-1
Driving Information . . . . . . . . . . . . . 9-2
Starting and Operating . . . . . . . 9-14
Engine Exhaust . . . . . . . . . . . . . . 9-25
Automatic Transmission . . . . . . 9-26
Brakes . . . . . . . . . . . . . . . . . . . . . . . 9-28
Ride Control Systems . . . . . . . . 9-32
Cruise Control . . . . . . . . . . . . . . . . 9-34
Object Detection Systems . . . . 9-37
Fuel . . . . . . . . . . . . . . . . . . . . . . . . . . 9-44
Towing . . . . . . . . . . . . . . . . . . . . . . . 9-50
Conversions and Add-Ons . . . 9-50
Vehicle Care . . . . . . . . . . . . . . . . . 10-1
General Information . . . . . . . . . . 10-2
Vehicle Checks . . . . . . . . . . . . . . . 10-4
Headlamp Aiming . . . . . . . . . . . 10-28
Bulb Replacement . . . . . . . . . . 10-28
Electrical System . . . . . . . . . . . . 10-37
Page 7 of 436
Black plate (1,1)Chevrolet Malibu Owner Manual - 2013 - CRC - 6/6/12
In Brief 1-1
In Brief
Instrument Panel
Instrument Panel Overview . . . . 1-2
Initial Drive Information
Initial Drive Information . . . . . . . . 1-4
Remote Keyless Entry (RKE)System . . . . . . . . . . . . . . . . . . . . . . 1-4
Remote Vehicle Start . . . . . . . . . 1-5
Door Locks . . . . . . . . . . . . . . . . . . . 1-5
Windows . . . . . . . . . . . . . . . . . . . . . . 1-6
Seat Adjustment . . . . . . . . . . . . . . 1-7
Memory Features . . . . . . . . . . . . . 1-9
Second Row Seats . . . . . . . . . . 1-10
Heated Seats . . . . . . . . . . . . . . . . 1-10
Head Restraint Adjustment . . . . . . . . . . . . . . . . . 1-10
Safety Belts . . . . . . . . . . . . . . . . . . 1-10
Passenger Sensing System . . . . . . . . . . . . . . . . . . . . . 1-11
Mirror Adjustment . . . . . . . . . . . . 1-11
Steering Wheel Adjustment . . . . . . . . . . . . . . . . . 1-12
Interior Lighting . . . . . . . . . . . . . . 1-12 Exterior Lighting . . . . . . . . . . . . . 1-13
Windshield Wiper/Washer . . . . 1-14
Climate Controls . . . . . . . . . . . . . 1-15
Transmission . . . . . . . . . . . . . . . . 1-16
Vehicle Features
Radio(s) . . . . . . . . . . . . . . . . . . . . . 1-17
Satellite Radio . . . . . . . . . . . . . . . 1-17
Portable Audio Devices . . . . . . 1-17
Bluetooth
®. . . . . . . . . . . . . . . . . . . 1-17
Steering Wheel Controls . . . . . 1-18
Cruise Control . . . . . . . . . . . . . . . 1-18
Infotainment System . . . . . . . . . 1-19
Driver Information Center (DIC) . . . . . . . . . . . . . . . 1-19
Forward Collision Alert (FCA) System . . . . . . . . . . . . . . . . . . . . . 1-19
Lane Departure Warning (LDW) . . . . . . . . . . . . . 1-20
Rear Vision Camera (RVC) . . . . . . . . . . . . . 1-20
Ultrasonic Parking Assist . . . . 1-20
Power Outlets . . . . . . . . . . . . . . . 1-20
Universal Remote System . . . 1-21
Sunroof . . . . . . . . . . . . . . . . . . . . . . 1-21
eAssist Features
eAssist®Overview . . . . . . . . . . . 1-22
High Voltage Safety Information . . . . . . . . . . . . . . . . . 1-22
Driver Efficiency Gauge . . . . . . 1-23
Automatic Engine Start/Stop Feature . . . . . . . . . . . . . . . . . . . . . 1-23
Regenerative Braking . . . . . . . . 1-23
Battery . . . . . . . . . . . . . . . . . . . . . . . 1-23
Service . . . . . . . . . . . . . . . . . . . . . . 1-24
Performance and Maintenance
Traction Control System (TCS) . . . . . . . . . . . . . . 1-24
StabiliTrak
®System . . . . . . . . . 1-24
Tire Pressure Monitor . . . . . . . . 1-24
Tire Sealant and Compressor Kit . . . . . . . . . . . . . 1-25
Engine Oil Life System . . . . . . 1-25
Fuel E85 (85% Ethanol) . . . . . 1-26
Driving for Better Fuel Economy . . . . . . . . . . . . . . . . . . . 1-26
Roadside Assistance Program . . . . . . . . . . . . . . . . . . . . 1-26
OnStar
®. . . . . . . . . . . . . . . . . . . . . 1-26
Page 15 of 436
Black plate (9,1)Chevrolet Malibu Owner Manual - 2013 - CRC - 6/6/12
In Brief 1-9
To return the seatback to the upright
position:
1. Lift the lever fully withoutapplying pressure to the
seatback, and the seatback will
return to the upright position.
2. Push and pull on the seatback to make sure it is locked.
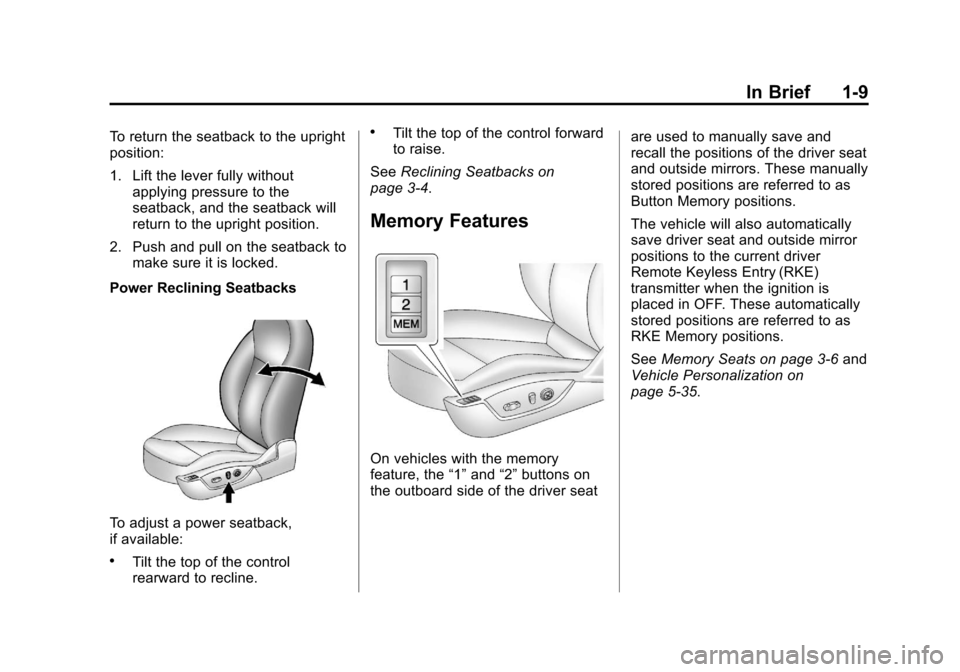
Power Reclining Seatbacks
To adjust a power seatback,
if available:
.Tilt the top of the control
rearward to recline.
.Tilt the top of the control forward
to raise.
See Reclining Seatbacks on
page 3‑4.
Memory Features
On vehicles with the memory
feature, the “1”and “2”buttons on
the outboard side of the driver seat are used to manually save and
recall the positions of the driver seat
and outside mirrors. These manually
stored positions are referred to as
Button Memory positions.
The vehicle will also automatically
save driver seat and outside mirror
positions to the current driver
Remote Keyless Entry (RKE)
transmitter when the ignition is
placed in OFF. These automatically
stored positions are referred to as
RKE Memory positions.
See
Memory Seats on page 3‑6 and
Vehicle Personalization on
page 5‑35.
Page 17 of 436
Black plate (11,1)Chevrolet Malibu Owner Manual - 2013 - CRC - 6/6/12
In Brief 1-11
.Lower Anchors and Tethers for
Children (LATCH System) on
page 3‑40.
Passenger Sensing
System
The passenger sensing system
turns off the front outboard
passenger frontal airbag and knee
airbag under certain conditions. No
other airbag is affected by the
passenger sensing system.
The passenger airbag status
indicator will light on the center
stack when the vehicle is started.
SeePassenger Sensing System on
page 3‑26 for important information.
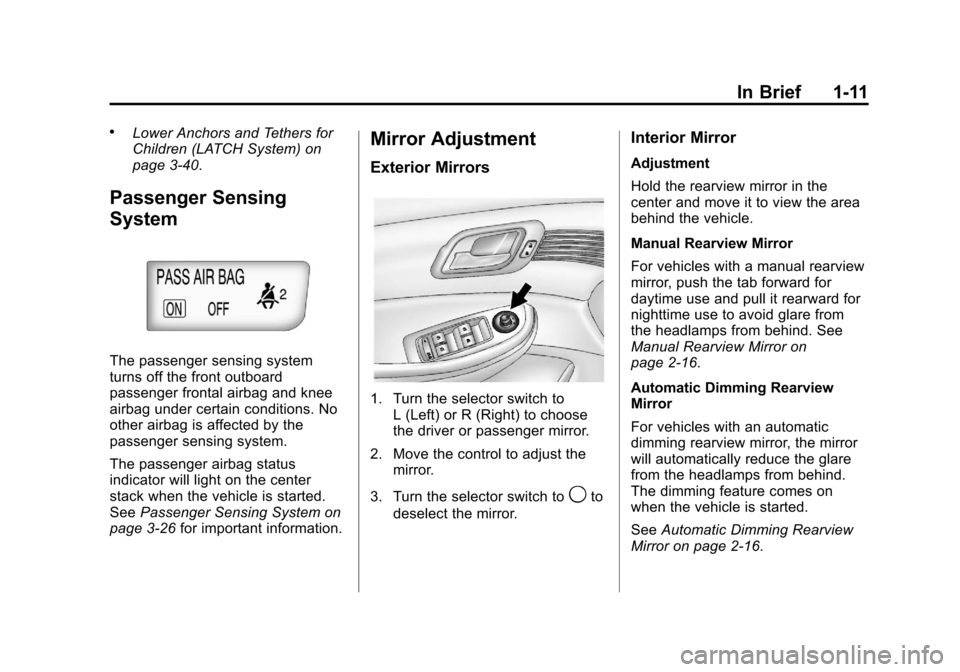
Mirror Adjustment
Exterior Mirrors
1. Turn the selector switch to
L (Left) or R (Right) to choose
the driver or passenger mirror.
2. Move the control to adjust the mirror.
3. Turn the selector switch to
9to
deselect the mirror.
Interior Mirror
Adjustment
Hold the rearview mirror in the
center and move it to view the area
behind the vehicle.
Manual Rearview Mirror
For vehicles with a manual rearview
mirror, push the tab forward for
daytime use and pull it rearward for
nighttime use to avoid glare from
the headlamps from behind. See
Manual Rearview Mirror on
page 2‑16.
Automatic Dimming Rearview
Mirror
For vehicles with an automatic
dimming rearview mirror, the mirror
will automatically reduce the glare
from the headlamps from behind.
The dimming feature comes on
when the vehicle is started.
See Automatic Dimming Rearview
Mirror on page 2‑16.
Page 25 of 436
Black plate (19,1)Chevrolet Malibu Owner Manual - 2013 - CRC - 6/6/12
In Brief 1-19
SET/−:Move the thumbwheel down
to set a speed and activate cruise
control or to make the vehicle
decelerate.
See Cruise Control on page 9‑34.
Infotainment System
See the infotainment manual for
information on the radio, audio
players, phone, navigation system,
and voice or speech recognition.
It also includes information on
settings and downloadable
applications (if equipped).
Driver Information
Center (DIC)
The DIC display is in the center of
the instrument cluster. It shows the
status of many vehicle systems. The
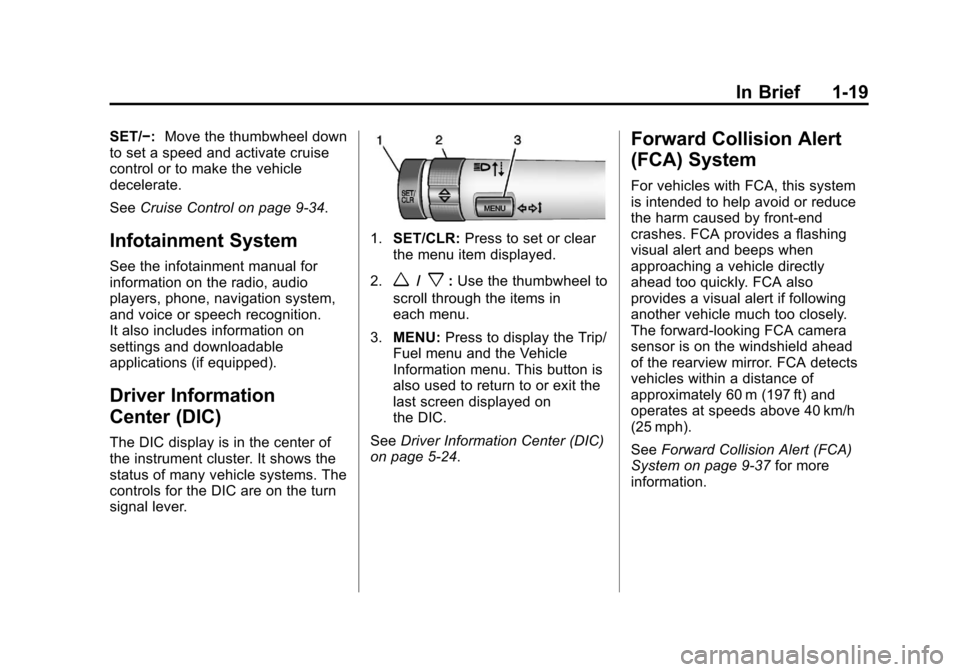
controls for the DIC are on the turn
signal lever.
1.SET/CLR: Press to set or clear
the menu item displayed.
2.
w/x: Use the thumbwheel to
scroll through the items in
each menu.
3. MENU: Press to display the Trip/
Fuel menu and the Vehicle
Information menu. This button is
also used to return to or exit the
last screen displayed on
the DIC.
See Driver Information Center (DIC)
on page 5‑24.
Forward Collision Alert
(FCA) System
For vehicles with FCA, this system
is intended to help avoid or reduce
the harm caused by front-end
crashes. FCA provides a flashing
visual alert and beeps when
approaching a vehicle directly
ahead too quickly. FCA also
provides a visual alert if following
another vehicle much too closely.
The forward-looking FCA camera
sensor is on the windshield ahead
of the rearview mirror. FCA detects
vehicles within a distance of
approximately 60 m (197 ft) and
operates at speeds above 40 km/h
(25 mph).
See Forward Collision Alert (FCA)
System on page 9‑37 for more
information.
Page 27 of 436
Black plate (21,1)Chevrolet Malibu Owner Manual - 2013 - CRC - 6/6/12
In Brief 1-21
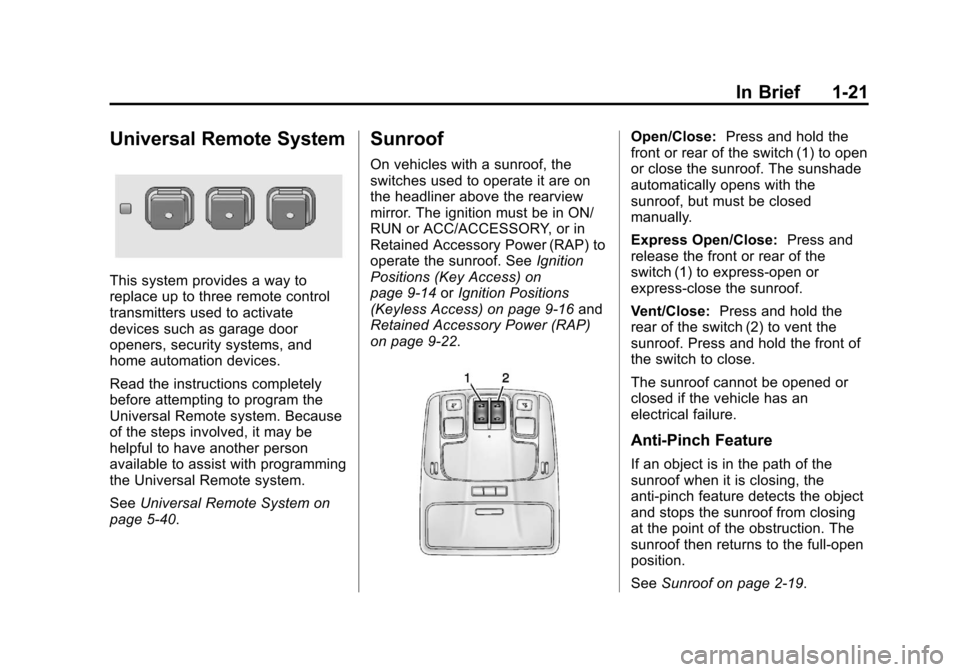
Universal Remote System
This system provides a way to
replace up to three remote control
transmitters used to activate
devices such as garage door
openers, security systems, and
home automation devices.
Read the instructions completely
before attempting to program the
Universal Remote system. Because
of the steps involved, it may be
helpful to have another person
available to assist with programming
the Universal Remote system.
SeeUniversal Remote System on
page 5‑40.
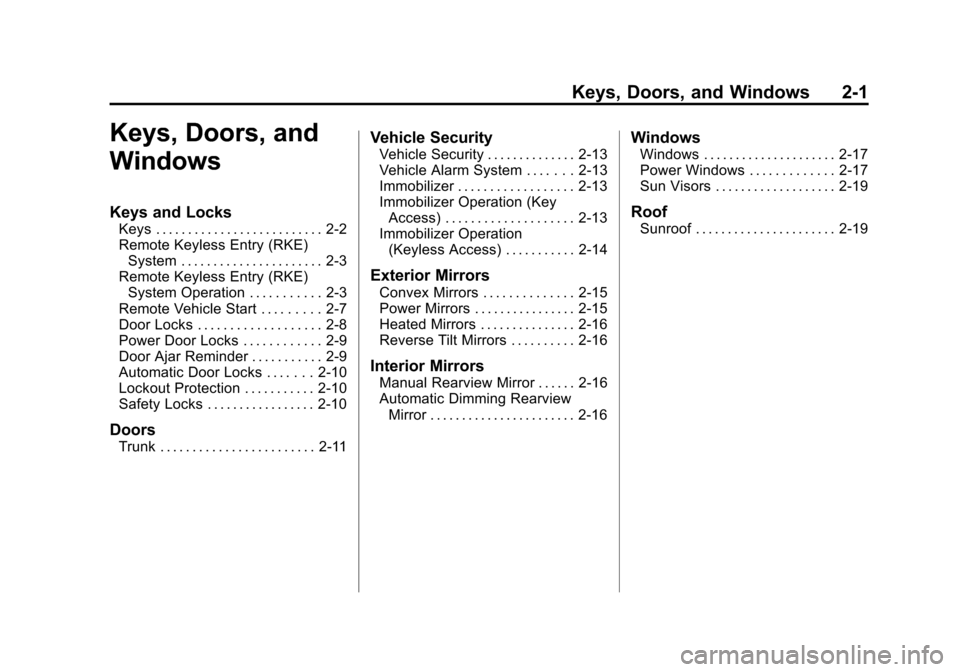
Sunroof
On vehicles with a sunroof, the
switches used to operate it are on
the headliner above the rearview
mirror. The ignition must be in ON/
RUN or ACC/ACCESSORY, or in
Retained Accessory Power (RAP) to
operate the sunroof. See Ignition
Positions (Key Access) on
page 9‑14 orIgnition Positions
(Keyless Access) on page 9‑16 and
Retained Accessory Power (RAP)
on page 9‑22.
Open/Close: Press and hold the
front or rear of the switch (1) to open
or close the sunroof. The sunshade
automatically opens with the
sunroof, but must be closed
manually.
Express Open/Close: Press and
release the front or rear of the
switch (1) to express-open or
express-close the sunroof.
Vent/Close: Press and hold the
rear of the switch (2) to vent the
sunroof. Press and hold the front of
the switch to close.
The sunroof cannot be opened or
closed if the vehicle has an
electrical failure.
Anti-Pinch Feature
If an object is in the path of the
sunroof when it is closing, the
anti-pinch feature detects the object
and stops the sunroof from closing
at the point of the obstruction. The
sunroof then returns to the full-open
position.
See Sunroof on page 2‑19.
Page 33 of 436
Black plate (1,1)Chevrolet Malibu Owner Manual - 2013 - CRC - 6/6/12
Keys, Doors, and Windows 2-1
Keys, Doors, and
Windows
Keys and Locks
Keys . . . . . . . . . . . . . . . . . . . . . . . . . . 2-2
Remote Keyless Entry (RKE)System . . . . . . . . . . . . . . . . . . . . . . 2-3
Remote Keyless Entry (RKE) System Operation . . . . . . . . . . . 2-3
Remote Vehicle Start . . . . . . . . . 2-7
Door Locks . . . . . . . . . . . . . . . . . . . 2-8
Power Door Locks . . . . . . . . . . . . 2-9
Door Ajar Reminder . . . . . . . . . . . 2-9
Automatic Door Locks . . . . . . . 2-10
Lockout Protection . . . . . . . . . . . 2-10
Safety Locks . . . . . . . . . . . . . . . . . 2-10
Doors
Trunk . . . . . . . . . . . . . . . . . . . . . . . . 2-11
Vehicle Security
Vehicle Security . . . . . . . . . . . . . . 2-13
Vehicle Alarm System . . . . . . . 2-13
Immobilizer . . . . . . . . . . . . . . . . . . 2-13
Immobilizer Operation (Key Access) . . . . . . . . . . . . . . . . . . . . 2-13
Immobilizer Operation (Keyless Access) . . . . . . . . . . . 2-14
Exterior Mirrors
Convex Mirrors . . . . . . . . . . . . . . 2-15
Power Mirrors . . . . . . . . . . . . . . . . 2-15
Heated Mirrors . . . . . . . . . . . . . . . 2-16
Reverse Tilt Mirrors . . . . . . . . . . 2-16
Interior Mirrors
Manual Rearview Mirror . . . . . . 2-16
Automatic Dimming RearviewMirror . . . . . . . . . . . . . . . . . . . . . . . 2-16
Windows
Windows . . . . . . . . . . . . . . . . . . . . . 2-17
Power Windows . . . . . . . . . . . . . 2-17
Sun Visors . . . . . . . . . . . . . . . . . . . 2-19
Roof
Sunroof . . . . . . . . . . . . . . . . . . . . . . 2-19
Page 47 of 436
Black plate (15,1)Chevrolet Malibu Owner Manual - 2013 - CRC - 6/6/12
Keys, Doors, and Windows 2-15
If the RKE transmitter appears to be
undamaged, try another transmitter.
Or, you may try placing the
transmitter in the transmitter pocket
in the center console. See“Starting
the Vehicle with a Low Transmitter
Battery” underRemote Keyless
Entry (RKE) System Operation on
page 2‑3.
If the engine does not start with the
other transmitter or when the
transmitter is in the pocket in the
center console, your vehicle needs
service. See your dealer who can
service the theft-deterrent system
and have a new transmitter
programmed to the vehicle.
Do not leave the key or device that
disarms or deactivates the
theft-deterrent system in the vehicle.Exterior Mirrors
Convex Mirrors
{WARNING
A convex mirror can make things,
like other vehicles, look farther
away than they really are. If you
cut too sharply into the right lane,
you could hit a vehicle on the
right. Check the inside mirror or
glance over your shoulder before
changing lanes.
The passenger side mirror is convex
shaped. A convex mirror's surface is
curved so more can be seen from
the driver seat.
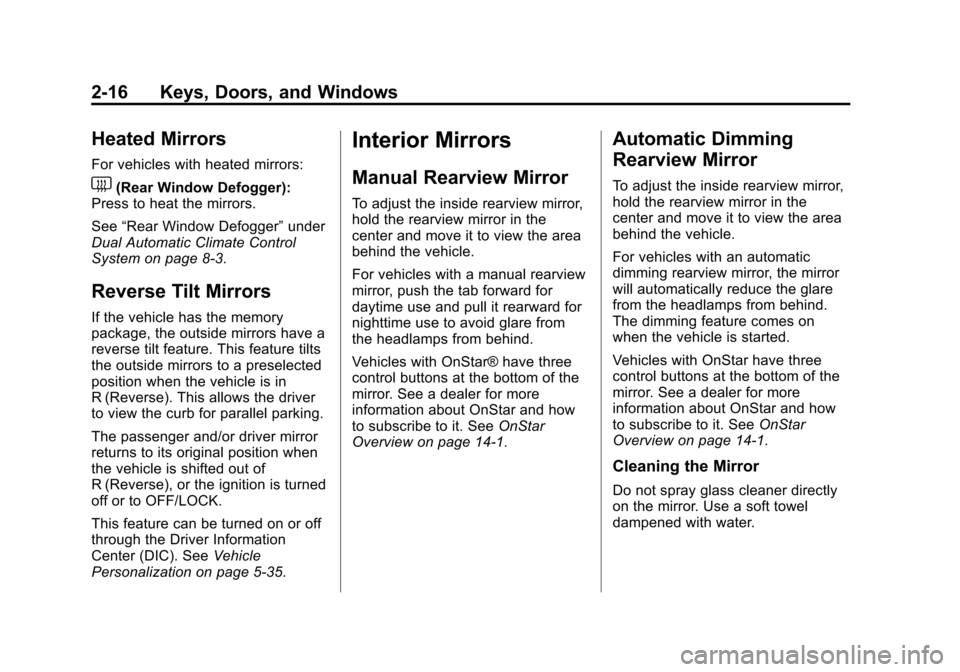
Power Mirrors
To adjust the mirrors:
1. Turn the selector switch to L (Left) or R (Right) to choose
the driver or passenger mirror.
2. Move the control to adjust the mirror.
3. Turn the selector switch to
9to
deselect the mirror.
Page 48 of 436
Black plate (16,1)Chevrolet Malibu Owner Manual - 2013 - CRC - 6/6/12
2-16 Keys, Doors, and Windows
Heated Mirrors
For vehicles with heated mirrors:
1(Rear Window Defogger):
Press to heat the mirrors.
See “Rear Window Defogger” under
Dual Automatic Climate Control
System on page 8‑3.
Reverse Tilt Mirrors
If the vehicle has the memory
package, the outside mirrors have a
reverse tilt feature. This feature tilts
the outside mirrors to a preselected
position when the vehicle is in
R (Reverse). This allows the driver
to view the curb for parallel parking.
The passenger and/or driver mirror
returns to its original position when
the vehicle is shifted out of
R (Reverse), or the ignition is turned
off or to OFF/LOCK.
This feature can be turned on or off
through the Driver Information
Center (DIC). See Vehicle
Personalization on page 5‑35.
Interior Mirrors
Manual Rearview Mirror
To adjust the inside rearview mirror,
hold the rearview mirror in the
center and move it to view the area
behind the vehicle.
For vehicles with a manual rearview
mirror, push the tab forward for
daytime use and pull it rearward for
nighttime use to avoid glare from
the headlamps from behind.
Vehicles with OnStar® have three
control buttons at the bottom of the
mirror. See a dealer for more
information about OnStar and how
to subscribe to it. See OnStar
Overview on page 14‑1.
Automatic Dimming
Rearview Mirror
To adjust the inside rearview mirror,
hold the rearview mirror in the
center and move it to view the area
behind the vehicle.
For vehicles with an automatic
dimming rearview mirror, the mirror
will automatically reduce the glare
from the headlamps from behind.
The dimming feature comes on
when the vehicle is started.
Vehicles with OnStar have three
control buttons at the bottom of the
mirror. See a dealer for more
information about OnStar and how
to subscribe to it. See OnStar
Overview on page 14‑1.
Cleaning the Mirror
Do not spray glass cleaner directly
on the mirror. Use a soft towel
dampened with water.
Page 51 of 436
Black plate (19,1)Chevrolet Malibu Owner Manual - 2013 - CRC - 6/6/12
Keys, Doors, and Windows 2-19
Pressv{to activate the window
lockout. The indicator light in the
switch will illuminate.
Press
v {again to deactivate the
window lockout and safety locks.
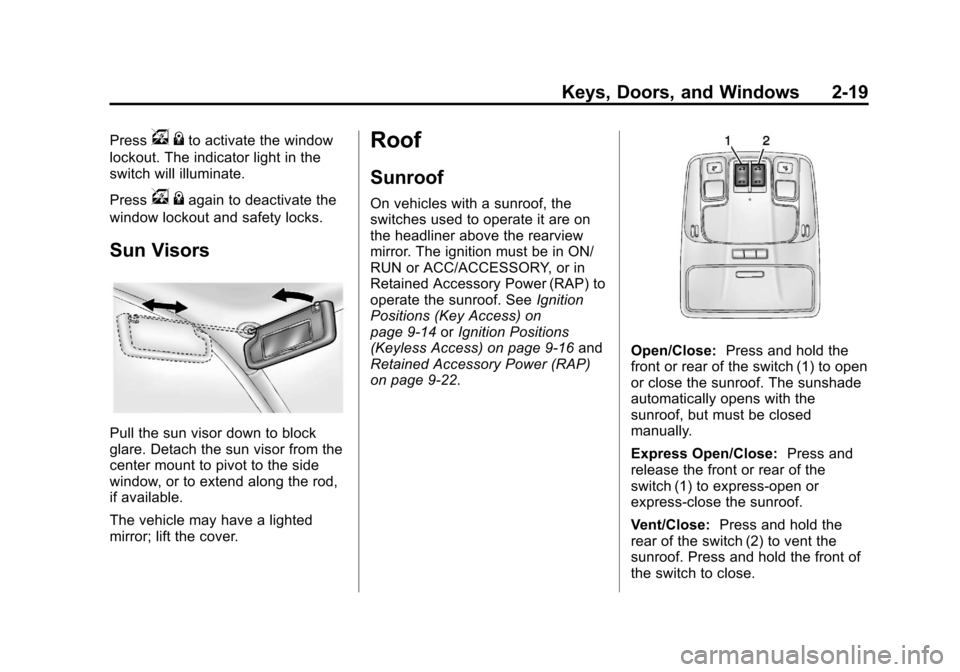
Sun Visors
Pull the sun visor down to block
glare. Detach the sun visor from the
center mount to pivot to the side
window, or to extend along the rod,
if available.
The vehicle may have a lighted
mirror; lift the cover.
Roof
Sunroof
On vehicles with a sunroof, the
switches used to operate it are on
the headliner above the rearview
mirror. The ignition must be in ON/
RUN or ACC/ACCESSORY, or in
Retained Accessory Power (RAP) to
operate the sunroof. See Ignition
Positions (Key Access) on
page 9‑14 orIgnition Positions
(Keyless Access) on page 9‑16 and
Retained Accessory Power (RAP)
on page 9‑22.
Open/Close: Press and hold the
front or rear of the switch (1) to open
or close the sunroof. The sunshade
automatically opens with the
sunroof, but must be closed
manually.
Express Open/Close: Press and
release the front or rear of the
switch (1) to express-open or
express-close the sunroof.
Vent/Close: Press and hold the
rear of the switch (2) to vent the
sunroof. Press and hold the front of
the switch to close.