climate control CHEVROLET MALIBU 2014 8.G User Guide
[x] Cancel search | Manufacturer: CHEVROLET, Model Year: 2014, Model line: MALIBU, Model: CHEVROLET MALIBU 2014 8.GPages: 428, PDF Size: 5.94 MB
Page 42 of 428
Black plate (10,1)Chevrolet Malibu Owner Manual (GMNA-Localizing-U.S./Canada/Mexico-
6081487) - 2014 - CRC - 11/19/13
2-10 Keys, Doors, and Windows
If the vehicle has heated seats, they
may come on during a remote start.
SeeHeated Front Seats on
page 3-7.
Laws in some local communities
may restrict the use of remote
starters. For example, some laws
require a person using remote start
to have the vehicle in view. Check
local regulations for any
requirements.
Other conditions can affect the
performance of the transmitter. See
Remote Keyless Entry (RKE)
System on page 2-2.
Starting the Engine Using Remote
Start
To start the engine using the remote
start feature:
1. Press and release
Q.
2. Immediately after completing Step 1, press and hold
/for at
least four seconds or until the
turn signal lamps flash. The turn signal lamps flashing confirms
the request to remote start the
vehicle has been received.
When the engine starts, the parking
lamps will turn on and remain on as
long as the engine is running. The
doors will be locked and the climate
control system may come on.
The engine will continue to run for
10 minutes. Repeat the steps for a
10-minute time extension. Remote
start can be extended only once.
Start the vehicle before driving.
Extending Engine Run Time
The engine run time can be
extended by another 10 minutes,
if during the first 10 minutes
Steps 1–2 are repeated while the
engine is still running. When the
remote start is extended, the
second 10 minute period is added
on to the first 10 minutes for a total
of 20 minutes.
The remote start can only be
extended once. A maximum of two remote starts,
or a single start with an extension,
is allowed between ignition cycles.
The vehicle's ignition must be
turned on and then back off before
the remote start procedure can be
used again.
Canceling a Remote Start
To cancel a remote start, do one of
the following:
.Aim the RKE transmitter at the
vehicle and press and hold
/
until the parking lamps turn off.
.Turn on the hazard warning
flashers.
.Turn the vehicle on and then off.
Conditions in Which Remote Start
Will Not Work
The remote vehicle start feature will
not operate if:
.The key is in the ignition (Key
Access) or if the key is in the
vehicle (Keyless Access).
.The hood is not closed.
Page 46 of 428
Black plate (14,1)Chevrolet Malibu Owner Manual (GMNA-Localizing-U.S./Canada/Mexico-
6081487) - 2014 - CRC - 11/19/13
2-14 Keys, Doors, and Windows
Pressv{to activate the rear door
safety locks. The indicator light in
the switch will illuminate.
Press
v {again to deactivate the
safety locks and window lockout.
If a rear door handle is being pulled
when the safety lock is deactivated,
that door will remain locked and the
indicator light may flash. Release
the handle, then press the safety
lock twice to deactivate the safety
locks.
Doors
Trunk
{Warning
Exhaust gases can enter the
vehicle if it is driven with the
liftgate, hatch/trunk open, or with
any objects that pass through the
seal between the body and the
hatch/trunk or liftgate. Engine
exhaust contains carbon
monoxide (CO) which cannot be
seen or smelled. It can cause
unconsciousness and even death.
If the vehicle must be driven with
the liftgate or hatch/trunk open:
.Close all of the windows.
.Fully open the air outlets on
or under the instrument
panel.
(Continued)
Warning (Continued)
.Adjust the climate control
system to a setting that
brings in only outside air and
set the fan speed to the
highest setting. See “Climate
Control Systems” in the
Index.
.If the vehicle is equipped with
a power liftgate, disable the
power liftgate function.
For more information about
carbon monoxide, see Engine
Exhaust on page 9-26.
Page 52 of 428
Black plate (20,1)Chevrolet Malibu Owner Manual (GMNA-Localizing-U.S./Canada/Mexico-
6081487) - 2014 - CRC - 11/19/13
2-20 Keys, Doors, and Windows
Heated Mirrors
For vehicles with heated mirrors:
1(Rear Window Defogger):
Press to heat the mirrors.
See “Rear Window Defogger” under
Dual Automatic Climate Control
System on page 8-4.
Reverse Tilt Mirrors
If equipped with the memory
package, the outside mirrors have a
reverse tilt feature. This feature tilts
the outside mirrors to a preselected
position when the vehicle is in
R (Reverse). This allows the driver
to view the curb for parallel parking.
The passenger and/or driver mirror
returns to its original position when
the vehicle is shifted out of
R (Reverse), or the ignition is turned
off or to OFF/LOCK.
This feature can be turned on or off
through the Driver Information
Center (DIC). See Vehicle
Personalization on page 5-34.
Interior Mirrors
Interior Rearview Mirrors
Adjust the rearview mirror for a clear
view of the area behind your
vehicle.
If equipped with OnStar, the vehicle
may have three control buttons at
the bottom of the mirror. See your
dealer for more information about
OnStar and how to subscribe to it.
See OnStar Overview on page 14-1.
Do not spray glass cleaner directly
on the mirror. Use a soft towel
dampened with water.
Manual Rearview Mirror
Push the tab forward for daytime
use and pull it rearward for
nighttime use to avoid glare of the
headlamps from behind.
Automatic Dimming
Rearview Mirror
The rearview mirror automatically
dims to reduce the glare of the
headlamps from behind. This
feature comes on when the vehicle
is started.
Page 64 of 428
Black plate (8,1)Chevrolet Malibu Owner Manual (GMNA-Localizing-U.S./Canada/Mexico-
6081487) - 2014 - CRC - 11/19/13
3-8 Seats and Restraints
Warning (Continued)
heat, such as a blanket, cushion,
cover, or similar item. This may
cause the seat heater to
overheat. An overheated seat
heater may cause a burn or may
damage the seat.
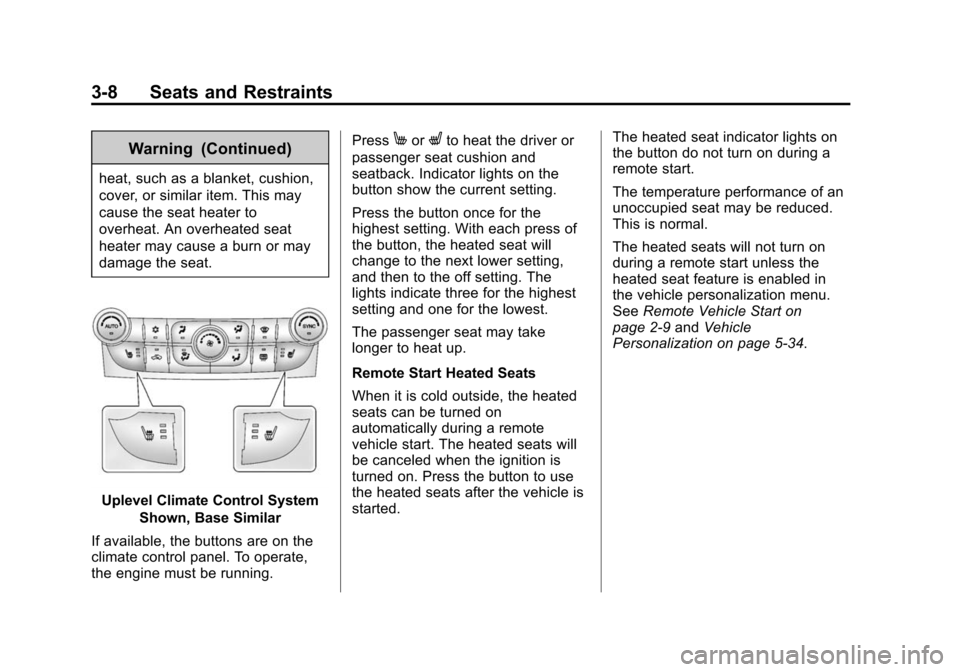
Uplevel Climate Control SystemShown, Base Similar
If available, the buttons are on the
climate control panel. To operate,
the engine must be running. Press
MorLto heat the driver or
passenger seat cushion and
seatback. Indicator lights on the
button show the current setting.
Press the button once for the
highest setting. With each press of
the button, the heated seat will
change to the next lower setting,
and then to the off setting. The
lights indicate three for the highest
setting and one for the lowest.
The passenger seat may take
longer to heat up.
Remote Start Heated Seats
When it is cold outside, the heated
seats can be turned on
automatically during a remote
vehicle start. The heated seats will
be canceled when the ignition is
turned on. Press the button to use
the heated seats after the vehicle is
started. The heated seat indicator lights on
the button do not turn on during a
remote start.
The temperature performance of an
unoccupied seat may be reduced.
This is normal.
The heated seats will not turn on
during a remote start unless the
heated seat feature is enabled in
the vehicle personalization menu.
See
Remote Vehicle Start on
page 2-9 andVehicle
Personalization on page 5-34.
Page 115 of 428
Black plate (5,1)Chevrolet Malibu Owner Manual (GMNA-Localizing-U.S./Canada/Mexico-
6081487) - 2014 - CRC - 11/19/13
Instruments and Controls 5-5
information about how to use the
menu system. For vehicles with a
navigation system, see the
navigation manual.
Setting the Clock (Radio
with CD)
To set the time:
1. Press the CONFIG button andselect Time Settings.
2. Select Set Time.
3. Turn the TUNE/MENU knob to adjust the highlighted number.
4. Press the TUNE/MENU knob to select the next number.
5. To save the time and return to the Time Settings menu, press
the BACK
/button at any time
or press the TUNE/MENU knob
after adjusting the minutes.
Setting the 12/24 Hour Format
1. Press the CONFIG button and select Time Settings.
2. Highlight 12/24 Hour Format. 3. Press the TUNE/MENU knob to
select the 12 hour or 24 hour
display format.
Setting the Clock (Radios with
Touchscreen)
To set the time:
1. Press the CONFIG button to
enter the menu options. Turn the
TUNE/MENU knob to scroll
through the available setup
features. Press the TUNE/MENU
knob or press the Time screen
button to display other options
within that feature.
2. Press + or −to increase or
decrease the Hours and Minutes
displayed on the clock.
To turn Auto Set on and off, press
the Auto Set button.
If auto timing is set, the time
displayed on the clock may not
update immediately when driving
into a new time zone. 12/24 HR Format:
Press the 12 HR
screen button for standard time;
press the 24 HR screen button for
military time.
Day + or Day −:Press the Day +
or Day −display buttons to increase
or decrease the day.
Display: Press Display to turn the
display of the time on the screen on
or off.
Power Outlets
The accessory power outlets can be
used to plug in electrical equipment,
such as a cell phone or MP3 player.
There are two accessory power
outlets: one on the center stack
below the climate control system,
and one under the armrest inside
the center console storage.
The outlet is powered when the
ignition is in ON/RUN or ACC/
ACCESSORY, or until the driver
door is opened within 10 minutes of
Page 145 of 428
Black plate (35,1)Chevrolet Malibu Owner Manual (GMNA-Localizing-U.S./Canada/Mexico-
6081487) - 2014 - CRC - 11/19/13
Instruments and Controls 5-35
3. Press TUNE/MENU to select theVehicle Settings menu.
The following list of menu items will
be available:
.Climate and Air Quality
.Collision/Detection Systems
.Comfort and Convenience
.Language
.Lighting
.Power Door Locks
.Remote Locking, Unlocking,
Starting
.Return to Factory Settings
Turn the TUNE/MENU knob to
highlight the menu. Press TUNE/
MENU to select it. Each of the
menus is detailed in the following
information.
Climate and Air Quality
Select the Climate and Air Quality
menu and the following may be
displayed:
.Auto Fan Speed
.Remote Start Heated Seats
.Auto Defog
.Auto Rear Defog
Auto Fan Speed
This allows for selecting the
automatic fan speed. It can be
adjusted to run lower or higher than
normal.
Press TUNE/MENU when Auto Fan
Speed is highlighted to open the
menu. Turn the TUNE/MENU knob
to highlight High, Medium, or Low.
Press TUNE/MENU to confirm the
selection and move back to the
last menu.
Remote Start Heated Seats
When turned on, this feature will
turn the heated seats on when using
remote start on cold days.
Press TUNE/MENU when Remote
Start Heated Seats is highlighted.
Turn the TUNE/MENU knob to
select On or Off. Press TUNE/
MENU to confirm the selection and
move back to the last menu. Auto Defog
Only vehicles with dual automatic
climate control will have this option.
This allows for turning the auto
defog on or off.
Press TUNE/MENU when Auto
Defog is highlighted to open the
menu. Turn the TUNE/MENU knob
to highlight On or Off. Press TUNE/
MENU to confirm the selection and
move back to the last menu.
Auto Rear Defog
This will allow for turning the auto
rear defog on or off. This feature will
automatically turn on the rear
window defogger when it is cold
outside.
Press TUNE/MENU when Auto
Rear Defog is highlighted to open
the menu. Turn the TUNE/MENU
knob to highlight On or Off. Press
TUNE/MENU to confirm the
selection and move back to the
last menu.
Page 161 of 428
Black plate (7,1)Chevrolet Malibu Owner Manual (GMNA-Localizing-U.S./Canada/Mexico-
6081487) - 2014 - CRC - 11/19/13
Lighting 6-7
Battery Load
Management
The vehicle has Electric Power
Management (EPM), which
estimates the battery's temperature
and state of charge. It then adjusts
the voltage for best performance
and extended life of the battery.
When the battery's state of charge
is low, the voltage is raised slightly
to quickly bring the charge back up.
When the state of charge is high,
the voltage is lowered slightly to
prevent overcharging. If the vehicle
has a voltage display on the Driver
Information Center (DIC), you may
see the voltage move up or down.
This is normal. If there is a problem,
an alert will be displayed.The battery can be discharged at
idle if the electrical loads are very
high. This is true for all vehicles.
This is because the generator
(alternator) may not be spinning fast
enough at idle to produce all the
power that is needed for very high
electrical loads.
A high electrical load occurs when
several of the following are on, such
as: headlamps, high beams, fog
lamps, rear window defogger,
climate control fan at high speed,
heated seats, engine cooling fans,
trailer loads, and loads plugged into
accessory power outlets.
EPM works to prevent excessive
discharge of the battery. It does this
by balancing the generator's output
and the vehicle's electrical needs.
It can increase engine idle speed to
generate more power, whenever
needed. It can temporarily reduce
the power demands of some
accessories.
Normally, these actions occur in
steps or levels, without being
noticeable. In rare cases at the
highest levels of corrective action,
this action may be noticeable to the
driver. If so, a DIC message might
be displayed and it is recommended
that the driver reduce the electrical
loads as much as possible. See
Battery Voltage and Charging
Messages on page 5-27.
Page 195 of 428
Black plate (1,1)Chevrolet Malibu Owner Manual (GMNA-Localizing-U.S./Canada/Mexico-
6081487) - 2014 - CRC - 11/19/13
Climate Controls 8-1
Climate Controls
Climate Control Systems
Climate Control Systems . . . . . . 8-1
Dual Automatic Climate ControlSystem . . . . . . . . . . . . . . . . . . . . . . 8-4
Air Vents
Air Vents . . . . . . . . . . . . . . . . . . . . . . 8-8
Maintenance
Passenger Compartment AirFilter . . . . . . . . . . . . . . . . . . . . . . . . . 8-9
Service . . . . . . . . . . . . . . . . . . . . . . 8-10
Climate Control Systems
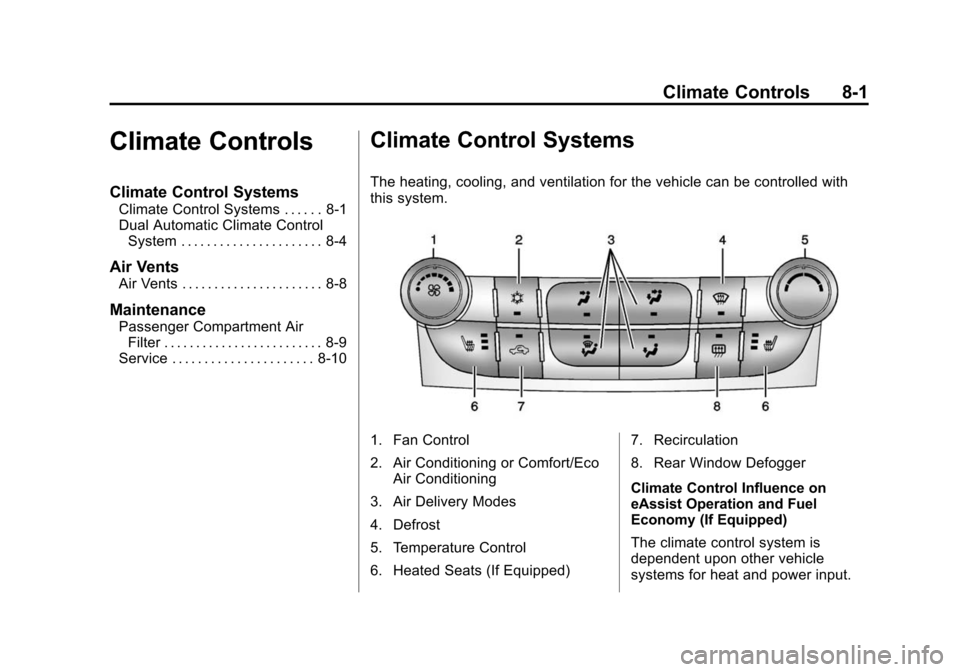
The heating, cooling, and ventilation for the vehicle can be controlled with
this system.
1. Fan Control
2. Air Conditioning or Comfort/Eco
Air Conditioning
3. Air Delivery Modes
4. Defrost
5. Temperature Control
6. Heated Seats (If Equipped) 7. Recirculation
8. Rear Window Defogger
Climate Control Influence on
eAssist Operation and Fuel
Economy (If Equipped)
The climate control system is
dependent upon other vehicle
systems for heat and power input.
Page 196 of 428
Black plate (2,1)Chevrolet Malibu Owner Manual (GMNA-Localizing-U.S./Canada/Mexico-
6081487) - 2014 - CRC - 11/19/13
8-2 Climate Controls
Certain climate control settings can
lead to higher fuel usage and/or
fewer auto stops.
The following are climate control
settings that use more fuel:
.Comfort air conditioning mode.
.Defrost mode.
.Setting the climate control to the
coldest or hottest temperature.
.High fan speed settings.
To help reduce fuel usage:
.Use eco air conditioning, instead
of the comfort air conditioning.
.Select a temperature setting that
is higher in hot weather and
lower in cold weather.
.Turn off the air conditioning
when it is not needed.
.Only use defrost to clear the
windows.
Temperature Control: Turn the
knob clockwise or counterclockwise
to increase or decrease the driver or
passenger temperature setting. Fan Control:
Turn the knob
clockwise or counterclockwise to
increase or decrease the fan speed.
Air Delivery Modes: Press
Y,\,
[, or-to change the direction of
the airflow. An indicator light comes
on in the selected mode button.
Y(Vent): Air is directed to the
instrument panel outlets.
\(Bi-Level): Air is directed to the
instrument panel outlets and the
floor outlets.
[(Floor): Air is directed to the
floor outlets.
-(Defog): Air is directed to the
windshield and floor outlets to clear
the windows of fog or moisture.
0(Defrost): Press to clear the
windshield of fog or frost more
quickly. Air is directed to the
windshield and side window outlets.
For best results, clear all snow and
ice from the windshield before
defrosting.
#(Air Conditioning): Press to
turn the air conditioning on or off.
If the fan is turned off or the outside
temperature falls below freezing, the
air conditioner will not run and the
indicator light turns off.
#(Comfort/Eco Air
Conditioning): Press to cycle
between the off, comfort, and eco
(economy) air conditioning modes.
The indicator will be lit in comfort
and eco modes and turns off when
there is no A/C function. If the fan is
turned off or the outside
temperature falls below freezing, the
air conditioner will not run and the
indicator light turns off.
For eco a/c, press
#. The indicator
will turn green. This setting
balances fuel economy and air
conditioning comfort. In warm
weather conditions, auto stops may
occur more frequently and the
vehicle interior may be warmer as
compared to the comfort air
conditioning. This setting allows
Page 197 of 428
Black plate (3,1)Chevrolet Malibu Owner Manual (GMNA-Localizing-U.S./Canada/Mexico-
6081487) - 2014 - CRC - 11/19/13
Climate Controls 8-3
higher humidity inside the vehicle
and window fogging before the
engine restarts.
Pressing the
0button during an
auto stop will restart the engine to
prevent window fogging. To reach
comfort levels quickly during an
auto stop, the engine will restart if
the air conditioner is off and AUTO
or
#is selected.
For comfort a/c, press
#again.
The indicator will turn amber.
When the indicator light is on, the
air conditioner runs automatically to
cool the air inside the vehicle or to
dry the air needed to defog the
windshield faster.
h(Recirculation): Press to turn
on recirculation. An indicator light
comes on. Air is recirculated to
quickly cool the inside of the vehicle
or prevent outside air and odors
from entering.
MorL(Heated Seats, If
Equipped): Press to turn the
heated seats on or off. See Heated
Front Seats on page 3-7.
Rear Window Defogger
=(Rear Window Defogger):
Press to turn the rear window
defogger on or off.
The rear window defogger turns off
automatically after about
10 minutes. If turned on again, it
runs for about five minutes before
turning off. At higher speeds, the
rear window defogger may stay on
continuously.
If equipped with heated outside
rearview mirrors, they turn on with
the rear window defogger and help
to clear fog or frost from the surface
of the mirror. See Heated Mirrors on
page 2-20.
{Caution
Using a razor blade or sharp
object on the inside rear window
can damage the antenna or
defogger. Repairs would not be
covered by the vehicle warranty.
Do not stick anything to the rear
window.
Sensors
The solar sensor on top of the
instrument panel near the
windshield monitors the solar heat.
The climate control system uses the
sensor information to adjust the
temperature, fan speed,
recirculation, and air delivery mode
for best comfort.
If the sensor is covered, the
automatic climate control system
may not work properly.