manual radio set CHEVROLET MALIBU 2014 8.G Owners Manual
[x] Cancel search | Manufacturer: CHEVROLET, Model Year: 2014, Model line: MALIBU, Model: CHEVROLET MALIBU 2014 8.GPages: 428, PDF Size: 5.94 MB
Page 24 of 428
Black plate (18,1)Chevrolet Malibu Owner Manual (GMNA-Localizing-U.S./Canada/Mexico-
6081487) - 2014 - CRC - 11/19/13
1-18 In Brief
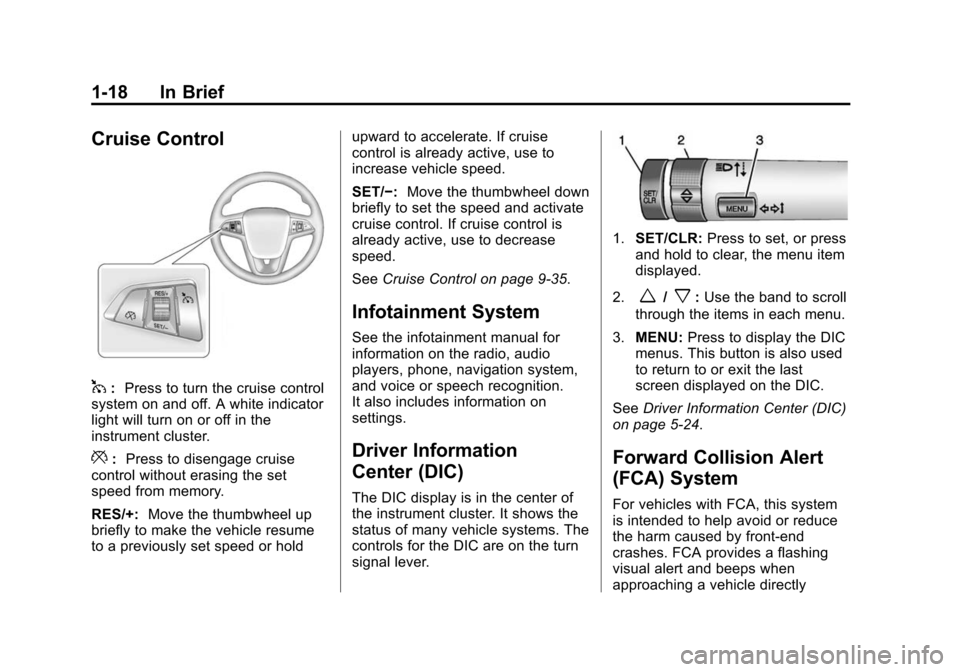
Cruise Control
1:Press to turn the cruise control
system on and off. A white indicator
light will turn on or off in the
instrument cluster.
*: Press to disengage cruise
control without erasing the set
speed from memory.
RES/+: Move the thumbwheel up
briefly to make the vehicle resume
to a previously set speed or hold upward to accelerate. If cruise
control is already active, use to
increase vehicle speed.
SET/−:
Move the thumbwheel down
briefly to set the speed and activate
cruise control. If cruise control is
already active, use to decrease
speed.
See Cruise Control on page 9-35.
Infotainment System
See the infotainment manual for
information on the radio, audio
players, phone, navigation system,
and voice or speech recognition.
It also includes information on
settings.
Driver Information
Center (DIC)
The DIC display is in the center of
the instrument cluster. It shows the
status of many vehicle systems. The
controls for the DIC are on the turn
signal lever.
1.SET/CLR: Press to set, or press
and hold to clear, the menu item
displayed.
2.
w/x: Use the band to scroll
through the items in each menu.
3. MENU: Press to display the DIC
menus. This button is also used
to return to or exit the last
screen displayed on the DIC.
See Driver Information Center (DIC)
on page 5-24.
Forward Collision Alert
(FCA) System
For vehicles with FCA, this system
is intended to help avoid or reduce
the harm caused by front-end
crashes. FCA provides a flashing
visual alert and beeps when
approaching a vehicle directly
Page 49 of 428
Black plate (17,1)Chevrolet Malibu Owner Manual (GMNA-Localizing-U.S./Canada/Mexico-
6081487) - 2014 - CRC - 11/19/13
Keys, Doors, and Windows 2-17
will bypass the 30-second delay
and immediately arm the alarm
system.
The vehicle alarm system will not
arm if the doors are locked with
the key.
If the driver door is opened without
first unlocking with the RKE
transmitter, the horn will chirp and
the lights will flash to indicate
pre-alarm. If the vehicle is not
started, or the door is not unlocked
by pressing
Kon the RKE
transmitter during the 10-second
pre-alarm, the alarm will be
activated.
If a door, the hood, or the trunk is
opened without first disarming the
system, the turn signals will flash
and the horn will sound for about
30 seconds. The alarm system will
then re-arm to monitor for the next
unauthorized event.
Disarming the Alarm System
Do one of the following to disarm
the alarm system or turn off the
alarm if it has been activated:
.PressKon the RKE transmitter.
.Unlock the vehicle using the
Keyless Access system,
if equipped.
.Start the vehicle.
To avoid setting off the alarm by
accident:
.Lock the vehicle after all
occupants have left the vehicle
and all doors are closed.
.Always unlock a door with the
RKE transmitter or use the
Keyless Access system,
if equipped.
Unlocking the driver door with the
key will not disarm the system or
turn off the alarm.
How to Detect a Tamper
Condition
IfKis pressed on the RKE
transmitter and the horn chirps three
times, an alarm occurred previously
while the alarm system was armed.
If the alarm has been activated, a
message will appear on the DIC.
See Security Messages on
page 5-32.
Immobilizer
See Radio Frequency Statement on
page 13-15.
Immobilizer Operation
(Key Access)
This vehicle has a passive
theft-deterrent system.
The system does not have to be
manually armed or disarmed.
The vehicle is automatically
immobilized when the key is
removed from the ignition.
Page 114 of 428
Black plate (4,1)Chevrolet Malibu Owner Manual (GMNA-Localizing-U.S./Canada/Mexico-
6081487) - 2014 - CRC - 11/19/13
5-4 Instruments and Controls
nL(Windshield Washer): Pull
the windshield wiper lever toward
you to spray windshield washer fluid
and activate the wipers. The wipers
will continue until the lever is
released or the maximum wash time
is reached. When the windshield
wiper lever is released, additional
wipes may occur depending on how
long the windshield washer had
been activated. For more
information on filling the windshield
washer fluid reservoir, see Washer
Fluid on page 10-21.
{Warning
In freezing weather, do not use
the washer until the windshield is
warmed. Otherwise the washer
fluid can form ice on the
windshield, blocking your vision.
Clear snow and ice from the wiper
blades and windshield before using
them. If frozen to the windshield,
carefully loosen or thaw them. Damaged blades should be
replaced. See
Wiper Blade
Replacement on page 10-27.
Heavy snow or ice can overload the
wiper motor.
Wipe Parking
If the ignition is turned to LOCK/
OFF while the wipers are on LO, HI,
or INT, they will immediately stop.
If the windshield wiper lever is then
moved to off before the driver door
is opened or within 10 minutes, the
wipers will restart and move to the
base of the windshield.
If the ignition is turned to LOCK/
OFF while the wipers are performing
wipes due to windshield washing,
the wipers continue to run until they
reach the base of the windshield.
Compass
The vehicle may have a compass
display on the center stack. The
compass receives its heading and
other information from the Global Positioning System (GPS) antenna,
StabiliTrak
®, and vehicle speed
information.
The compass system is designed to
operate for a certain number of
miles or degrees of turn before
needing a signal from the GPS
satellites. When the compass
display shows CAL, drive the
vehicle for a short distance in an
open area where it can receive a
GPS signal. The compass system
will automatically determine when a
GPS signal is restored and provide
a heading again. See Compass
Messages on page 5-28 for the
messages that may be displayed for
the compass.
Clock
The infotainment system controls
are used to access the time and
date settings through the menu
system. The clock menu can only
be used with the radio on while in
ON/RUN or ACC/ACCESSORY.
See Overview on page 7-3 for
Page 115 of 428
Black plate (5,1)Chevrolet Malibu Owner Manual (GMNA-Localizing-U.S./Canada/Mexico-
6081487) - 2014 - CRC - 11/19/13
Instruments and Controls 5-5
information about how to use the
menu system. For vehicles with a
navigation system, see the
navigation manual.
Setting the Clock (Radio
with CD)
To set the time:
1. Press the CONFIG button andselect Time Settings.
2. Select Set Time.
3. Turn the TUNE/MENU knob to adjust the highlighted number.
4. Press the TUNE/MENU knob to select the next number.
5. To save the time and return to the Time Settings menu, press
the BACK
/button at any time
or press the TUNE/MENU knob
after adjusting the minutes.
Setting the 12/24 Hour Format
1. Press the CONFIG button and select Time Settings.
2. Highlight 12/24 Hour Format. 3. Press the TUNE/MENU knob to
select the 12 hour or 24 hour
display format.
Setting the Clock (Radios with
Touchscreen)
To set the time:
1. Press the CONFIG button to
enter the menu options. Turn the
TUNE/MENU knob to scroll
through the available setup
features. Press the TUNE/MENU
knob or press the Time screen
button to display other options
within that feature.
2. Press + or −to increase or
decrease the Hours and Minutes
displayed on the clock.
To turn Auto Set on and off, press
the Auto Set button.
If auto timing is set, the time
displayed on the clock may not
update immediately when driving
into a new time zone. 12/24 HR Format:
Press the 12 HR
screen button for standard time;
press the 24 HR screen button for
military time.
Day + or Day −:Press the Day +
or Day −display buttons to increase
or decrease the day.
Display: Press Display to turn the
display of the time on the screen on
or off.
Power Outlets
The accessory power outlets can be
used to plug in electrical equipment,
such as a cell phone or MP3 player.
There are two accessory power
outlets: one on the center stack
below the climate control system,
and one under the armrest inside
the center console storage.
The outlet is powered when the
ignition is in ON/RUN or ACC/
ACCESSORY, or until the driver
door is opened within 10 minutes of
Page 134 of 428
Black plate (24,1)Chevrolet Malibu Owner Manual (GMNA-Localizing-U.S./Canada/Mexico-
6081487) - 2014 - CRC - 11/19/13
5-24 Instruments and Controls
Driver Information
Center (DIC)
The DIC displays information about
the vehicle. It also displays warning
messages if a system problem is
detected. SeeVehicle Messages on
page 5-27. All messages appear in
the DIC display in the center of the
instrument cluster.
The vehicle may also have features
that can be customized through the
controls on the radio. See Vehicle
Personalization on page 5-34.
DIC Operation and Displays
The DIC has different displays,
which can be accessed by using the
DIC buttons on the turn signal lever
to the left of the steering wheel. The
DIC displays trip, fuel, vehicle
system information, and warning
messages if a system problem is
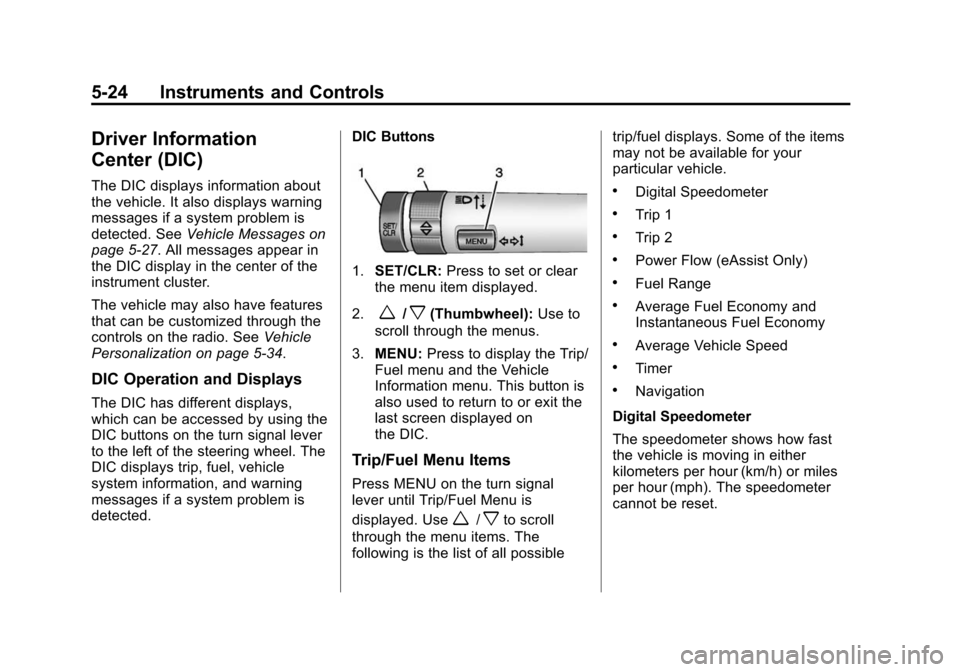
detected. DIC Buttons
1.
SET/CLR: Press to set or clear
the menu item displayed.
2.
w/x(Thumbwheel): Use to
scroll through the menus.
3. MENU: Press to display the Trip/
Fuel menu and the Vehicle
Information menu. This button is
also used to return to or exit the
last screen displayed on
the DIC.
Trip/Fuel Menu Items
Press MENU on the turn signal
lever until Trip/Fuel Menu is
displayed. Use
w/xto scroll
through the menu items. The
following is the list of all possible trip/fuel displays. Some of the items
may not be available for your
particular vehicle.
.Digital Speedometer
.Trip 1
.Trip 2
.Power Flow (eAssist Only)
.Fuel Range
.Average Fuel Economy and
Instantaneous Fuel Economy
.Average Vehicle Speed
.Timer
.Navigation
Digital Speedometer
The speedometer shows how fast
the vehicle is moving in either
kilometers per hour (km/h) or miles
per hour (mph). The speedometer
cannot be reset.
Page 150 of 428
Black plate (40,1)Chevrolet Malibu Owner Manual (GMNA-Localizing-U.S./Canada/Mexico-
6081487) - 2014 - CRC - 11/19/13
5-40 Instruments and Controls
Return to Factory Settings
Select Return to Factory Settings for
the option to return all vehicle
personalization to the default
settings. Turn the TUNE/MENU
knob to select Yes or No. Press
TUNE/MENU to confirm and go
back to the last menu.
Universal Remote
System
SeeRadio Frequency Statement on
page 13-15.
Universal Remote System
Programming
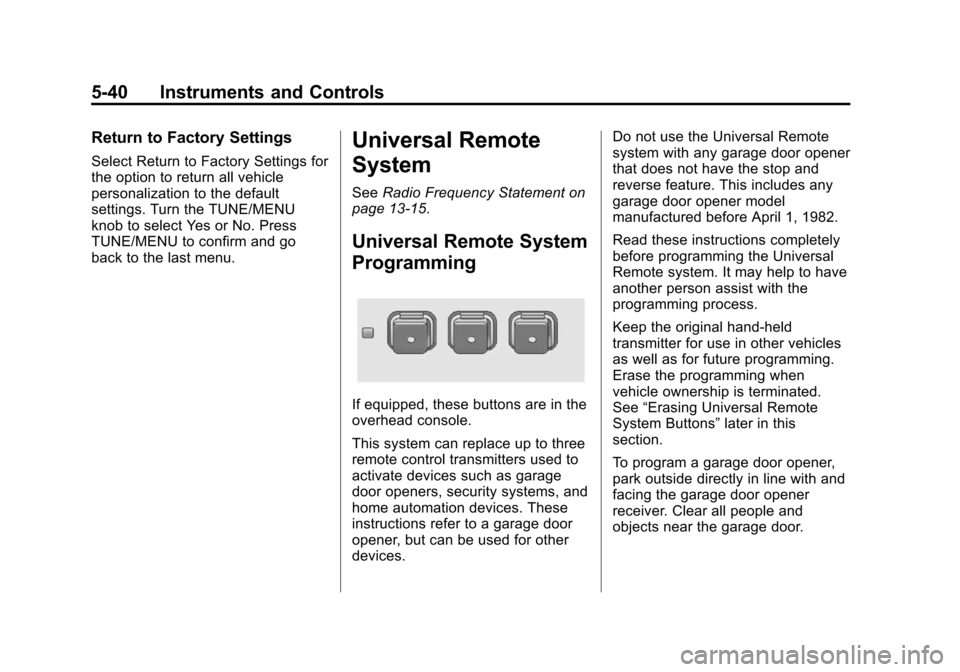
If equipped, these buttons are in the
overhead console.
This system can replace up to three
remote control transmitters used to
activate devices such as garage
door openers, security systems, and
home automation devices. These
instructions refer to a garage door
opener, but can be used for other
devices. Do not use the Universal Remote
system with any garage door opener
that does not have the stop and
reverse feature. This includes any
garage door opener model
manufactured before April 1, 1982.
Read these instructions completely
before programming the Universal
Remote system. It may help to have
another person assist with the
programming process.
Keep the original hand-held
transmitter for use in other vehicles
as well as for future programming.
Erase the programming when
vehicle ownership is terminated.
See
“Erasing Universal Remote
System Buttons” later in this
section.
To program a garage door opener,
park outside directly in line with and
facing the garage door opener
receiver. Clear all people and
objects near the garage door.
Page 163 of 428
Black plate (1,1)Chevrolet Malibu Owner Manual (GMNA-Localizing-U.S./Canada/Mexico-
6081487) - 2014 - CRC - 11/19/13
Infotainment System 7-1
Infotainment
System
Introduction
Infotainment . . . . . . . . . . . . . . . . . . . 7-1
Theft-Deterrent Feature . . . . . . . 7-2
Overview . . . . . . . . . . . . . . . . . . . . . . 7-3
Operation . . . . . . . . . . . . . . . . . . . . . 7-5
Radio
AM-FM Radio . . . . . . . . . . . . . . . . . 7-9
Satellite Radio . . . . . . . . . . . . . . . 7-11
Radio Reception . . . . . . . . . . . . . 7-13
Backglass Antenna . . . . . . . . . . 7-14
Multi-Band Antenna . . . . . . . . . . 7-14
Audio Players
CD Player . . . . . . . . . . . . . . . . . . . 7-15
Auxiliary Devices . . . . . . . . . . . . 7-16
Phone
Bluetooth (Overview) . . . . . . . . 7-21
Bluetooth (InfotainmentControls) . . . . . . . . . . . . . . . . . . . 7-23
Bluetooth (Voice Recognition) . . . . . . . . . . . . . . . 7-26
Introduction
Infotainment
Determine which radio the vehicle
has. For the radio without
connectivity, read the following
pages to become familiar with its
features. For radios with
connectivity, see the infotainment
manual.
{Warning
Taking your eyes off the road for
extended periods could cause a
crash resulting in injury or death
to you or others. Do not give
extended attention to infotainment
tasks while driving. This system provides access to
many audio and non-audio listings.
To minimize taking your eyes off the
road while driving, do the following
while the vehicle is parked:
.Become familiar with the
operation and controls of the
audio system.
.Set up the tone, speaker
adjustments, and preset radio
stations.
See Defensive Driving on page 9-3.
Page 166 of 428

Black plate (4,1)Chevrolet Malibu Owner Manual (GMNA-Localizing-U.S./Canada/Mexico-
6081487) - 2014 - CRC - 11/19/13
7-4 Infotainment System
.Character Input: Deletes
the last character.
7. TUNE/MENU
.Radio: Manually selects
radio stations.
.CD: Selects tracks.
8.
Z(CD Eject)
.Removes a disc from the
CD slot.
9.
v/>(Phone/Mute)
.Opens the Phone menu.
.Mutes the audio system.
10.
w j(Play/Pause)
.Press to start, pause, and
resume playback. See CD
Player on page 7-15.
11. CD Slot
.Insert a CD. 12.
©SEEK¨
.Press©to seek to the
beginning of the current or
previous track. If the track
has been playing for less
than five seconds, it seeks
the previous track.
If longer than
five seconds, the current
track starts from the
beginning.
.Press and hold©to
quickly reverse through a
track. Release the button
to return to playing speed.
See CD Player on
page 7-15.
.For AM or FM, press©to
seek to the previous
strong station.
.Press¨to seek the next
track.
.Press and hold¨to fast
forward through a track.
.Release¨to return to
playing speed. See CD
Player on page 7-15.
.For AM or FM, press¨to
seek to the next strong
station.
13. CONFIG (Configuration)
.Opens the
Configuration menu.
14. TONE
.Press to access the Tone
Settings menu to adjust
bass, midrange, and
treble. See Operation on
page 7-5.
15. INFO
.Radio: Shows available
information about the
current station.
.CD: Shows available
information about the
current track.
Page 168 of 428
Black plate (6,1)Chevrolet Malibu Owner Manual (GMNA-Localizing-U.S./Canada/Mexico-
6081487) - 2014 - CRC - 11/19/13
7-6 Infotainment System
.Highlight a menu option.
.Select a value.
BACK
/: Press to:
.Exit a menu.
.Return from a submenu screen
to the previous menu screen.
.Delete the last character in a
sequence.
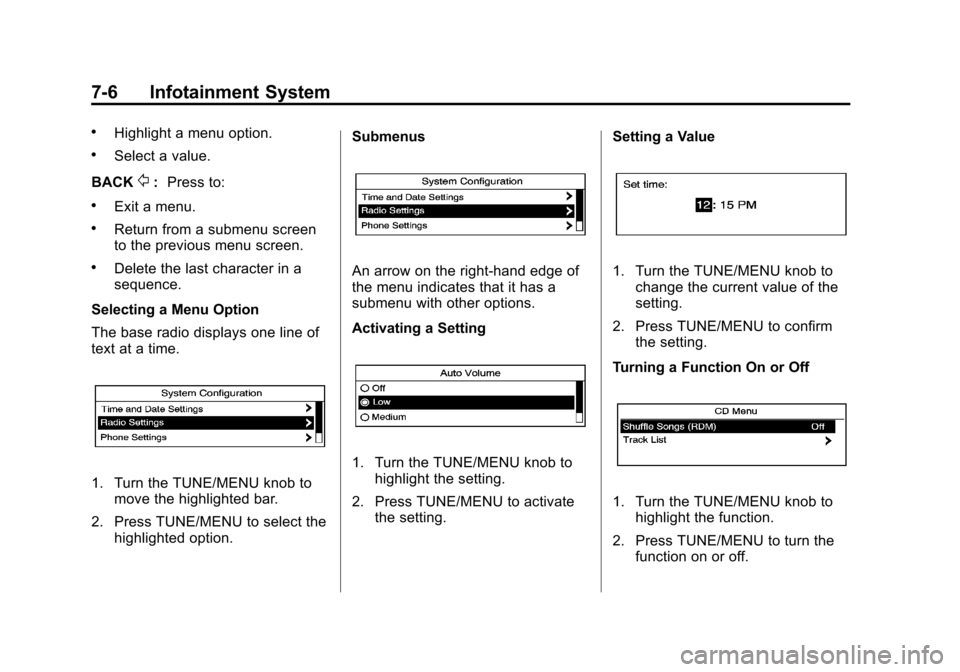
Selecting a Menu Option
The base radio displays one line of
text at a time.
1. Turn the TUNE/MENU knob to move the highlighted bar.
2. Press TUNE/MENU to select the highlighted option. Submenus
An arrow on the right-hand edge of
the menu indicates that it has a
submenu with other options.
Activating a Setting
1. Turn the TUNE/MENU knob to
highlight the setting.
2. Press TUNE/MENU to activate the setting. Setting a Value
1. Turn the TUNE/MENU knob to
change the current value of the
setting.
2. Press TUNE/MENU to confirm the setting.
Turning a Function On or Off
1. Turn the TUNE/MENU knob to highlight the function.
2. Press TUNE/MENU to turn the function on or off.
Page 169 of 428
Black plate (7,1)Chevrolet Malibu Owner Manual (GMNA-Localizing-U.S./Canada/Mexico-
6081487) - 2014 - CRC - 11/19/13
Infotainment System 7-7
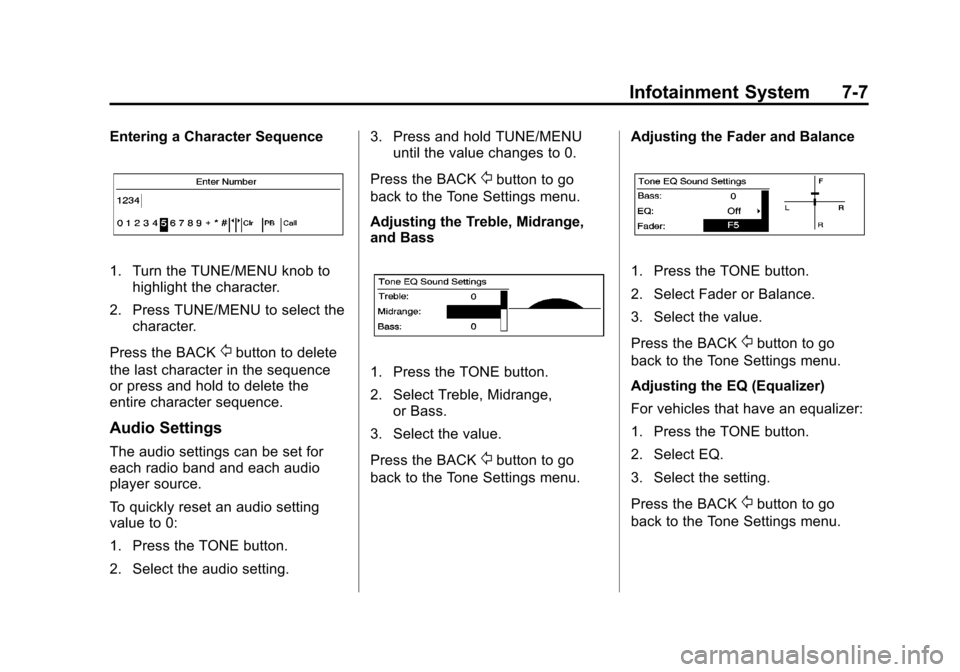
Entering a Character Sequence
1. Turn the TUNE/MENU knob tohighlight the character.
2. Press TUNE/MENU to select the character.
Press the BACK
/button to delete
the last character in the sequence
or press and hold to delete the
entire character sequence.
Audio Settings
The audio settings can be set for
each radio band and each audio
player source.
To quickly reset an audio setting
value to 0:
1. Press the TONE button.
2. Select the audio setting. 3. Press and hold TUNE/MENU
until the value changes to 0.
Press the BACK
/button to go
back to the Tone Settings menu.
Adjusting the Treble, Midrange,
and Bass
1. Press the TONE button.
2. Select Treble, Midrange, or Bass.
3. Select the value.
Press the BACK
/button to go
back to the Tone Settings menu. Adjusting the Fader and Balance
1. Press the TONE button.
2. Select Fader or Balance.
3. Select the value.
Press the BACK
/button to go
back to the Tone Settings menu.
Adjusting the EQ (Equalizer)
For vehicles that have an equalizer:
1. Press the TONE button.
2. Select EQ.
3. Select the setting.
Press the BACK
/button to go
back to the Tone Settings menu.