trunk release CHEVROLET MALIBU 2014 8.G Owners Manual
[x] Cancel search | Manufacturer: CHEVROLET, Model Year: 2014, Model line: MALIBU, Model: CHEVROLET MALIBU 2014 8.GPages: 428, PDF Size: 5.94 MB
Page 10 of 428
Black plate (4,1)Chevrolet Malibu Owner Manual (GMNA-Localizing-U.S./Canada/Mexico-
6081487) - 2014 - CRC - 11/19/13
1-4 In Brief
Initial Drive
Information
This section provides a brief
overview about some of the
important features that may or may
not be on your specific vehicle.
For more detailed information, refer
to each of the features which can be
found later in this owner manual.
Remote Keyless Entry
(RKE) System
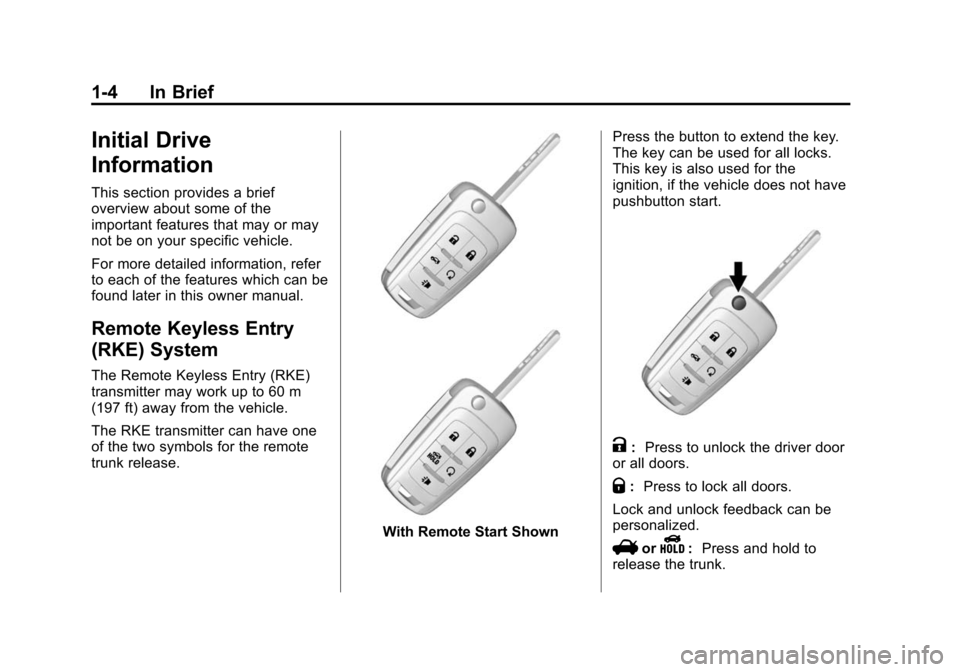
The Remote Keyless Entry (RKE)
transmitter may work up to 60 m
(197 ft) away from the vehicle.
The RKE transmitter can have one
of the two symbols for the remote
trunk release.
With Remote Start ShownPress the button to extend the key.
The key can be used for all locks.
This key is also used for the
ignition, if the vehicle does not have
pushbutton start.
K:
Press to unlock the driver door
or all doors.
Q: Press to lock all doors.
Lock and unlock feedback can be
personalized.
VorY: Press and hold to
release the trunk.
Page 29 of 428
Black plate (23,1)Chevrolet Malibu Owner Manual (GMNA-Localizing-U.S./Canada/Mexico-
6081487) - 2014 - CRC - 11/19/13
In Brief 1-23
Battery
This vehicle has a standard 12-volt
battery. Refer to the replacement
number on the original battery label
when a new standard 12-volt battery
is needed.
Vehicles with eAssist also have a
high voltage battery. Only a trained
service technician with the proper
knowledge and tools should inspect,
test, or replace the high voltage
battery. See your dealer if the high
voltage battery needs service.
For stop/start equipped vehicles,
there is an auxiliary battery behind
the access panel in the left rear of
the trunk. This battery is for
managing the stop/start auxiliary
loads and is not to be used for any
other purpose. See your dealer if
the auxiliary battery needs service.
SeeBattery on page 10-24.
Service
Never try to do your own service on
eAssist components. You can be
injured and the vehicle can be
damaged if you try to do your own
service work. Service and repair of
these high voltage components
should only be performed by a
trained service technician with the
proper knowledge and tools. See
Doing Your Own Service Work on
page 10-3.
Performance and
Maintenance
Traction Control/
Electronic Stability
Control
The traction control system limits
wheel spin. The system turns on
automatically every time the vehicle
is started.
The StabiliTrak system assists with
directional control of the vehicle in
difficult driving conditions. The
system turns on automatically every
time the vehicle is started.
.To turn off traction control, press
and release the TCS/StabiliTrak
button
gon the center stack.i
illuminates in the instrument
cluster.
.Press and release the TCS/
StabiliTrak button again to turn
on traction control.
Page 35 of 428
Black plate (3,1)Chevrolet Malibu Owner Manual (GMNA-Localizing-U.S./Canada/Mexico-
6081487) - 2014 - CRC - 11/19/13
Keys, Doors, and Windows 2-3
Remote Keyless Entry
(RKE) System Operation
The Keyless Access system allows
for vehicle entry when the
transmitter is within range. See
“Keyless Access Operation”
following.
The transmitter functions may work
up to 60 m (197 ft) away from the
vehicle.
Other conditions, such as those
previously stated, can impact the
performance of the transmitter.
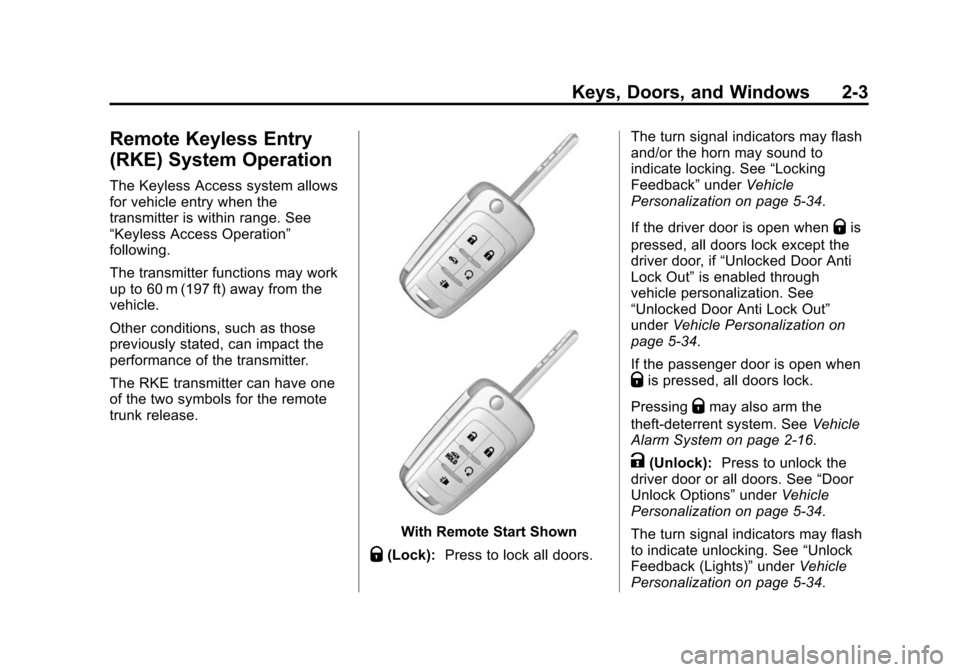
The RKE transmitter can have one
of the two symbols for the remote
trunk release.
With Remote Start Shown
Q(Lock):Press to lock all doors. The turn signal indicators may flash
and/or the horn may sound to
indicate locking. See
“Locking
Feedback” underVehicle
Personalization on page 5-34.
If the driver door is open when
Qis
pressed, all doors lock except the
driver door, if “Unlocked Door Anti
Lock Out” is enabled through
vehicle personalization. See
“Unlocked Door Anti Lock Out”
under Vehicle Personalization on
page 5-34.
If the passenger door is open when
Qis pressed, all doors lock.
Pressing
Qmay also arm the
theft-deterrent system. See Vehicle
Alarm System on page 2-16.
K(Unlock): Press to unlock the
driver door or all doors. See “Door
Unlock Options” underVehicle
Personalization on page 5-34.
The turn signal indicators may flash
to indicate unlocking. See “Unlock
Feedback (Lights)” underVehicle
Personalization on page 5-34.
Page 36 of 428
Black plate (4,1)Chevrolet Malibu Owner Manual (GMNA-Localizing-U.S./Canada/Mexico-
6081487) - 2014 - CRC - 11/19/13
2-4 Keys, Doors, and Windows
PressingKwill disarm the
theft-deterrent system. See Vehicle
Alarm System on page 2-16.
Memory seat positions may be
recalled when unlocking the vehicle.
See Memory Seats on page 3-6 and
“Memory Remote Recall” under
Vehicle Personalization on
page 5-34.
VorY(Remote Trunk
Release): Press and hold to open
the trunk.
7(Vehicle Locator/Panic
Alarm): Press and release one
time to initiate vehicle locator. The
exterior lamps flash and the horn
chirps three times.
Press and hold
7for at least
three seconds to sound the panic
alarm. The horn sounds and the
turn signals flash for about
30 seconds until
7is pressed again
or the vehicle is started.
/(Remote Vehicle Start): For
vehicles with this feature, press
Q
and release and then press and
hold
/for at least four seconds to
start the engine from outside the
vehicle using the RKE transmitter.
See Remote Vehicle Start on
page 2-9.
The RKE transmitter buttons will not
operate when the key is in the
ignition.
Keyless Access Operation
If equipped, the Keyless Access
system allows the door and trunk to
be locked and unlocked without
pressing the RKE transmitter button.
The RKE transmitter must be within
1 m (3 ft) of the door being opened.
If the vehicle has this feature, there
will be a button on the outside front
door handles. The Keyless Access can be
programmed to unlock all doors on
the first unlock/lock button press
from the driver door. See
Vehicle
Personalization on page 5-34.
Keyless Unlocking/Locking from
the Driver Door
When the doors are locked and the
RKE transmitter is within 1 m (3 ft)
of the driver door handle, pressing
the lock/unlock button on the driver
door handle will unlock the driver
door. If the lock/unlock button is
pressed again within five seconds,
all passenger doors will unlock. Pull
the door handle to unlatch the door.
Page 46 of 428
Black plate (14,1)Chevrolet Malibu Owner Manual (GMNA-Localizing-U.S./Canada/Mexico-
6081487) - 2014 - CRC - 11/19/13
2-14 Keys, Doors, and Windows
Pressv{to activate the rear door
safety locks. The indicator light in
the switch will illuminate.
Press
v {again to deactivate the
safety locks and window lockout.
If a rear door handle is being pulled
when the safety lock is deactivated,
that door will remain locked and the
indicator light may flash. Release
the handle, then press the safety
lock twice to deactivate the safety
locks.
Doors
Trunk
{Warning
Exhaust gases can enter the
vehicle if it is driven with the
liftgate, hatch/trunk open, or with
any objects that pass through the
seal between the body and the
hatch/trunk or liftgate. Engine
exhaust contains carbon
monoxide (CO) which cannot be
seen or smelled. It can cause
unconsciousness and even death.
If the vehicle must be driven with
the liftgate or hatch/trunk open:
.Close all of the windows.
.Fully open the air outlets on
or under the instrument
panel.
(Continued)
Warning (Continued)
.Adjust the climate control
system to a setting that
brings in only outside air and
set the fan speed to the
highest setting. See “Climate
Control Systems” in the
Index.
.If the vehicle is equipped with
a power liftgate, disable the
power liftgate function.
For more information about
carbon monoxide, see Engine
Exhaust on page 9-26.
Page 47 of 428
Black plate (15,1)Chevrolet Malibu Owner Manual (GMNA-Localizing-U.S./Canada/Mexico-
6081487) - 2014 - CRC - 11/19/13
Keys, Doors, and Windows 2-15
Trunk Release
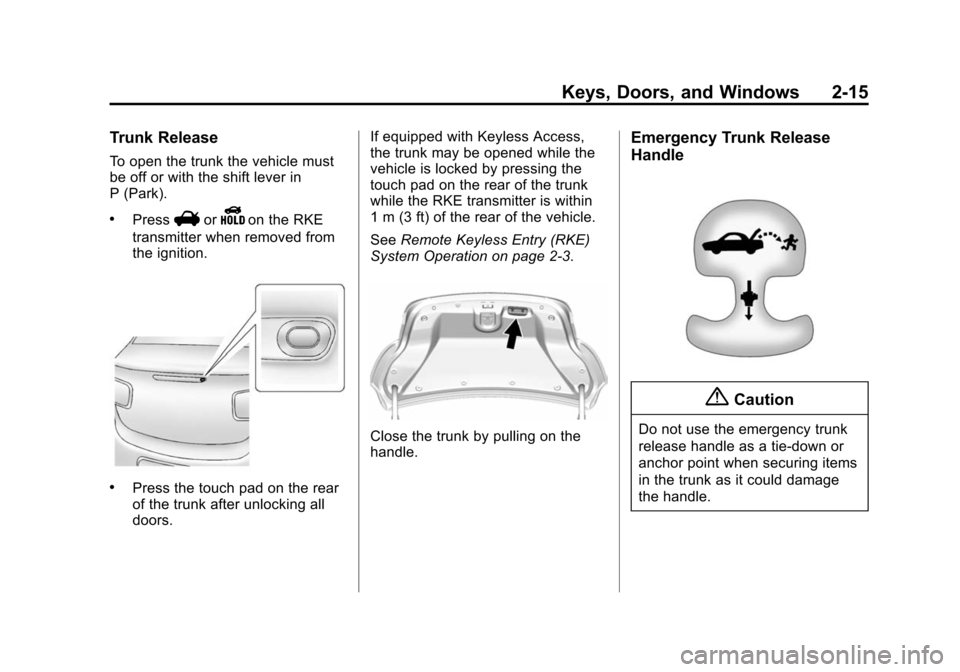
To open the trunk the vehicle must
be off or with the shift lever in
P (Park).
.PressVorYon the RKE
transmitter when removed from
the ignition.
.Press the touch pad on the rear
of the trunk after unlocking all
doors. If equipped with Keyless Access,
the trunk may be opened while the
vehicle is locked by pressing the
touch pad on the rear of the trunk
while the RKE transmitter is within
1 m (3 ft) of the rear of the vehicle.
See
Remote Keyless Entry (RKE)
System Operation on page 2-3.
Close the trunk by pulling on the
handle.
Emergency Trunk Release
Handle
{Caution
Do not use the emergency trunk
release handle as a tie-down or
anchor point when securing items
in the trunk as it could damage
the handle.
Page 48 of 428
Black plate (16,1)Chevrolet Malibu Owner Manual (GMNA-Localizing-U.S./Canada/Mexico-
6081487) - 2014 - CRC - 11/19/13
2-16 Keys, Doors, and Windows
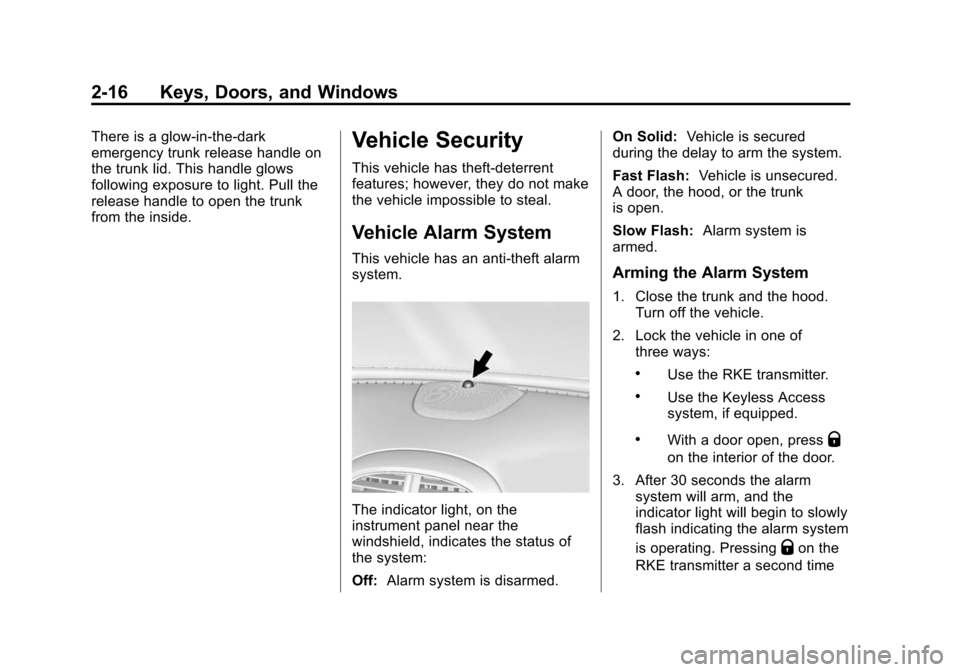
There is a glow-in-the-dark
emergency trunk release handle on
the trunk lid. This handle glows
following exposure to light. Pull the
release handle to open the trunk
from the inside.Vehicle Security
This vehicle has theft-deterrent
features; however, they do not make
the vehicle impossible to steal.
Vehicle Alarm System
This vehicle has an anti-theft alarm
system.
The indicator light, on the
instrument panel near the
windshield, indicates the status of
the system:
Off:Alarm system is disarmed. On Solid:
Vehicle is secured
during the delay to arm the system.
Fast Flash: Vehicle is unsecured.
A door, the hood, or the trunk
is open.
Slow Flash: Alarm system is
armed.
Arming the Alarm System
1. Close the trunk and the hood. Turn off the vehicle.
2. Lock the vehicle in one of three ways:
.Use the RKE transmitter.
.Use the Keyless Access
system, if equipped.
.With a door open, pressQ
on the interior of the door.
3. After 30 seconds the alarm system will arm, and the
indicator light will begin to slowly
flash indicating the alarm system
is operating. Pressing
Qon the
RKE transmitter a second time
Page 305 of 428
Black plate (43,1)Chevrolet Malibu Owner Manual (GMNA-Localizing-U.S./Canada/Mexico-
6081487) - 2014 - CRC - 11/19/13
Vehicle Care 10-43
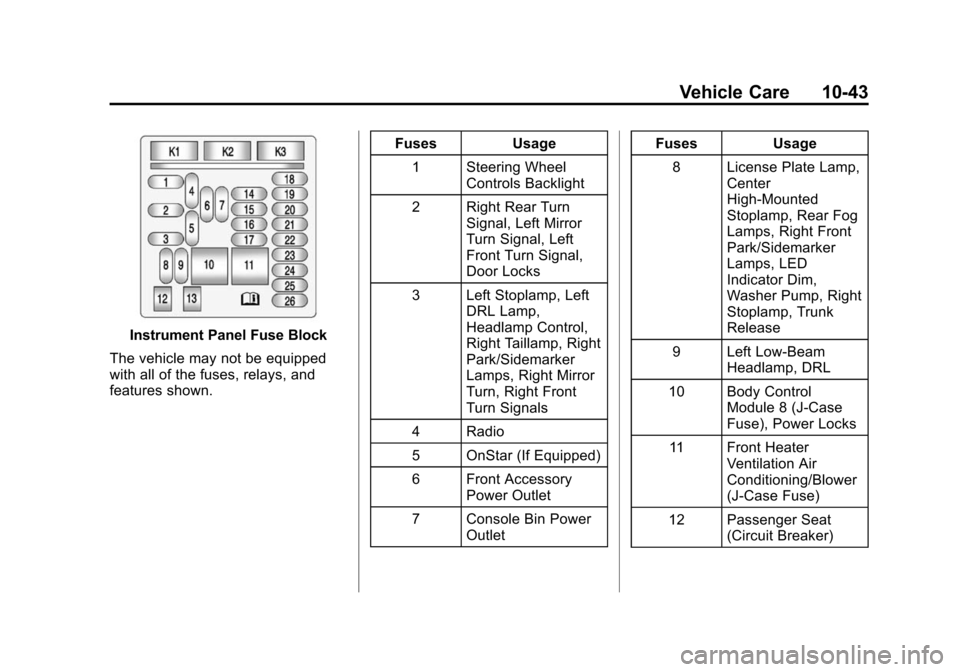
Instrument Panel Fuse Block
The vehicle may not be equipped
with all of the fuses, relays, and
features shown. Fuses Usage
1 Steering Wheel Controls Backlight
2 Right Rear Turn Signal, Left Mirror
Turn Signal, Left
Front Turn Signal,
Door Locks
3 Left Stoplamp, Left DRL Lamp,
Headlamp Control,
Right Taillamp, Right
Park/Sidemarker
Lamps, Right Mirror
Turn, Right Front
Turn Signals
4 Radio
5 OnStar (If Equipped)
6 Front Accessory Power Outlet
7 Console Bin Power Outlet Fuses Usage
8 License Plate Lamp, Center
High-Mounted
Stoplamp, Rear Fog
Lamps, Right Front
Park/Sidemarker
Lamps, LED
Indicator Dim,
Washer Pump, Right
Stoplamp, Trunk
Release
9 Left Low-Beam Headlamp, DRL
10 Body Control Module 8 (J-Case
Fuse), Power Locks
11 Front Heater Ventilation Air
Conditioning/Blower
(J-Case Fuse)
12 Passenger Seat (Circuit Breaker)
Page 306 of 428
Black plate (44,1)Chevrolet Malibu Owner Manual (GMNA-Localizing-U.S./Canada/Mexico-
6081487) - 2014 - CRC - 11/19/13
10-44 Vehicle Care
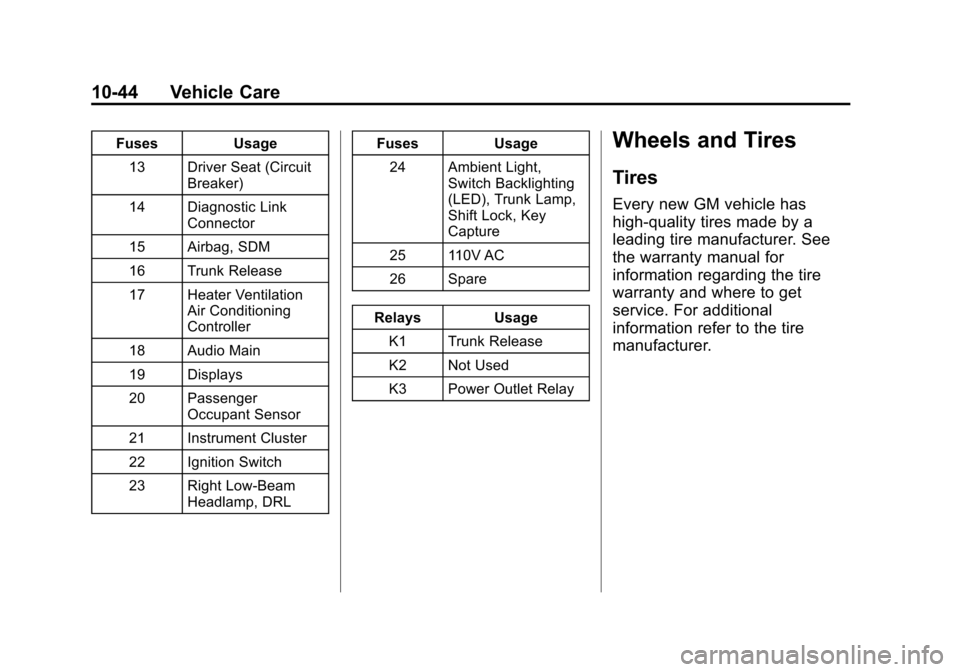
FusesUsage
13 Driver Seat (Circuit Breaker)
14 Diagnostic Link Connector
15 Airbag, SDM
16 Trunk Release
17 Heater Ventilation Air Conditioning
Controller
18 Audio Main
19 Displays
20 Passenger Occupant Sensor
21 Instrument Cluster
22 Ignition Switch
23 Right Low-Beam Headlamp, DRL Fuses
Usage
24 Ambient Light, Switch Backlighting
(LED), Trunk Lamp,
Shift Lock, Key
Capture
25 110V AC
26 Spare
Relays Usage
K1 Trunk Release
K2 Not Used
K3 Power Outlet RelayWheels and Tires
Tires
Every new GM vehicle has
high-quality tires made by a
leading tire manufacturer. See
the warranty manual for
information regarding the tire
warranty and where to get
service. For additional
information refer to the tire
manufacturer.
Page 345 of 428
Black plate (83,1)Chevrolet Malibu Owner Manual (GMNA-Localizing-U.S./Canada/Mexico-
6081487) - 2014 - CRC - 11/19/13
Vehicle Care 10-83
11. Press the on/off button (2) toturn the tire sealant and
compressor kit off.
Be careful while handling the
tire sealant and compressor kit
as it could be warm after
usage.
12. Unplug the power plug (8) from the accessory power outlet in
the vehicle.
13. Disconnect the air only hose (7) from the tire valve stem by
turning it counterclockwise, and
replace the tire valve stem cap.
14. Replace the air only hose (7) and the power plug (8) and
cord back in their original
locations.
15. Place the equipment in the original storage location in the
vehicle.
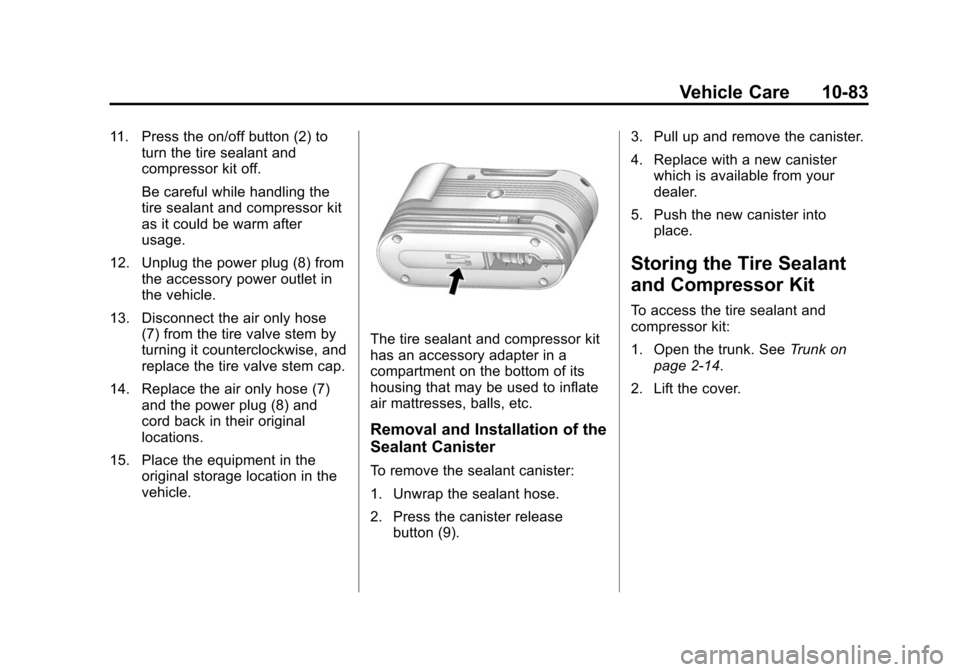
The tire sealant and compressor kit
has an accessory adapter in a
compartment on the bottom of its
housing that may be used to inflate
air mattresses, balls, etc.
Removal and Installation of the
Sealant Canister
To remove the sealant canister:
1. Unwrap the sealant hose.
2. Press the canister releasebutton (9). 3. Pull up and remove the canister.
4. Replace with a new canister
which is available from your
dealer.
5. Push the new canister into place.
Storing the Tire Sealant
and Compressor Kit
To access the tire sealant and
compressor kit:
1. Open the trunk. See Trunk on
page 2-14.
2. Lift the cover.