fog light CHEVROLET MALIBU 2016 8.G Owners Manual
[x] Cancel search | Manufacturer: CHEVROLET, Model Year: 2016, Model line: MALIBU, Model: CHEVROLET MALIBU 2016 8.GPages: 420, PDF Size: 7.86 MB
Page 4 of 420
Chevrolet Malibu Owner Manual (GMNA-Localizing-U.S./Canada/Mexico-
9087641) - 2016 - crc - 9/3/15
Introduction 3
{Danger
Danger indicates a hazard with a
high level of risk which will result
in serious injury or death.
{Warning
Warning indicates a hazard that
could result in injury or death.
Caution
Caution indicates a hazard that
could result in property or vehicle
damage.
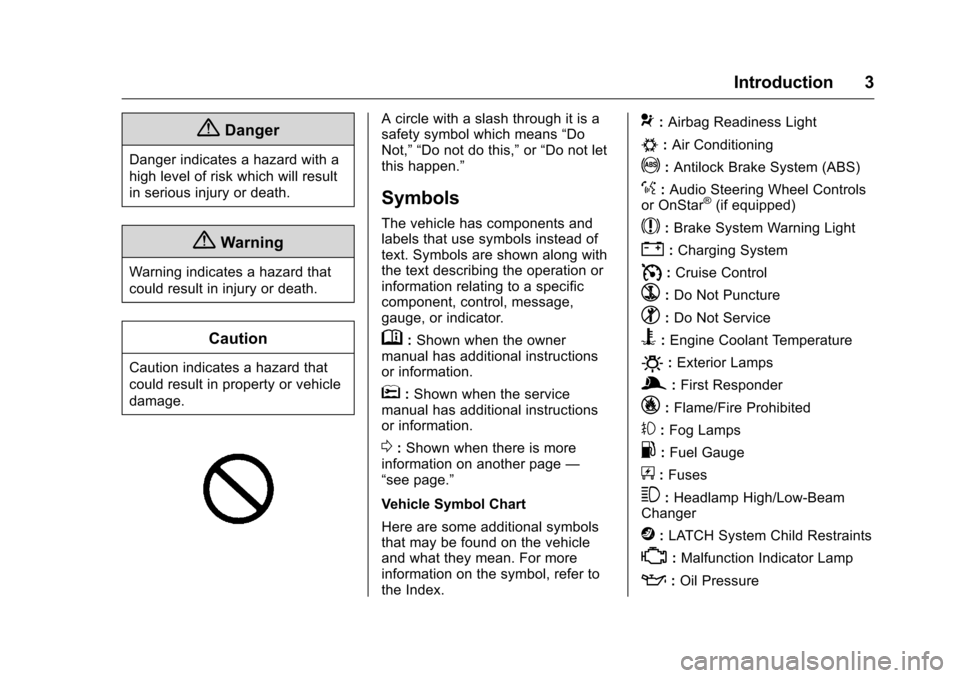
A circle with a slash through it is a
safety symbol which means“Do
Not,” “Do not do this,” or“Do not let
this happen.”
Symbols
The vehicle has components and
labels that use symbols instead of
text. Symbols are shown along with
the text describing the operation or
information relating to a specific
component, control, message,
gauge, or indicator.
M: Shown when the owner
manual has additional instructions
or information.
*: Shown when the service
manual has additional instructions
or information.
0: Shown when there is more
information on another page —
“see page.”
Vehicle Symbol Chart
Here are some additional symbols
that may be found on the vehicle
and what they mean. For more
information on the symbol, refer to
the Index.
9: Airbag Readiness Light
#:Air Conditioning
!:Antilock Brake System (ABS)
%:Audio Steering Wheel Controls
or OnStar®(if equipped)
$: Brake System Warning Light
":Charging System
I: Cruise Control
`:Do Not Puncture
^:Do Not Service
B:Engine Coolant Temperature
O:Exterior Lamps
g: First Responder
_:Flame/Fire Prohibited
#:Fog Lamps
.:Fuel Gauge
+: Fuses
3:Headlamp High/Low-Beam
Changer
j: LATCH System Child Restraints
*:Malfunction Indicator Lamp
::Oil Pressure
Page 38 of 420
Chevrolet Malibu Owner Manual (GMNA-Localizing-U.S./Canada/Mexico-
9087641) - 2016 - crc - 9/3/15
Keys, Doors, and Windows 37
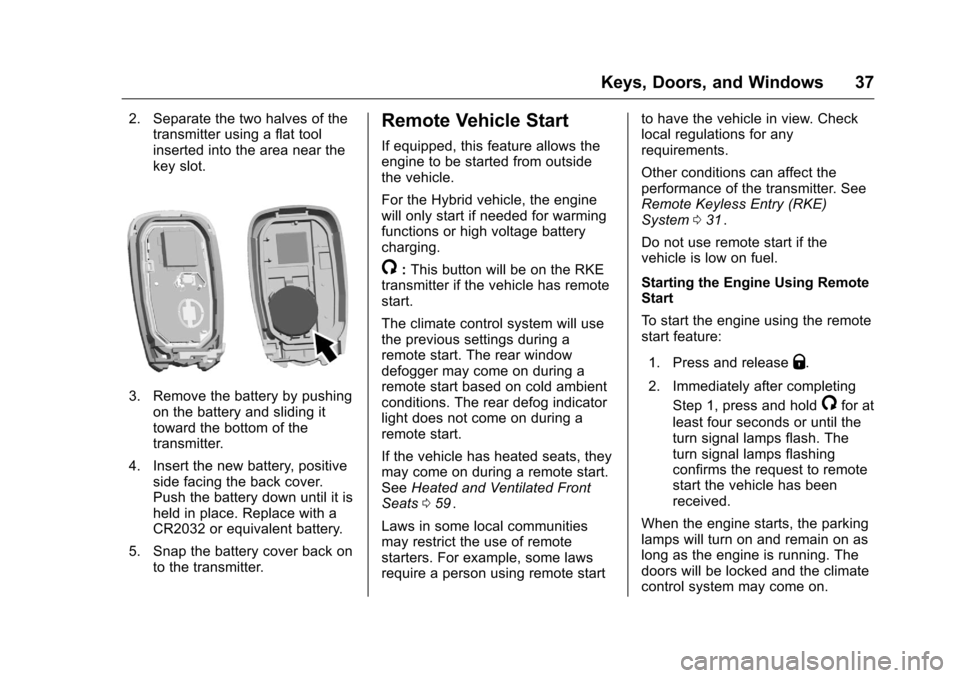
2. Separate the two halves of thetransmitter using a flat tool
inserted into the area near the
key slot.
3. Remove the battery by pushing
on the battery and sliding it
toward the bottom of the
transmitter.
4. Insert the new battery, positive side facing the back cover.
Push the battery down until it is
held in place. Replace with a
CR2032 or equivalent battery.
5. Snap the battery cover back on to the transmitter.
Remote Vehicle Start
If equipped, this feature allows the
engine to be started from outside
the vehicle.
For the Hybrid vehicle, the engine
will only start if needed for warming
functions or high voltage battery
charging.
/:This button will be on the RKE
transmitter if the vehicle has remote
start.
The climate control system will use
the previous settings during a
remote start. The rear window
defogger may come on during a
remote start based on cold ambient
conditions. The rear defog indicator
light does not come on during a
remote start.
If the vehicle has heated seats, they
may come on during a remote start.
See Heated and Ventilated Front
Seats 059
ii.
Laws in some local communities
may restrict the use of remote
starters. For example, some laws
require a person using remote start to have the vehicle in view. Check
local regulations for any
requirements.
Other conditions can affect the
performance of the transmitter. See
Remote Keyless Entry (RKE)
System
031
ii.
Do not use remote start if the
vehicle is low on fuel.
Starting the Engine Using Remote
Start
To start the engine using the remote
start feature:
1. Press and release
Q.
2. Immediately after completing Step 1, press and hold
/for at
least four seconds or until the
turn signal lamps flash. The
turn signal lamps flashing
confirms the request to remote
start the vehicle has been
received.
When the engine starts, the parking
lamps will turn on and remain on as
long as the engine is running. The
doors will be locked and the climate
control system may come on.
Page 147 of 420
Chevrolet Malibu Owner Manual (GMNA-Localizing-U.S./Canada/Mexico-
9087641) - 2016 - crc - 9/3/15
146 Instruments and Controls
Turn MENU to highlight, then press
to select.
Scan Music Folder Only
This feature will scan and index
music folders on an MTP device
when connected to the USB port.
Turn MENU to highlight, then press
to select.
Scan All Folder
This feature will scan and index all
folders on a MTP device when
connected to the USB port.
Turn MENU to highlight, then press
to select.
Time and Date
Select Time and Date to adjust the
clock. SeeClock0106ii.
Tone Settings
Select to set the radio tone. See
“Tone Settings” under“Radio
Controls without Touchscreen” in
Operation 0173
ii.
Auto Volume Control
This feature automatically adjusts
the radio volume based on the
speed of the vehicle.
Select the desired value.
Maximum Startup Volume
When the vehicle is started and the
radio volume is greater than this set
level, the volume is adjusted to this
level.
Select the desired value.
Vehicle Settings
Select and the following may
display:
.
Climate and Air Quality
. Comfort and Convenience
. Languages
. Lighting
. Power Door Locks
. Remote Lock, Unlock, Start
. Return to Factory Settings
. Software Information
. Valet Mode
Climate and Air Quality
Select and the following may
display:
.Auto Fan Speed
. Air Quality Sensor
. Auto Defog
. Auto Rear Defog
Auto Fan Speed
This adjusts the blower level during
automatic operation.
Select Low, Medium, or High.
Air Quality Sensor
This automatically selects
recirculate when certain gases are
detected.
Select Off, Low Sensitivity, or High
Sensitivity.
Auto Defog
This allows the climate control
system to prevent fog on the inside
of the windows. See “Auto Defog”in
Dual Automatic Climate Control
System 0209
ii.
Select Off or On.
Page 148 of 420
Chevrolet Malibu Owner Manual (GMNA-Localizing-U.S./Canada/Mexico-
9087641) - 2016 - crc - 9/3/15
Instruments and Controls 147
Auto Rear Defog
This allows the rear window
defogger to turn on automatically
when the interior temperature is cold
and the outside temperature is
about 7 °C (44 °F) and below. See
“Rear Window Defogger”inDual
Automatic Climate Control System
0 209
ii.
Select Off or On.
Comfort and Convenience
Select and the following may
display:
. Auto Memory Recall
. Easy Exit Options
. Chime Volume
. Reverse Tilt Mirror
. Extended Hill Start Assist
Auto Memory Recall
This feature automatically recalls
the current driver ’s previously stored
1 or 2 positions when the ignition is
changed from OFF to ON/RUN/
START or ACCESSORY. See
Memory Seats 058
ii. Select Off or On.
Easy Exit Options
This feature automatically recalls
the current driver
’s previously stored
Exit button position when exiting the
vehicle. See Memory Seats 058
ii.
Select Off or On.
Chime Volume
Select to set the chime volume
level.
Reverse Tilt Mirror
When on, both the driver and
passenger, driver, or passenger
mirrors will tilt downward when the
vehicle is shifted to R (Reverse) to
improve visibility of the ground near
the rear wheels. They will return to
their previous driving position when
the vehicle is shifted out of
R (Reverse) or the ignition is turned
to OFF.
Select Off, On - Driver and
Passenger, On - Driver, or On -
Passenger. Extended Hill Start Assist
This allows the duration of the Hill
Start Assist to be changed. See
“Extended Hill Start Assist (EHSA)”
in
Hill Start Assist (HSA) 0240
ii.
Select Extended Hold or
Standard Hold.
Languages
Select, then select from the
available language(s).
Lighting
Select the Lighting menu and the
following may be displayed:
. Exit Lighting
Exit Lighting
Select to set how long the exterior
lamps stay on when leaving the
vehicle and it is dark outside. See
Exit Lighting 0166
ii.
Select the desired time.
Power Door Locks
Select and the following may
display:
. Unlocked Door Anti Lock Out
Page 152 of 420
Chevrolet Malibu Owner Manual (GMNA-Localizing-U.S./Canada/Mexico-
9087641) - 2016 - crc - 9/3/15
Instruments and Controls 151
.Audible Touch Feedback
. Text Scroll
. Tone Settings
. Auto Volume
. Maximum Startup Volume
. Audio Cue
Manage Favorites
This allows favorites to be edited.
See “Manage Favorites” in“Radio
Setup” underHome Page (Radio
with Touchscreen) 0172
iior
“Manage Favorites” in“Settings”
under “Radio” in the infotainment
manual.
Number of Favorites Shown
Press to set the number of favorites
to display.
Select the desired number or select
Auto and the infotainment system
will automatically adjust the number
of favorites shown.
Audible Touch Feedback
This allows Audible Touch
Feedback to be turned on or off.
Select Off or On. Text Scroll
Select to see text scroll on the
screen.
Select Off or On.
Tone Settings
Select to adjust the radio tone. See
Operation
0173
ii.
Auto Volume
This feature adjusts the volume
based on vehicle speed and
ambient noise.
Select Off, Low, Medium-Low,
Medium, Medium-High, or High.
Maximum Startup Volume
This feature sets the maximum
startup volume. If the vehicle is
started and the volume is greater
than this level, the volume is
adjusted to this level. To set the
maximum startup volume, press +
or −to increase or decrease. Audio Cue
If equipped, this feature adjusts the
startup and shutdown sounds. To
adjust the volume, select + or
−to
increase or decrease.
Vehicle
Select and the following may
display:
. Climate and Air Quality
. Collision/Detection Systems
. Comfort and Convenience
. Lighting
. Power Door Locks
. Remote Lock, Unlock, Start
Climate and Air Quality
Select and the following may
display:
. Auto Fan Speed
. Auto Defog
. Auto Rear Defog
Auto Fan Speed
This feature will set the maximum
auto fan speed.
Page 163 of 420
Chevrolet Malibu Owner Manual (GMNA-Localizing-U.S./Canada/Mexico-
9087641) - 2016 - crc - 9/3/15
162 Lighting
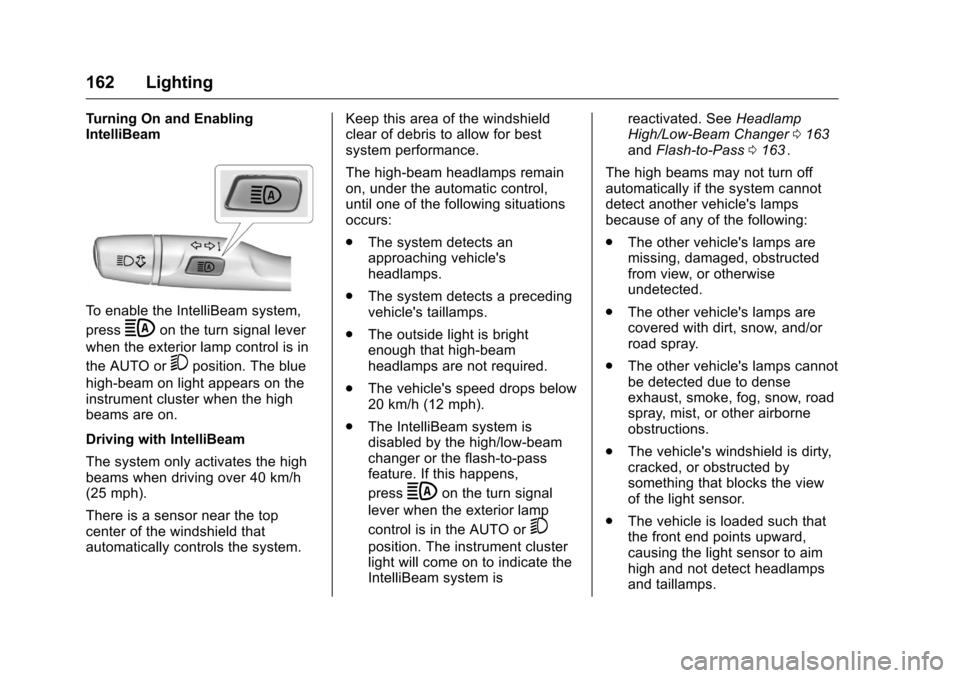
Turning On and Enabling
IntelliBeam
To enable the IntelliBeam system,
press
bon the turn signal lever
when the exterior lamp control is in
the AUTO or
5position. The blue
high-beam on light appears on the
instrument cluster when the high
beams are on.
Driving with IntelliBeam
The system only activates the high
beams when driving over 40 km/h
(25 mph).
There is a sensor near the top
center of the windshield that
automatically controls the system. Keep this area of the windshield
clear of debris to allow for best
system performance.
The high-beam headlamps remain
on, under the automatic control,
until one of the following situations
occurs:
.
The system detects an
approaching vehicle's
headlamps.
. The system detects a preceding
vehicle's taillamps.
. The outside light is bright
enough that high-beam
headlamps are not required.
. The vehicle's speed drops below
20 km/h (12 mph).
. The IntelliBeam system is
disabled by the high/low-beam
changer or the flash-to-pass
feature. If this happens,
press
bon the turn signal
lever when the exterior lamp
control is in the AUTO or
5
position. The instrument cluster
light will come on to indicate the
IntelliBeam system is reactivated. See
Headlamp
High/Low-Beam Changer 0163
iiand Flash-to-Pass 0163ii.
The high beams may not turn off
automatically if the system cannot
detect another vehicle's lamps
because of any of the following:
. The other vehicle's lamps are
missing, damaged, obstructed
from view, or otherwise
undetected.
. The other vehicle's lamps are
covered with dirt, snow, and/or
road spray.
. The other vehicle's lamps cannot
be detected due to dense
exhaust, smoke, fog, snow, road
spray, mist, or other airborne
obstructions.
. The vehicle's windshield is dirty,
cracked, or obstructed by
something that blocks the view
of the light sensor.
. The vehicle is loaded such that
the front end points upward,
causing the light sensor to aim
high and not detect headlamps
and taillamps.
Page 168 of 420
Chevrolet Malibu Owner Manual (GMNA-Localizing-U.S./Canada/Mexico-
9087641) - 2016 - crc - 9/3/15
Lighting 167
the OFF position. The exterior
lamps and dome lamp remain on for
a set amount of time, then
automatically turn off.
The exterior lamps turn off
immediately by turning the exterior
lamp control off.
This feature can be changed. See
Vehicle Personalization0145
ii.
Battery Load
Management
The vehicle has Electric Power
Management (EPM), which
estimates the battery's temperature
and state of charge. It then adjusts
the voltage for best performance
and extended life of the battery.
When the battery's state of charge
is low, the voltage is raised slightly
to quickly bring the charge back up.
When the state of charge is high,
the voltage is lowered slightly to
prevent overcharging. If the vehicle
has a voltage display on the Driver
Information Center (DIC), you may see the voltage move up or down.
This is normal. If there is a problem,
an alert will be displayed.
The battery can be discharged at
idle if the electrical loads are very
high. This is true for all vehicles.
This is because the generator
(alternator) may not be spinning fast
enough at idle to produce all the
power that is needed for very high
electrical loads.
A high electrical load occurs when
several of the following are on, such
as: headlamps, high beams, fog
lamps, rear window defogger,
climate control fan at high speed,
heated seats, engine cooling fans,
trailer loads, and loads plugged into
accessory power outlets.
EPM works to prevent excessive
discharge of the battery. It does this
by balancing the generator's output
and the vehicle's electrical needs.
It can increase engine idle speed to
generate more power, whenever
needed. It can temporarily reduce
the power demands of some
accessories.Normally, these actions occur in
steps or levels, without being
noticeable. In rare cases at the
highest levels of corrective action,
this action may be noticeable to the
driver. If so, a DIC message might
be displayed and it is recommended
that the driver reduce the electrical
loads as much as possible. See
Battery Voltage and Charging
Messages
0136
ii.
Page 208 of 420
Chevrolet Malibu Owner Manual (GMNA-Localizing-U.S./Canada/Mexico-
9087641) - 2016 - crc - 9/3/15
Climate Controls 207
Air Delivery Mode Controls :
Press the air delivery mode buttons
to change the direction of the
airflow. The indicator light in the
selected button will turn on. The
current mode appears in the display
screen.
To change the current mode, select
one or more of the following modes:
0:Clears the windows of fog or
moisture. Air is directed to the
windshield.
{: Air is directed to the
instrument panel outlets.
z: Air is directed to the floor
outlets.
0MAX : Air is directed to the
windshield and the fan runs at a
higher speed. This mode overrides
the previous mode selected and
clears fog or frost from the
windshield more quickly. When the
button is pressed again, the system
returns to the previous mode setting
and fan speed.
For best results, clear all snow and
ice from the windshield before
defrosting. A/C :
Press to turn the air
conditioning system on or off. If the
climate control system is turned off
or the outside temperature falls
below freezing, the air conditioner
will not run.
A/C (Max/Eco Air Conditioning)
(For Stop/Start Vehicles) : Press
to cycle between the off, eco, and
max air conditioning modes. The
indicator will be lit in max and eco
modes and turns off when there is
no A/C function. If the fan is turned
off, the air conditioner will not run
and the indicator light may turn off.
For max a/c, press A/C. The
indicator will turn amber.
For eco a/c, press A/C again. The
indicator will turn green. This setting
balances fuel economy and air
conditioning comfort. In warm
weather conditions, auto stops may
occur more frequently and the
vehicle interior may be warmer as
compared to the max air
conditioning setting. This setting
allows higher humidity inside the
vehicle and window fogging before
the engine restarts.
@: Press to turn on recirculation.
An indicator light comes on. Air is
recirculated to quickly cool the
inside of the vehicle or to reduce the
entry of outside air and odors.
Rear Window Defogger
K: Press to turn the rear window
defogger on or off. An indicator light
on the button comes on to show that
the rear window defogger is on. The
defogger turns off when the ignition
is placed in the ACC/ACCESSORY
or LOCK/OFF position.
The upper lines on the rear window
are antenna grids and are not
intended to defrost the glass.
The rear window defogger can be
set to automatic operation. See
“Climate and Air Quality” under
Vehicle Personalization 0145
ii.
When Auto Rear Defog is selected,
the rear window defogger turns on
automatically when the interior
temperature is cold and the outside
temperature is about 7 °C (44 °F)
and below. The auto rear defogger
turns off automatically.
Page 209 of 420
Chevrolet Malibu Owner Manual (GMNA-Localizing-U.S./Canada/Mexico-
9087641) - 2016 - crc - 9/3/15
208 Climate Controls
If the vehicle is equipped with
heated outside rearview mirrors,
they turn on when the rear window
defogger button is on and help to
clear fog or frost from the surface of
the mirror. SeeHeated Mirrors 047
ii.
Caution
Do not try to clear frost or other
material from the inside of the
front windshield and rear window
with a razor blade or anything
else that is sharp. This may
damage the rear window
defogger grid and affect the
radio's ability to pick up stations
clearly. The repairs would not be
covered by the vehicle warranty.
LorM:If equipped, pressLorMto heat the driver or passenger seat
cushion. See Heated and Ventilated
Front Seats 059
ii.
Remote Start Climate Control
Operation : If equipped with remote
start, the climate control system
may run when the vehicle is started
remotely. The system uses the driver
’s previous settings to heat or
cool the inside of the vehicle. The
rear defog may come on during
remote start based on cold ambient
conditions. The rear defog indicator
light does not come on during a
remote start. The front heated seats
will turn on if it is cold outside. The
heated seat indicator lights do not
come on during a remote start.
Page 210 of 420
Chevrolet Malibu Owner Manual (GMNA-Localizing-U.S./Canada/Mexico-
9087641) - 2016 - crc - 9/3/15
Climate Controls 209
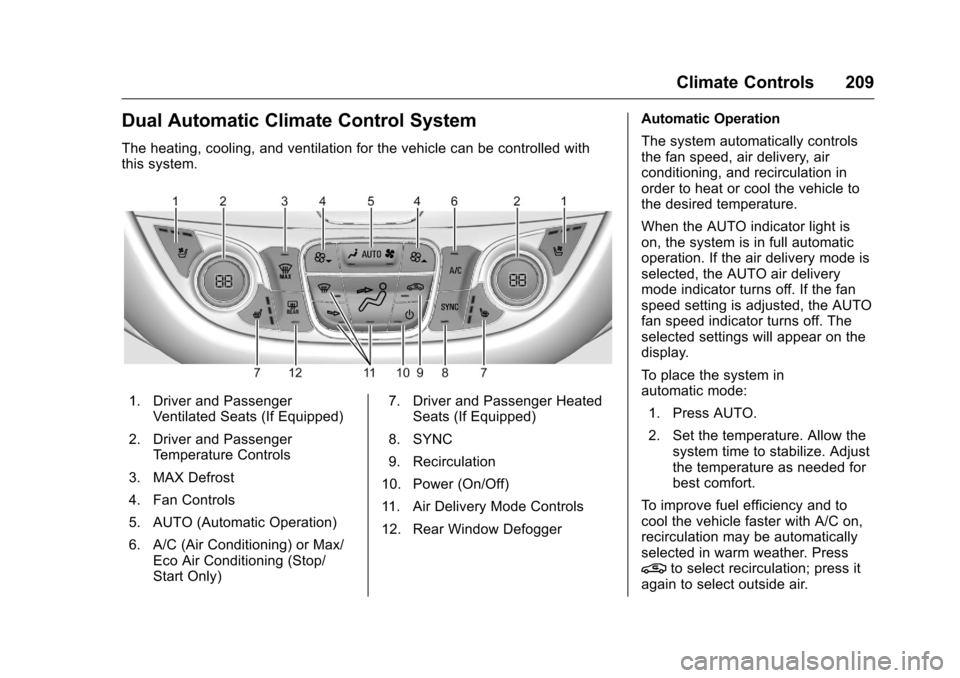
Dual Automatic Climate Control System
The heating, cooling, and ventilation for the vehicle can be controlled with
this system.
1. Driver and PassengerVentilated Seats (If Equipped)
2. Driver and Passenger Temperature Controls
3. MAX Defrost
4. Fan Controls
5. AUTO (Automatic Operation)
6. A/C (Air Conditioning) or Max/ Eco Air Conditioning (Stop/
Start Only) 7. Driver and Passenger Heated
Seats (If Equipped)
8. SYNC
9. Recirculation
10. Power (On/Off)
11. Air Delivery Mode Controls
12. Rear Window Defogger Automatic Operation
The system automatically controls
the fan speed, air delivery, air
conditioning, and recirculation in
order to heat or cool the vehicle to
the desired temperature.
When the AUTO indicator light is
on, the system is in full automatic
operation. If the air delivery mode is
selected, the AUTO air delivery
mode indicator turns off. If the fan
speed setting is adjusted, the AUTO
fan speed indicator turns off. The
selected settings will appear on the
display.
To place the system in
automatic mode:
1. Press AUTO.
2. Set the temperature. Allow the system time to stabilize. Adjust
the temperature as needed for
best comfort.
To improve fuel efficiency and to
cool the vehicle faster with A/C on,
recirculation may be automatically
selected in warm weather. Press
@to select recirculation; press it
again to select outside air.