buttons CHEVROLET MALIBU 2017 9.G Owners Manual
[x] Cancel search | Manufacturer: CHEVROLET, Model Year: 2017, Model line: MALIBU, Model: CHEVROLET MALIBU 2017 9.GPages: 419, PDF Size: 7.81 MB
Page 8 of 419

Chevrolet Malibu Owner Manual (GMNA-Localizing-U.S./Canada/Mexico-10122664) - 2017 - crc - 6/1/16
In Brief 7
1.Air Vents0211.
2. Turn Signal Lever. SeeTu r nand Lane-ChangeSignals0167.
3.Instrument Cluster (BaseLevel)011 2orInstrumentCluster (Uplevel)011 4.
Driver Information Center (DIC)(Base Level)0131orDriverInformation Center (DIC)(Uplevel)0134.
4.Windshield Wiper/Washer0105.
5. Light Sensor. SeeAutomaticHeadlamp System0166.
6.Infotainment0171.
7.Climate ControlSystems0205.
Dual Automatic Climate ControlSystem0208(If Equipped).
8.Hazard WarningFlashers0166.
9.Power Outlets0108.
10.Tr a c t i o n C o n t r o l / E l e c t r o n i cStability Control0241.
Assistance Systems forParking or Backing0253(If Equipped).
11 . S h i f t L e v e r. S e eAutomaticTr a n s m i s s i o n0233.
12.Electric Parking Brake0238.
13.USB Port0184.
14. ENGINE START/STOP Button.SeeIgnition Positions0225.
15.Steering Wheel Controls0104.
Driver Information CenterButtons. SeeDriver InformationCenter (DIC) (Base Level)0131orDriver InformationCenter (DIC) (Uplevel)0134.
16.Horn0105.
17.Steering WheelAdjustment0104.
18.Cruise Control0243.
Adaptive Cruise Control0245(If Equipped).
Heated Steering Wheel0105(If Equipped).
Forward Collision Alert (FCA)System0258(If Equipped).
Lane Keep Assist (LKA)0266(If Equipped).
19. Hood Release. SeeHood0281.
20. Data Link Connector (Out ofView). SeeMalfunctionIndicator Lamp (Check EngineLight)0122.
21.Exterior Lamp Controls0163.
22.Instrument Panel IlluminationControl0167.
Page 13 of 419
Chevrolet Malibu Owner Manual (GMNA-Localizing-U.S./Canada/Mexico-10122664) - 2017 - crc - 6/1/16
12 In Brief
To r e t u r n t h e s e a t b a c k t o t h e u p r i g h tposition:
1. Lift the lever fully withoutapplying pressure to theseatback, and the seatback willreturn to the upright position.
2. Push and pull on the seatbackto make sure it is locked.
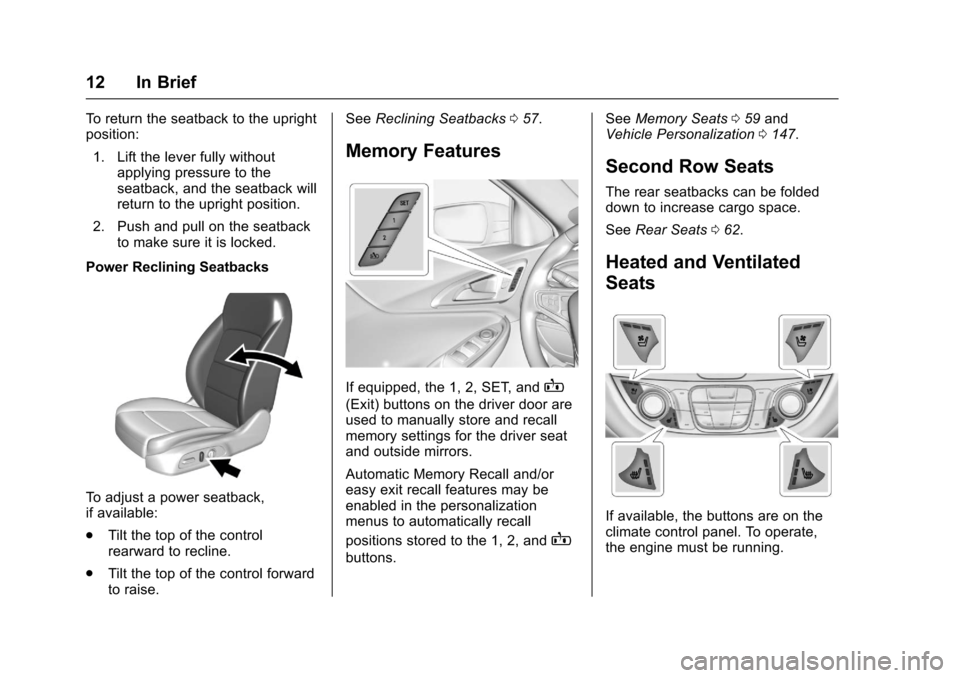
Power Reclining Seatbacks
To a d j u s t a p o w e r s e a t b a c k ,if available:
.Tilt the top of the controlrearward to recline.
.Tilt the top of the control forwardto raise.
SeeReclining Seatbacks057.
Memory Features
If equipped, the 1, 2, SET, andB
(Exit) buttons on the driver door areused to manually store and recallmemory settings for the driver seatand outside mirrors.
Automatic Memory Recall and/oreasy exit recall features may beenabled in the personalizationmenus to automatically recall
positions stored to the 1, 2, andB
buttons.
SeeMemory Seats059andVehicle Personalization0147.
Second Row Seats
The rear seatbacks can be foldeddown to increase cargo space.
SeeRear Seats062.
Heated and Ventilated
Seats
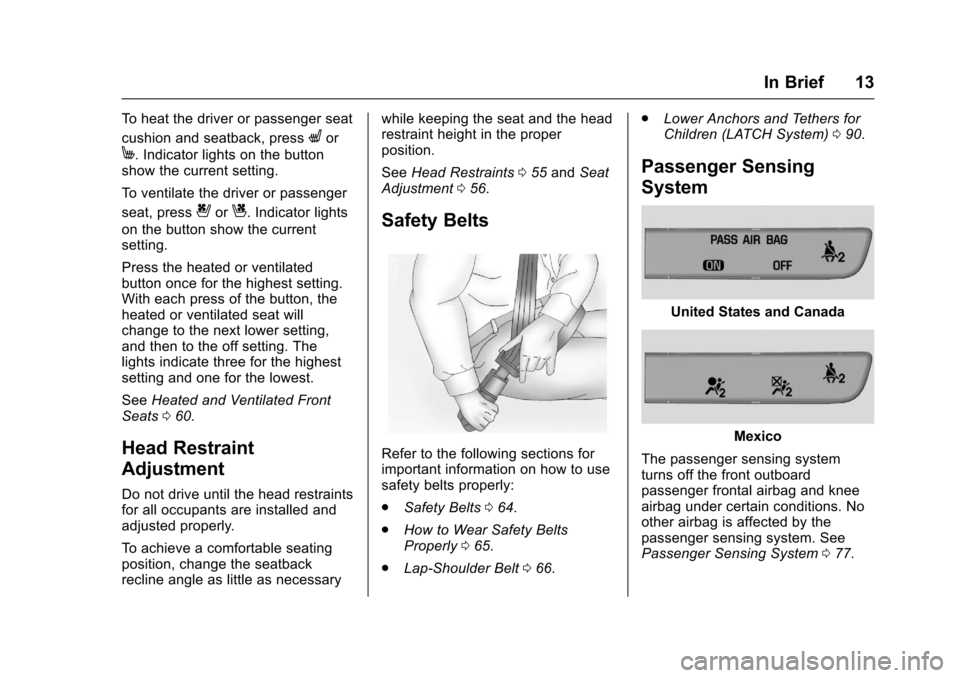
If available, the buttons are on theclimate control panel. To operate,the engine must be running.
Page 14 of 419
Chevrolet Malibu Owner Manual (GMNA-Localizing-U.S./Canada/Mexico-10122664) - 2017 - crc - 6/1/16
In Brief 13
To h e a t t h e d r i v e r o r p a s s e n g e r s e a t
cushion and seatback, pressLor
M.Indicatorlightsonthebuttonshow the current setting.
To v e n t i l a t e t h e d r i v e r o r p a s s e n g e r
seat, press{orC.Indicatorlights
on the button show the currentsetting.
Press the heated or ventilatedbutton once for the highest setting.With each press of the button, theheated or ventilated seat willchange to the next lower setting,and then to the off setting. Thelights indicate three for the highestsetting and one for the lowest.
SeeHeated and Ventilated FrontSeats060.
Head Restraint
Adjustment
Do not drive until the head restraintsfor all occupants are installed andadjusted properly.
To a c h i e v e a c o m f o r t a b l e s e a t i n gposition, change the seatbackrecline angle as little as necessary
while keeping the seat and the headrestraint height in the properposition.
SeeHead Restraints055andSeatAdjustment056.
Safety Belts
Refer to the following sections forimportant information on how to usesafety belts properly:
.Safety Belts064.
.How to Wear Safety BeltsProperly065.
.Lap-Shoulder Belt066.
.Lower Anchors and Tethers forChildren (LATCH System)090.
Passenger Sensing
System
United States and Canada
Mexico
The passenger sensing systemturns off the front outboardpassenger frontal airbag and kneeairbag under certain conditions. Noother airbag is affected by thepassenger sensing system. SeePassenger Sensing System077.
Page 16 of 419

Chevrolet Malibu Owner Manual (GMNA-Localizing-U.S./Canada/Mexico-10122664) - 2017 - crc - 6/1/16
In Brief 15
Interior Lighting
Dome Lamps
The dome lamp controls are in theoverhead console.
To o p e r a t e , p r e s s t h e f o l l o w i n gbuttons:
+ON/OFF :Press to turn the domelamps on manually.
jOFF :Press to turn off thedome lamps when a door is open.An indicator light on the button willturn on when the dome lamp
override is activated. Pressj
OFF again to deactivate this feature
and the indicator light will turn off.The dome lamps will come on whendoors are opened.
Reading Lamps
There may be front and rear readinglamps.
If equipped, the front reading lampsare in the overhead console.
Press the lamp lenses to turn thereading lamps on or off.
If equipped, the rear reading lampsare in the headliner.
Press the button near each lamp toturn reading lamps on or off.
For more information on interiorlighting, seeInstrument PanelIllumination Control0167.
Page 20 of 419
Chevrolet Malibu Owner Manual (GMNA-Localizing-U.S./Canada/Mexico-10122664) - 2017 - crc - 6/1/16
In Brief 19
pedal. L2 (Low 2) provides moderatebraking and L1 (Low 1) providesmaximum braking below 80 km/h(50 mph). When the battery reachesfull charge the engine may run tomaintain braking.
To u s e t h i s f e a t u r e :
1. Move the shift lever to L (Low).The transmission will enterL2 (Low 2).
2. Press + (Plus) or✓(Minus) onthe shift lever to shift betweenL2 (Low 2) and L1 (Low 1).
SeeManual Mode0235.
Vehicle Features
Infotainment System
Base radio information is included inthis manual. See the infotainmentmanual for information on otheravailable infotainment systems.
Read the following pages tobecome familiar with these features.
{Warning
Ta k i n g y o u r e y e s o f f t h e r o a d f o r
too long or too often while using
any infotainment feature can
cause a crash. You or others
could be injured or killed. Do not
give extended attention to
infotainment tasks while driving.
Limit your glances at the vehicle
displays and focus your attention
on driving. Use voice commands
whenever possible.
The infotainment system has built-infeatures intended to help avoiddistraction by disabling somefunctions when driving. These
functions may gray out when theyare unavailable. Many infotainmentfeatures are also available throughthe instrument cluster and steeringwheel controls.
Before driving:
.Become familiar with theoperation, faceplate buttons, andscreen buttons.
.Set up the audio by presettingfavorite stations, setting thetone, and adjusting thespeakers.
.Set up phone numbers inadvance so they can be calledeasily by pressing a singlebutton or by using a single voicecommand if equipped withBluetooth phone capability.
SeeDefensive Driving0216.
To p l a y t h e i n f o t a i n m e n t s y s t e m w i t hthe ignition off, seeRetainedAccessory Power (RAP)0230.
Page 34 of 419
Chevrolet Malibu Owner Manual (GMNA-Localizing-U.S./Canada/Mexico-10122664) - 2017 - crc - 5/23/16
Keys, Doors, and Windows 33
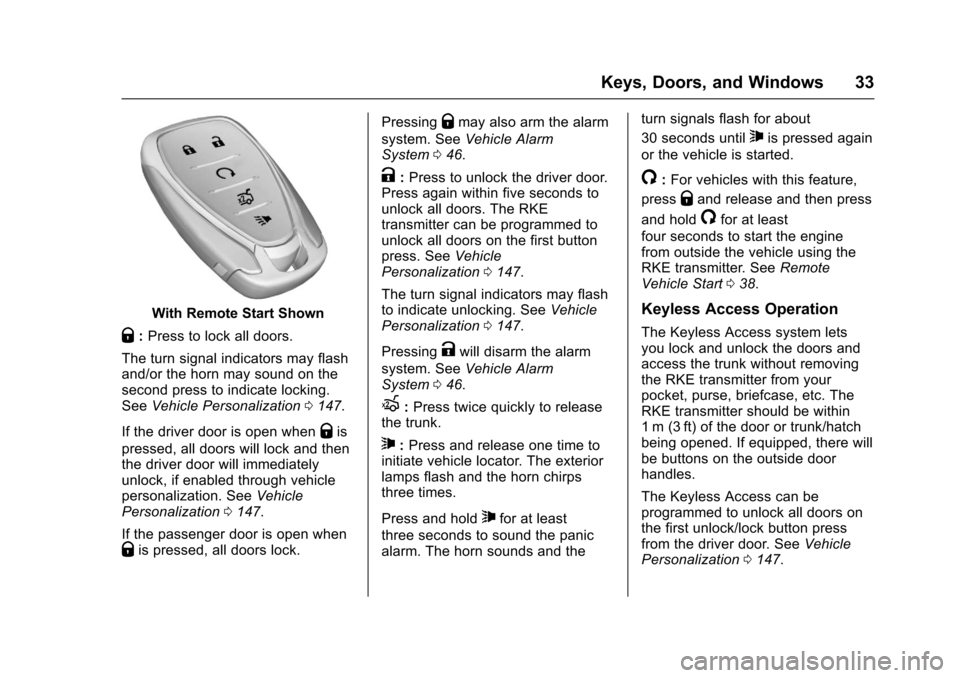
With Remote Start Shown
Q:Press to lock all doors.
The turn signal indicators may flashand/or the horn may sound on thesecond press to indicate locking.SeeVehicle Personalization0147.
If the driver door is open whenQis
pressed, all doors will lock and thenthe driver door will immediatelyunlock, if enabled through vehiclepersonalization. SeeVehiclePersonalization0147.
If the passenger door is open whenQis pressed, all doors lock.
PressingQmay also arm the alarm
system. SeeVehicle AlarmSystem046.
K:Press to unlock the driver door.Press again within five seconds tounlock all doors. The RKEtransmitter can be programmed tounlock all doors on the first buttonpress. SeeVehiclePersonalization0147.
The turn signal indicators may flashto indicate unlocking. SeeVehiclePersonalization0147.
PressingKwill disarm the alarm
system. SeeVehicle AlarmSystem046.
X:Press twice quickly to releasethe trunk.
7:Press and release one time toinitiate vehicle locator. The exteriorlamps flash and the horn chirpsthree times.
Press and hold7for at least
three seconds to sound the panicalarm. The horn sounds and the
turn signals flash for about
30 seconds until7is pressed again
or the vehicle is started.
/:For vehicles with this feature,
pressQand release and then press
and hold/for at least
four seconds to start the enginefrom outside the vehicle using theRKE transmitter. SeeRemoteVehicle Start038.
Keyless Access Operation
The Keyless Access system letsyou lock and unlock the doors andaccess the trunk without removingthe RKE transmitter from yourpocket, purse, briefcase, etc. TheRKE transmitter should be within1m (3ft) of the door or trunk/hatchbeing opened. If equipped, there willbe buttons on the outside doorhandles.
The Keyless Access can beprogrammed to unlock all doors onthe first unlock/lock button pressfrom the driver door. SeeVehiclePersonalization0147.
Page 36 of 419
Chevrolet Malibu Owner Manual (GMNA-Localizing-U.S./Canada/Mexico-10122664) - 2017 - crc - 5/23/16
Keys, Doors, and Windows 35
untilQon the interior door is
pressed, or until the vehicle isturned on.
Remote Left In Vehicle Alert
When the vehicle is turned off and aremote is left in the vehicle, the hornwill chirp three times after all doorsare closed. To turn on or off seeVehicle Personalization0147.
Remote No Longer In Vehicle Alert
If the vehicle is on, with a dooropen, and then all doors are closed,the vehicle will check for an RKEtransmitter(s) inside. If an RKEtransmitter is not detected, the DICwill display NO REMOTEDETECTED and the horn will chirpthree times.
This occurs only once each time thevehicle is driven. SeeVehiclePersonalization0147
Keyless Trunk Opening
Press the touch pad on the rear ofthe trunk to open it if the RKEtransmitter is within 1 m (3 ft) of thetrunk.
Keyed Access
To a c c e s s a v e h i c l e w i t h a d e a dtransmitter battery, seeDoorLocks040.
Programming Transmitters to
the Vehicle
Only RKE transmitters programmedto the vehicle will work. If atransmitter is lost or stolen, areplacement can be purchased andprogrammed through your dealer.The vehicle can be reprogrammedso that lost or stolen transmitters nolonger work. Any remainingtransmitters will need to bereprogrammed. Each vehicle canhave up to eight transmittersmatched to it.
Programming with RecognizedTransmitters
Anewtransmittercanbeprogrammed to the vehicle whenthere are two recognizedtransmitters. To program, the vehiclemust be off and all of thetransmitters, both currentlyrecognized and new, must bewith you.
1. Place the two recognizedtransmitter(s) in the transmitterpocket with the buttons facingthe rear of the vehicle. Thetransmitter pocket is inside thecenter console storage area.
2. Remove the key lock cylindercap on the driver door handle.SeeDoor Locks040.Insertthe vehicle key of the newtransmitter into the key lockcylinder on the outside of thedriver door and turn the keycounterclockwise five timeswithin 10 seconds.
The Driver Information Center(DIC) displays READY FORREMOTE #2, 3, 4 or 5.
Page 37 of 419
Chevrolet Malibu Owner Manual (GMNA-Localizing-U.S./Canada/Mexico-10122664) - 2017 - crc - 5/23/16
36 Keys, Doors, and Windows
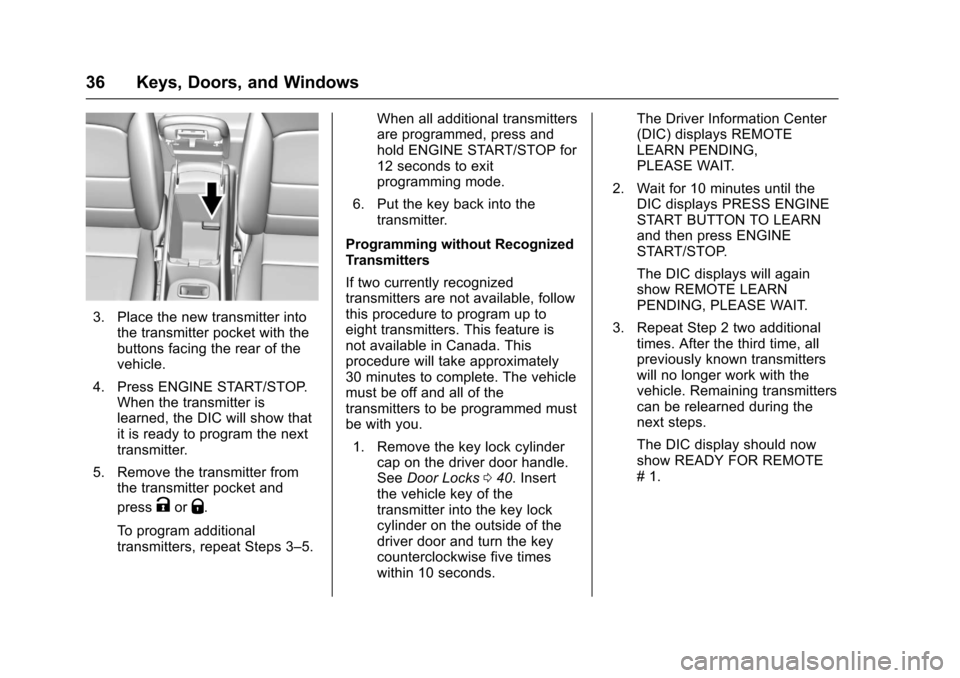
3. Place the new transmitter intothe transmitter pocket with thebuttons facing the rear of thevehicle.
4. Press ENGINE START/STOP.When the transmitter islearned, the DIC will show thatit is ready to program the nexttransmitter.
5. Remove the transmitter fromthe transmitter pocket and
pressKorQ.
To p r o g r a m a d d i t i o n a ltransmitters, repeat Steps 3–5.
When all additional transmittersare programmed, press andhold ENGINE START/STOP for12 seconds to exitprogramming mode.
6. Put the key back into thetransmitter.
Programming without RecognizedTransmitters
If two currently recognizedtransmitters are not available, followthis procedure to program up toeight transmitters. This feature isnot available in Canada. Thisprocedure will take approximately30 minutes to complete. The vehiclemust be off and all of thetransmitters to be programmed mustbe with you.
1. Remove the key lock cylindercap on the driver door handle.SeeDoor Locks040.Insertthe vehicle key of thetransmitter into the key lockcylinder on the outside of thedriver door and turn the keycounterclockwise five timeswithin 10 seconds.
The Driver Information Center(DIC) displays REMOTELEARN PENDING,PLEASE WAIT.
2. Wait for 10 minutes until theDIC displays PRESS ENGINESTART BUTTON TO LEARNand then press ENGINESTART/STOP.
The DIC displays will againshow REMOTE LEARNPENDING, PLEASE WAIT.
3. Repeat Step 2 two additionaltimes. After the third time, allpreviously known transmitterswill no longer work with thevehicle. Remaining transmitterscan be relearned during thenext steps.
The DIC display should nowshow READY FOR REMOTE#1.
Page 38 of 419
Chevrolet Malibu Owner Manual (GMNA-Localizing-U.S./Canada/Mexico-10122664) - 2017 - crc - 5/23/16
Keys, Doors, and Windows 37
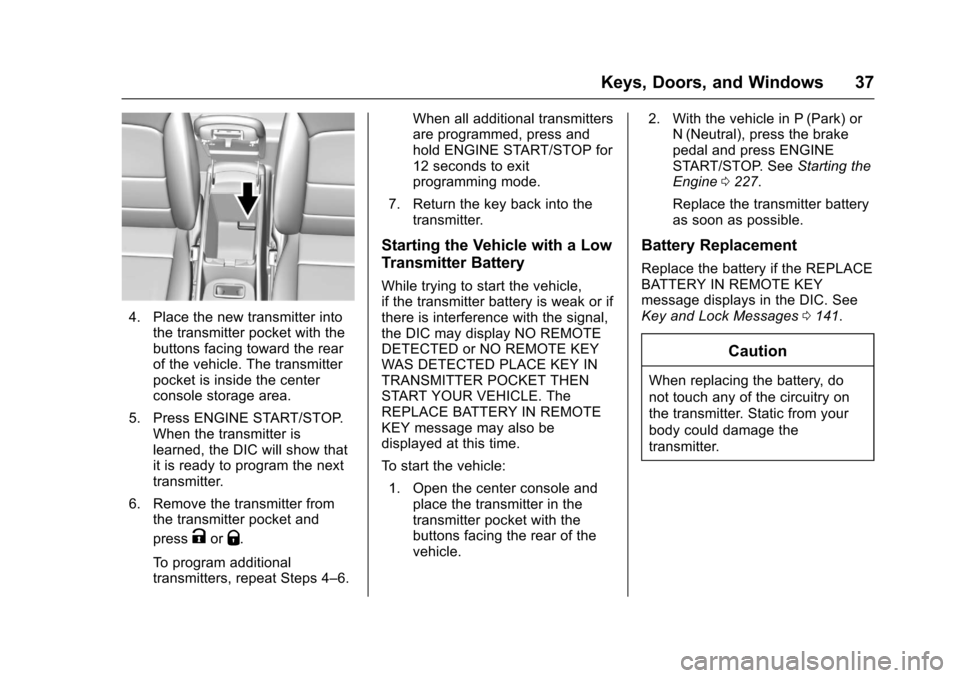
4. Place the new transmitter intothe transmitter pocket with thebuttons facing toward the rearof the vehicle. The transmitterpocket is inside the centerconsole storage area.
5. Press ENGINE START/STOP.When the transmitter islearned, the DIC will show thatit is ready to program the nexttransmitter.
6. Remove the transmitter fromthe transmitter pocket and
pressKorQ.
To p r o g r a m a d d i t i o n a ltransmitters, repeat Steps 4–6.
When all additional transmittersare programmed, press andhold ENGINE START/STOP for12 seconds to exitprogramming mode.
7. Return the key back into thetransmitter.
Starting the Vehicle with a Low
Transmitter Battery
While trying to start the vehicle,if the transmitter battery is weak or ifthere is interference with the signal,the DIC may display NO REMOTEDETECTED or NO REMOTE KEYWAS DETECTED PLACE KEY INTRANSMITTER POCKET THENSTART YOUR VEHICLE. TheREPLACE BATTERY IN REMOTEKEY message may also bedisplayed at this time.
To s t a r t t h e v e h i c l e :
1. Open the center console andplace the transmitter in thetransmitter pocket with thebuttons facing the rear of thevehicle.
2. With the vehicle in P (Park) orN(Neutral), press the brakepedal and press ENGINESTART/STOP. SeeStarting theEngine0227.
Replace the transmitter batteryas soon as possible.
Battery Replacement
Replace the battery if the REPLACEBATTERY IN REMOTE KEYmessage displays in the DIC. SeeKey and Lock Messages0141.
Caution
When replacing the battery, do
not touch any of the circuitry on
the transmitter. Static from your
body could damage the
transmitter.
Page 60 of 419
Chevrolet Malibu Owner Manual (GMNA-Localizing-U.S./Canada/Mexico-10122664) - 2017 - crc - 5/23/16
Seats and Restraints 59
Memory Seats
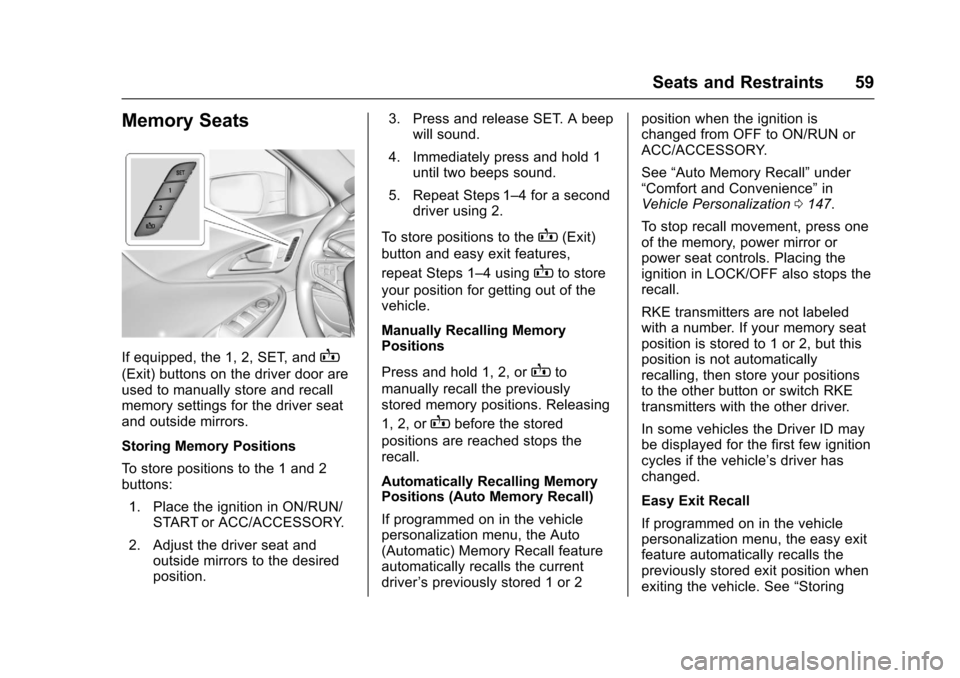
If equipped, the 1, 2, SET, andB
(Exit) buttons on the driver door areused to manually store and recallmemory settings for the driver seatand outside mirrors.
Storing Memory Positions
To s t o r e p o s i t i o n s t o t h e 1 a n d 2buttons:
1. Place the ignition in ON/RUN/START or ACC/ACCESSORY.
2. Adjust the driver seat andoutside mirrors to the desiredposition.
3. Press and release SET. A beepwill sound.
4. Immediately press and hold 1until two beeps sound.
5. Repeat Steps 1–4foraseconddriver using 2.
To s t o r e p o s i t i o n s t o t h eB(Exit)
button and easy exit features,
repeat Steps 1–4usingBto store
your position for getting out of thevehicle.
Manually Recalling MemoryPositions
Press and hold 1, 2, orBto
manually recall the previouslystored memory positions. Releasing
1, 2, orBbefore the stored
positions are reached stops therecall.
Automatically Recalling MemoryPositions (Auto Memory Recall)
If programmed on in the vehiclepersonalization menu, the Auto(Automatic) Memory Recall featureautomatically recalls the currentdriver’spreviouslystored1or2
position when the ignition ischanged from OFF to ON/RUN orACC/ACCESSORY.
See“Auto Memory Recall”under“Comfort and Convenience”inVehicle Personalization0147.
To s t o p r e c a l l m o v e m e n t , p r e s s o n eof the memory, power mirror orpower seat controls. Placing theignition in LOCK/OFF also stops therecall.
RKE transmitters are not labeledwith a number. If your memory seatposition is stored to 1 or 2, but thisposition is not automaticallyrecalling, then store your positionsto the other button or switch RKEtransmitters with the other driver.
In some vehicles the Driver ID maybe displayed for the first few ignitioncycles if the vehicle’sdriverhaschanged.
Easy Exit Recall
If programmed on in the vehiclepersonalization menu, the easy exitfeature automatically recalls thepreviously stored exit position whenexiting the vehicle. See“Storing