turn signal bulb CHEVROLET MALIBU 2017 9.G Owners Manual
[x] Cancel search | Manufacturer: CHEVROLET, Model Year: 2017, Model line: MALIBU, Model: CHEVROLET MALIBU 2017 9.GPages: 419, PDF Size: 7.81 MB
Page 143 of 419
Chevrolet Malibu Owner Manual (GMNA-Localizing-U.S./Canada/Mexico-10122664) - 2017 - crc - 5/23/16
142 Instruments and Controls
NO REMOTE DETECTED
This message displays when thetransmitter battery may be weak.See“Starting the Vehicle with a LowTransmitter Battery”underRemoteKeyless Entry (RKE) SystemOperation032.
NO REMOTE DETECTED
PRESS BRAKE TO RESTART
This message displays whenattempting to turn off the vehicleand the RKE transmitter is no longerdetected. Restarting is allowedwithout the RKE transmitter forfive minutes. Press the brake pedaland ENGINE START/STOP torestart the vehicle.
NUMBER OF KEYS
PROGRAMMED
This message displays whenprogramming new keys to thevehicle.
REMOTE LEFT IN VEHICLE
This message displays whenleaving the vehicle with the RKEtransmitter still inside.
REPLACE BATTERY IN
REMOTE KEY
This message displays when thebattery in the RKE transmitter needsto be replaced.
Lamp Messages
AUTOMATIC LIGHT CONTROL
ON/OFF
This message is displayed when theautomatic light control has beenturned on or off. SeeAutomaticHeadlamp System0166.
CHECK XXX TURN
SIGNAL LAMP
When one of the turn signals is out,this message displays to showwhich bulb needs to be replaced.SeeBulb Replacement0305andReplacement Bulbs0309.
TURN SIGNAL ON
This message is displayed if theturn signal has been left on. Turn offthe turn signal.
Object Detection System
Messages
24 GHz RADARS OFF
This message displays when drivingin certain areas where there may beradar interference. Adaptive CruiseControl (ACC), Forward CollisionAlert (FCA), and the ForwardAutomatic Braking (FAB) may notwork or may not work as well. Thevehicle does not need service.
FORWARD COLLISION
SYSTEM OFF
This message displays whenForward Automatic Braking (FAB)has been turned off. SeeForwardAutomatic Braking (FAB)0260.
FORWARD COLLISION
SYSTEM REDUCED
This message displays when theForward Automatic Braking (FAB)has been set to the Alert setting.This setting disables FAB functions.SeeForward Automatic Braking(FAB)0260.
Page 168 of 419
Chevrolet Malibu Owner Manual (GMNA-Localizing-U.S./Canada/Mexico-10122664) - 2017 - crc - 5/23/16
Lighting 167
Turn and Lane-Change
Signals
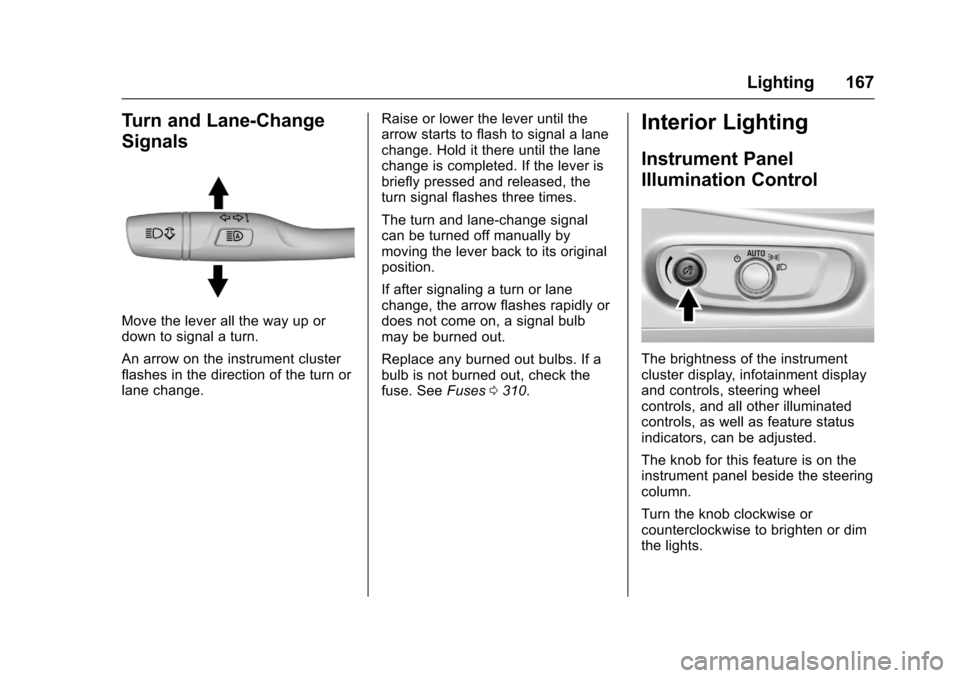
Move the lever all the way up ordown to signal a turn.
An arrow on the instrument clusterflashes in the direction of the turn orlane change.
Raise or lower the lever until thearrow starts to flash to signal a lanechange. Hold it there until the lanechange is completed. If the lever isbriefly pressed and released, theturn signal flashes three times.
The turn and lane-change signalcan be turned off manually bymoving the lever back to its originalposition.
If after signaling a turn or lanechange, the arrow flashes rapidly ordoes not come on, a signal bulbmay be burned out.
Replace any burned out bulbs. If abulb is not burned out, check thefuse. SeeFuses0310.
Interior Lighting
Instrument Panel
Illumination Control
The brightness of the instrumentcluster display, infotainment displayand controls, steering wheelcontrols, and all other illuminatedcontrols, as well as feature statusindicators, can be adjusted.
The knob for this feature is on theinstrument panel beside the steeringcolumn.
Turn the knob clockwise orcounterclockwise to brighten or dimthe lights.
Page 275 of 419
Chevrolet Malibu Owner Manual (GMNA-Localizing-U.S./Canada/Mexico-10122664) - 2017 - crc - 5/23/16
274 Driving and Operating
Backing Up
Hold the bottom of the steeringwheel with one hand. To move thetrailer to the left, move your hand tothe left. To move the trailer to theright, move your hand to the right.Always back up slowly and,if possible, have someoneguide you.
Making Turns
Caution
Making very sharp turns while
trailering could cause the trailer to
come in contact with the vehicle.
The vehicle could be damaged.
Avoid making very sharp turns
while trailering.
When turning with a trailer, makewider turns than normal so thetrailer will not strike soft shoulders,curbs, road signs, trees, or otherobjects. Use the turn signal well inadvance and avoid jerky or suddenmaneuvers.
Turn Signals When Towing a
Trailer
The turn signal indicators on theinstrument cluster flash wheneversignaling a turn or lane change.Properly hooked up, the trailerlamps also flash, telling otherdrivers the vehicle is turning,changing lanes, or stopping.
When towing a trailer, the arrows onthe instrument cluster flash for turnseven if the bulbs on the trailer areburned out. Check occasionally tobe sure the trailer bulbs are stillworking.
Driving on Grades
Reduce speed and shift to a lowergear before starting down a long orsteep downgrade. If thetransmission is not shifted down, thebrakes might have to be used somuch that they would get hot and nolonger work well.
The vehicle can tow in D (Drive).Use a lower gear if the transmissionshifts too often.
When towing at high altitude onsteep uphill grades, engine coolantboils at a lower temperature than atnormal altitudes. If the engine isturned off immediately after towingat high altitude on steep uphillgrades, the vehicle could showsigns similar to engine overheating.To a v o i d t h i s , l e t t h e e n g i n e r u nwhile parked, preferably on levelground, with the transmission inP(Park) for a few minutes beforeturning the engine off. If theoverheat warning comes on, seeEngine Overheating0297.
Parking on Hills
{Warning
Parking the vehicle on a hill with
the trailer attached can be
dangerous. If something goes
wrong, the rig could start to move.
People can be injured, and both
the vehicle and the trailer can be
damaged. When possible, always
park the rig on a flat surface.
Page 279 of 419
Chevrolet Malibu Owner Manual (GMNA-Localizing-U.S./Canada/Mexico-10122664) - 2017 - crc - 5/23/16
278 Vehicle Care
Vehicle Care
General Information
General Information . . . . . . . . . . 279California Proposition65 Warning . . . . . . . . . . . . . . . . . 279California PerchlorateMaterials Requirements . . . . . 279Accessories andModifications . . . . . . . . . . . . . . . . 280
Vehicle Checks
Doing Your OwnService Work . . . . . . . . . . . . . . . 280Hood . . . . . . . . . . . . . . . . . . . . . . . . . 281Engine CompartmentOverview . . . . . . . . . . . . . . . . . . . . 283Engine Oil . . . . . . . . . . . . . . . . . . . . 288Engine Oil Life System . . . . . . . 291Automatic TransmissionFluid . . . . . . . . . . . . . . . . . . . . . . . . 292Engine Air Cleaner/Filter . . . . . . 292Cooling System (Engine) . . . . . 293Cooling System (PowerElectronics) . . . . . . . . . . . . . . . . . 294Engine Coolant . . . . . . . . . . . . . . . 295Engine Overheating . . . . . . . . . . 297Washer Fluid . . . . . . . . . . . . . . . . . 299Brakes . . . . . . . . . . . . . . . . . . . . . . . 299Brake Fluid . . . . . . . . . . . . . . . . . . . 300
Battery - North America . . . . . . 301Starter Switch Check . . . . . . . . . 303Automatic Transmission ShiftLock Control FunctionCheck . . . . . . . . . . . . . . . . . . . . . . . 303Park Brake and P (Park)Mechanism Check . . . . . . . . . . 303Wiper Blade Replacement . . . . 304
Headlamp Aiming
Headlamp Aiming . . . . . . . . . . . . 305
Bulb Replacement
Bulb Replacement . . . . . . . . . . . . 305Halogen Bulbs . . . . . . . . . . . . . . . . 305LED Lighting . . . . . . . . . . . . . . . . . 305Headlamps, Front Turn Signal,Sidemarker, and ParkingLamps . . . . . . . . . . . . . . . . . . . . . . 305Ta i l l a m p s , T u r n S i g n a l ,Stoplamps, and Back-UpLamps (LS and LT) . . . . . . . . . . 307Ta i l l a m p s , T u r n S i g n a l ,Stoplamps, and Back-UpLamps (LTZ) . . . . . . . . . . . . . . . . 308License Plate Lamp . . . . . . . . . . 308Replacement Bulbs . . . . . . . . . . . 309
Electrical System
High Voltage Devices andWiring . . . . . . . . . . . . . . . . . . . . . . . 309Electrical System Overload . . . 310
Fuses . . . . . . . . . . . . . . . . . . . . . . . . 310Engine Compartment FuseBlock . . . . . . . . . . . . . . . . . . . . . . . . 311Instrument Panel FuseBlock . . . . . . . . . . . . . . . . . . . . . . . . 315
Wheels and Tires
Tires . . . . . . . . . . . . . . . . . . . . . . . . . . 317All-Season Tires . . . . . . . . . . . . . . 318Winter Tires . . . . . . . . . . . . . . . . . . 318Low-Profile Tires . . . . . . . . . . . . . 319Summer Tires . . . . . . . . . . . . . . . . 319Tire Sidewall Labeling . . . . . . . . 320Tire Designations . . . . . . . . . . . . . 322Tire Terminology andDefinitions . . . . . . . . . . . . . . . . . . 322Tire Pressure . . . . . . . . . . . . . . . . . 325Tire Pressure for High-SpeedOperation . . . . . . . . . . . . . . . . . . . 326Tire Pressure MonitorSystem . . . . . . . . . . . . . . . . . . . . . . 327Tire Pressure MonitorOperation . . . . . . . . . . . . . . . . . . . 328Tire Inspection . . . . . . . . . . . . . . . . 331Tire Rotation . . . . . . . . . . . . . . . . . 331When It Is Time for NewTires . . . . . . . . . . . . . . . . . . . . . . . . 332Buying New Tires . . . . . . . . . . . . . 333Different Size Tires andWheels . . . . . . . . . . . . . . . . . . . . . . 334
Page 306 of 419
Chevrolet Malibu Owner Manual (GMNA-Localizing-U.S./Canada/Mexico-10122664) - 2017 - crc - 5/23/16
Vehicle Care 305
Headlamp Aiming
Headlamp aim has been preset andshould need no further adjustment.
If the vehicle is damaged in a crash,the headlamp aim may be affected.If adjustment to the headlamps isnecessary, see your dealer.
Bulb Replacement
For the proper type of replacementbulbs, seeReplacementBulbs0309.
For any bulb-changing procedurenot listed in this section, contactyour dealer.
Halogen Bulbs
{Warning
Halogen bulbs have pressurized
gas inside and can burst if you
drop or scratch the bulb. You or
others could be injured. Be sure
to read and follow the instructions
on the bulb package.
LED Lighting
This vehicle has several LED lamps.For replacement of any LED lightingassembly, contact your dealer.
Headlamps, Front Turn
Signal, Sidemarker, and
Parking Lamps
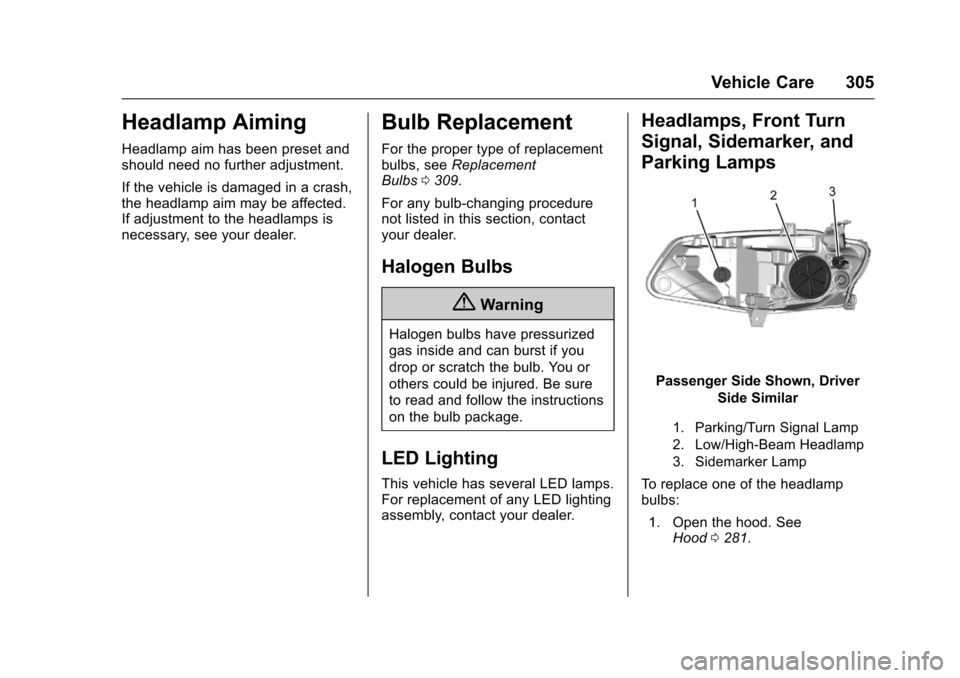
Passenger Side Shown, Driver
Side Similar
1. Parking/Turn Signal Lamp
2. Low/High-Beam Headlamp
3. Sidemarker Lamp
To r e p l a c e o n e o f t h e h e a d l a m pbulbs:
1. Open the hood. SeeHood0281.
Page 307 of 419
Chevrolet Malibu Owner Manual (GMNA-Localizing-U.S./Canada/Mexico-10122664) - 2017 - crc - 5/23/16
306 Vehicle Care
2. For the driver side bulb,remove the windshield washerbottle filler neck by firmlypulling it straight up and out ofthe bottle.
3. For hybrid vehicles, remove theengine air cleaner housing bygripping firmly and pullingstraight up.
4. Remove the cover from theback of the headlampassembly by turning itcounterclockwise.
5. Disconnect the electricalconnector.
6. Remove the bulb from the lampassembly by turningcounterclockwise.
7. Install a new bulb in the lampassembly.
8. Connect the electricalconnector.
9. Replace the cover from theback of the headlampassembly by turning itclockwise.
10. For the driver side, reinstall thewindshield washer bottle fillerneck by firmly pushing itstraight into the bottle. Makesure that the filler neck clipengages into the bracket onthe upper tie-bar.
11 . R e p l a c e t h e e n g i n e a i r c l e a n e rhousing by aligning the pegswith the grommets andpressing firmly down.
Front Turn Signal, Parking, and
Sidemarker Lamps
To r e p l a c e o n e o f t h e s e l a m p s :
1. For the driver side bulb,remove the windshield washerbottle filler neck by firmlypulling it straight up and out ofthe bottle.
2. For hybrid vehicles, remove theengine air cleaner housing bygripping firmly and pullingstraight up.
3. Remove the bulb socket fromthe headlamp assembly byturning it counterclockwise.
4. Remove the bulb from thesocket.
5. Replace the bulb in the bulbsocket.
6. Install the bulb socket in theheadlamp assembly by turningit clockwise.
7. For the driver side, reinstall thewindshield washer bottle fillerneck by firmly pushing itstraight into the bottle. Makesure that the filler neck clipengages into the bracket onthe upper tie-bar.
8. Replace the engine air cleanerhousing by aligning the pegswith the grommets andpressing firmly down.
Page 308 of 419
Chevrolet Malibu Owner Manual (GMNA-Localizing-U.S./Canada/Mexico-10122664) - 2017 - crc - 5/23/16
Vehicle Care 307
Taillamps, Turn Signal,
Stoplamps, and Back-Up
Lamps (LS and LT)
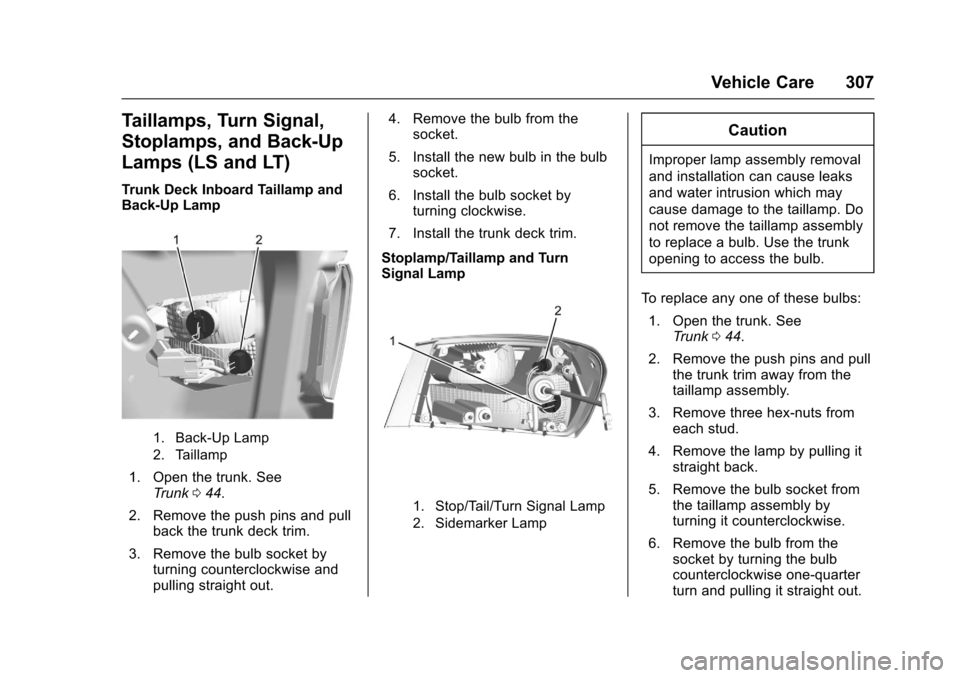
Trunk Deck Inboard Taillamp andBack-Up Lamp
1. Back-Up Lamp
2. Taillamp
1. Open the trunk. SeeTr u n k044.
2. Remove the push pins and pullback the trunk deck trim.
3. Remove the bulb socket byturning counterclockwise andpulling straight out.
4. Remove the bulb from thesocket.
5. Install the new bulb in the bulbsocket.
6. Install the bulb socket byturning clockwise.
7. Install the trunk deck trim.
Stoplamp/Taillamp and TurnSignal Lamp
1. Stop/Tail/Turn Signal Lamp
2. Sidemarker Lamp
Caution
Improper lamp assembly removal
and installation can cause leaks
and water intrusion which may
cause damage to the taillamp. Do
not remove the taillamp assembly
to replace a bulb. Use the trunk
opening to access the bulb.
To r e p l a c e a n y o n e o f t h e s e b u l b s :
1. Open the trunk. SeeTr u n k044.
2. Remove the push pins and pullthe trunk trim away from thetaillamp assembly.
3. Remove three hex-nuts fromeach stud.
4. Remove the lamp by pulling itstraight back.
5. Remove the bulb socket fromthe taillamp assembly byturning it counterclockwise.
6. Remove the bulb from thesocket by turning the bulbcounterclockwise one-quarterturn and pulling it straight out.
Page 309 of 419
Chevrolet Malibu Owner Manual (GMNA-Localizing-U.S./Canada/Mexico-10122664) - 2017 - crc - 5/23/16
308 Vehicle Care
7. Install a new bulb into thesocket.
8. Install the bulb socket into thetaillamp assembly by turning itclockwise.
9. Install the trunk trim, hex nuts,and push pins.
Taillamps, Turn Signal,
Stoplamps, and Back-Up
Lamps (LTZ)
Caution
Improper lamp assembly removal
and installation can cause leaks
and water intrusion which may
cause damage to the taillamp. Do
not remove the taillamp assembly
to replace a bulb. Use the trunk
opening to access the bulb.
The stoplamp/taillamp and trunkdeck inboard taillamp are LEDs. Toreplace, see your dealer.
Back-Up Lamp
1. Open the trunk. SeeTr u n k044.
2. Remove the push pins and pullback the trunk deck trim.
3. Remove the bulb socket byturning counterclockwise andpulling straight out.
4. Remove the bulb from thesocket.
5. Install the new bulb in the bulbsocket.
6. Install the bulb socket byturning clockwise.
7. Install the trunk deck trim.
License Plate Lamp
To r e p l a c e o n e o f t h e s e b u l b s :
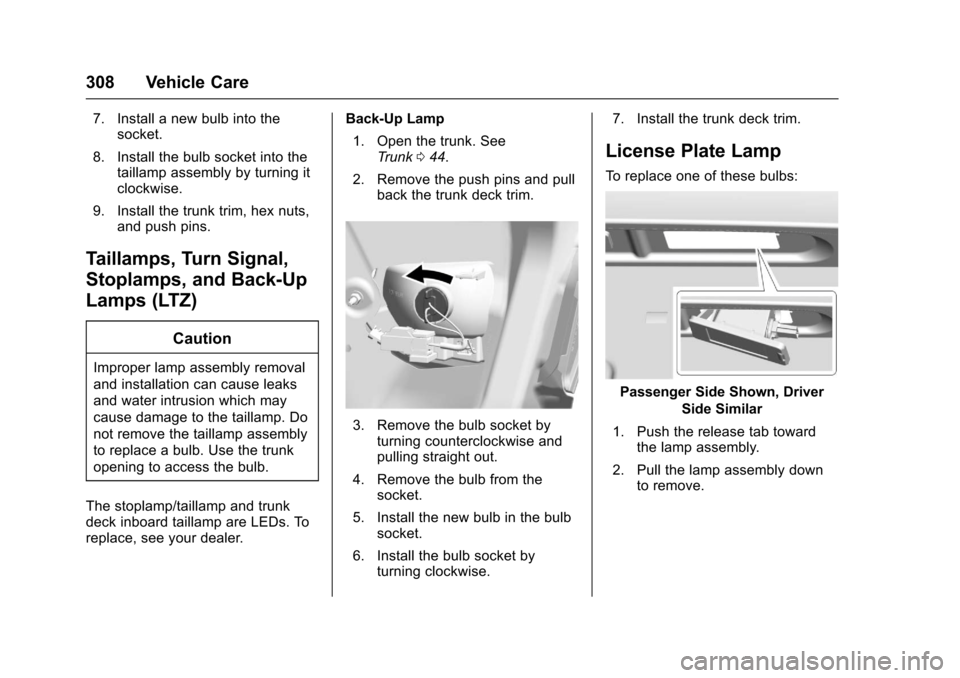
Passenger Side Shown, Driver
Side Similar
1. Push the release tab towardthe lamp assembly.
2. Pull the lamp assembly downto remove.
Page 310 of 419
Chevrolet Malibu Owner Manual (GMNA-Localizing-U.S./Canada/Mexico-10122664) - 2017 - crc - 5/23/16
Vehicle Care 309
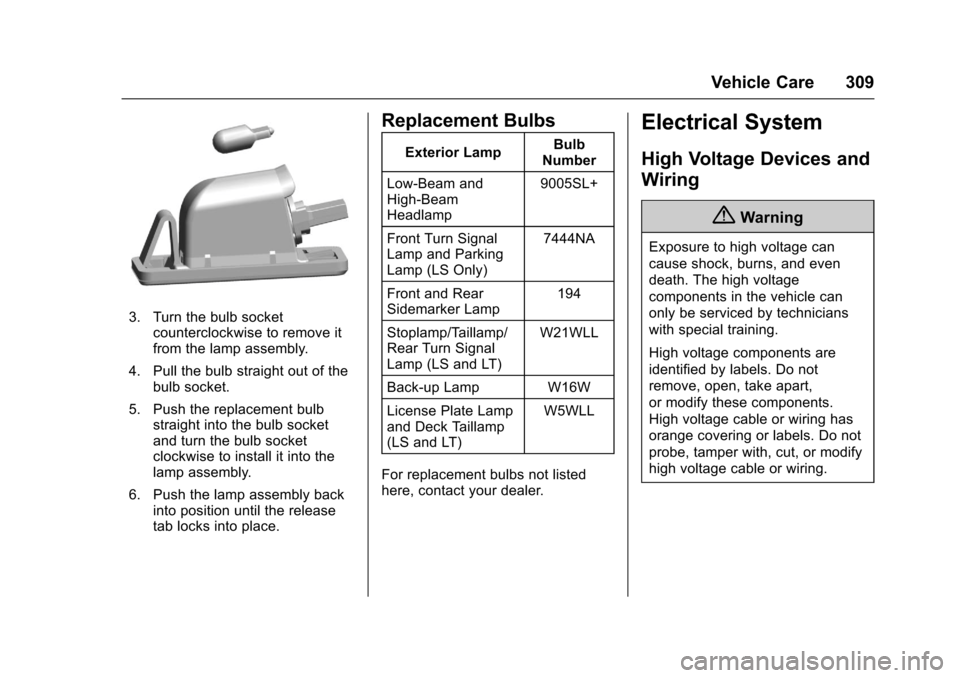
3. Turn the bulb socketcounterclockwise to remove itfrom the lamp assembly.
4. Pull the bulb straight out of thebulb socket.
5. Push the replacement bulbstraight into the bulb socketand turn the bulb socketclockwise to install it into thelamp assembly.
6. Push the lamp assembly backinto position until the releasetab locks into place.
Replacement Bulbs
Exterior LampBulbNumber
Low-Beam andHigh-BeamHeadlamp
9005SL+
Front Turn SignalLamp and ParkingLamp (LS Only)
7444NA
Front and RearSidemarker Lamp194
Stoplamp/Taillamp/Rear Turn SignalLamp (LS and LT)
W21WLL
Back-up Lamp W16W
License Plate Lampand Deck Taillamp(LS and LT)
W5WLL
For replacement bulbs not listedhere, contact your dealer.
Electrical System
High Voltage Devices and
Wiring
{Warning
Exposure to high voltage can
cause shock, burns, and even
death. The high voltage
components in the vehicle can
only be serviced by technicians
with special training.
High voltage components are
identified by labels. Do not
remove, open, take apart,
or modify these components.
High voltage cable or wiring has
orange covering or labels. Do not
probe, tamper with, cut, or modify
high voltage cable or wiring.
Page 409 of 419

Chevrolet Malibu Owner Manual (GMNA-Localizing-U.S./Canada/Mexico-10122664) - 2017 - crc - 5/23/16
408 Index
Apple CarPlay and
Android Auto . . . . . . . . . . . . . . . . . . 199
Armrest
Rear Seat . . . . . . . . . . . . . . . . . . . . . . 64
Assistance Program,
Roadside . . . . . . . . . . . . . . . . . . . . . . 387
Assistance Systems for
Driving . . . . . . . . . . . . . . . . . . . . . . . . 257
Assistance Systems for
Parking and Backing . . . . . . . . . . 253
Audio
Theft-Deterrent Feature . . . . . . . 172
Automatic
Door Locks . . . . . . . . . . . . . . . . . . . . . 43
Forward Braking . . . . . . . . . . . . . . 260
Headlamp System . . . . . . . . . . . . 166
Transmission . . . . . . . . . . . . . . . . . 233
Transmission Fluid . . . . . . . . . . . 292
Automatic Transmission
Manual Mode . . . . . . . . . . . . . . . . . 235
Shift Lock Control Function
Check . . . . . . . . . . . . . . . . . . . . . . . 303
Avoiding Untrusted Media
Devices . . . . . . . . . . . . . . . . . . . . . . . 184
B
Backglass Antenna . . . . . . . . . . . . . 183
Battery
Exterior Lighting Battery
Saver . . . . . . . . . . . . . . . . . . . . . . . 170
Load Management . . . . . . . . . . . . 169
Power Protection . . . . . . . . . . . . . 170
Voltage and Charging
Messages . . . . . . . . . . . . . . . . . . . 138
Battery - North America . . . . 301, 352
Blade Replacement, Wiper . . . . . 304
Bluetooth
Overview . . . . . . . . . . . 190, 191, 195
Brake
Parking, Electric . . . . . . . . . . . . . . 238
System Warning Light . . . . . . . . 124
Brakes . . . . . . . . . . . . . . . . . . . . . . . . . . 299
Antilock . . . . . . . . . . . . . . . . . . . . . . . 236
Assist . . . . . . . . . . . . . . . . . . . . . . . . . 239
Fluid . . . . . . . . . . . . . . . . . . . . . . . . . . 300
Parking . . . . . . . . . . . . . . . . . . . . . . . 237
Regenerative Braking . . . . . . . . . 240
System Messages . . . . . . . . . . . . 138
Braking . . . . . . . . . . . . . . . . . . . . . . . . . 216
Automatic Forward . . . . . . . . . . . 260
Braking System
Front Pedestrian (FPB) . . . . . . . 261
Break-In, New Vehicle . . . . . . . . . . 225
Bulb Replacement . . . . . . . . . . . . . . 309
Halogen Bulbs . . . . . . . . . . . . . . . . 305
Headlamp Aiming . . . . . . . . . . . . . 305
Headlamps . . . . . . . . . . . . . . . . . . . 305
Headlamps, Front Turn
Signal, Sidemarker, and
Parking Lamps . . . . . . . . . . . . . . 305
License Plate Lamps . . . . . . . . . 308
Ta i l l a m p s , T u r n S i g n a l ,
Stoplamps, and
Back-up Lamps . . . . . . . . 307, 308
Buying New Tires . . . . . . . . . . . . . . . 333
C
Calibration . . . . . . . . . . . . . . . . . . . . . . 106
California
Fuel Requirements . . . . . . . . . . . 269
Perchlorate Materials
Requirements . . . . . . . . . . . . . . . 279
California
Proposition
65 Warning . . . . . . . . . .279, 301, 352
Canadian Vehicle Owners . . . . . . . . 2
Capacities and
Specifications . . . . . . . . . . . . . . . . . 381
Carbon Monoxide
Engine Exhaust . . . . . . . . . . . . . . . 232
Trunk . . . . . . . . . . . . . . . . . . . . . . . . . . . 44
Winter Driving . . . . . . . . . . . . . . . . 220