battery replacement CHEVROLET MALIBU 2019 Owner's Manual
[x] Cancel search | Manufacturer: CHEVROLET, Model Year: 2019, Model line: MALIBU, Model: CHEVROLET MALIBU 2019Pages: 382, PDF Size: 37.7 MB
Page 25 of 382
Chevrolet Malibu Owner Manual (GMNA-Localizing-U.S./Canada/Mexico-
12461813) - 2019 - crc - 12/11/18
In Brief 25
contributing to increased energy
efficiency. SeeRegenerative
Braking (Hybrid Only)0191.
Battery
This vehicle has a standard 12-volt
battery and a high voltage hybrid
battery. When a new standard
12-volt battery is needed, see your
dealer for one that has the
replacement number shown on the
original battery's label. Only a
trained service technician with the
proper knowledge and tools should
inspect, test, or replace the hybrid
battery. See your dealer if the high
voltage hybrid battery needs
service. SeeBattery - North
America0257.
Service
{Warning
Never try to do your own service
on hybrid components. You can
be seriously injured and the
vehicle can be damaged if you try
to do your own service work.
Service and repair of hybrid
components should only be
performed by a trained service
technician with the proper
knowledge and tools. SeeDoing
Your Own Service Work0235.
Performance and
Maintenance
Traction Control/
Electronic Stability
Control
The Traction Control System (TCS)
limits wheel spin. The system turns
on automatically every time the
vehicle is started and begins
to move.
The StabiliTrak/Electronic Stability
Control (ESC) system assists with
directional control of the vehicle in
difficult driving conditions. The
system turns on automatically every
time the vehicle is started and
begins to move.
.
To turn off TCS, press and
release
gon the center console.
iilluminates in the instrument
cluster.
.
To turn TCS on again, press and
release
g.
Page 30 of 382
Chevrolet Malibu Owner Manual (GMNA-Localizing-U.S./Canada/Mexico-
12461813) - 2019 - crc - 12/11/18
30 Keys, Doors, and Windows
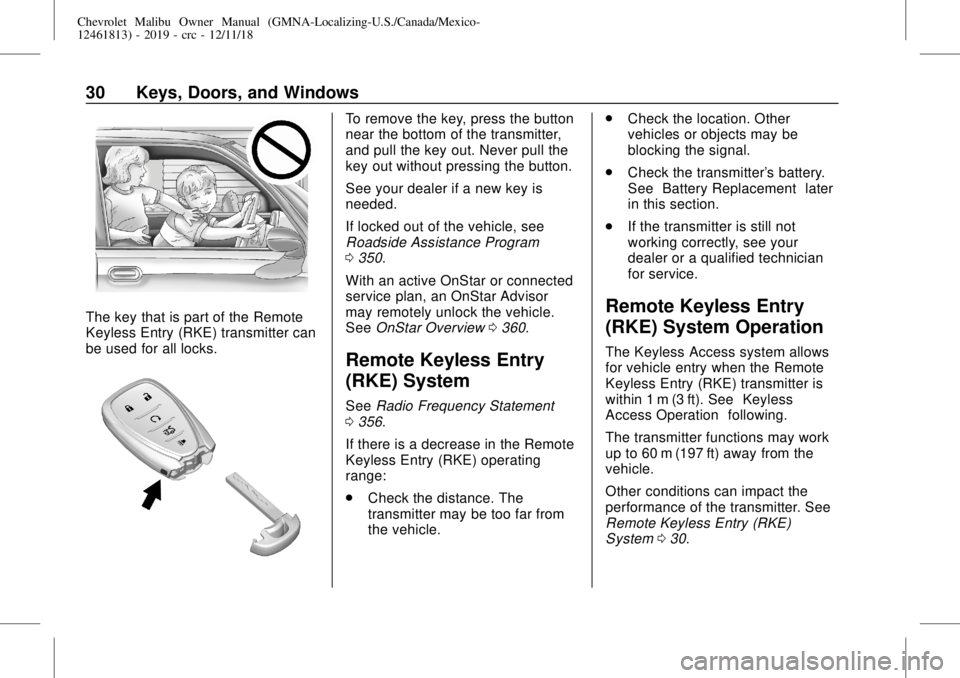
The key that is part of the Remote
Keyless Entry (RKE) transmitter can
be used for all locks.
To remove the key, press the button
near the bottom of the transmitter,
and pull the key out. Never pull the
key out without pressing the button.
See your dealer if a new key is
needed.
If locked out of the vehicle, see
Roadside Assistance Program
0350.
With an active OnStar or connected
service plan, an OnStar Advisor
may remotely unlock the vehicle.
SeeOnStar Overview0360.
Remote Keyless Entry
(RKE) System
SeeRadio Frequency Statement
0356.
If there is a decrease in the Remote
Keyless Entry (RKE) operating
range:
.
Check the distance. The
transmitter may be too far from
the vehicle..
Check the location. Other
vehicles or objects may be
blocking the signal.
.
Check the transmitter's battery.
See“Battery Replacement”later
in this section.
.
If the transmitter is still not
working correctly, see your
dealer or a qualified technician
for service.
Remote Keyless Entry
(RKE) System Operation
The Keyless Access system allows
for vehicle entry when the Remote
Keyless Entry (RKE) transmitter is
within 1 m (3 ft). See“Keyless
Access Operation”following.
The transmitter functions may work
up to 60 m (197 ft) away from the
vehicle.
Other conditions can impact the
performance of the transmitter. See
Remote Keyless Entry (RKE)
System030.
Page 34 of 382
Chevrolet Malibu Owner Manual (GMNA-Localizing-U.S./Canada/Mexico-
12461813) - 2019 - crc - 12/11/18
34 Keys, Doors, and Windows
Key Access
To access a vehicle with a weak
transmitter battery, seeDoor Locks
039.
Programming Transmitters to
the Vehicle
Only RKE transmitters programmed
to the vehicle will work. If a
transmitter is lost or stolen, a
replacement can be purchased and
programmed through your dealer.
The vehicle can be reprogrammed
so that lost or stolen transmitters no
longer work. Any remaining
transmitters will need to be
reprogrammed. Each vehicle can
have up to eight transmitters
matched to it.
Programming with Recognized
Transmitters
A new transmitter can be
programmed to the vehicle when
there are two recognized
transmitters. To program, the vehicle
must be off and all of thetransmitters, both currently
recognized and new, must be
with you.
1. Place the two recognized
transmitters in the cupholder.
2. Remove the key lock cylinder
cap on the driver door handle.
SeeDoor Locks039. Insert
the vehicle key of the new
transmitter into the key lock
cylinder on the outside of the
driver door and turn the key
counterclockwise five times
within 10 seconds.
The DIC displays READY FOR
REMOTE #2, 3, 4 or 5.
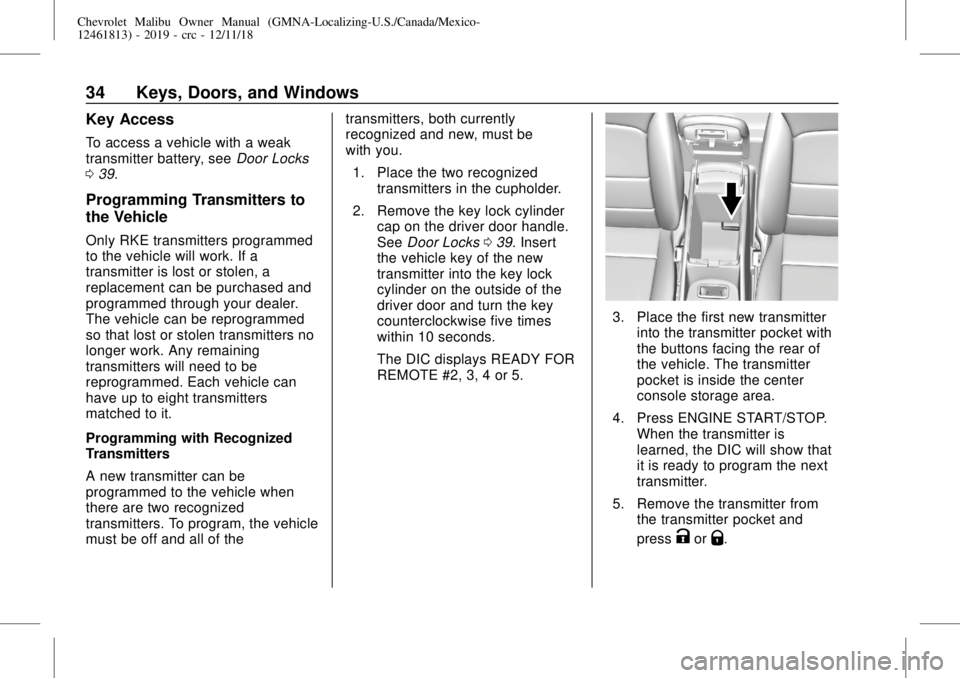
3. Place the first new transmitter
into the transmitter pocket with
the buttons facing the rear of
the vehicle. The transmitter
pocket is inside the center
console storage area.
4. Press ENGINE START/STOP.
When the transmitter is
learned, the DIC will show that
it is ready to program the next
transmitter.
5. Remove the transmitter from
the transmitter pocket and
press
KorQ.
Page 36 of 382
Chevrolet Malibu Owner Manual (GMNA-Localizing-U.S./Canada/Mexico-
12461813) - 2019 - crc - 12/11/18
36 Keys, Doors, and Windows
When all additional transmitters
are programmed, press and
hold ENGINE START/STOP for
12 seconds to exit
programming mode.
7. Return the key back into the
transmitter.
8. Replace the key lock cylinder
cap. SeeDoor Locks039.
Starting the Vehicle with a Low
Transmitter Battery
While trying to start the vehicle,
if the transmitter battery is weak or if
there is interference with the signal,
the DIC may display NO REMOTE
DETECTED or NO REMOTE KEY
WAS DETECTED PLACE KEY IN
TRANSMITTER POCKET THEN
START YOUR VEHICLE. The DIC
may also display REPLACE
BATTERY IN REMOTE KEY.
To start the vehicle:
1. Open the center console and
place the transmitter in the
transmitter pocket with the
buttons facing the rear of the
vehicle.2. With the vehicle in P (Park) or
N (Neutral), press the brake
pedal and press ENGINE
START/STOP. SeeStarting the
Engine0178.
Replace the transmitter battery
as soon as possible.
Battery Replacement
Replace the battery if the DIC
displays REPLACE BATTERY IN
REMOTE KEY.
Caution
When replacing the battery, do
not touch any of the circuitry on
the transmitter. Static from your
body could damage the
transmitter.
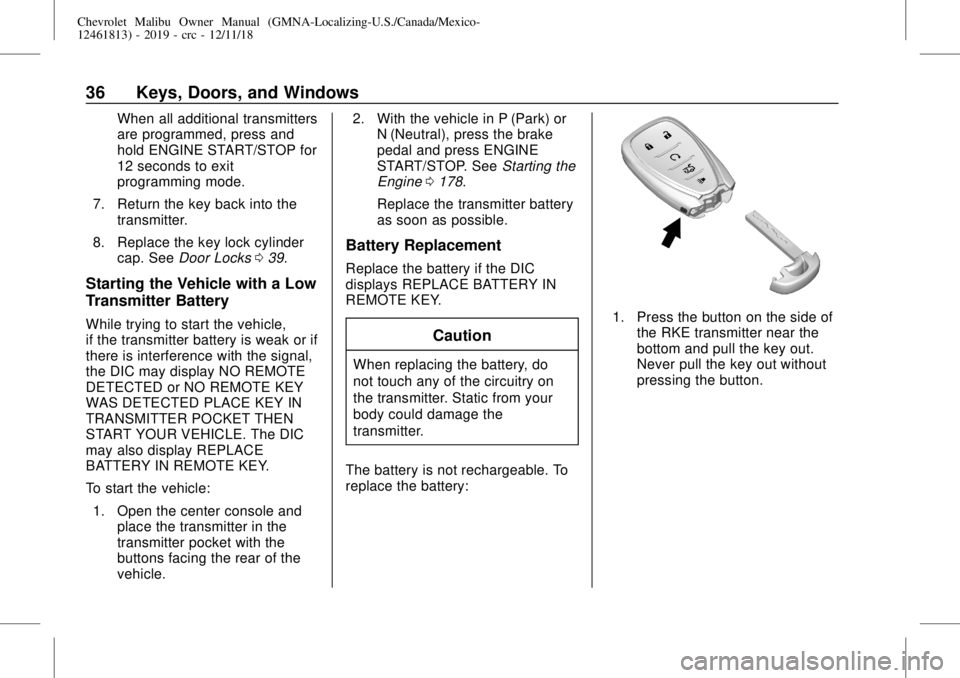
The battery is not rechargeable. To
replace the battery:
1. Press the button on the side of
the RKE transmitter near the
bottom and pull the key out.
Never pull the key out without
pressing the button.
Page 85 of 382
Chevrolet Malibu Owner Manual (GMNA-Localizing-U.S./Canada/Mexico-
12461813) - 2019 - crc - 12/11/18
Seats and Restraints 85
{Warning
For up to 10 seconds after the
vehicle is turned off and the 12‐
volt battery is disconnected, an
airbag can still inflate during
improper service. You can be
injured if you are close to an
airbag when it inflates. Avoid
yellow connectors. They are
probably part of the airbag
system. Be sure to follow proper
service procedures, and make
sure the person performing work
for you is qualified to do so.
Adding Equipment to the
Airbag-Equipped Vehicle
Adding accessories that change the
vehicle's frame, bumper system,
height, front end, or side sheet
metal may keep the airbag system
from working properly.
The operation of the airbag system
can also be affected by changing,
including improperly repairing or
replacing, any parts of the following:.
Airbag system, including airbag
modules, front or side impact
sensors, sensing and diagnostic
module, or airbag wiring
.
Front seats, including stitching,
seams or zippers
.
Seat belts
.
Steering wheel, instrument
panel, overhead console, ceiling
trim, or pillar garnish trim
.
Inner door seals, including
speakers
Your dealer and the service manual
have information about the location
of the airbag modules and sensors,
sensing and diagnostic module, and
airbag wiring along with the proper
replacement procedures.
In addition, the vehicle has a
passenger sensing system for the
front outboard passenger position,
which includes sensors that are part
of the passenger seat. The
passenger sensing system may not
operate properly if the original seat
trim is replaced with non-GM
covers, upholstery, or trim; or withGM covers, upholstery, or trim
designed for a different vehicle. Any
object, such as an aftermarket seat
heater or a comfort-enhancing pad
or device, installed under or on top
of the seat fabric, could also
interfere with the operation of the
passenger sensing system. This
could either prevent proper
deployment of the passenger
airbag(s) or prevent the passenger
sensing system from properly
turning off the passenger airbag(s).
SeePassenger Sensing System
080.
If the vehicle has rollover roof-rail
airbags, seeDifferent Size Tires
and Wheels0294for additional
important information.
If the vehicle must be modified
because you have a disability and
have questions about whether the
modifications will affect the vehicle's
airbag system, or if you have
questions about whether the airbag
system will be affected if the vehicle
is modified for any other reason, call
Customer Assistance. See
Customer Assistance Offices0348.
Page 136 of 382
Chevrolet Malibu Owner Manual (GMNA-Localizing-U.S./Canada/Mexico-
12461813) - 2019 - crc - 12/11/18
136 Instruments and Controls
Oil pressure can vary with engine
speed, outside temperature, and oil
viscosity. On some models, the oil
pump will vary engine oil pressure
according to engine needs. Oil
pressure may change quickly as the
engine speed or load varies. This is
normal. If the oil pressure warning
light or Driver Information Center
(DIC) message indicates oil
pressure outside the normal
operating range, check the vehicle's
oil as soon as possible.
Air Filter Life :Shows an estimate
of the engine air filter’s remaining
useful life and the state of the
system. Engine Air Filter Life 95%
means 95% of the current air filter
life remains. Messages will display
based on the engine air filter life and
the state of the system. When the
REPLACE AT NEXT OIL CHANGE
message displays, the engine air
filter should be replaced at the time
of the next oil change. When the
REPLACE NOW message displays,
the engine air filter should be
replaced as soon as possible.The Air Filter Life display must be
reset after the engine air filter
replacement. To reset, seeEngine
Air Filter Life System0246.
Tire Pressure :Displays a vehicle
with the approximate pressures of
all four tires. Tire pressure is
displayed in either kilopascal (kPa)
or in pounds per square inch (psi).
SeeTire Pressure Monitor System
0285and
Tire Pressure Monitor Operation
0286.
Battery Voltage :Displays the
current battery voltage, if equipped.
Battery voltage changes are normal
while driving. SeeCharging System
Light0124. If there is a problem
with the battery charging system,
the DIC will display a message.
Coolant Temperature :Shows the
engine coolant temperature in either
degrees Celsius (°C) or degrees
Fahrenheit (°F).
Speed Warning :This display is
used to set the vehicle speed at
which the speed warning chime
sounds and the alert is displayed.The speed can be set by pressing
Vwhile the speed warning display
is showing.
Units :Move
worxto change
between Metric or US when the Unit
display is active. Press
Vto confirm
the setting. This will change the
displays on the DIC to the type of
measurements you select.
ECO Drive Assist Menu (ECO)
Items
Useworxto scroll through the
menu items. Not all items are
available on every vehicle.
Best Average Fuel Economy :The
bottom displays the best average
fuel economy (AFE) that is achieved
for a selected distance. The top
displays a running average of fuel
economy for the most recently
traveled selected distance. The
center bar graph displays the
instantaneous fuel economy.
Quickly press
Vto change the
settings for the distance options.
Page 141 of 382
Chevrolet Malibu Owner Manual (GMNA-Localizing-U.S./Canada/Mexico-
12461813) - 2019 - crc - 12/11/18
Instruments and Controls 141
Vehicle Messages
Messages displayed on the DIC
indicate the status of the vehicle or
some action that may be needed to
correct a condition. Multiple
messages may appear one after
another.
The messages that do not require
immediate action can be
acknowledged and cleared by
pressing
V. The messages that
require immediate action cannot be
cleared until that action is
performed.
All messages should be taken
seriously; clearing the message
does not correct the problem.
If a SERVICE message appears,
see your dealer.
Follow the instructions given in the
messages. The system displays
messages regarding the following
topics:
.
Service Messages
.
Fluid Levels
.
Vehicle Security.
Brakes
.
Steering
.
Ride Control Systems
.
Driver Assistance Systems
.
Cruise Control
.
Lighting and Bulb Replacement
.
Wiper/Washer Systems
.
Doors and Windows
.
Seat Belts
.
Airbag Systems
.
Engine and Transmission
.
Tire Pressure
.
Battery
Engine Power Messages
ENGINE POWER IS REDUCED
This message displays when the
vehicle's propulsion power is
reduced. A reduction in propulsion
power can affect the vehicle's ability
to accelerate. If this message is on,
but there is no observed reduction
in performance, proceed to your
destination. The performance maybe reduced the next time the vehicle
is driven. The vehicle may be driven
while this message is on, but
maximum acceleration and speed
may be reduced. Anytime this
message stays on, or displays
repeatedly, the vehicle should be
taken to your dealer for service as
soon as possible.
Vehicle Speed Messages
SPEED LIMITED TO XXX
KM/H (MPH)
This message shows that the
vehicle speed has been limited to
the speed displayed. The limited
speed is a protection for various
propulsion and vehicle systems,
such as lubrication, thermal,
suspension, Teen Driver if
equipped, or tires.
Page 232 of 382
Chevrolet Malibu Owner Manual (GMNA-Localizing-U.S./Canada/Mexico-
12461813) - 2019 - crc - 12/11/18
232 Vehicle Care
Vehicle Care
General Information
General Information . . . . . . . . . . 233
California Proposition
65 Warning . . . . . . . . . . . . . . . . . 234
California Perchlorate
Materials Requirements . . . . . 234
Accessories and
Modifications . . . . . . . . . . . . . . . . 234
Vehicle Checks
Doing Your Own
Service Work . . . . . . . . . . . . . . . 235
Hood . . . . . . . . . . . . . . . . . . . . . . . . . 235
Engine Compartment
Overview . . . . . . . . . . . . . . . . . . . . 237
Engine Oil . . . . . . . . . . . . . . . . . . . . 242
Engine Oil Life System . . . . . . . 245
Automatic Transmission
Fluid . . . . . . . . . . . . . . . . . . . . . . . . 246
Engine Air Filter Life
System . . . . . . . . . . . . . . . . . . . . . . 246
Engine Air Cleaner/Filter . . . . . . 247
Cooling System (Engine) . . . . . 248
Cooling System (Power
Electronics) . . . . . . . . . . . . . . . . . 253
Engine Overheating . . . . . . . . . . 253
Washer Fluid . . . . . . . . . . . . . . . . . 254Brakes . . . . . . . . . . . . . . . . . . . . . . . 255
Brake Fluid . . . . . . . . . . . . . . . . . . . 256
Battery - North America . . . . . . 257
Starter Switch Check . . . . . . . . . 260
Automatic Transmission Shift
Lock Control Function
Check . . . . . . . . . . . . . . . . . . . . . . . 260
Park Brake and P (Park)
Mechanism Check . . . . . . . . . . 260
Wiper Blade Replacement . . . . 261
Windshield Replacement . . . . . 262
Gas Strut(s) . . . . . . . . . . . . . . . . . . 262Headlamp Aiming
Headlamp Aiming . . . . . . . . . . . . 263
Bulb Replacement
Bulb Replacement . . . . . . . . . . . . 263
Halogen Bulbs . . . . . . . . . . . . . . . . 263
LED Lighting . . . . . . . . . . . . . . . . . 264
Headlamps, Front Turn Signal,
Sidemarker, and Parking
Lamps . . . . . . . . . . . . . . . . . . . . . . 264
Taillamps, Turn Signal,
Stoplamps, and Back-Up
Lamps (LS and LT) . . . . . . . . . . 264
Taillamps, Turn Signal,
Stoplamps, and Back-Up
Lamps (LT and Premier) . . . . . 266
License Plate Lamp . . . . . . . . . . 266
Electrical System
High Voltage Devices and
Wiring . . . . . . . . . . . . . . . . . . . . . . . 267
Electrical System Overload . . . 267
Fuses and Circuit Breakers . . . 268
Engine Compartment Fuse
Block . . . . . . . . . . . . . . . . . . . . . . . . 268
Instrument Panel Fuse
Block . . . . . . . . . . . . . . . . . . . . . . . . 273
Wheels and Tires
Tires . . . . . . . . . . . . . . . . . . . . . . . . . . 276
All-Season Tires . . . . . . . . . . . . . . 277
Winter Tires . . . . . . . . . . . . . . . . . . 277
Low-Profile Tires . . . . . . . . . . . . . 277
Summer Tires . . . . . . . . . . . . . . . . 278
Tire Sidewall Labeling . . . . . . . . 278
Tire Designations . . . . . . . . . . . . . 280
Tire Terminology and
Definitions . . . . . . . . . . . . . . . . . . 281
Tire Pressure . . . . . . . . . . . . . . . . . 284
Tire Pressure for High-Speed
Operation . . . . . . . . . . . . . . . . . . . 285
Tire Pressure Monitor
System . . . . . . . . . . . . . . . . . . . . . . 285
Tire Pressure Monitor
Operation . . . . . . . . . . . . . . . . . . . 286
Tire Inspection . . . . . . . . . . . . . . . . 291
Tire Rotation . . . . . . . . . . . . . . . . . 291
Page 257 of 382
Chevrolet Malibu Owner Manual (GMNA-Localizing-U.S./Canada/Mexico-
12461813) - 2019 - crc - 12/11/18
Vehicle Care 257
When the brake fluid falls to a low
level, the brake warning light comes
on. SeeBrake System Warning
Light0126.
Brake fluid absorbs water over time
which degrades the effectiveness of
the brake fluid. Replace brake fluid
at the specified intervals to prevent
increased stopping distance. See
Maintenance Schedule0329.
What to Add
Use only GM approved DOT 3
brake fluid from a clean, sealed
container. SeeRecommended
Fluids and Lubricants0338.
{Warning
The wrong or contaminated brake
fluid could result in damage to the
brake system. This could result in
the loss of braking leading to a
possible injury. Always use the
proper GM approved brake fluid.
Caution
If brake fluid is spilled on the
vehicle's painted surfaces, the
paint finish can be damaged.
Immediately wash off any painted
surface.
Battery - North America
The original equipment battery is
maintenance free. Do not remove
the cap and do not add fluid.
The non-hybrid vehicle has a
standard 12-volt battery under the
hood. SeeEngine Compartment
Overview0237.
Refer to the replacement number
shown on the original battery label
when a new 12-volt battery is
needed.
Hybrid Vehicle
The hybrid vehicle 12-volt battery is
in the trunk on the driver side.
Hybrid vehicles also have a high
voltage battery. Only a trained
service technician with the properknowledge and tools should inspect,
test, or replace the high voltage
battery. See your dealer if the high
voltage battery needs service. The
dealer has information on how to
recycle the high voltage battery.
The hybrid high voltage battery is
cooled with air drawn from the
vehicle interior. The cold air intake
for the battery is under the rear
seat. Do not block the area in front
of the cold air intake.
{Warning
Damage to the high voltage
battery or high voltage system
can create a risk of electric shock,
overheating, or fire.
If the vehicle is damaged from a
moderate to severe crash, flood,
fire, or other event, the vehicle
should be inspected as soon as
possible. Until the vehicle has
been inspected, store it outside at
least 15 m (50 ft) from any
(Continued)
Page 259 of 382
Chevrolet Malibu Owner Manual (GMNA-Localizing-U.S./Canada/Mexico-
12461813) - 2019 - crc - 12/11/18
Vehicle Care 259
Negative Battery Cable
Disconnection
{Warning
Before disconnecting the negative
battery cable, turn off all features,
turn the ignition off, and remove
the key, if equipped, from the
vehicle. If this is not done, you or
others could be injured, and the
vehicle could be damaged.
Caution
If the battery is disconnected with
the ignition on or the vehicle in
Retained Accessory Power
(RAP), the OnStar back-up
battery will be permanently
discharged and will need to be
replaced.
1. Make sure the lamps, features,
and accessories are turned off.
2. Turn the ignition off and
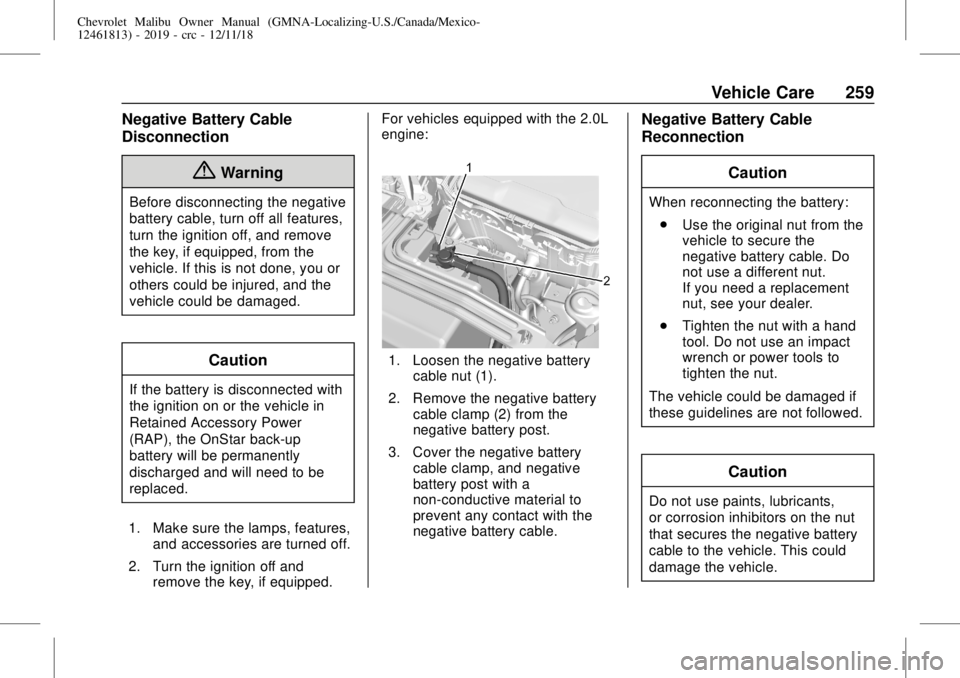
remove the key, if equipped.For vehicles equipped with the 2.0L
engine:
1. Loosen the negative battery
cable nut (1).
2. Remove the negative battery
cable clamp (2) from the
negative battery post.
3. Cover the negative battery
cable clamp, and negative
battery post with a
non-conductive material to
prevent any contact with the
negative battery cable.
Negative Battery Cable
Reconnection
Caution
When reconnecting the battery:
.
Use the original nut from the
vehicle to secure the
negative battery cable. Do
not use a different nut.
If you need a replacement
nut, see your dealer.
.
Tighten the nut with a hand
tool. Do not use an impact
wrench or power tools to
tighten the nut.
The vehicle could be damaged if
these guidelines are not followed.
Caution
Do not use paints, lubricants,
or corrosion inhibitors on the nut
that secures the negative battery
cable to the vehicle. This could
damage the vehicle.