tire pressure CHEVROLET MALIBU 2020 Owner's Guide
[x] Cancel search | Manufacturer: CHEVROLET, Model Year: 2020, Model line: MALIBU, Model: CHEVROLET MALIBU 2020Pages: 358, PDF Size: 3.27 MB
Page 277 of 358
Chevrolet Malibu Owner Manual (GMNA-Localizing-U.S./Canada/Mexico-
13555849) - 2020 - CRC - 8/21/19
276 Vehicle Care
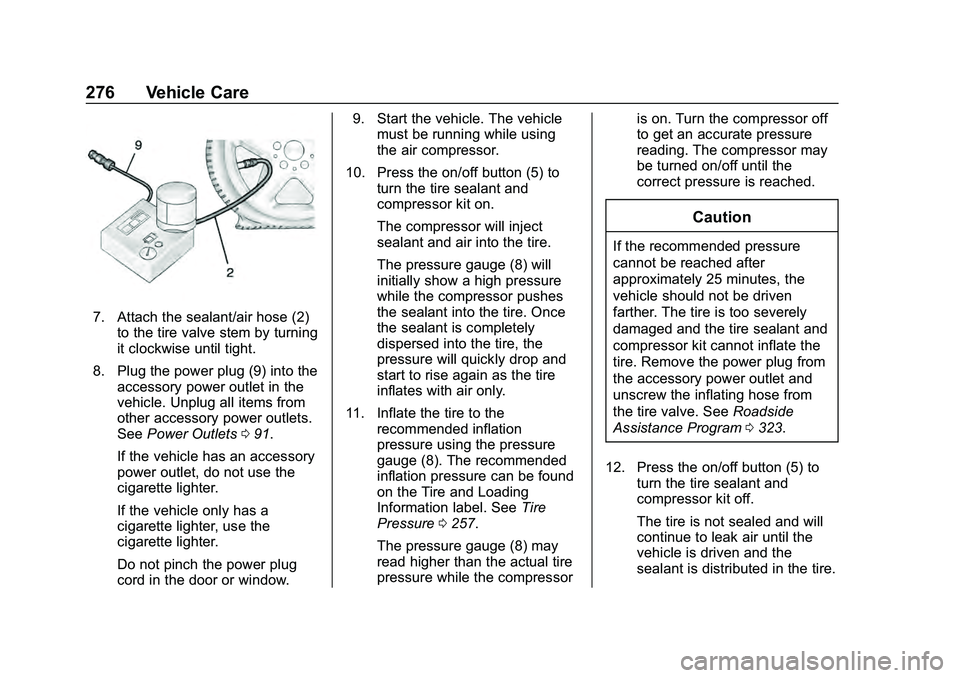
7. Attach the sealant/air hose (2)to the tire valve stem by turning
it clockwise until tight.
8. Plug the power plug (9) into the accessory power outlet in the
vehicle. Unplug all items from
other accessory power outlets.
See Power Outlets 091.
If the vehicle has an accessory
power outlet, do not use the
cigarette lighter.
If the vehicle only has a
cigarette lighter, use the
cigarette lighter.
Do not pinch the power plug
cord in the door or window. 9. Start the vehicle. The vehicle
must be running while using
the air compressor.
10. Press the on/off button (5) to turn the tire sealant and
compressor kit on.
The compressor will inject
sealant and air into the tire.
The pressure gauge (8) will
initially show a high pressure
while the compressor pushes
the sealant into the tire. Once
the sealant is completely
dispersed into the tire, the
pressure will quickly drop and
start to rise again as the tire
inflates with air only.
11. Inflate the tire to the recommended inflation
pressure using the pressure
gauge (8). The recommended
inflation pressure can be found
on the Tire and Loading
Information label. See Tire
Pressure 0257.
The pressure gauge (8) may
read higher than the actual tire
pressure while the compressor is on. Turn the compressor off
to get an accurate pressure
reading. The compressor may
be turned on/off until the
correct pressure is reached.
Caution
If the recommended pressure
cannot be reached after
approximately 25 minutes, the
vehicle should not be driven
farther. The tire is too severely
damaged and the tire sealant and
compressor kit cannot inflate the
tire. Remove the power plug from
the accessory power outlet and
unscrew the inflating hose from
the tire valve. See
Roadside
Assistance Program 0323.
12. Press the on/off button (5) to turn the tire sealant and
compressor kit off.
The tire is not sealed and will
continue to leak air until the
vehicle is driven and the
sealant is distributed in the tire.
Page 278 of 358
Chevrolet Malibu Owner Manual (GMNA-Localizing-U.S./Canada/Mexico-
13555849) - 2020 - CRC - 8/21/19
Vehicle Care 277
Therefore, Steps 13–21 must
be done immediately after
Step 12.
Be careful while handling the
tire sealant and compressor kit
as it could be warm after
usage.
13. Unplug the power plug (9) from the accessory power outlet in
the vehicle.
14. Turn the sealant/air hose (2) counterclockwise to remove it
from the tire valve stem.
15. Replace the tire valve stem cap.
16. Remove the tire sealant canister (4) from the slot on top
of the compressor (6).
17. Turn the air only hose (10) counterclockwise to remove it
from the tire sealant canister
inlet valve (1).
18. Turn the sealant/air hose (2) clockwise onto the sealant
canister inlet valve (1) to
prevent sealant leakage. 19. Return the air only hose (10)
and power plug (9) back to
their original storage location.
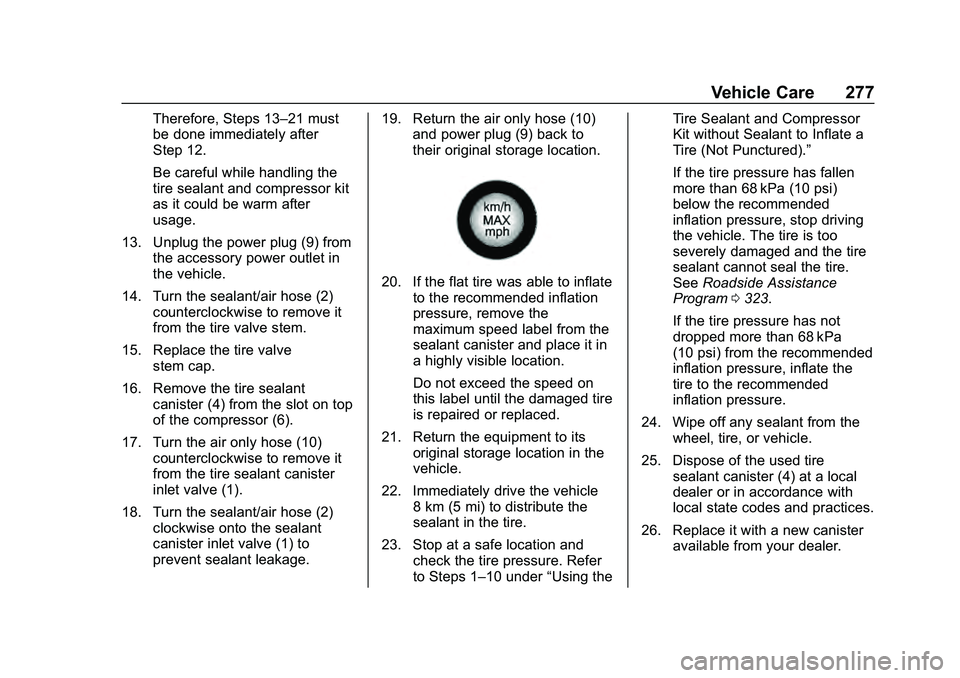
20. If the flat tire was able to inflate
to the recommended inflation
pressure, remove the
maximum speed label from the
sealant canister and place it in
a highly visible location.
Do not exceed the speed on
this label until the damaged tire
is repaired or replaced.
21. Return the equipment to its original storage location in the
vehicle.
22. Immediately drive the vehicle 8 km (5 mi) to distribute the
sealant in the tire.
23. Stop at a safe location and check the tire pressure. Refer
to Steps 1–10 under “Using theTire Sealant and Compressor
Kit without Sealant to Inflate a
Tire (Not Punctured).”
If the tire pressure has fallen
more than 68 kPa (10 psi)
below the recommended
inflation pressure, stop driving
the vehicle. The tire is too
severely damaged and the tire
sealant cannot seal the tire.
See
Roadside Assistance
Program 0323.
If the tire pressure has not
dropped more than 68 kPa
(10 psi) from the recommended
inflation pressure, inflate the
tire to the recommended
inflation pressure.
24. Wipe off any sealant from the wheel, tire, or vehicle.
25. Dispose of the used tire sealant canister (4) at a local
dealer or in accordance with
local state codes and practices.
26. Replace it with a new canister available from your dealer.
Page 279 of 358
Chevrolet Malibu Owner Manual (GMNA-Localizing-U.S./Canada/Mexico-
13555849) - 2020 - CRC - 8/21/19
278 Vehicle Care
27. After temporarily sealing a tireusing the tire sealant and
compressor kit, take the
vehicle to an authorized dealer
within 161 km (100 mi) of
driving to have the tire repaired
or replaced.
Using the Tire Sealant and
Compressor Kit without
Sealant to Inflate a Tire (Not
Punctured)
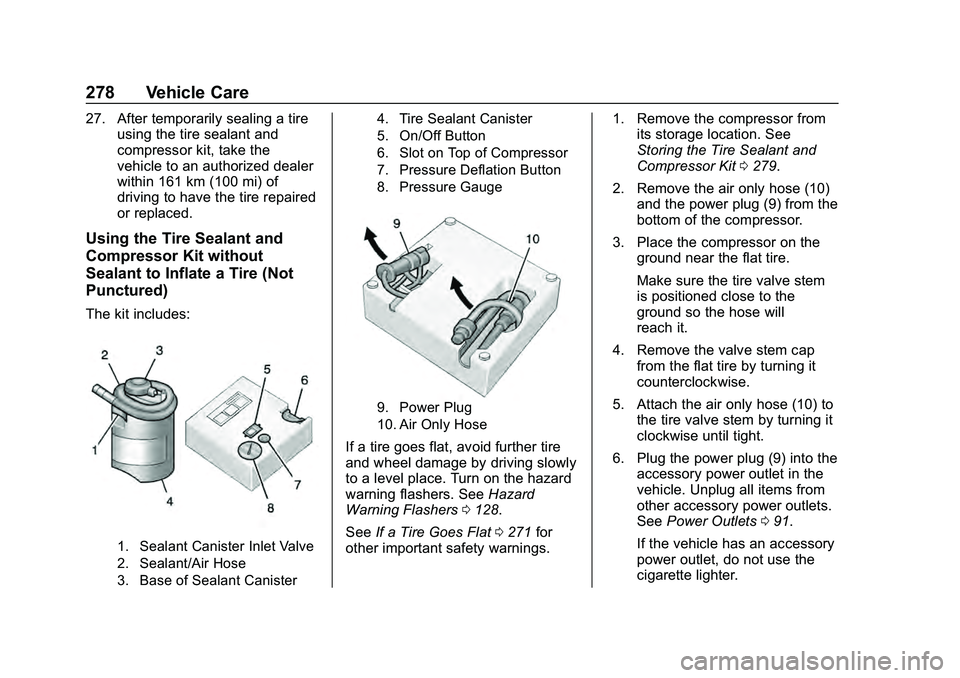
The kit includes:
1. Sealant Canister Inlet Valve
2. Sealant/Air Hose
3. Base of Sealant Canister 4. Tire Sealant Canister
5. On/Off Button
6. Slot on Top of Compressor
7. Pressure Deflation Button
8. Pressure Gauge
9. Power Plug
10. Air Only Hose
If a tire goes flat, avoid further tire
and wheel damage by driving slowly
to a level place. Turn on the hazard
warning flashers. See
Hazard
Warning Flashers 0128.
See If a Tire Goes Flat 0271 for
other important safety warnings. 1. Remove the compressor from
its storage location. See
Storing the Tire Sealant and
Compressor Kit 0279.
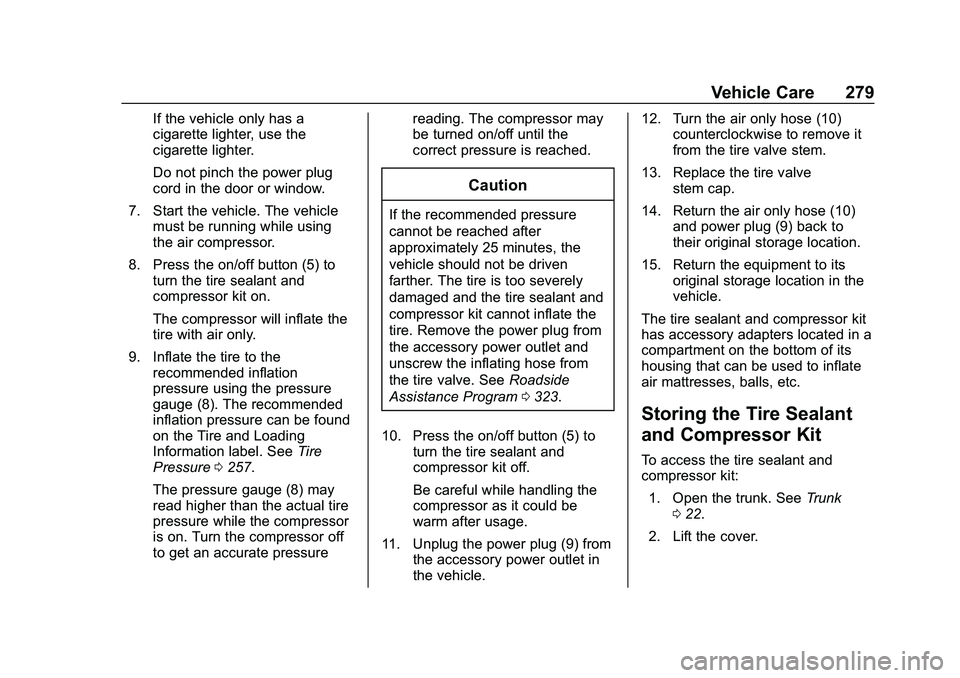
2. Remove the air only hose (10) and the power plug (9) from the
bottom of the compressor.
3. Place the compressor on the ground near the flat tire.
Make sure the tire valve stem
is positioned close to the
ground so the hose will
reach it.
4. Remove the valve stem cap from the flat tire by turning it
counterclockwise.
5. Attach the air only hose (10) to the tire valve stem by turning it
clockwise until tight.
6. Plug the power plug (9) into the accessory power outlet in the
vehicle. Unplug all items from
other accessory power outlets.
See Power Outlets 091.
If the vehicle has an accessory
power outlet, do not use the
cigarette lighter.
Page 280 of 358
Chevrolet Malibu Owner Manual (GMNA-Localizing-U.S./Canada/Mexico-
13555849) - 2020 - CRC - 8/21/19
Vehicle Care 279
If the vehicle only has a
cigarette lighter, use the
cigarette lighter.
Do not pinch the power plug
cord in the door or window.
7. Start the vehicle. The vehicle must be running while using
the air compressor.
8. Press the on/off button (5) to turn the tire sealant and
compressor kit on.
The compressor will inflate the
tire with air only.
9. Inflate the tire to the recommended inflation
pressure using the pressure
gauge (8). The recommended
inflation pressure can be found
on the Tire and Loading
Information label. See Tire
Pressure 0257.
The pressure gauge (8) may
read higher than the actual tire
pressure while the compressor
is on. Turn the compressor off
to get an accurate pressure reading. The compressor may
be turned on/off until the
correct pressure is reached.
Caution
If the recommended pressure
cannot be reached after
approximately 25 minutes, the
vehicle should not be driven
farther. The tire is too severely
damaged and the tire sealant and
compressor kit cannot inflate the
tire. Remove the power plug from
the accessory power outlet and
unscrew the inflating hose from
the tire valve. See
Roadside
Assistance Program 0323.
10. Press the on/off button (5) to turn the tire sealant and
compressor kit off.
Be careful while handling the
compressor as it could be
warm after usage.
11. Unplug the power plug (9) from the accessory power outlet in
the vehicle. 12. Turn the air only hose (10)
counterclockwise to remove it
from the tire valve stem.
13. Replace the tire valve stem cap.
14. Return the air only hose (10) and power plug (9) back to
their original storage location.
15. Return the equipment to its original storage location in the
vehicle.
The tire sealant and compressor kit
has accessory adapters located in a
compartment on the bottom of its
housing that can be used to inflate
air mattresses, balls, etc.
Storing the Tire Sealant
and Compressor Kit
To access the tire sealant and
compressor kit: 1. Open the trunk. See Trunk
0 22.
2. Lift the cover.
Page 286 of 358
Chevrolet Malibu Owner Manual (GMNA-Localizing-U.S./Canada/Mexico-
13555849) - 2020 - CRC - 8/21/19
Vehicle Care 285
7. Place the floor cover on thewheel.
The compact spare is for temporary
use only. Replace the compact
spare tire with a full-size tire as
soon as you can.
Compact Spare Tire
{Warning
Driving with more than one
compact spare tire at a time could
result in loss of braking and
handling. This could lead to a
crash and you or others could be
injured. Use only one compact
spare tire at a time.
If this vehicle has a compact spare
tire, it was fully inflated when new;
however, it can lose air over time.
Check the inflation pressure
regularly. It should be 420 kPa
(60 psi).
Stop as soon as possible and check
that the spare tire is correctly
inflated after being installed on the vehicle. The compact spare tire is
designed for temporary use only.
The vehicle will perform differently
with the spare tire installed and it is
recommended that the vehicle
speed be limited to 80 km/h
(50 mph). To conserve the tread of
the spare tire, have the standard tire
repaired or replaced as soon as
convenient and return the spare tire
to the storage area.
When using a compact spare tire,
the AWD (if equipped), ABS, and
Traction Control systems may
engage until the spare tire is
recognized by the vehicle,
especially on slippery roads. Adjust
driving to reduce possible
wheel slip.
Caution
When the compact spare is
installed, do not take the vehicle
through an automatic car wash
with guide rails. The compact
spare can get caught on the rails
which can damage the tire, wheel,
and other parts of the vehicle.
Do not use the compact spare on
other vehicles.
Do not mix the compact spare tire or
wheel with other wheels or tires.
They will not fit. Keep the spare tire
and its wheel together.
Caution
Tire chains will not fit the compact
spare. Using them can damage
the vehicle and the chains. Do not
use tire chains on the compact
spare.
Page 297 of 358

Chevrolet Malibu Owner Manual (GMNA-Localizing-U.S./Canada/Mexico-
13555849) - 2020 - CRC - 8/21/19
296 Vehicle Care
Caution (Continued)
dust and ice. Always wash the
chrome with soap and water after
exposure.
Caution
To avoid surface damage on
wheels and wheel trim, do not
use strong soaps, chemicals,
abrasive polishes, cleaners,
or brushes. Use only GM
approved cleaners. Do not drive
the vehicle through an automatic
car wash that uses silicon carbide
tire/wheel cleaning brushes.
Damage could occur and the
repairs would not be covered by
the vehicle warranty.
Brake System
Visually inspect brake lines and
hoses for proper hook-up, binding,
leaks, cracks, chafing, etc. Inspect
disc brake pads for wear and rotorsfor surface condition. Inspect drum
brake linings/shoes for wear or
cracks. Inspect all other brake parts.
Steering, Suspension, and
Chassis Components
Visually inspect steering,
suspension, and chassis
components for damaged, loose,
or missing parts or signs of wear at
least once a year.
Inspect power steering for proper
attachment, connections, binding,
leaks, cracks, chafing, etc.
Visually check constant velocity joint
boots and axle seals for leaks.
Body Component Lubrication
Lubricate all key lock cylinders,
hood hinges, decklid hinges, steel
fuel door hinge, unless the
components are plastic. Applying
silicone grease on weatherstrips
with a clean cloth will make them
last longer, seal better, and not stick
or squeak.
Underbody Maintenance
At least twice a year, spring and fall,
use plain water to flush any
corrosive materials from the
underbody. Take care to thoroughly
clean any areas where mud and
other debris can collect.
Do not directly power wash the
transfer case and/or front/rear axle
output seals. High pressure water
can overcome the seals and
contaminate the fluid. Contaminated
fluid will decrease the life of the
transfer case and/or axles and
should be replaced.
Sheet Metal Damage
If the vehicle is damaged and
requires sheet metal repair or
replacement, make sure the body
repair shop applies anti-corrosion
material to parts repaired or
replaced to restore corrosion
protection.
Original manufacturer replacement
parts will provide the corrosion
protection while maintaining the
vehicle warranty.
Page 305 of 358
Chevrolet Malibu Owner Manual (GMNA-Localizing-U.S./Canada/Mexico-
13555849) - 2020 - CRC - 8/16/19
304 Service and Maintenance
Maintenance
Schedule
Owner Checks and Services
Check the engine oil level. See
Engine Oil0219.
Once a Month
. Check the tire inflation
pressures. See Tire Pressure
0 257.
. Inspect the tires for wear. See
Tire Inspection 0264.
. Check the windshield washer
fluid level. See Washer Fluid
0 229.
Engine Oil Change
When the CHANGE ENGINE OIL
SOON message displays, have the
engine oil and filter changed within
the next 1 000 km (600 mi). If driven
under the best conditions, the
engine oil life system may not
indicate the need for vehicle service
for up to a year. The engine oil and
filter must be changed at least once
a year and the oil life system must be reset. Your trained dealer
technician can perform this work.
If the engine oil life system is reset
accidentally, service the vehicle
within 5 000 km (3,000 mi) since the
last service. Reset the oil life
system when the oil is changed.
See
Engine Oil Life System 0221.
Engine Air Filter Change
When the REPLACE AT NEXT OIL
CHANGE message displays, the
engine air filter should be replaced
at the next engine oil change. When
the REPLACE ENGINE AIR FILTER
SOON message displays, the
engine air filter should be replaced
at the earliest convenience. Reset
the engine air filter life system after
the engine air filter is replaced. See
Engine Air Filter Life System 0223.
Air Conditioning Desiccant
(Replace Every Seven Years)
The air conditioning system requires
maintenance every seven years.
This service requires replacement of
the desiccant to help the longevity and efficient operation of the air
conditioning system. This service
can be complex. See your dealer.
Tire Rotation and Required
Services Every 12 000 km
(7,500 mi)
Rotate the tires, if recommended for
the vehicle, and perform the
following services. See
Tire
Rotation 0265.
. Check engine oil level and oil
life percentage. If needed,
change engine oil and filter, and
reset oil life system. See Engine
Oil 0219 and
Engine Oil Life System 0221.
. If equipped with the engine air
filter life system, check the air
filter life percentage.
If necessary, replace the engine
air filter and reset the engine air
filter life system. See Engine Air
Filter Life System 0223. If the
vehicle is not equipped with the
engine air filter life system,
inspect the engine air cleaner
filter. See Engine Air Cleaner/
Filter 0223.
Page 306 of 358

Chevrolet Malibu Owner Manual (GMNA-Localizing-U.S./Canada/Mexico-
13555849) - 2020 - CRC - 8/16/19
Service and Maintenance 305
.Check engine coolant level. See
Cooling System 0225.
. Check windshield washer fluid
level. See Washer Fluid 0229.
. Check tire inflation pressures.
See Tire Pressure 0257.
. Inspect tire wear. See Tire
Inspection 0264.
. Visually check for fluid leaks.
. Inspect brake system. See
Exterior Care 0292.
. Visually inspect steering,
suspension, and chassis
components for damage,
including cracks or tears in the
rubber boots, loose or missing
parts, or signs of wear at least
once a year. See Exterior Care
0 292.
. Inspect power steering for
proper attachment, connections,
binding, leaks, cracks,
chafing, etc.
. Visually inspect halfshafts and
drive shafts for excessive wear,
lubricant leaks, and/or damage
including: tube dents or cracks, constant velocity joint or
universal joint looseness,
cracked or missing boots, loose
or missing boot clamps, center
bearing excessive looseness,
loose or missing fasteners, and
axle seal leaks.
. Check restraint system
components. See Safety System
Check 052.
. Visually inspect fuel system for
damage or leaks.
. Visually inspect exhaust system
and nearby heat shields for
loose or damaged parts.
. Lubricate body components. See
Exterior Care 0292.
. Check starter switch. See Starter
Switch Check 0234.
. Check automatic transmission
shift lock control function. See
Automatic Transmission Shift
Lock Control Function Check
0234. .
Check parking brake and
automatic transmission park
mechanism. See Park Brake and
P (Park) Mechanism Check
0 235.
. Check accelerator pedal for
damage, high effort, or binding.
Replace if needed.
. Visually inspect gas strut for
signs of wear, cracks, or other
damage. Check the hold open
ability of the strut. If the hold
open ability is low, service the
gas strut. See Gas Strut(s)
0 236.
. Check tire sealant expiration
date, if equipped. See Tire
Sealant and Compressor Kit
0 273.
. Inspect sunroof track and seal,
if equipped. See Sunroof030.
Page 346 of 358
Chevrolet Malibu Owner Manual (GMNA-Localizing-U.S./Canada/Mexico-
13555849) - 2020 - CRC - 8/16/19
Connected Services 345
vehicles, the SSID and
password can be changed in
the Wi-Fi Hotspot menu.
After initial set-up, your vehicle’s
Wi-Fi hotspot will connect
automatically to your mobile
devices. Manage data usage by
turning Wi-Fi on or off on your
mobile device, using the
myChevrolet mobile app, or by
contacting an OnStar Advisor. On
some vehicles, Wi-Fi can also be
managed from the Wi-Fi
Hotspot menu.
MyChevrolet Mobile App (If
Available)
Download the myChevrolet mobile
app to compatible Apple and
Android smartphones. Chevrolet
users can access the following
services from a smartphone:
. Remotely start/stop the vehicle,
if factory-equipped.
. Lock/unlock doors, if equipped
with automatic locks.
. Activate the horn and lamps. .
Check the vehicle’s fuel level, oil
life, or tire pressure,
if factory-equipped with the Tire
Pressure Monitor System.
. Send destinations to the vehicle.
. Locate the vehicle on a map
(U.S. market only).
. Turn the vehicle's Wi-Fi hotspot
on/off, manage settings, and
monitor data consumption,
if equipped.
. Locate a dealer and schedule
service.
. Request roadside assistance.
. Set a parking reminder with pin
drop, take a photo, make a note,
and set a timer.
. Connect with Chevrolet on social
media.
Features are subject to change. For
myChevrolet mobile app information
and compatibility, see
my.chevrolet.com.
An active OnStar or connected
service plan may be required.
A compatible device, factory-installed remote start, and
power locks are required. Data rates
apply. See www.onstar.com for
details and system limitations.
Remote Services
Contact an OnStar Advisor to
unlock the doors or sound the horn
and flash the lamps.
Marketplace
OnStar Advisors can provide offers
from restaurants and retailers on
your route, help locate hotels,
or book a room. These services
vary by market.
Diagnostics
By monitoring and reporting on the
vehicle's key systems, OnStar
Advanced Diagnostics, if equipped,
provides a way to keep up on
maintenance. Capabilities vary by
model. See www.onstar.com for
details and system limitations.
Features are subject to change. For
updates on feature capabilities, see
my.chevrolet.com. Message and
data rates may apply.
Page 350 of 358

Chevrolet Malibu Owner Manual (GMNA-Localizing-U.S./Canada/Mexico-
13555849) - 2020 - CRC - 8/16/19
Index 349
DrivingAssistance Systems . . . . . . . . . . 188
Better Fuel Economy . . . . . . . . . 144
Characteristics and
Towing Tips . . . . . . . . . . . . . . . . . 203
Defensive . . . . . . . . . . . . . . . . . . . . . 145
Drunk . . . . . . . . . . . . . . . . . . . . . . . . . 145
Hill and Mountain Roads . . . . . . 149
If the Vehicle is Stuck . . . . . . . . . 151
Loss of Control . . . . . . . . . . . . . . . 148
Off-Road Recovery . . . . . . . . . . . 147
Vehicle Load Limits . . . . . . . . . . . 151
Wet Roads . . . . . . . . . . . . . . . . . . . 148
Winter . . . . . . . . . . . . . . . . . . . . . . . . 150
Dual Automatic Climate Control System . . . . . . . . . . . . . . . . 137
E
Electric Parking Brake . . . . . . . . . . 168
Electric Parking Brake Light . . . . 106
Electrical Equipment,
Add-On . . . . . . . . . . . . . . . . . . . . . . . 210
Electrical System Engine Compartment FuseBlock . . . . . . . . . . . . . . . . . . . . . . . . 243
Fuses and Circuit Breakers . . . 242
Instrument Panel Fuse
Block . . . . . . . . . . . . . . . . . . . . . . . . 247 Electrical System (cont'd)
Overload . . . . . . . . . . . . . . . . . . . . . 242
Emergency OnStar . . . . . . . . . . . . . . . . . . . . . . . 336
Engine Air Cleaner/Filter . . . . . . . . . . . . . 223
Check Light (MalfunctionIndicator) . . . . . . . . . . . . . . . . . . . . 104
Compartment Overview . . . . . . . 216
Coolant Temperature
Gauge . . . . . . . . . . . . . . . . . . . . . . 101
Coolant Temperature Warning Light . . . . . . . . . . . . . . . .110
Cooling System . . . . . . . . . . . . . . . 225
Drive Belt Routing . . . . . . . . . . . . 318
Exhaust . . . . . . . . . . . . . . . . . . . . . . 163
Heater . . . . . . . . . . . . . . . . . . . . . . . . 159
Oil Life System . . . . . . . . . . . . . . . 221
Oil Pressure Light . . . . . . . . . . . . .110
Overheating . . . . . . . . . . . . . . . . . . 228
Power Messages . . . . . . . . . . . . . 120
Running While Parked . . . . . . . . 163
Starting . . . . . . . . . . . . . . . . . . . . . . . 157
Engine Air Filter Life System . . . . 223
Entry Lighting . . . . . . . . . . . . . . . . . . . 131
Equipment, Towing . . . . . . . . . . . . . 208
Event Data Recorders . . . . . . . . . . 332
Exit Lighting . . . . . . . . . . . . . . . . . . . . 131 Extended Parking . . . . . . . . . . . . . . . 162
Extender, Seat Belt . . . . . . . . . . . . . . 52
Exterior Lamp Controls . . . . . . . . . 125
Exterior Lamps Off Reminder . . . 127
Exterior Lighting Battery
Saver . . . . . . . . . . . . . . . . . . . . . . . . . 132
F
Filter,Engine Air Cleaner . . . . . . . . . . . 223
Flash-to-Pass . . . . . . . . . . . . . . . . . . . 127
Flashers, Hazard Warning . . . . . . 128
Flat Tire . . . . . . . . . . . . . . . . . . . . . . . . 271 Changing . . . . . . . . . . . . . . . . . . . . . 280
Floor Mats . . . . . . . . . . . . . . . . . . . . . . 300
Fluid Automatic Transmission . . . . . . 222
Brakes . . . . . . . . . . . . . . . . . . . . . . . . 231
Washer . . . . . . . . . . . . . . . . . . . . . . . 229
Folding Mirrors . . . . . . . . . . . . . . . . . . 27
Forward Collision Alert (FCA) System . . . . . . . . . . . . . . . . . 188
Frequency Statement Radio . . . . . . . . . . . . . . . . . . . . . . . . . 329
Front Pedestrian Braking (FPB) System . . . . . . . . . . . . . . . . . 191
Front Seats Adjustment . . . . . . . . . . . . . . . . . . . . . 35