warning CHEVROLET MALIBU 2021 Get To Know Guide
[x] Cancel search | Manufacturer: CHEVROLET, Model Year: 2021, Model line: MALIBU, Model: CHEVROLET MALIBU 2021Pages: 16, PDF Size: 2.69 MB
Page 3 of 16
3
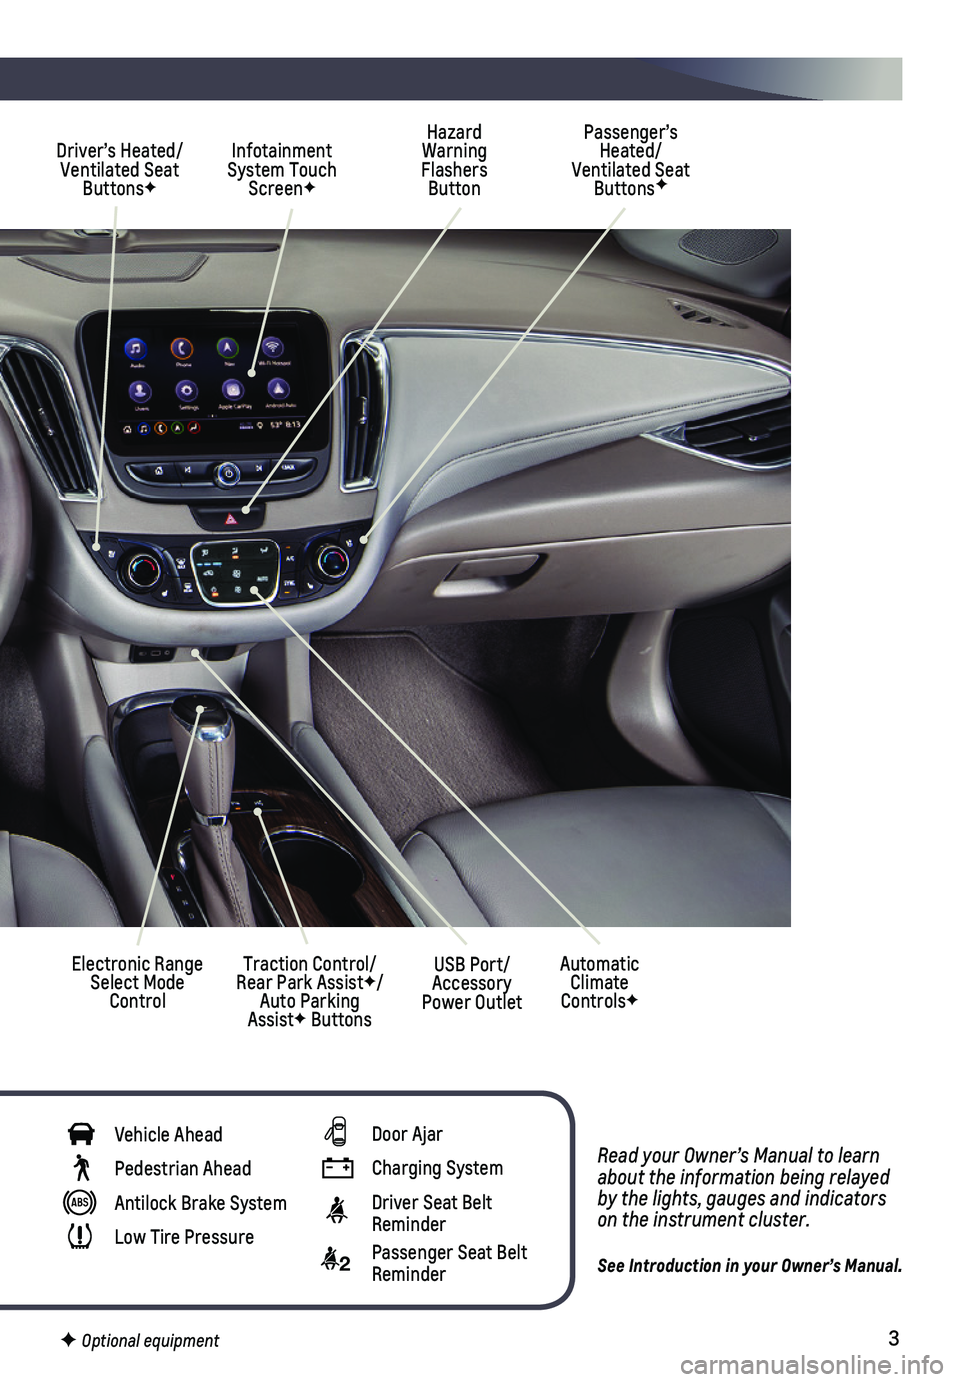
Read your Owner’s Manual to learn about the information being relayed by the lights, gauges and indicators on the instrument cluster.
See Introduction in your Owner’s Manual.
Hazard Warning Flashers Button
Infotainment System Touch ScreenF
Passenger’s Heated/Ventilated Seat ButtonsF
Electronic Range Select Mode Control
Traction Control/Rear Park AssistF/Auto Parking AssistF Buttons
Driver’s Heated/Ventilated Seat ButtonsF
Automatic Climate ControlsF
USB Port/Accessory Power Outlet
Vehicle Ahead
Pedestrian Ahead
Antilock Brake System
Low Tire Pressure
Door Ajar
Charging System
Driver Seat Belt Reminder
2 Passenger Seat Belt Reminder
F Optional equipment
Page 6 of 16
6
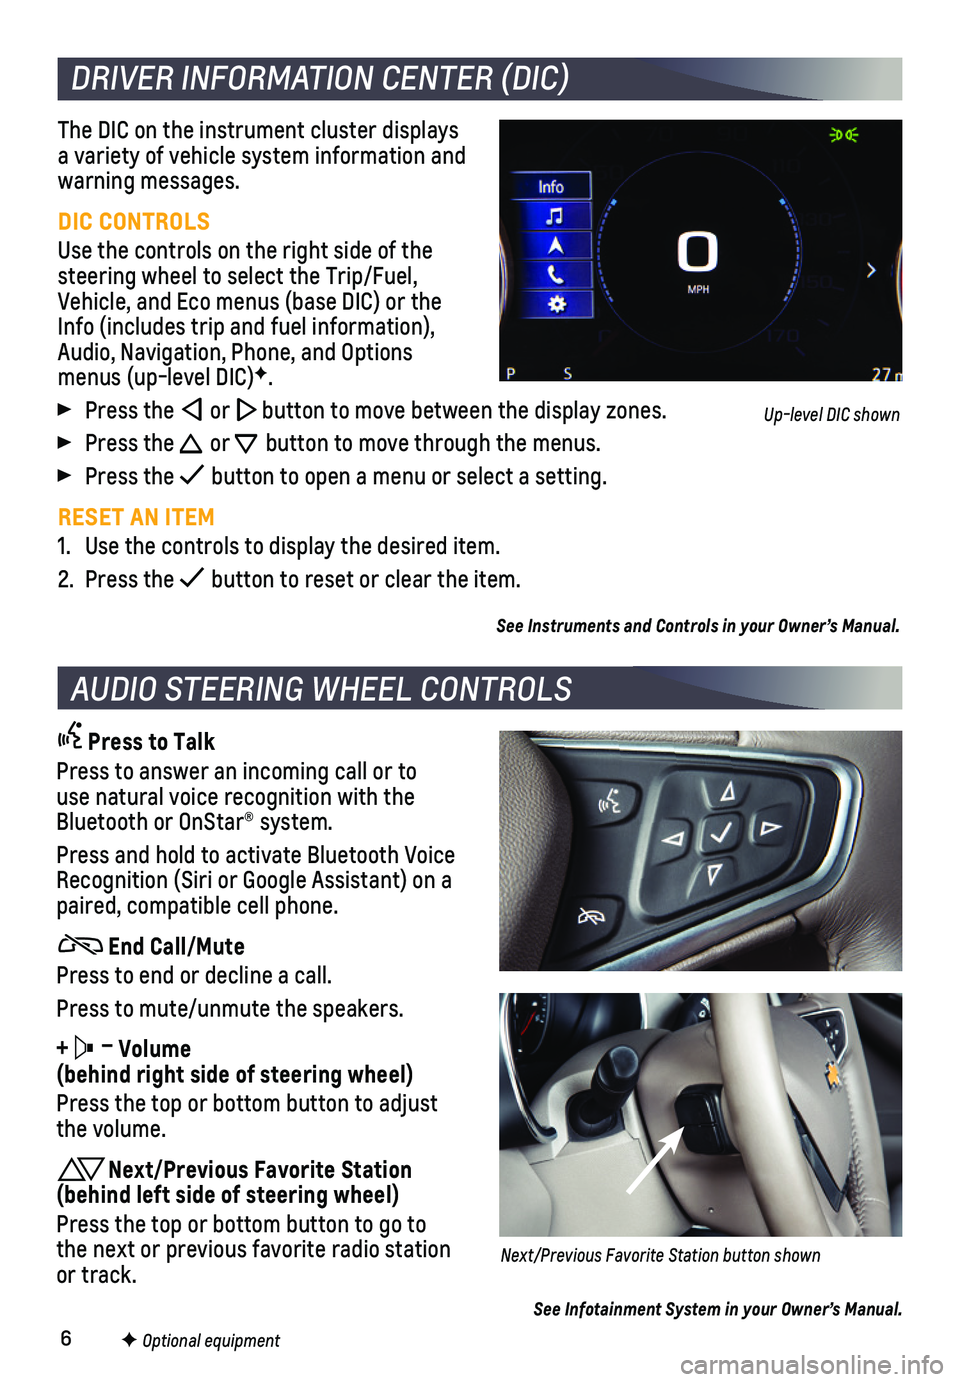
The DIC on the instrument cluster displays a variety of vehicle system information and warning messages.
DIC CONTROLS
Use the controls on the right side of the steering wheel to select the Trip/Fuel, Vehicle, and Eco menus (base DIC) or the Info (includes trip and fuel information), Audio, Navigation, Phone, and Options menus (up-level DIC)F.
Press the or button to move between the display zones.
Press the or button to move through the menus.
Press the button to open a menu or select a setting.
RESET AN ITEM
1. Use the controls to display the desired item.
2. Press the button to reset or clear the item.
See Instruments and Controls in your Owner’s Manual.
DRIVER INFORMATION CENTER (DIC)
F Optional equipment
AUDIO STEERING WHEEL CONTROLS
Press to Talk
Press to answer an incoming call or to use natural voice recognition with the Bluetooth or OnStar® system.
Press and hold to activate Bluetooth Voice Recognition (Siri or Google Assistant) on a paired, compatible cell phone.
End Call/Mute
Press to end or decline a call.
Press to mute/unmute the speakers.
+ – Volume (behind right side of steering wheel)
Press the top or bottom button to adjust the volume.
Next/Previous Favorite Station (behind left side of steering wheel)
Press the top or bottom button to go to the next or previous favorite radio station or track.Next/Previous Favorite Station button shown
See Infotainment System in your Owner’s Manual.
Up-level DIC shown
Page 10 of 16
10F Optional equipment
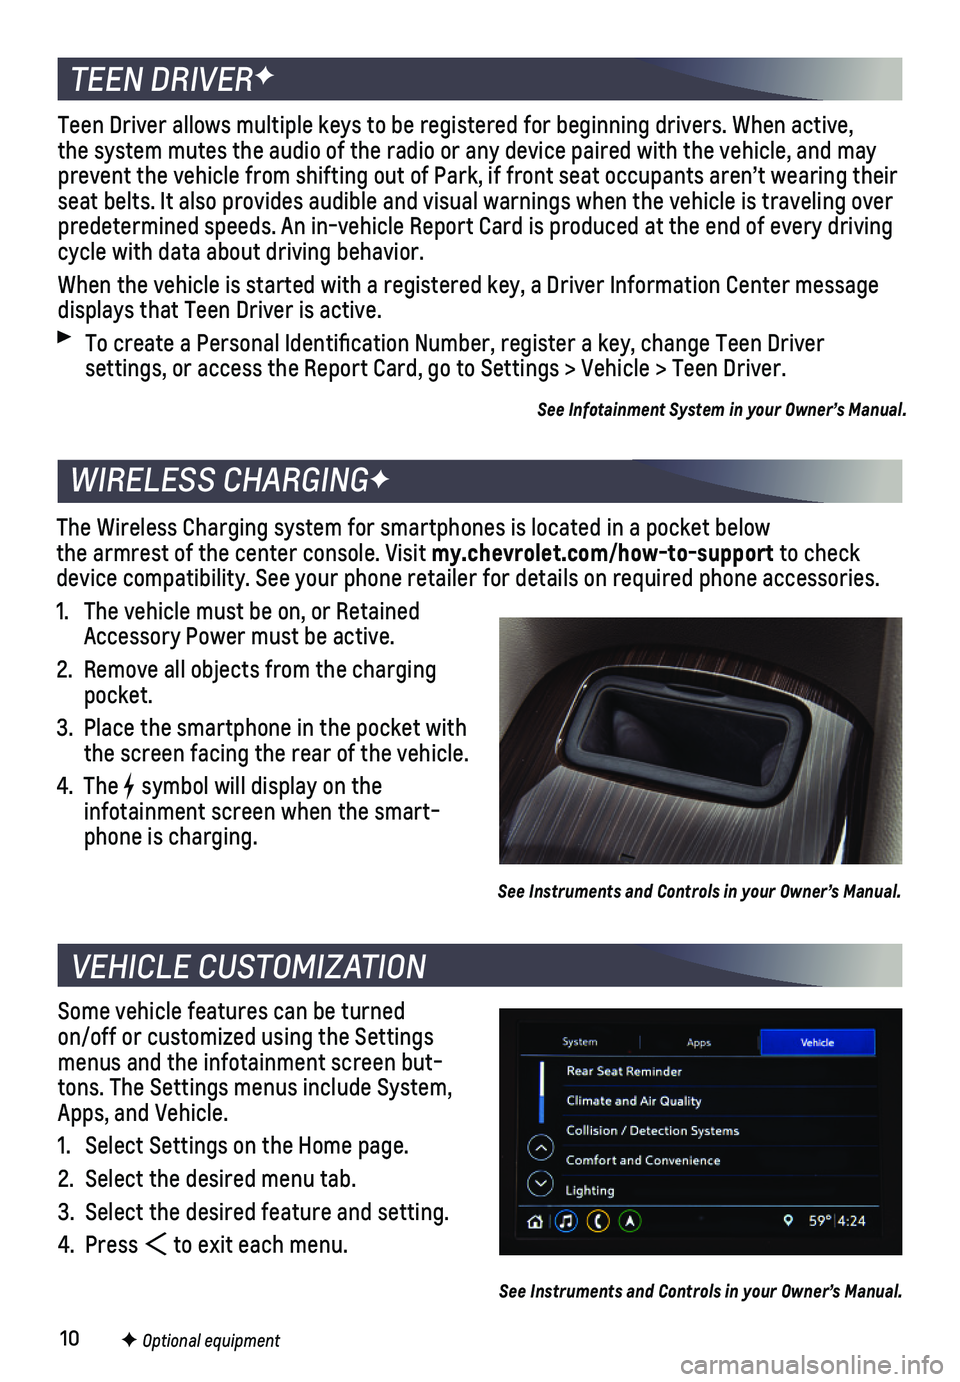
Some vehicle features can be turned on/off or customized using the Settings menus and the infotainment screen but-tons. The Settings menus include System, Apps, and Vehicle.
1. Select Settings on the Home page.
2. Select the desired menu tab.
3. Select the desired feature and setting.
4. Press to exit each menu.
See Instruments and Controls in your Owner’s Manual.
VEHICLE CUSTOMIZATION
The Wireless Charging system for smartphones is located in a pocket belo\
w the armrest of the center console. Visit my.chevrolet.com/how-to-support to check device compatibility. See your phone retailer for details on required ph\
one accessories.
1. The vehicle must be on, or Retained Accessory Power must be active.
2. Remove all objects from the charging pocket.
3. Place the smartphone in the pocket with the screen facing the rear of the vehicle.
4. The symbol will display on the
infotainment screen when the smart-phone is charging.
See Instruments and Controls in your Owner’s Manual.
WIRELESS CHARGINGF
TEEN DRIVERF
Teen Driver allows multiple keys to be registered for beginning drivers.\
When active, the system mutes the audio of the radio or any device paired with the ve\
hicle, and may prevent the vehicle from shifting out of Park, if front seat occupants a\
ren’t wearing their seat belts. It also provides audible and visual warnings when the vehicl\
e is traveling over predetermined speeds. An in-vehicle Report Card is produced at the end o\
f every driving cycle with data about driving behavior.
When the vehicle is started with a registered key, a Driver Information \
Center message displays that Teen Driver is active.
To create a Personal Identification Number, register a key, change Tee\
n Driver
settings, or access the Report Card, go to Settings > Vehicle > Teen Dri\
ver.
See Infotainment System in your Owner’s Manual.
Page 13 of 16
13
DRIVER ASSISTANCE SYSTEMS
Safety or driver assistance features are no substitute for the driver’\
s responsibility to operate the vehicle in a safe manner. The driver should remain attentive to traffic, surroundings and road conditions at all times. Read your Owner’s Manual for important feature limitations and information.
LANE CHANGE ALERT WITH SIDE BLIND ZONE ALERTF — While driving, the system
displays a warning symbol on the left or right side mirror when a moving vehicle is\
detected rapidly approaching or is in a side blind zone. The warning sy\
mbol flashes if a turn signal is activated when a vehicle has been detected on the same si\
de.
To turn on or off, go to Settings > Vehicle > Collision/Detection System\
s > Lane Change Alert.
LANE KEEP ASSIST WITH LANE DEPARTURE WARNINGF — The system may help you avoid collisions due to unintentional lane departures. The Lane Keep Assist Indicator is green on the instrument cluster if the system is available to assist.\
If the vehicle approaches a detected lane marking without using a turn signal in that d\
irection, the system may assist by providing brief, gentle steering wheel turns and di\
splaying an amber .
If active driver steering is not detected, the amber may flash and 3 beeps may sound on the side of the departure direction as the lane marking is crossed. T\
he Lane Keep Assist system does not continuously steer the vehicle; the driver needs \
to steer and be in complete control of the vehicle.
To turn on or off, press the Lane Keep Assist button on the steering wheel.
FORWARD COLLISION ALERTF — The Vehicle Ahead Indicator is green on the instru-ment cluster when a vehicle is detected and is amber when following a ve\
hicle ahead much too closely. When approaching a detected vehicle directly ahead too\
rapidly, a red alert flashes on the windshield and rapid beeps sound.
Press the Forward Collision Alert button on the steering wheel to set the alert timing to Far, Medium, or Near. The setting is displayed on the Driver I\
nformation Center.
ENHANCED AUTOMATIC EMERGENCY BRAKINGF — In detected potential imminent
collision situations with vehicles directly ahead, the system can provid\
e alerts and enhance driver braking or automatically apply hard emergency braking, if\
you have not already done so, to help reduce the severity or help avoid collisions at\
very low speeds.
To set Enhanced Automatic Emergency Braking and Forward Collision Alert \
to Alert and Brake, Alert, or Off, go to Settings > Vehicle > Collision/Detection\
Systems > Forward Collision System.
FRONT PEDESTRIAN BRAKINGF — During daytime driving, the system can detect
pedestrians directly ahead up to a distance of approximately 131 feet an\
d displays an amber indicator. When approaching a detected pedestrian too quickly, a red ale\
rt flashes on the windshield and rapid beeps sound. The system may prepar\
e the brakes or automatically apply hard emergency braking, if you have not already done\
so.
To set the system to Alert and Brake, Alert, or Off, go to Settings > Ve\
hicle > Collision/ Detection Systems > Front Pedestrian Detection.
See Driving and Operating in your Owner’s Manual.
F Optional equipment
Page 15 of 16
15
TIRE PRESSURE MONITOR SYSTEM
The Low Tire Pressure warning light on the instrument cluster illuminates wh\
en one or more of the vehicle’s tires is significantly underinflated. Fi\
ll the tires to the proper tire pressures listed on the Tire and Loading Information label, located belo\
w the driver’s door latch. Current tire pressures can be viewed on the Driver Informati\
on Center.
The Tire Fill Alert provides visual and audible alerts to help when infl\
ating a tire to the recommended tire pressure. The horn sounds and the turn signals change f\
rom flashing to solid when the recommended pressure is reached.
See Vehicle Care in your Owner’s Manual.
TRACTION CONTROL
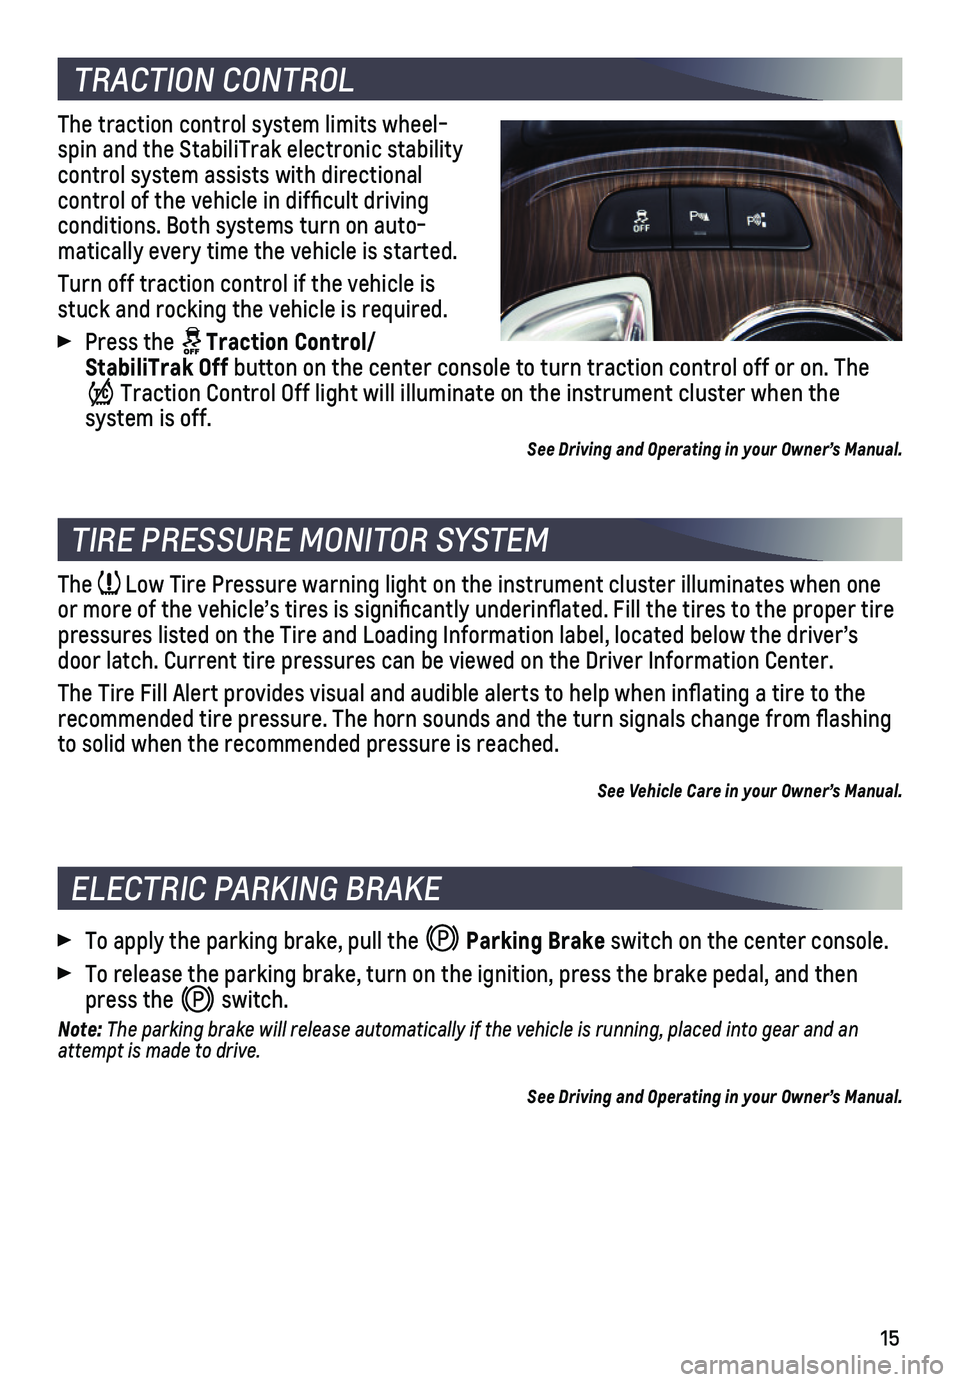
The traction control system limits wheel-spin and the StabiliTrak electronic stability
control system assists with directional
control of the vehicle in difficult driving conditions. Both systems turn on auto-matically every time the vehicle is started.
Turn off traction control if the vehicle is stuck and rocking the vehicle is required.
Press the Traction Control/StabiliTrak Off button on the center console to turn traction control off or on. The
Traction Control Off light will illuminate on the instrument cluster when the
system is off.
See Driving and Operating in your Owner’s Manual.
ELECTRIC PARKING BRAKE
To apply the parking brake, pull the Parking Brake switch on the center console.
To release the parking brake, turn on the ignition, press the brake peda\
l, and then press the switch.
Note: The parking brake will release automatically if the vehicle is running, \
placed into gear and an attempt is made to drive.
See Driving and Operating in your Owner’s Manual.