engine CHEVROLET MALIBU 2022 Owners Manual
[x] Cancel search | Manufacturer: CHEVROLET, Model Year: 2022, Model line: MALIBU, Model: CHEVROLET MALIBU 2022Pages: 351, PDF Size: 9.4 MB
Page 255 of 351
Chevrolet Malibu Owner Manual (GMNA-Localizing-U.S./Canada-
14584249) - 2021 - CRC - 11/9/20
254 Vehicle Care
{Warning
Installation or use of fuses that do not
meet GM’s original fuse specifications is
dangerous. The fuses could fail, and result
in a fire. You or others could be injured
or killed, and the vehicle could be
damaged.
See Accessories and Modifications 0229 and
General Information 0228.
To check a fuse, look at the silver-colored
band inside the fuse. If the band is broken
or melted, replace the fuse. Be sure to
replace a bad fuse with a new one of the
identical size and rating. Fuses of the same amperage can be
temporarily borrowed from another fuse
location, if a fuse goes out. Replace the fuse
as soon as possible.
Engine Compartment Fuse Block
The engine compartment fuse block is on
the driver side of the engine compartment.
There is a fuse puller in the engine
compartment fuse block. It can be used to
easily remove fuses from the fuse block.
Caution
Spilling liquid on any electrical
component on the vehicle may damage
it. Always keep the covers on any
electrical component.
Page 257 of 351
Chevrolet Malibu Owner Manual (GMNA-Localizing-U.S./Canada-
14584249) - 2021 - CRC - 11/9/20
256 Vehicle Care
The vehicle may not be equipped with all of
the fuses, relays, and features shown.Fuses Usage
1 –
2 –
3 Antilock brake system pump/Electric brake
booster
5 –
6 Rear closure 7 –
8 Memory seat module
9 –
10 –
11 DC DC converter 1
12 Rear window defogger
13 Heated mirrors
14 –
15 Passive entry/Passive start
16 Front wiper 17 Passenger power seat Fuses
Usage
18 Antilock brake system valve
19 Driver power seat 21 Sunroof
22 Parking lamp
23 Automatic headlamp leveling/Adaptive forward
lighting
24 –
26 Transmission control module/Ignition
27 Instrument panel/Body/ Ignition
28 –
29 Rear vision camera/ Ventilated seats
30 Malfunction indicator lamp/Ignition
32 Canister vent solenoid/Evap leak check module
33 Front heated seat
34 – Fuses
Usage
35 Body control module 6/ Body control module 7
36 Fuel module
38 –
39 –
40 Steering column lock 41 –
43 Heated steering wheel
44 Headlamp leveling 45 –
46 Engine control module/ Ignition
47 –
48 –
49 DC DC converter 2 50 –
51 –
52 –
53 –
54 –
Page 258 of 351
Chevrolet Malibu Owner Manual (GMNA-Localizing-U.S./Canada-
14584249) - 2021 - CRC - 11/9/20
Vehicle Care 257
FusesUsage
55 –
56 Starter motor 57 –
58 –
59 High-beam headlamps Left/ Right
60 Cooling fan 61 –
62 –
63 –
65 Air conditioning
67 –
68 –
69 –
70 –
72 Starter pinion
74 –
75 Engine control module main
76 Engine control module sense Fuses
Usage
78 Horn
79 Washer pump 81 Transmission control module/Engine control
module
82 –
83 Ignition coil
84 Powertrain on engine 85 Shunt
86 Shunt 87 –
88 Aeroshutter
89 –
91 –
92 –
93 Automatic headlamp leveling
95 –
96 –
97 –
99 Coolant pump Relays
Usage
4 –
20 Rear window defogger 25 Front wiper control31 Run/Crank
37 Front wiper speed
42 –
64 Starter motor
66 Powertrain 71 –
73 Air conditioning
80 Starter pinion
90 –
94 –
98 –
Page 264 of 351
Chevrolet Malibu Owner Manual (GMNA-Localizing-U.S./Canada-
14584249) - 2021 - CRC - 11/9/20
Vehicle Care 263
(7) TPC Spec (Tire Performance Criteria
Specification)
:Original equipment tires
designed to GM's specific tire
performance criteria have a TPC
specification code molded onto the
sidewall. GM's TPC specifications meet
or exceed all federal safety guidelines.
Tire Designations
Tire Size
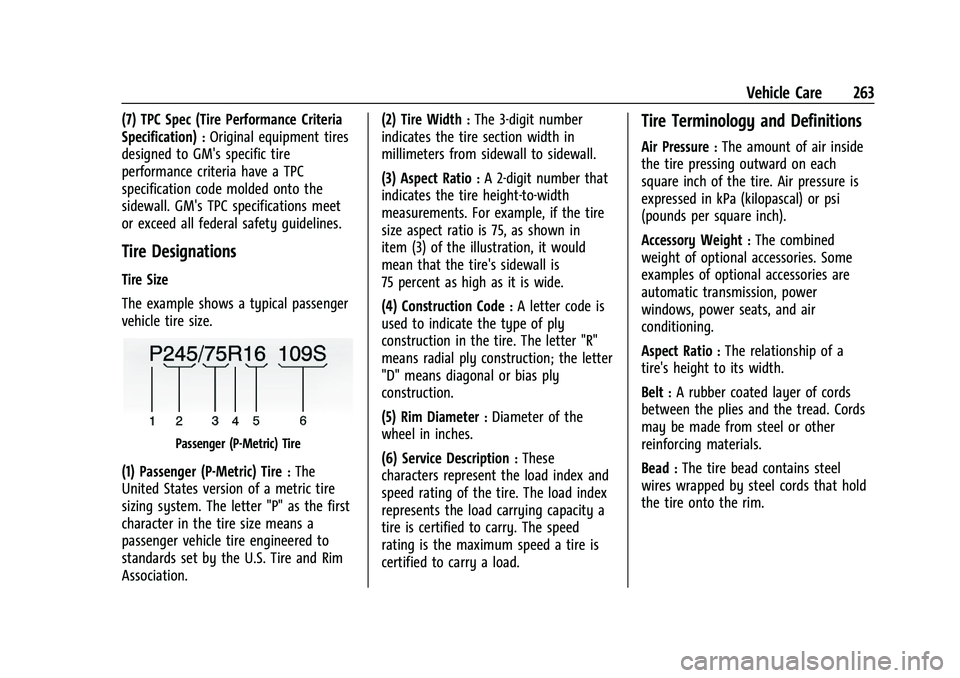
The example shows a typical passenger
vehicle tire size.
Passenger (P-Metric) Tire
(1) Passenger (P-Metric) Tire:The
United States version of a metric tire
sizing system. The letter "P" as the first
character in the tire size means a
passenger vehicle tire engineered to
standards set by the U.S. Tire and Rim
Association. (2) Tire Width
:The 3-digit number
indicates the tire section width in
millimeters from sidewall to sidewall.
(3) Aspect Ratio
:A 2-digit number that
indicates the tire height-to-width
measurements. For example, if the tire
size aspect ratio is 75, as shown in
item (3) of the illustration, it would
mean that the tire's sidewall is
75 percent as high as it is wide.
(4) Construction Code
:A letter code is
used to indicate the type of ply
construction in the tire. The letter "R"
means radial ply construction; the letter
"D" means diagonal or bias ply
construction.
(5) Rim Diameter
:Diameter of the
wheel in inches.
(6) Service Description
:These
characters represent the load index and
speed rating of the tire. The load index
represents the load carrying capacity a
tire is certified to carry. The speed
rating is the maximum speed a tire is
certified to carry a load.
Tire Terminology and Definitions
Air Pressure:The amount of air inside
the tire pressing outward on each
square inch of the tire. Air pressure is
expressed in kPa (kilopascal) or psi
(pounds per square inch).
Accessory Weight
:The combined
weight of optional accessories. Some
examples of optional accessories are
automatic transmission, power
windows, power seats, and air
conditioning.
Aspect Ratio
:The relationship of a
tire's height to its width.
Belt
:A rubber coated layer of cords
between the plies and the tread. Cords
may be made from steel or other
reinforcing materials.
Bead
:The tire bead contains steel
wires wrapped by steel cords that hold
the tire onto the rim.
Page 279 of 351
Chevrolet Malibu Owner Manual (GMNA-Localizing-U.S./Canada-
14584249) - 2021 - CRC - 11/9/20
278 Vehicle Care
If a Tire Goes Flat
It is unusual for a tire to blow out while
driving, especially if the tires are maintained
properly. SeeTires0259. If air goes out of
a tire, it is much more likely to leak out
slowly. But if there is ever a blowout, here
are a few tips about what to expect and
what to do:
If a front tire fails, the flat tire creates a
drag that pulls the vehicle toward that side.
Take your foot off the accelerator pedal and
grip the steering wheel firmly. Steer to
maintain lane position, and then gently
brake to a stop, well off the road,
if possible.
A rear blowout, particularly on a curve, acts
much like a skid and may require the same
correction as used in a skid. Stop pressing
the accelerator pedal and steer to straighten
the vehicle. It may be very bumpy and
noisy. Gently brake to a stop, well off the
road, if possible.
{Warning
Driving on a flat tire will cause
permanent damage to the tire.
Re-inflating a tire after it has been driven
(Continued)
Warning (Continued)
on while severely underinflated or flat
may cause a blowout and a serious crash.
Never attempt to re-inflate a tire that has
been driven on while severely
underinflated or flat. Have your dealer or
an authorized tire service center repair or
replace the flat tire as soon as possible.
{Warning
Lifting a vehicle and getting under it to
do maintenance or repairs is dangerous
without the appropriate safety equipment
and training. If a jack is provided with
the vehicle, it is designed only for
changing a flat tire. If it is used for
anything else, you or others could be
badly injured or killed if the vehicle slips
off the jack. If a jack is provided with the
vehicle, only use it for changing a
flat tire.
If a tire goes flat, avoid further tire and
wheel damage by driving slowly to a level
place, well off the road, if possible. Turn on
the hazard warning flashers. See Hazard
Warning Flashers 0106.
{Warning
Changing a tire can be dangerous. The
vehicle can slip off the jack and roll over
or fall causing injury or death. Find a
level place to change the tire. To help
prevent the vehicle from moving:
1. Set the parking brake firmly.
2. Put an automatic transmission in P (Park) or a manual transmission in
1 (First) or R (Reverse).
3. Turn off the engine and do not restart while the vehicle is raised.
4. Do not allow passengers to remain in the vehicle.
5. Place wheel blocks, if equipped, on both sides of the tire at the opposite
corner of the tire being changed.
This vehicle may come with a jack and spare
tire or a tire sealant and compressor kit. To
use the jacking equipment to change a spare
tire safely, follow the instructions below.
Then see Tire Changing 0285. To use the
tire sealant and compressor kit, see Tire
Sealant and Compressor Kit 0279.
Page 280 of 351
Chevrolet Malibu Owner Manual (GMNA-Localizing-U.S./Canada-
14584249) - 2021 - CRC - 11/9/20
Vehicle Care 279
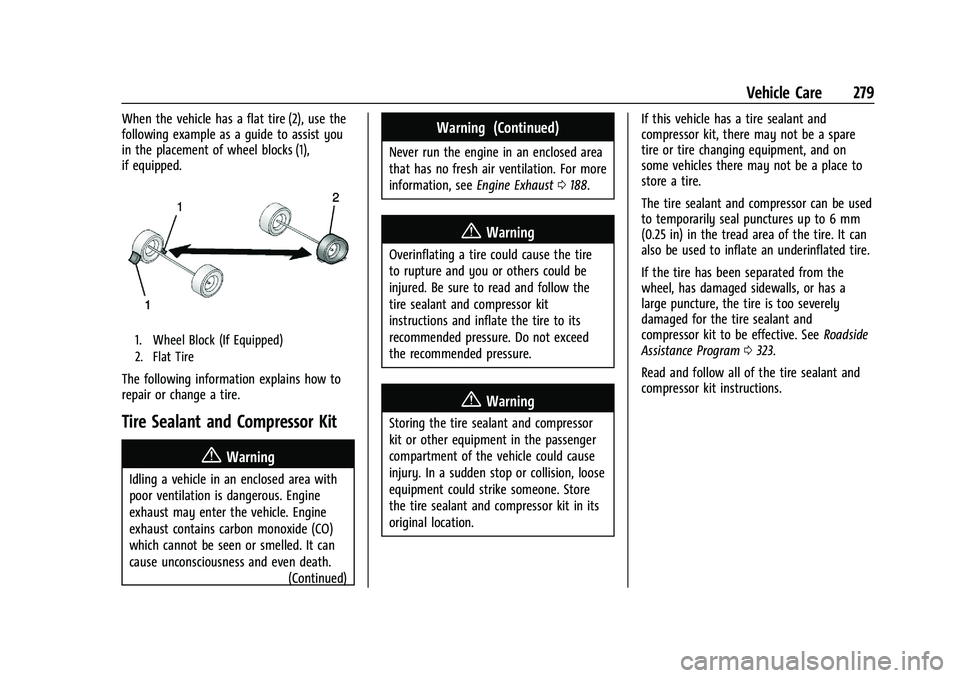
When the vehicle has a flat tire (2), use the
following example as a guide to assist you
in the placement of wheel blocks (1),
if equipped.
1. Wheel Block (If Equipped)
2. Flat Tire
The following information explains how to
repair or change a tire.
Tire Sealant and Compressor Kit
{Warning
Idling a vehicle in an enclosed area with
poor ventilation is dangerous. Engine
exhaust may enter the vehicle. Engine
exhaust contains carbon monoxide (CO)
which cannot be seen or smelled. It can
cause unconsciousness and even death.(Continued)
Warning (Continued)
Never run the engine in an enclosed area
that has no fresh air ventilation. For more
information, seeEngine Exhaust0188.
{Warning
Overinflating a tire could cause the tire
to rupture and you or others could be
injured. Be sure to read and follow the
tire sealant and compressor kit
instructions and inflate the tire to its
recommended pressure. Do not exceed
the recommended pressure.
{Warning
Storing the tire sealant and compressor
kit or other equipment in the passenger
compartment of the vehicle could cause
injury. In a sudden stop or collision, loose
equipment could strike someone. Store
the tire sealant and compressor kit in its
original location. If this vehicle has a tire sealant and
compressor kit, there may not be a spare
tire or tire changing equipment, and on
some vehicles there may not be a place to
store a tire.
The tire sealant and compressor can be used
to temporarily seal punctures up to 6 mm
(0.25 in) in the tread area of the tire. It can
also be used to inflate an underinflated tire.
If the tire has been separated from the
wheel, has damaged sidewalls, or has a
large puncture, the tire is too severely
damaged for the tire sealant and
compressor kit to be effective. See
Roadside
Assistance Program 0323.
Read and follow all of the tire sealant and
compressor kit instructions.
Page 291 of 351
Chevrolet Malibu Owner Manual (GMNA-Localizing-U.S./Canada-
14584249) - 2021 - CRC - 11/9/20
290 Vehicle Care
Jump Starting
Jump Starting - North America
For more information about the vehicle
12-volt battery, seeBattery - North America
0 244.
If the battery has run down, you may want
to use another vehicle and some jumper
cables to start your vehicle. Be sure to use
the following steps to do it safely.
{Warning
WARNING: Battery posts, terminals, and
related accessories contain lead and lead
compounds, chemicals known to the
State of California to cause cancer and
birth defects or other reproductive harm.
Batteries also contain other chemicals
known to the State of California to cause
cancer. WASH HANDS AFTER HANDLING.
For more information go to
www.P65Warnings.ca.gov/
passenger-vehicle.
See California Proposition 65 Warning 0228
and the back cover.
{Warning
Batteries can hurt you. They can be
dangerous because:
.They contain acid that can burn you.
.They contain gas that can explode or
ignite.
.They contain enough electricity to
burn you.
If you do not follow these steps exactly,
some or all of these things can hurt you.
Caution
Ignoring these steps could result in costly
damage to the vehicle that would not be
covered by the vehicle warranty. Trying
to start the vehicle by pushing or pulling
it will not work, and it could damage the
vehicle.
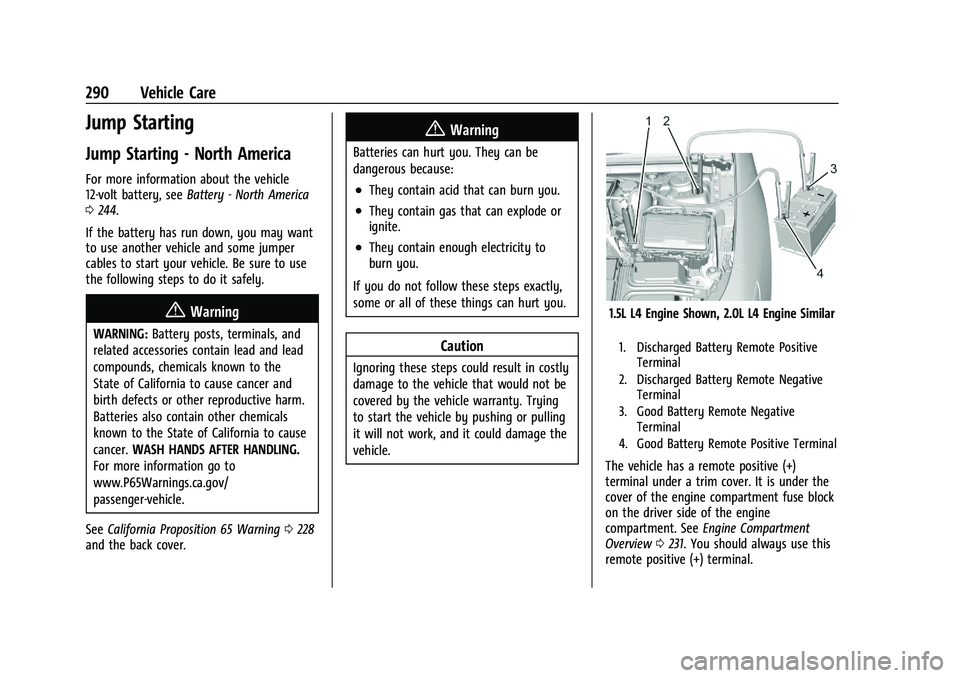
1.5L L4 Engine Shown, 2.0L L4 Engine Similar
1. Discharged Battery Remote Positive Terminal
2. Discharged Battery Remote Negative Terminal
3. Good Battery Remote Negative Terminal
4. Good Battery Remote Positive Terminal
The vehicle has a remote positive (+)
terminal under a trim cover. It is under the
cover of the engine compartment fuse block
on the driver side of the engine
compartment. See Engine Compartment
Overview 0231. You should always use this
remote positive (+) terminal.
Page 292 of 351
Chevrolet Malibu Owner Manual (GMNA-Localizing-U.S./Canada-
14584249) - 2021 - CRC - 11/9/20
Vehicle Care 291
The jump start negative ground terminal for
the discharged battery is on the shock tower
on the driver side of the engine
compartment.1. Check the other vehicle. It must have a 12-volt battery with a negative ground
system.
Caution
If the other vehicle does not have a
12-volt system with a negative ground,
both vehicles can be damaged. Only use
a vehicle that has a 12-volt system with a
negative ground for jump starting.
2. Position the two vehicles so that they are not touching.
3. Set the parking brake firmly on both vehicles. Put an automatic transmission
in P (Park) or a manual transmission in
Neutral before setting the parking brake.
Caution
If any accessories are left on or plugged
in during the jump starting procedure,
they could be damaged. The repairs
would not be covered by the vehicle
(Continued)
Caution (Continued)
warranty. Whenever possible, turn off or
unplug all accessories on either vehicle
when jump starting.
4. Turn the ignition off and switch off all lights and accessories in both vehicles,
except the hazard warning flashers if
needed.
{Warning
An electric fan can start up even when
the engine is not running and can injure
you. Keep hands, clothing, and tools
away from any underhood electric fan.
{Warning
Using a match near a battery can cause
battery gas to explode. People have been
hurt doing this, and some have been
blinded. Use a flashlight if you need
more light.
(Continued)
Warning (Continued)
Battery fluid contains acid that can burn
you. Do not get it on you. If you
accidentally get it in your eyes or on
your skin, flush the place with water and
get medical help immediately.
{Warning
Fans or other moving engine parts can
injure you badly. Keep your hands away
from moving parts once the engine is
running.
5. Connect the red positive (+) cable to the positive (+) or remote positive (+)
terminal of the discharged battery.
6. Connect the other end of the positive (+) cable to the positive (+) terminal of the
good battery. Use a remote positive (+)
terminal if the vehicle has one.
7. Connect one end of the black negative (−) cable to the negative (−) terminal of
the good battery.
8. Connect the other end of the negative (−) cable to the negative (–) ground
terminal for the discharged battery.
Page 293 of 351
Chevrolet Malibu Owner Manual (GMNA-Localizing-U.S./Canada-
14584249) - 2021 - CRC - 11/9/20
292 Vehicle Care
9. Start the vehicle with the good batteryand run the engine at idle speed for at
least four minutes.
10. Try to start the vehicle that had the dead battery. If it will not start after a
few tries, it probably needs service.
Caution
If the jumper cables are connected or
removed in the wrong order, electrical
shorting may occur and damage the
vehicle. The repairs would not be covered
by the vehicle warranty. Always connect
and remove the jumper cables in the
correct order, making sure that the cables
do not touch each other or other metal.
Jumper Cable Removal
Reverse the sequence exactly when
removing the jumper cables.
After starting the disabled vehicle and
removing the jumper cables, allow it to idle
for several minutes.
Towing the Vehicle
Caution
Incorrectly towing a disabled vehicle may
cause damage. The damage would not be
covered by the vehicle warranty. Do not
lash or hook to suspension components.
Use the proper straps around the tires to
secure the vehicle. Do not drag a locked
wheel/tire. Use tire skates or dollies
under any locked wheel/tire while
loading the vehicle. Do not use a sling
type lift to tow the vehicle. This could
damage the vehicle.
Caution
Improper use of the tow eye can damage
the vehicle. If equipped, use the tow eye
to load a disabled vehicle onto a flatbed
tow truck from a flat road surface, or to
move the vehicle a short distance. Use
caution and low speeds. The transmission
must be in (N) Neutral when moving the
vehicle. GM recommends a flatbed tow truck to
transport a disabled vehicle. Use ramps to
help reduce approach angles, if necessary.
A towed vehicle should have its drive wheels
off the ground. Contact Roadside Assistance
or a professional towing service if the
disabled vehicle must be towed.
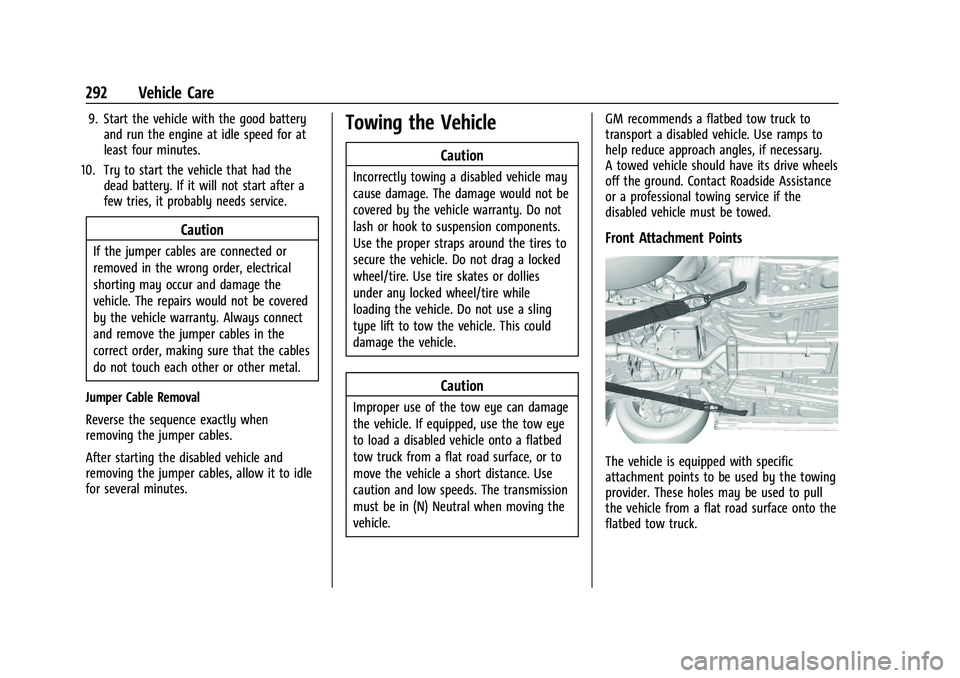
Front Attachment Points
The vehicle is equipped with specific
attachment points to be used by the towing
provider. These holes may be used to pull
the vehicle from a flat road surface onto the
flatbed tow truck.
Page 294 of 351
Chevrolet Malibu Owner Manual (GMNA-Localizing-U.S./Canada-
14584249) - 2021 - CRC - 11/9/20
Vehicle Care 293
Recreational Vehicle Towing
Recreational vehicle towing means towing
the vehicle behind another vehicle–such as
behind a motor home. The two most
common types of recreational vehicle
towing are known as dinghy towing and
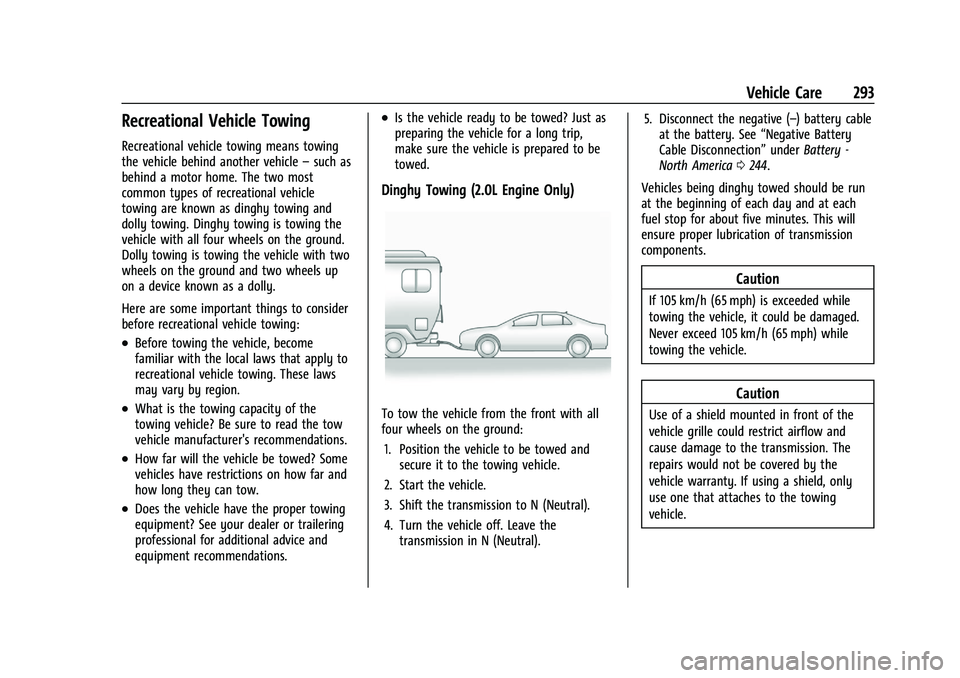
dolly towing. Dinghy towing is towing the
vehicle with all four wheels on the ground.
Dolly towing is towing the vehicle with two
wheels on the ground and two wheels up
on a device known as a dolly.
Here are some important things to consider
before recreational vehicle towing:
.Before towing the vehicle, become
familiar with the local laws that apply to
recreational vehicle towing. These laws
may vary by region.
.What is the towing capacity of the
towing vehicle? Be sure to read the tow
vehicle manufacturer's recommendations.
.How far will the vehicle be towed? Some
vehicles have restrictions on how far and
how long they can tow.
.Does the vehicle have the proper towing
equipment? See your dealer or trailering
professional for additional advice and
equipment recommendations.
.Is the vehicle ready to be towed? Just as
preparing the vehicle for a long trip,
make sure the vehicle is prepared to be
towed.
Dinghy Towing (2.0L Engine Only)
To tow the vehicle from the front with all
four wheels on the ground:
1. Position the vehicle to be towed and secure it to the towing vehicle.
2. Start the vehicle.
3. Shift the transmission to N (Neutral).
4. Turn the vehicle off. Leave the transmission in N (Neutral). 5. Disconnect the negative (–) battery cable
at the battery. See “Negative Battery
Cable Disconnection” underBattery -
North America 0244.
Vehicles being dinghy towed should be run
at the beginning of each day and at each
fuel stop for about five minutes. This will
ensure proper lubrication of transmission
components.
Caution
If 105 km/h (65 mph) is exceeded while
towing the vehicle, it could be damaged.
Never exceed 105 km/h (65 mph) while
towing the vehicle.
Caution
Use of a shield mounted in front of the
vehicle grille could restrict airflow and
cause damage to the transmission. The
repairs would not be covered by the
vehicle warranty. If using a shield, only
use one that attaches to the towing
vehicle.