maintenance CHEVROLET MALIBU 2022 User Guide
[x] Cancel search | Manufacturer: CHEVROLET, Model Year: 2022, Model line: MALIBU, Model: CHEVROLET MALIBU 2022Pages: 351, PDF Size: 9.4 MB
Page 174 of 351
Chevrolet Malibu Owner Manual (GMNA-Localizing-U.S./Canada-
14584249) - 2021 - CRC - 11/9/20
Driving and Operating 173
Driving Information
Driving for Better Fuel Economy
Driving habits can affect fuel mileage. Here
are some driving tips to get the best fuel
economy possible:
.Set the climate controls to the desired
temperature after the engine is started,
or turn them off when not required.
.Avoid fast starts and accelerate smoothly.
.Brake gradually and avoid abrupt stops.
.Avoid idling the engine for long periods
of time.
.When road and weather conditions are
appropriate, use cruise control.
.Always follow posted speed limits or
drive more slowly when conditions
require.
.Keep vehicle tires properly inflated.
.Combine several trips into a single trip.
.Replace the vehicle's tires with the same
TPC Spec number molded into the tire's
sidewall near the size.
.Follow recommended scheduled
maintenance.
Distracted Driving
Distraction comes in many forms and can
take your focus from the task of driving.
Exercise good judgment and do not let other
activities divert your attention away from
the road. Many local governments have
enacted laws regarding driver distraction.
Become familiar with the local laws in
your area.
To avoid distracted driving, keep your eyes
on the road, keep your hands on the
steering wheel, and focus your attention on
driving.
.Do not use a phone in demanding driving
situations. Use a hands-free method to
place or receive necessary phone calls.
.Watch the road. Do not read, take notes,
or look up information on phones or
other electronic devices.
.Designate a front seat passenger to
handle potential distractions.
.Become familiar with vehicle features
before driving, such as programming
favorite radio stations and adjusting
climate control and seat settings. Program
all trip information into any navigation
device prior to driving.
.Wait until the vehicle is parked to
retrieve items that have fallen to the
floor.
.Stop or park the vehicle to tend to
children.
.Keep pets in an appropriate carrier or
restraint.
.Avoid stressful conversations while
driving, whether with a passenger or on a
cell phone.
{Warning
Taking your eyes off the road too long or
too often could cause a crash resulting in
injury or death. Focus your attention on
driving.
Refer to the infotainment section for more
information on using that system and the
navigation system, if equipped, including
pairing and using a cell phone.
Defensive Driving
Defensive driving means “always expect the
unexpected.” The first step in driving
defensively is to wear the seat belt. See
Seat Belts 038.
Page 176 of 351
Chevrolet Malibu Owner Manual (GMNA-Localizing-U.S./Canada-
14584249) - 2021 - CRC - 11/9/20
Driving and Operating 175
Variable Effort Steering
The vehicle has a steering system that
varies the amount of effort required to steer
the vehicle in relation to the speed of the
vehicle.
The amount of steering effort required is
less at slower speeds to make the vehicle
more maneuverable and easier to park. At
faster speeds, the steering effort increases
to provide a sport-like feel to the steering.
This provides maximum control and stability.
Electric Power Steering
The vehicle has electric power steering.
It does not have power steering fluid.
Regular maintenance is not required.
If power steering assist is lost due to a
system malfunction, the vehicle can be
steered, but may require increased effort.
If the steering wheel is turned until it
reaches the end of its travel and is held
against that position for an extended period
of time, power steering assist may be
reduced.
If the steering assist is used for an extended
period of time while the vehicle is not
moving, power assist may be reduced.Normal use of the power steering assist
should return when the system cools down.
See your dealer if there is a problem.
Curve Tips
.Take curves at a reasonable speed.
.Reduce speed before entering a curve.
.Maintain a reasonable steady speed
through the curve.
.Wait until the vehicle is out of the curve
before accelerating gently into the
straightaway.
Steering in Emergencies
.There are some situations when steering
around a problem may be more effective
than braking.
.Holding both sides of the steering wheel
allows you to turn 180 degrees without
removing a hand.
.Antilock Brake System (ABS) allows
steering while braking.
Off-Road Recovery
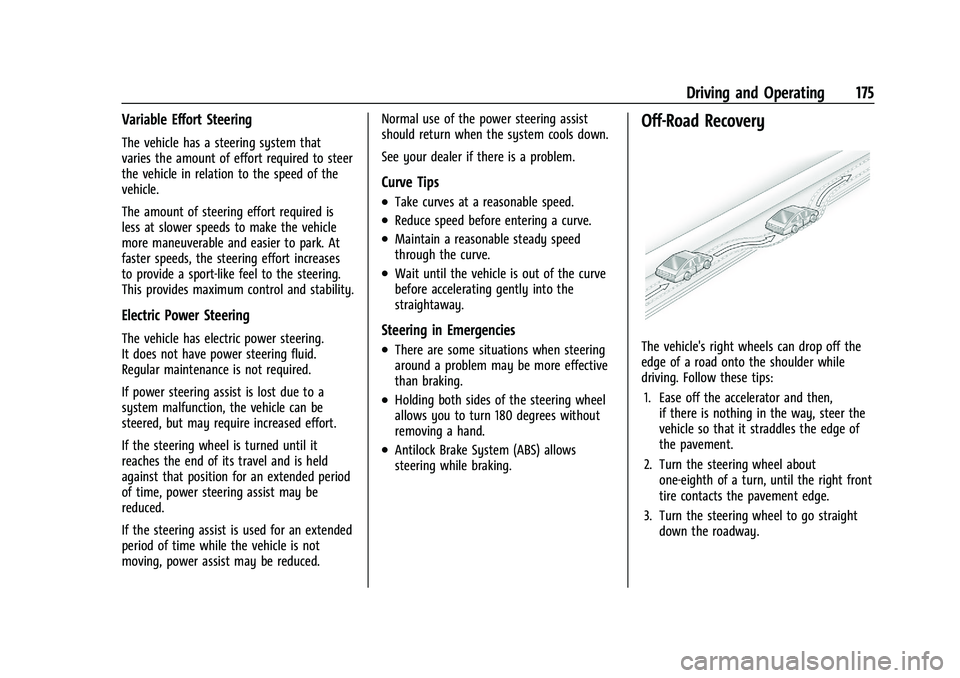
The vehicle's right wheels can drop off the
edge of a road onto the shoulder while
driving. Follow these tips:
1. Ease off the accelerator and then, if there is nothing in the way, steer the
vehicle so that it straddles the edge of
the pavement.
2. Turn the steering wheel about one-eighth of a turn, until the right front
tire contacts the pavement edge.
3. Turn the steering wheel to go straight down the roadway.
Page 224 of 351
Chevrolet Malibu Owner Manual (GMNA-Localizing-U.S./Canada-
14584249) - 2021 - CRC - 11/9/20
Driving and Operating 223
Making TurnsCaution
Turn more slowly and make wider arcs
when towing a trailer to prevent damage
to your vehicle. Making very sharp turns
could cause the trailer to contact the
vehicle.
Make wider turns than normal when towing,
so trailer will not go over soft shoulders,
over curbs, or strike road signs, trees,
or other objects. Always signal turns well in
advance. Do not steer or brake suddenly.
Driving on Grades
Reduce speed and shift to a lower gear
before starting down a long or steep
downhill grade. If the transmission is not
shifted down, the brakes may overheat and
result in reduced braking efficiency.
The vehicle can tow in D (Drive). Shift the
transmission to a lower gear if the
transmission shifts too often under heavy
loads and/or hilly conditions.
When towing at higher altitudes, engine
coolant will boil at a lower temperature
than at lower altitudes. If the engine is
turned off immediately after towing at high altitude on steep uphill grades, the vehicle
could show signs similar to engine
overheating. To avoid this, let the engine
run, preferably on level ground, with the
transmission in P (Park) for a few minutes
before turning the engine off. If the
overheat warning comes on, see
Engine
Overheating 0241.
Parking on Hills
{Warning
To prevent serious injury or death,
always park your vehicle and trailer on a
level surface when possible.
When parking your vehicle and your trailer
on a hill: 1. Press the brake pedal, but do not shift into P (Park) yet. Turn the wheels into
the curb if facing downhill or into traffic
if facing uphill.
2. Have someone place chocks under the trailer wheels.
3. When the wheel chocks are in place, gradually release the brake pedal to
allow the chocks to absorb the load of
the trailer. 4. Reapply the brake pedal. Then apply the
parking brake and shift into P (Park).
5. Release the brake pedal.
Leaving After Parking on a Hill
1. Apply and hold the brake pedal.
.Start the engine.
.Shift into a gear.
.Release the parking brake.
2. Let up on the brake pedal.
3. Drive slowly until the trailer is clear of the chocks.
4. Stop and have someone pick up and store the chocks.
Maintenance When Trailer Towing
The vehicle needs service more often when
used to tow trailers. See Maintenance
Schedule 0304. It is especially important to
check the automatic transmission fluid,
engine oil, axle lubricant, belts, cooling
system, and brake system before and during
each trip.
Check periodically that all nuts and bolts on
the trailer hitch are tight.
Page 227 of 351
Chevrolet Malibu Owner Manual (GMNA-Localizing-U.S./Canada-
14584249) - 2021 - CRC - 11/9/20
226 Driving and Operating
Trailer Lamps
Always check all trailer lamps are working at
the beginning of each trip, and periodically
on longer trips.
Turn Signals When Towing a Trailer
When properly connected, the trailer turn
signals will illuminate to indicate the vehicle
is turning, changing lanes, or stopping.
When towing a trailer, the arrows on the
instrument cluster will illuminate even if the
trailer is not properly connected or the bulbs
are burned out.
Trailer Tires
Special Trailer (ST) tires differ from vehicle
tires. Trailer tires are designed with stiff
sidewalls to help prevent sway and to
support heavy loads. These features can
make it difficult to determine if the trailer
tire pressures are low only based on a visual
inspection.
Always check all trailer tire pressures before
each trip when the tires are cool. Low trailer
tire pressure is a leading cause of trailer tire
blow-outs.Trailer tires deteriorate over time. The trailer
tire sidewall will show the week and year
the tire was manufactured. Many trailer tire
manufacturers recommend replacing tires
more than six years old.
Overloading is another leading cause of
trailer tire blow-outs. Never load your trailer
with more weight than the tires are
designed to support. The load rating is
located on the trailer tire sidewall.
Always know the maximum speed rating for
the trailer tires before driving. This may be
significantly lower than the vehicle tire
speed rating. The speed rating may be on
the trailer tire sidewall. If the speed rating is
not shown, the default trailer tire speed
rating is 105 km/h (65 mph).
Conversions and Add-Ons
Add-On Electrical Equipment
{Warning
The Data Link Connector (DLC) is used for
vehicle service and Emission Inspection/
Maintenance testing. See
Malfunction
Indicator Lamp (Check Engine Light) 087.
(Continued)
Warning (Continued)
A device connected to the DLC —such as
an aftermarket fleet or driver-behavior
tracking device —may interfere with
vehicle systems. This could affect vehicle
operation and cause a crash. Such devices
may also access information stored in the
vehicle’s systems.
Caution
Some electrical equipment can damage
the vehicle or cause components to not
work and would not be covered by the
vehicle warranty. Always check with your
dealer before adding electrical equipment.
Add-on equipment can drain the vehicle's
12-volt battery, even if the vehicle is not
operating.
The vehicle has an airbag system. Before
attempting to add anything electrical to the
vehicle, see Servicing the Airbag-Equipped
Vehicle 053 and
Adding Equipment to the Airbag-Equipped
Vehicle 053.
Page 230 of 351
Chevrolet Malibu Owner Manual (GMNA-Localizing-U.S./Canada-
14584249) - 2021 - CRC - 11/9/20
Vehicle Care 229
Accessories and Modifications
Adding non-dealer accessories or making
modifications to the vehicle can affect
vehicle performance and safety, including
such things as airbags, braking, stability,
ride and handling, emissions systems,
aerodynamics, durability, and electronic
systems like antilock brakes, traction control,
and stability control. These accessories or
modifications could even cause malfunction
or damage not covered by the vehicle
warranty.
Damage to suspension components caused
by modifying vehicle height outside of
factory settings will not be covered by the
vehicle warranty.
Damage to vehicle components resulting
from modifications or the installation or use
of non-GM certified parts, including control
module or software modifications, is not
covered under the terms of the vehicle
warranty and may affect remaining
warranty coverage for affected parts.
GM Accessories are designed to complement
and function with other systems on the
vehicle. See your dealer to accessorize the
vehicle using genuine GM Accessories
installed by a dealer technician.Also, see
Adding Equipment to the
Airbag-Equipped Vehicle 053.
Vehicle Checks
Doing Your Own Service Work
{Warning
It can be dangerous to work on your
vehicle if you do not have the proper
knowledge, service manual, tools,
or parts. Always follow owner’s manual
procedures and consult the service
manual for your vehicle before doing any
service work.
If doing some of your own service work, use
the proper service manual. It tells you much
more about how to service the vehicle than
this manual can. To order the proper service
manual, see Publication Ordering
Information 0327.
This vehicle has an airbag system. Before
attempting to do your own service work,
see Servicing the Airbag-Equipped Vehicle
0 53. If equipped with remote vehicle start, open
the hood before performing any service
work to prevent remote starting the vehicle
accidentally. See
Remote Vehicle Start 013.
Keep a record with all parts receipts and list
the mileage and the date of any service
work performed. See Maintenance Records
0 315.Caution
Even small amounts of contamination can
cause damage to vehicle systems. Do not
allow contaminants to contact the fluids,
reservoir caps, or dipsticks.
Hood
{Warning
For vehicles with auto engine stop/start,
turn the vehicle off before opening the
hood. If the vehicle is on, the engine will
start when the hood is opened. You or
others could be injured.
Page 238 of 351
Chevrolet Malibu Owner Manual (GMNA-Localizing-U.S./Canada-
14584249) - 2021 - CRC - 11/9/20
Vehicle Care 237
Change the fluid at the intervals listed in
Maintenance Schedule0304, and be sure to
use the fluid listed in Recommended Fluids
and Lubricants 0312.
Engine Air Filter Life System
If equipped, this feature provides the engine
air filter’s remaining life and best timing for
a change. The timing to change an engine
air filter depends on driving and
environmental conditions.
When to Change the Engine Air Filter
When the Driver Information Center (DIC)
displays a message to replace the engine air
filter at the next oil change, follow this
timing.
When the DIC displays a message to replace
the engine air filter soon, replace the engine
air filter at the earliest convenience.
The system must be reset after the engine
air filter is changed.
If the DIC displays a message to check the
engine air filter system, see your dealer.
How to Reset the Engine Air Filter Life
System
Reset the system whenever the engine air
filter is replaced so that the system can
calculate the next engine air filter change.
To reset:
1. Place the vehicle in P (Park).
2. Select Engine Air Filter Life on the DIC menu. See Driver Information Center
(DIC) (Base Level) 094 or
Driver Information Center (DIC) (Uplevel)
0 96.
3. Press
Vto move to the Reset/Disable
display area. Select Reset then press
V.
Then press Yes to confirm the reset.
4. 100% Air Filter Life will be displayed when the Engine Air Filter Life System is
successfully reset.
Engine Air Cleaner/Filter
The engine air cleaner/filter is in the engine
compartment on the passenger side of the
vehicle. See Engine Compartment Overview
0 231.
When to Inspect the Engine Air Cleaner/
Filter
.For intervals on changing and inspecting
the engine air filter, see Maintenance
Schedule 0304.
.If equipped with Engine Air Filter Life
System, see Engine Air Filter Life System
0 237.
.If driving in very dusty areas, follow the
engine air filter inspecting and changing
intervals, see Maintenance Schedule
0 304.
How to Inspect/Replace the Engine Air
Cleaner/Filter
Do not start the engine or have the engine
running with the engine air cleaner/filter
housing open. Before removing the engine
air cleaner/filter, make sure that the engine
air cleaner/filter housing and nearby
components are free of dirt and debris. Do
not clean the engine air cleaner/filter or
components with water or compressed air.
To inspect or replace the engine air cleaner/
filter:
Page 240 of 351
Chevrolet Malibu Owner Manual (GMNA-Localizing-U.S./Canada-
14584249) - 2021 - CRC - 11/9/20
Vehicle Care 239
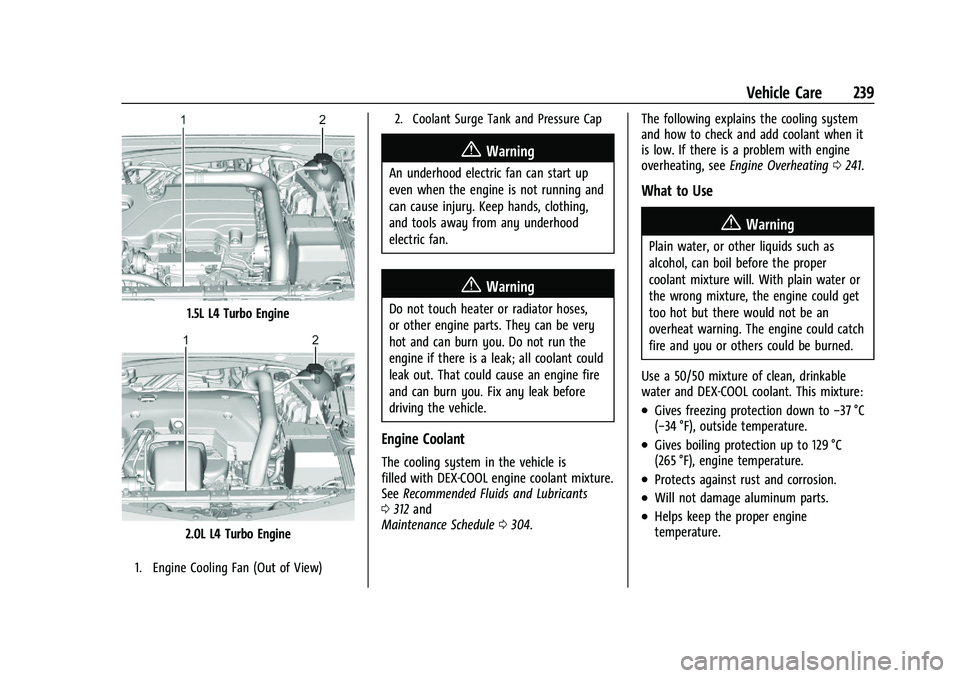
1.5L L4 Turbo Engine
2.0L L4 Turbo Engine
1. Engine Cooling Fan (Out of View)2. Coolant Surge Tank and Pressure Cap
{Warning
An underhood electric fan can start up
even when the engine is not running and
can cause injury. Keep hands, clothing,
and tools away from any underhood
electric fan.
{Warning
Do not touch heater or radiator hoses,
or other engine parts. They can be very
hot and can burn you. Do not run the
engine if there is a leak; all coolant could
leak out. That could cause an engine fire
and can burn you. Fix any leak before
driving the vehicle.
Engine Coolant
The cooling system in the vehicle is
filled with DEX-COOL engine coolant mixture.
See
Recommended Fluids and Lubricants
0 312 and
Maintenance Schedule 0304. The following explains the cooling system
and how to check and add coolant when it
is low. If there is a problem with engine
overheating, see
Engine Overheating 0241.
What to Use
{Warning
Plain water, or other liquids such as
alcohol, can boil before the proper
coolant mixture will. With plain water or
the wrong mixture, the engine could get
too hot but there would not be an
overheat warning. The engine could catch
fire and you or others could be burned.
Use a 50/50 mixture of clean, drinkable
water and DEX-COOL coolant. This mixture:
.Gives freezing protection down to −37 °C
(−34 °F), outside temperature.
.Gives boiling protection up to 129 °C
(265 °F), engine temperature.
.Protects against rust and corrosion.
.Will not damage aluminum parts.
.Helps keep the proper engine
temperature.
Page 245 of 351
Chevrolet Malibu Owner Manual (GMNA-Localizing-U.S./Canada-
14584249) - 2021 - CRC - 11/9/20
244 Vehicle Care
The brake master cylinder reservoir is filled
with GM approved DOT 4 brake fluid as
indicated on the reservoir cap. SeeEngine
Compartment Overview 0231 for the
location of the reservoir.
Checking Brake Fluid
With the vehicle in P (Park) on a level
surface, the brake fluid level should be
between the minimum and maximum marks
on the brake fluid reservoir.
There are only two reasons why the brake
fluid level in the reservoir may go down:
.Normal brake lining wear. When new
linings are installed, the fluid level goes
back up.
.A fluid leak in the brake hydraulic system.
Have the brake hydraulic system fixed.
With a leak, the brakes will not
work well.
Always clean the brake fluid reservoir cap
and the area around the cap before
removing it.
Do not top off the brake fluid. Adding fluid
does not correct a leak. If fluid is added
when the linings are worn, there will be too
much fluid when new brake linings are installed. Add or remove fluid, as necessary,
only when work is done on the brake
hydraulic system.
{Warning
If too much brake fluid is added, it can
spill on the engine and burn, if the
engine is hot enough. You or others could
be burned, and the vehicle could be
damaged. Add brake fluid only when
work is done on the brake hydraulic
system.
When the brake fluid falls to a low level,
the brake warning light comes on. See Brake
System Warning Light 088.
Brake fluid absorbs water over time which
degrades the effectiveness of the brake fluid.
Replace brake fluid at the specified intervals
to prevent increased stopping distance. See
Maintenance Schedule 0304.
What to Add
Use only GM approved DOT 4 brake fluid
from a clean, sealed container. See
Recommended Fluids and Lubricants 0312.
{Warning
The wrong or contaminated brake fluid
could result in damage to the brake
system. This could result in the loss of
braking leading to a possible injury.
Always use the proper GM approved
brake fluid.
Caution
If brake fluid is spilled on the vehicle's
painted surfaces, the paint finish can be
damaged. Immediately wash off any
painted surface.
Battery - North America
The original equipment battery is
maintenance free. Do not remove the cap
and do not add fluid.
The vehicle has a standard 12-volt battery
under the hood. See Engine Compartment
Overview 0231.
Refer to the replacement number shown on
the original battery label when a new 12-volt
battery is needed.
Page 248 of 351
Chevrolet Malibu Owner Manual (GMNA-Localizing-U.S./Canada-
14584249) - 2021 - CRC - 11/9/20
Vehicle Care 247
For vehicles equipped with the 2.0L engine:1. Install the negative battery cable clamp to the negative battery post.
2. Tighten the negative battery cable nut.
3. Turn the ignition on.
Automatic Transmission Shift Lock
Control Function Check
{Warning
When you are doing this inspection, the
vehicle could move suddenly. If the
vehicle moves, you or others could be
injured.
1. Before starting this check, be sure there is enough room around the vehicle.
It should be parked on a level surface.
2. Apply the parking brake. Be ready to apply the regular brake immediately if
the vehicle begins to move.
3. With the engine off, turn the ignition on, but do not start the engine. Without
applying the regular brake, try to move
the shift lever out of P (Park) with
normal effort. If the shift lever moves
out of P (Park), contact your dealer for
service.
Park Brake and P (Park)
Mechanism Check
{Warning
When you are doing this check, the
vehicle could begin to move. You or
others could be injured and property
could be damaged. Make sure there is
room in front of the vehicle in case it
begins to roll. Be ready to apply the
regular brake at once should the vehicle
begin to move.
Park on a fairly steep hill, with the vehicle
facing downhill. Keeping your foot on the
regular brake, set the parking brake.
.To check the parking brake's holding
ability: With the engine running and the
transmission in N (Neutral), slowly remove
foot pressure from the regular brake
pedal. Do this until the vehicle is held by
the parking brake only.
.To check the P (Park) mechanism's holding
ability: With the engine running, shift to
P (Park). Then release the parking brake
followed by the regular brake.
Contact your dealer if service is required.
Wiper Blade Replacement
Windshield wiper blades should be inspected
for wear or cracking.
It is a good idea to clean the wiper blade
assembly on a regular basis. When worn,
or when cleaning is ineffective, replace the
wiper blade. For proper windshield wiper
blade length and type, see Maintenance
Replacement Parts 0313.
Caution
Allowing the wiper arm to touch the
windshield when no wiper blade is
installed could damage the windshield.
Any damage that occurs would not be
covered by the vehicle warranty. Do not
allow the wiper arm to touch the
windshield.
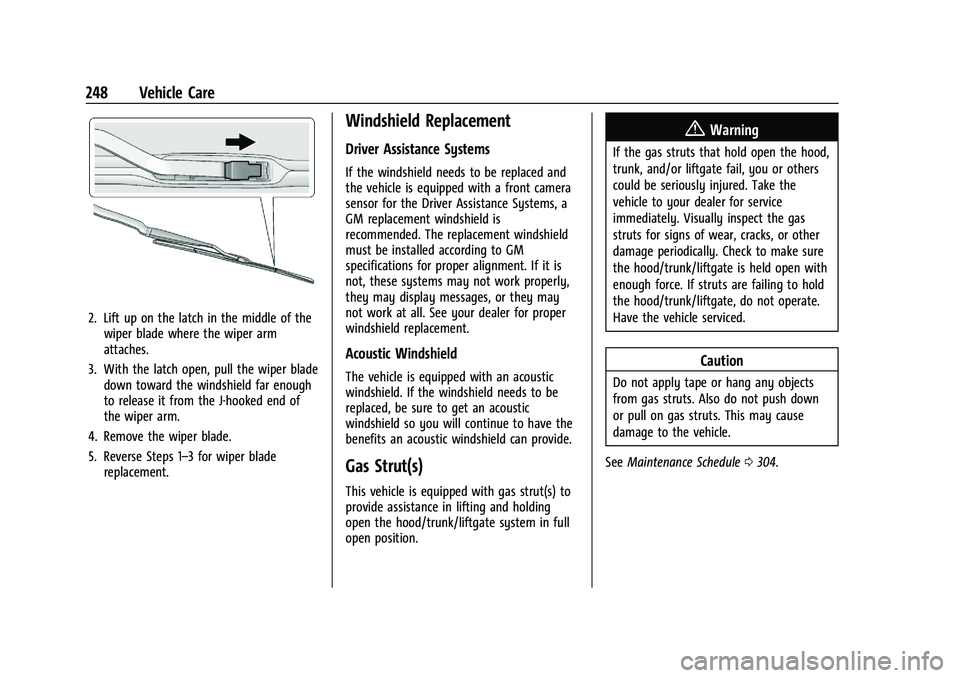
To replace the wiper blade: 1. Pull the wiper assembly away from the windshield.
Page 249 of 351
Chevrolet Malibu Owner Manual (GMNA-Localizing-U.S./Canada-
14584249) - 2021 - CRC - 11/9/20
248 Vehicle Care
2. Lift up on the latch in the middle of thewiper blade where the wiper arm
attaches.
3. With the latch open, pull the wiper blade down toward the windshield far enough
to release it from the J-hooked end of
the wiper arm.
4. Remove the wiper blade.
5. Reverse Steps 1–3 for wiper blade replacement.
Windshield Replacement
Driver Assistance Systems
If the windshield needs to be replaced and
the vehicle is equipped with a front camera
sensor for the Driver Assistance Systems, a
GM replacement windshield is
recommended. The replacement windshield
must be installed according to GM
specifications for proper alignment. If it is
not, these systems may not work properly,
they may display messages, or they may
not work at all. See your dealer for proper
windshield replacement.
Acoustic Windshield
The vehicle is equipped with an acoustic
windshield. If the windshield needs to be
replaced, be sure to get an acoustic
windshield so you will continue to have the
benefits an acoustic windshield can provide.
Gas Strut(s)
This vehicle is equipped with gas strut(s) to
provide assistance in lifting and holding
open the hood/trunk/liftgate system in full
open position.
{Warning
If the gas struts that hold open the hood,
trunk, and/or liftgate fail, you or others
could be seriously injured. Take the
vehicle to your dealer for service
immediately. Visually inspect the gas
struts for signs of wear, cracks, or other
damage periodically. Check to make sure
the hood/trunk/liftgate is held open with
enough force. If struts are failing to hold
the hood/trunk/liftgate, do not operate.
Have the vehicle serviced.
Caution
Do not apply tape or hang any objects
from gas struts. Also do not push down
or pull on gas struts. This may cause
damage to the vehicle.
See Maintenance Schedule 0304.