maintenance CHEVROLET MALIBU 2023 User Guide
[x] Cancel search | Manufacturer: CHEVROLET, Model Year: 2023, Model line: MALIBU, Model: CHEVROLET MALIBU 2023Pages: 332, PDF Size: 6.2 MB
Page 169 of 332
Chevrolet Malibu Owner Manual (GMNA-Localizing-U.S./Canada-
16273584) - 2023 - CRC - 9/28/22
168 Driving and Operating
Variable Effort Steering
The vehicle has a steering system that
varies the amount of effort required to steer
the vehicle in relation to the speed of the
vehicle.
The amount of steering effort required is
less at slower speeds to make the vehicle
more maneuverable and easier to park. At
faster speeds, the steering effort increases
to provide a sport-like feel to the steering.
This provides maximum control and stability.
Electric Power Steering
The vehicle is equipped with an electric
power steering system, which reduces the
amount of effort needed to steer the
vehicle. It does not have power steering
fluid. Regular maintenance is not required.
If the vehicle experiences a system
malfunction and loses power steering,
greater steering effort may be required.
Power steering assist also may be reduced if
you turn the steering wheel as far as it can
turn and hold it there with force for an
extended period of time.
See your dealer if there is a problem.
Curve Tips
.Take curves at a reasonable speed.
.Reduce speed before entering a curve.
.Maintain a reasonable steady speed
through the curve.
.Wait until the vehicle is out of the curve
before accelerating gently into the
straightaway.
Steering in Emergencies
.There are some situations when steering
around a problem may be more effective
than braking.
.Holding both sides of the steering wheel
allows you to turn 180 degrees without
removing a hand.
.Antilock Brake System (ABS) allows
steering while braking.
Off-Road Recovery
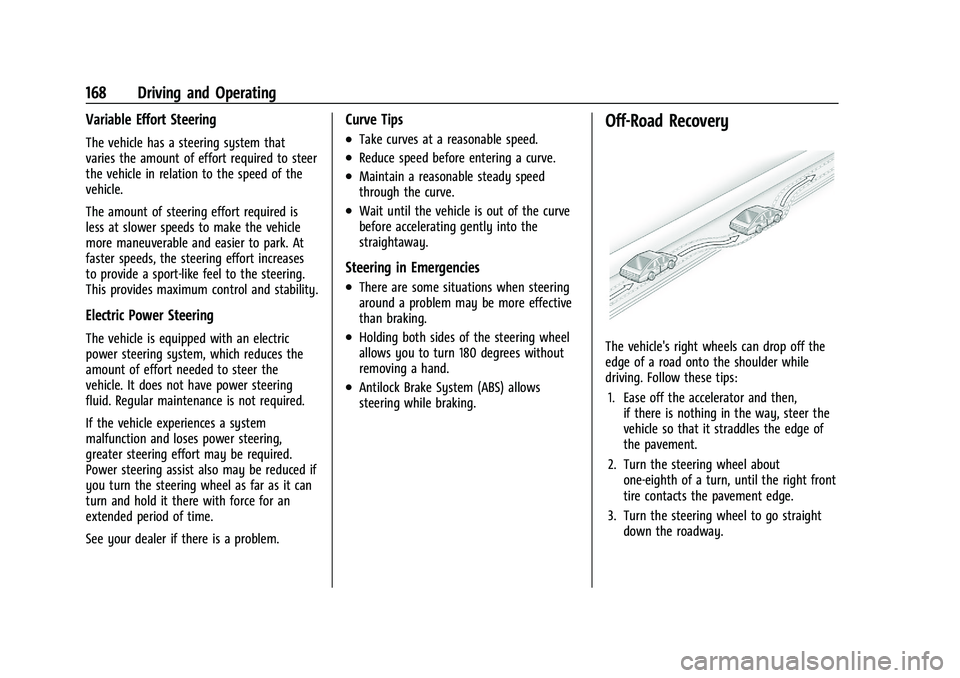
The vehicle's right wheels can drop off the
edge of a road onto the shoulder while
driving. Follow these tips:1. Ease off the accelerator and then, if there is nothing in the way, steer the
vehicle so that it straddles the edge of
the pavement.
2. Turn the steering wheel about one-eighth of a turn, until the right front
tire contacts the pavement edge.
3. Turn the steering wheel to go straight down the roadway.
Page 217 of 332
Chevrolet Malibu Owner Manual (GMNA-Localizing-U.S./Canada-
16273584) - 2023 - CRC - 9/28/22
216 Driving and Operating
Parking on Hills
{Warning
To prevent serious injury or death,
always park your vehicle and trailer on a
level surface when possible.
When parking your vehicle and your trailer
on a hill: 1. Press the brake pedal, but do not shift into P (Park). Turn the wheels into the
curb if facing downhill or into traffic if
facing uphill.
2. Have someone place chocks under the trailer wheels.
3. When the wheel chocks are in place, gradually release the brake pedal to
allow the chocks to absorb the load of
the trailer.
4. Reapply the brake pedal. Then apply the parking brake and shift into P (Park).
5. Release the brake pedal.
Leaving After Parking on a Hill
1. Apply and hold the brake pedal.
.Start the engine.
.Shift into the desired gear.
.Release the parking brake. 2. Let up on the brake pedal.
3. Drive slowly until the trailer is clear of
the chocks.
4. Stop and have someone pick up and store the chocks.
Maintenance When Trailer Towing
The vehicle needs service more often when
used to tow trailers. See Maintenance
Schedule 0290. It is especially important to
check the automatic transmission fluid,
engine oil, axle lubricant, belts, cooling
system, and brake system before and during
each trip.
Check periodically that all nuts and bolts on
the trailer hitch are tight.
Engine Cooling When Trailer Towing
The cooling system may temporarily
overheat during severe operating conditions.
See Engine Overheating 0232.
Trailer Towing
Caution
Towing a trailer improperly can damage
the vehicle and result in costly repairs
not covered by the vehicle warranty. To
(Continued)
Caution (Continued)
tow a trailer correctly, follow the
directions in this section and see your
dealer for important information about
towing a trailer with the vehicle.
Trailer Weight
{Warning
Never exceed the towing capacity for
your vehicle.
Safe trailering requires monitoring the
weight, speed, altitude, road grades, outside
temperature, dimensions of the front of the
trailer, and how frequently the vehicle is
used to tow a trailer.
Before towing a trailer, always separately
weigh:
.The fully loaded vehicle and trailer
combination.
.The trailer.
.The trailer tongue.
Page 220 of 332
Chevrolet Malibu Owner Manual (GMNA-Localizing-U.S./Canada-
16273584) - 2023 - CRC - 9/28/22
Driving and Operating 219
Overloading is another leading cause of
trailer tire blow-outs. Never load your trailer
with more weight than the tires are
designed to support. The load rating is
located on the trailer tire sidewall.
Always know the maximum speed rating for
the trailer tires before driving. This may be
significantly lower than the vehicle tire
speed rating. The speed rating may be on
the trailer tire sidewall. If the speed rating is
not shown, the default trailer tire speed
rating is 105 km/h (65 mph).
Conversions and Add-Ons
Add-On Electrical Equipment
{Warning
The Data Link Connector (DLC) is used for
vehicle service and Emission Inspection/
Maintenance testing. SeeMalfunction
Indicator Lamp (Check Engine Light) 088.
A device connected to the DLC —such as
an aftermarket fleet or driver-behavior
tracking device —may interfere with
vehicle systems. This could affect vehicle (Continued)
Warning (Continued)
operation and cause a crash. Such devices
may also access information stored in the
vehicle’s systems.
Caution
Some electrical equipment can damage
the vehicle or cause components to not
work and would not be covered by the
vehicle warranty. Always check with your
dealer before adding electrical equipment.
Add-on equipment can drain the vehicle's
12-volt battery, even if the vehicle is not
operating.
The vehicle has an airbag system. Before
attempting to add anything electrical to the
vehicle, see Servicing the Airbag-Equipped
Vehicle 053 and
Adding Equipment to the Airbag-Equipped
Vehicle 053.
Page 223 of 332

Chevrolet Malibu Owner Manual (GMNA-Localizing-U.S./Canada-
16273584) - 2023 - CRC - 9/28/22
222 Vehicle Care
Vehicle Checks
Doing Your Own Service Work
{Warning
It can be dangerous to work on your
vehicle if you do not have the proper
knowledge, service manual, tools,
or parts. Always follow owner’s manual
procedures and consult the service
manual for your vehicle before doing any
service work.
If doing some of your own service work, use
the proper service manual. It tells you much
more about how to service the vehicle than
this manual can. To order the proper service
manual, see Publication Ordering
Information 0308.
This vehicle has an airbag system. Before
attempting to do your own service work,
see Servicing the Airbag-Equipped Vehicle
0 53.
If equipped with remote vehicle start, open
the hood before performing any service
work to prevent remote starting the vehicle
accidentally. See Remote Vehicle Start 013. Keep a record with all parts receipts and list
the mileage and the date of any service
work performed. See
Maintenance Records
0 296.
Caution
Even small amounts of contamination can
cause damage to vehicle systems. Do not
allow contaminants to contact the fluids,
reservoir caps, or dipsticks.
Hood
{Warning
For vehicles with auto engine stop/start,
turn the vehicle off before opening the
hood. If the vehicle is on, the engine will
start when the hood is opened. You or
others could be injured.
{Warning
Components under the hood can get hot
from running the engine. To help avoid
the risk of burning unprotected skin,
never touch these components until they
have cooled, and always use a glove or
towel to avoid direct skin contact. Clear any snow from the hood before
opening.
To open the hood:
1. Pull the hood release lever with the
isymbol. It is on the lower left side
of the instrument panel.
2. Go to the front of the vehicle and locate the secondary release lever under the
front center of the hood. Push the
secondary hood release lever to the right
to release.
Page 229 of 332
Chevrolet Malibu Owner Manual (GMNA-Localizing-U.S./Canada-
16273584) - 2023 - CRC - 9/28/22
228 Vehicle Care
Automatic Transmission Fluid
It is not necessary to check the transmission
fluid level. A transmission fluid leak is the
only reason for fluid loss. If a leak occurs,
take the vehicle to your dealer and have it
repaired as soon as possible.
Caution
Use of the incorrect automatic
transmission fluid may damage the
vehicle, and the damage may not be
covered by the vehicle warranty. Always
use the correct automatic transmission
fluid. SeeRecommended Fluids and
Lubricants 0294.
Change the fluid at the intervals listed in
Maintenance Schedule 0290, and be sure to
use the fluid listed in Recommended Fluids
and Lubricants 0294.
Engine Air Filter Life System
If equipped, this feature provides the engine
air filter’s remaining life and best timing for
a change. The timing to change an engine
air filter depends on driving and
environmental conditions.
When to Change the Engine Air Filter
When the Driver Information Center (DIC)
displays a message to replace the engine air
filter at the next oil change, follow this
timing.
When the DIC displays a message to replace
the engine air filter soon, replace the engine
air filter at the earliest convenience.
The system must be reset after the engine
air filter is changed.
If the DIC displays a message to check the
engine air filter system, see your dealer.
How to Reset the Engine Air Filter Life
System
Reset the system whenever the engine air
filter is replaced so that the system can
calculate the next engine air filter change.
To reset:
1. Place the vehicle in P (Park).
2. Select Engine Air Filter Life on the DIC menu. See Driver Information Center
(DIC) (Base Level) 095 or
Driver Information Center (DIC) (Uplevel)
0 98. 3. Press
Vto move to the Reset/Disable
display area. Select Reset then press
V.
Then press Yes to confirm the reset.
4. 100% Air Filter Life will be displayed when the Engine Air Filter Life System is
successfully reset.
Engine Air Cleaner/Filter
The engine air cleaner/filter is in the engine
compartment on the passenger side of the
vehicle. See Engine Compartment Overview
0 224.
When to Inspect the Engine Air Cleaner/
Filter
.For intervals on changing and inspecting
the engine air filter, see Maintenance
Schedule 0290.
.If equipped with Engine Air Filter Life
System, see Engine Air Filter Life System
0 228.
.If driving in very dusty areas, follow the
engine air filter inspecting and changing
intervals, see Maintenance Schedule
0 290.
Page 231 of 332
Chevrolet Malibu Owner Manual (GMNA-Localizing-U.S./Canada-
16273584) - 2023 - CRC - 9/28/22
230 Vehicle Care
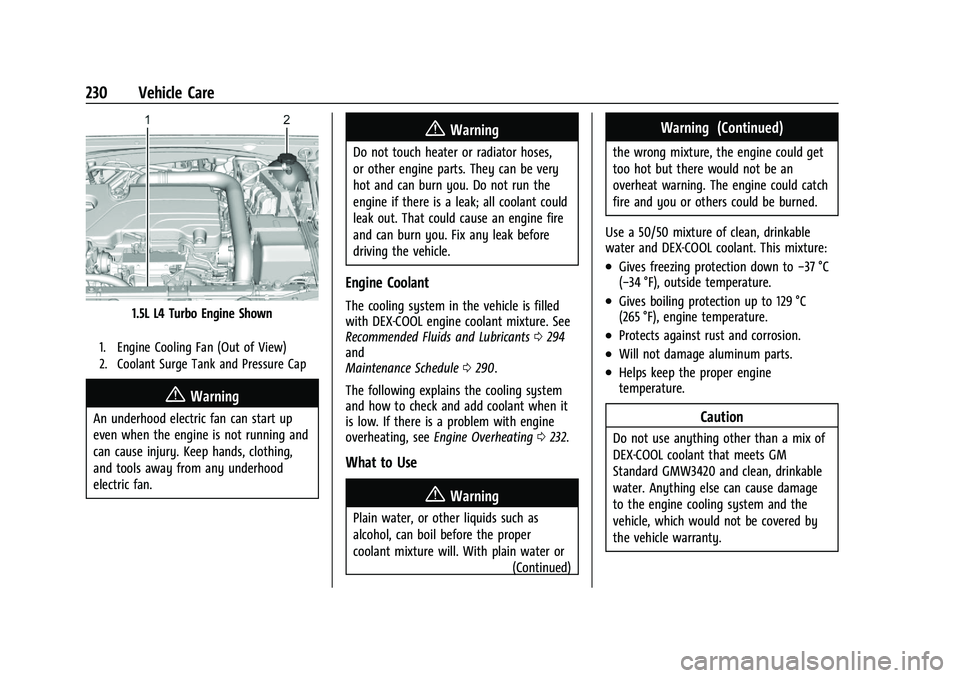
1.5L L4 Turbo Engine Shown
1. Engine Cooling Fan (Out of View)
2. Coolant Surge Tank and Pressure Cap
{Warning
An underhood electric fan can start up
even when the engine is not running and
can cause injury. Keep hands, clothing,
and tools away from any underhood
electric fan.
{Warning
Do not touch heater or radiator hoses,
or other engine parts. They can be very
hot and can burn you. Do not run the
engine if there is a leak; all coolant could
leak out. That could cause an engine fire
and can burn you. Fix any leak before
driving the vehicle.
Engine Coolant
The cooling system in the vehicle is filled
with DEX-COOL engine coolant mixture. See
Recommended Fluids and Lubricants0294
and
Maintenance Schedule 0290.
The following explains the cooling system
and how to check and add coolant when it
is low. If there is a problem with engine
overheating, see Engine Overheating 0232.
What to Use
{Warning
Plain water, or other liquids such as
alcohol, can boil before the proper
coolant mixture will. With plain water or
(Continued)
Warning (Continued)
the wrong mixture, the engine could get
too hot but there would not be an
overheat warning. The engine could catch
fire and you or others could be burned.
Use a 50/50 mixture of clean, drinkable
water and DEX-COOL coolant. This mixture:
.Gives freezing protection down to −37 °C
(−34 °F), outside temperature.
.Gives boiling protection up to 129 °C
(265 °F), engine temperature.
.Protects against rust and corrosion.
.Will not damage aluminum parts.
.Helps keep the proper engine
temperature.
Caution
Do not use anything other than a mix of
DEX-COOL coolant that meets GM
Standard GMW3420 and clean, drinkable
water. Anything else can cause damage
to the engine cooling system and the
vehicle, which would not be covered by
the vehicle warranty.
Page 236 of 332
Chevrolet Malibu Owner Manual (GMNA-Localizing-U.S./Canada-
16273584) - 2023 - CRC - 9/28/22
Vehicle Care 235
Checking Brake Fluid
With the vehicle in P (Park) on a level
surface, the brake fluid level should be
between the minimum and maximum marks
on the brake fluid reservoir.
There are only two reasons why the brake
fluid level in the reservoir may go down:
.Normal brake lining wear. When new
linings are installed, the fluid level goes
back up.
.A fluid leak in the brake hydraulic system.
Have the brake hydraulic system fixed.
With a leak, the brakes will not
work well.
Always clean the brake fluid reservoir cap
and the area around the cap before
removing it.
Do not top off the brake fluid. Adding fluid
does not correct a leak. If fluid is added
when the linings are worn, there will be too
much fluid when new brake linings are
installed. Add or remove fluid, as necessary,
only when work is done on the brake
hydraulic system.
{Warning
If too much brake fluid is added, it can
spill on the engine and burn, if the
engine is hot enough. You or others could
be burned, and the vehicle could be
damaged. Add brake fluid only when
work is done on the brake hydraulic
system.
When the brake fluid falls to a low level,
the brake warning light comes on. See Brake
System Warning Light 089.
Brake fluid absorbs water over time which
degrades the effectiveness of the brake fluid.
Replace brake fluid at the specified intervals
to prevent increased stopping distance. See
Maintenance Schedule 0290.
What to Add
Use only GM approved DOT 4 brake fluid
from a clean, sealed container. See
Recommended Fluids and Lubricants 0294.
{Warning
The wrong or contaminated brake fluid
could result in damage to the brake
system. This could result in the loss of
braking leading to a possible injury.
Always use the proper GM approved
brake fluid.
Caution
If brake fluid is spilled on the vehicle's
painted surfaces, the paint finish can be
damaged. Immediately wash off any
painted surface.
Battery - North America
The original equipment battery is
maintenance free. Do not remove the cap
and do not add fluid.
The vehicle has a standard 12-volt battery
under the hood. See Engine Compartment
Overview 0224.
Refer to the replacement number shown on
the original battery label when a new 12-volt
battery is needed.
Page 238 of 332

Chevrolet Malibu Owner Manual (GMNA-Localizing-U.S./Canada-
16273584) - 2023 - CRC - 9/28/22
Vehicle Care 237
Park Brake and P (Park)
Mechanism Check
{Warning
When you are doing this check, the
vehicle could begin to move. You or
others could be injured and property
could be damaged. Make sure there is
room in front of the vehicle in case it
begins to roll. Be ready to apply the
regular brake at once should the vehicle
begin to move.
Park on a fairly steep hill, with the vehicle
facing downhill. Keeping your foot on the
regular brake, set the parking brake.
.To check the parking brake's holding
ability: With the engine running and the
transmission in N (Neutral), slowly remove
foot pressure from the regular brake
pedal. Do this until the vehicle is held by
the parking brake only.
.To check the P (Park) mechanism's holding
ability: With the engine running, shift to
P (Park). Then release the parking brake
followed by the regular brake.
Contact your dealer if service is required.
Wiper Blade Replacement
Windshield wiper blades should be inspected
for wear or cracking.
It is a good idea to clean the wiper blade
assembly on a regular basis. When worn,
or when cleaning is ineffective, replace the
wiper blade. For proper windshield wiper
blade length and type, see Maintenance
Replacement Parts 0295.
Caution
Allowing the wiper arm to touch the
windshield when no wiper blade is
installed could damage the windshield.
Any damage that occurs would not be
covered by the vehicle warranty. Do not
allow the wiper arm to touch the
windshield.
To replace the wiper blade: 1. Pull the wiper assembly away from the windshield.2. Lift up on the latch in the middle of thewiper blade where the wiper arm
attaches.
3. With the latch open, pull the wiper blade down toward the windshield far enough
to release it from the J-hooked end of
the wiper arm.
4. Remove the wiper blade.
5. Reverse Steps 1–3 for wiper blade replacement.
Page 239 of 332
Chevrolet Malibu Owner Manual (GMNA-Localizing-U.S./Canada-
16273584) - 2023 - CRC - 9/28/22
238 Vehicle Care
Windshield Replacement
Driver Assistance Systems
If the windshield needs to be replaced and
the vehicle is equipped with a front camera
sensor for the Driver Assistance Systems,
a GM replacement windshield is
recommended. The replacement windshield
must be installed according to GM
specifications for proper alignment. If it is
not, these systems may not work properly,
they may display messages, or they may
not work at all. See your dealer for proper
windshield replacement.
Acoustic Windshield
The vehicle is equipped with an acoustic
windshield. If the windshield needs to be
replaced, be sure to get an acoustic
windshield so you will continue to have the
benefits an acoustic windshield can provide.
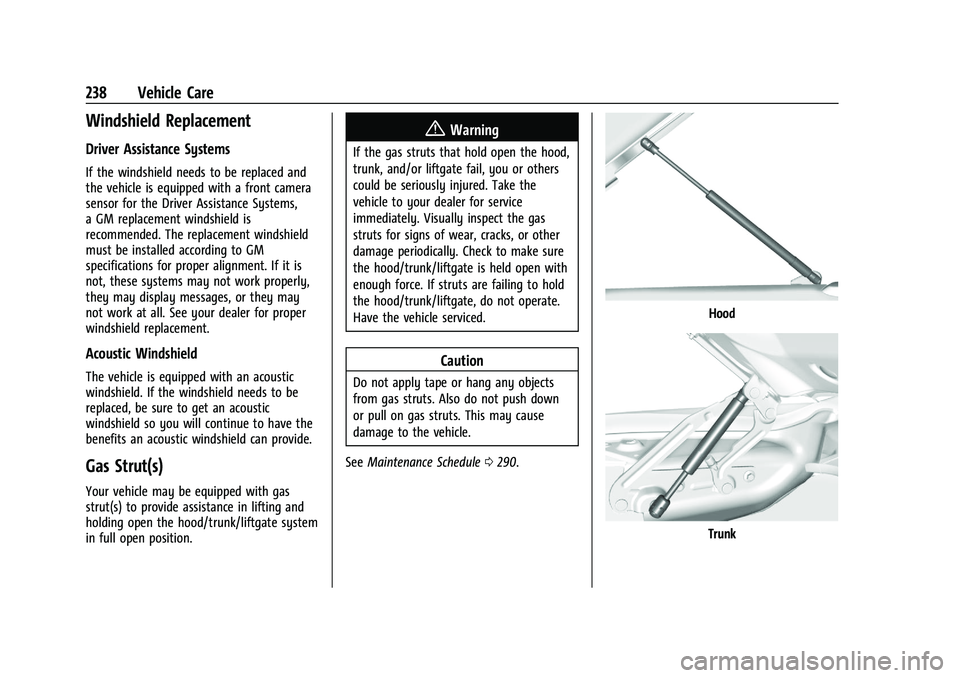
Gas Strut(s)
Your vehicle may be equipped with gas
strut(s) to provide assistance in lifting and
holding open the hood/trunk/liftgate system
in full open position.
{Warning
If the gas struts that hold open the hood,
trunk, and/or liftgate fail, you or others
could be seriously injured. Take the
vehicle to your dealer for service
immediately. Visually inspect the gas
struts for signs of wear, cracks, or other
damage periodically. Check to make sure
the hood/trunk/liftgate is held open with
enough force. If struts are failing to hold
the hood/trunk/liftgate, do not operate.
Have the vehicle serviced.
Caution
Do not apply tape or hang any objects
from gas struts. Also do not push down
or pull on gas struts. This may cause
damage to the vehicle.
See Maintenance Schedule 0290.
Hood
Trunk
Page 260 of 332
Chevrolet Malibu Owner Manual (GMNA-Localizing-U.S./Canada-
16273584) - 2023 - CRC - 9/28/22
Vehicle Care 259
High Speed Operation Inflation Pressures
Tire Size Cold Inflation Pressure kPa (psi)
245/40R19 260 kPa (38 psi)
Return the tires to the recommended cold
tire inflation pressure when high-speed
driving has ended. See Vehicle Load Limits
0 172 and
Tire Pressure 0257.
Tire Pressure Monitor System
The Tire Pressure Monitor System (TPMS)
uses radio and sensor technology to check
tire pressure levels. The TPMS sensors
monitor the air pressure in your tires and
transmit tire pressure readings to a receiver
located in the vehicle.
Each tire, including the spare (if provided),
should be checked monthly when cold and
inflated to the inflation pressure
recommended by the vehicle manufacturer
on the vehicle placard or tire inflation
pressure label. (If your vehicle has tires of a
different size than the size indicated on the
vehicle placard or tire inflation pressure
label, you should determine the proper tire
inflation pressure for those tires.) As an added safety feature, your vehicle has
been equipped with a tire pressure
monitoring system (TPMS) that illuminates a
low tire pressure telltale when one or more
of your tires is significantly under-inflated.
Accordingly, when the low tire pressure
telltale illuminates, you should stop and
check your tires as soon as possible, and
inflate them to the proper pressure. Driving
on a significantly under-inflated tire causes
the tire to overheat and can lead to tire
failure. Under-inflation also reduces energy
efficiency and tire tread life, and may affect
the vehicle's handling and stopping ability.
Please note that the TPMS is not a
substitute for proper tire maintenance, and
it is the driver's responsibility to maintain
correct tire pressure, even if under-inflation
has not reached the level to trigger
illumination of the TPMS low tire pressure
telltale.
Your vehicle has also been equipped with a
TPMS malfunction indicator to indicate when
the system is not operating properly. The
TPMS malfunction indicator is combined
with the low tire pressure telltale. When the
system detects a malfunction, the telltale
will flash for approximately one minute and
then remain continuously illuminated. This
sequence will continue upon subsequent
vehicle start-ups as long as the malfunction
exists.
When the malfunction indicator is
illuminated, the system may not be able to
detect or signal low tire pressure as
intended. TPMS malfunctions may occur for
a variety of reasons, including the
installation of replacement or alternate tires
or wheels on the vehicle that prevent the
TPMS from functioning properly. Always
check the TPMS malfunction telltale after
replacing one or more tires or wheels on