display CHEVROLET MALIBU 2023 Owners Manual
[x] Cancel search | Manufacturer: CHEVROLET, Model Year: 2023, Model line: MALIBU, Model: CHEVROLET MALIBU 2023Pages: 332, PDF Size: 6.2 MB
Page 11 of 332
Chevrolet Malibu Owner Manual (GMNA-Localizing-U.S./Canada-
16273584) - 2023 - CRC - 9/28/22
10 Keys, Doors, and Windows
heard. Passive locking will then remain
disabled until
Qon the interior door is
pressed, or until the vehicle is turned on.
Remote Left In Vehicle Alert
When the vehicle is turned off and an
remote key is left in the vehicle, the horn
will chirp three times after all doors are
closed. To view available settings from the
infotainment screen, touch Settings >
Vehicle > Remote Lock, Unlock, Start.
Remote No Longer In Vehicle Alert
If the vehicle is on with a door open, and
then all doors are closed, the vehicle will
check for an remote key inside. If an remote
key is not detected, the Driver Information
Center (DIC) will display NO REMOTE
DETECTED and the horn will chirp three
times.
This occurs only once each time the vehicle
is driven. To view available settings from the
infotainment screen, touch Settings >
Vehicle > Remote Lock, Unlock, Start.
Keyless Trunk Opening
Press the touch pad on the rear of the trunk
to open it if the remote key is within 1 m
(3 ft) of the trunk.
Key Access
To access a vehicle with a weak remote key
battery, see Door Locks014.
Programming Remote Keys to the
Vehicle
Only remote keys programmed to the
vehicle will work. If a remote key is lost or
stolen, a replacement can be purchased and
programmed through your dealer. The
vehicle can be reprogrammed so that lost or
stolen remote keys no longer work. Any
remaining remote keys will need to be
reprogrammed. Each vehicle can have up to
eight remote keys matched to it.
Programming with Recognized Remote Keys
A new remote key can be programmed to
the vehicle when there are two recognized
remote keys. To program, the vehicle must
be off and all of the remote keys, both
currently recognized and new, must be
with you.
1. Place the two recognized remote keys in the cupholder.
2. Remove the key lock cylinder cap on the driver door handle. See Door Locks014.
Insert the vehicle key of the new remote
key into the key lock cylinder on the outside of the driver door and turn the
key counterclockwise five times within
10 seconds.
The DIC displays READY FOR REMOTE #2,
3, 4, or 5.
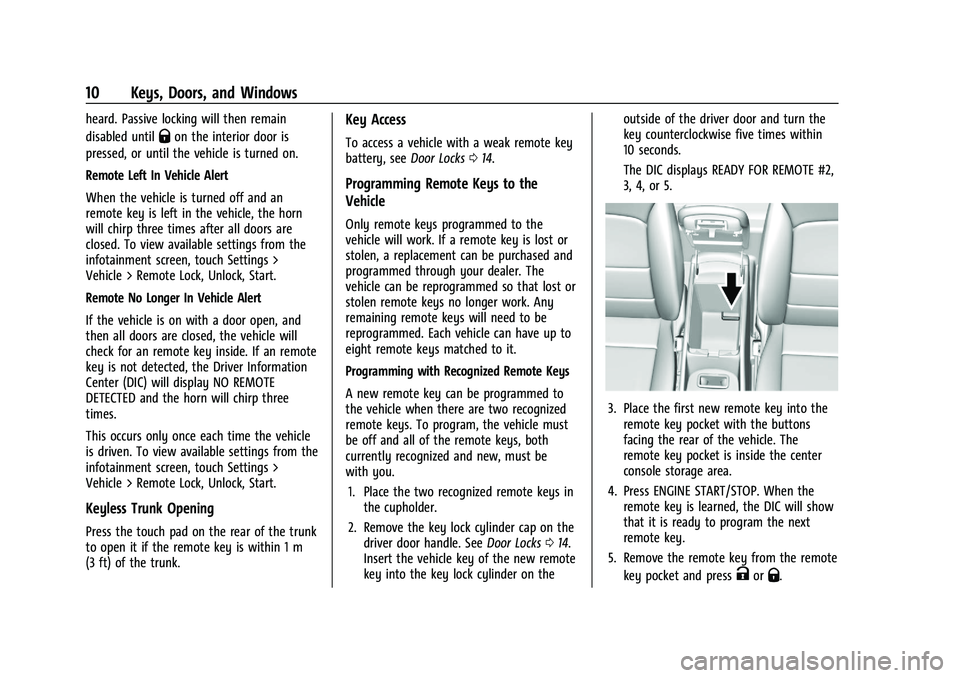
3. Place the first new remote key into the
remote key pocket with the buttons
facing the rear of the vehicle. The
remote key pocket is inside the center
console storage area.
4. Press ENGINE START/STOP. When the remote key is learned, the DIC will show
that it is ready to program the next
remote key.
5. Remove the remote key from the remote key pocket and press
KorQ.
Page 12 of 332
Chevrolet Malibu Owner Manual (GMNA-Localizing-U.S./Canada-
16273584) - 2023 - CRC - 9/28/22
Keys, Doors, and Windows 11
To program additional remote keys,
repeat Steps 3–5 for each new
remote key.
When all additional remote keys are
programmed, press and hold ENGINE
START/STOP for 12 seconds to exit
programming mode.
6. Put the key back into the remote key.
7. Replace the key lock cylinder cap. See Door Locks 014.
Programming without Recognized
Remote Keys
If two currently recognized remote keys are
not available, follow this procedure to
program up to eight remote keys. This
feature is not available in Canada. This
procedure will take approximately
30 minutes to complete. The vehicle must
be off and all of the remote keys to be
programmed must be with you. 1. Remove the key lock cylinder cap on the driver door handle. See Door Locks014.
Insert the vehicle key of the remote key
into the key lock cylinder on the outside
of the driver door and turn the key
counterclockwise five times within
10 seconds. The DIC displays REMOTE LEARN
PENDING, PLEASE WAIT.
2. Wait for 10 minutes until the DIC displays PRESS ENGINE START BUTTON TO
LEARN and then press ENGINE
START/STOP.
The DIC will again display REMOTE LEARN
PENDING, PLEASE WAIT.
3. Repeat Step 2 two additional times. After the third time, all previously known
remote keys will no longer work with
the vehicle. Remaining remote keys can
be relearned during the next steps.
The DIC should now display READY FOR
REMOTE # 1.4. Place the new remote key into theremote key pocket with the buttons
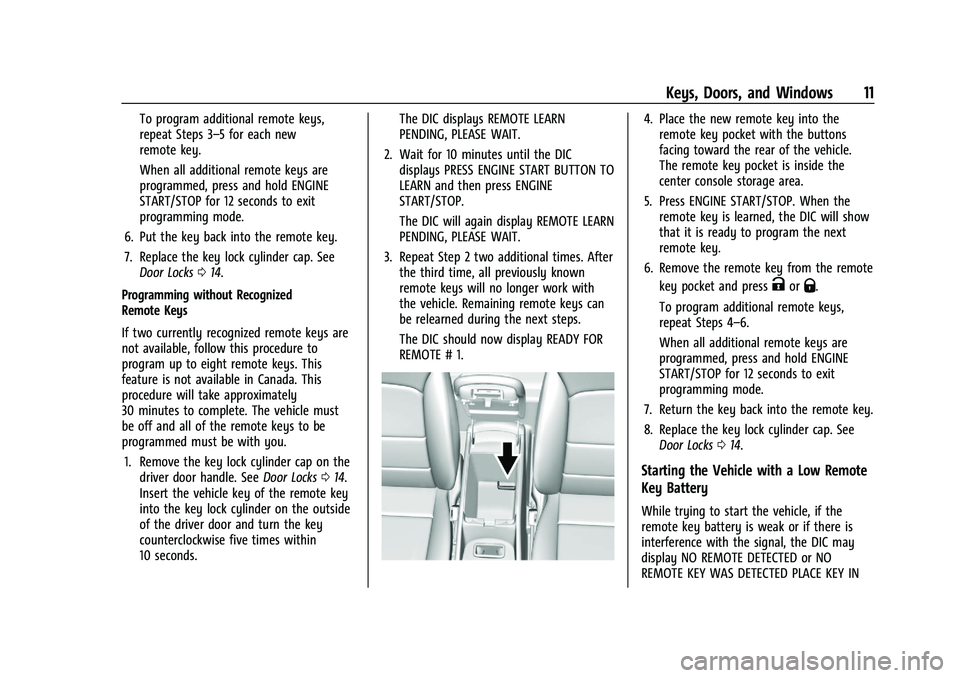
facing toward the rear of the vehicle.
The remote key pocket is inside the
center console storage area.
5. Press ENGINE START/STOP. When the remote key is learned, the DIC will show
that it is ready to program the next
remote key.
6. Remove the remote key from the remote key pocket and press
KorQ.
To program additional remote keys,
repeat Steps 4–6.
When all additional remote keys are
programmed, press and hold ENGINE
START/STOP for 12 seconds to exit
programming mode.
7. Return the key back into the remote key.
8. Replace the key lock cylinder cap. See Door Locks 014.
Starting the Vehicle with a Low Remote
Key Battery
While trying to start the vehicle, if the
remote key battery is weak or if there is
interference with the signal, the DIC may
display NO REMOTE DETECTED or NO
REMOTE KEY WAS DETECTED PLACE KEY IN
Page 13 of 332
Chevrolet Malibu Owner Manual (GMNA-Localizing-U.S./Canada-
16273584) - 2023 - CRC - 9/28/22
12 Keys, Doors, and Windows
TRANSMITTER POCKET THEN START YOUR
VEHICLE. The DIC may also display REPLACE
BATTERY IN REMOTE KEY.
To start the vehicle:1. Open the center console and place the remote key in the remote key pocket
with the buttons facing the rear of the
vehicle.
2. With the vehicle in P (Park) or N (Neutral), press the brake pedal and
press ENGINE START/STOP. See Starting
the Engine 0177.
Replace the remote key battery as soon
as possible.
Battery Replacement
{Warning
Never allow children to play with the
remote key. The remote key contains a
small battery, which can be a choking
hazard. If swallowed, internal burns can
occur, resulting in severe injury or death.
Seek medical attention immediately if a
battery is swallowed.
{Warning
To avoid personal injury, do not touch
metal surfaces on the remote key when
it has been exposed to extreme heat.
These surfaces can be hot to the touch at
temperatures above 59 °C (138 °F).
Caution
When replacing the battery, do not touch
any of the circuitry on the remote key.
Static from your body could damage the
remote key.
Caution
Always replace the battery with the
correct type. Replacing the battery with
an incorrect type could potentially create
a risk of battery explosion. Dispose of
used batteries according to instructions
and local laws. Do not attempt to burn,
crush, or cut the used battery, and avoid
exposing the battery to environments
with extremely low air pressures or high
temperatures.
Caution
If the remote key is not reassembled
properly, liquids could enter the housing
and damage the circuitry, resulting in a
remote key malfunction and/or failure. To
prevent damage, always follow the steps
for remote key reassembly in this manual
to ensure the remote key is sealed
properly whenever the remote key is
opened.
Replace the battery if the DIC displays
REPLACE BATTERY IN REMOTE KEY.
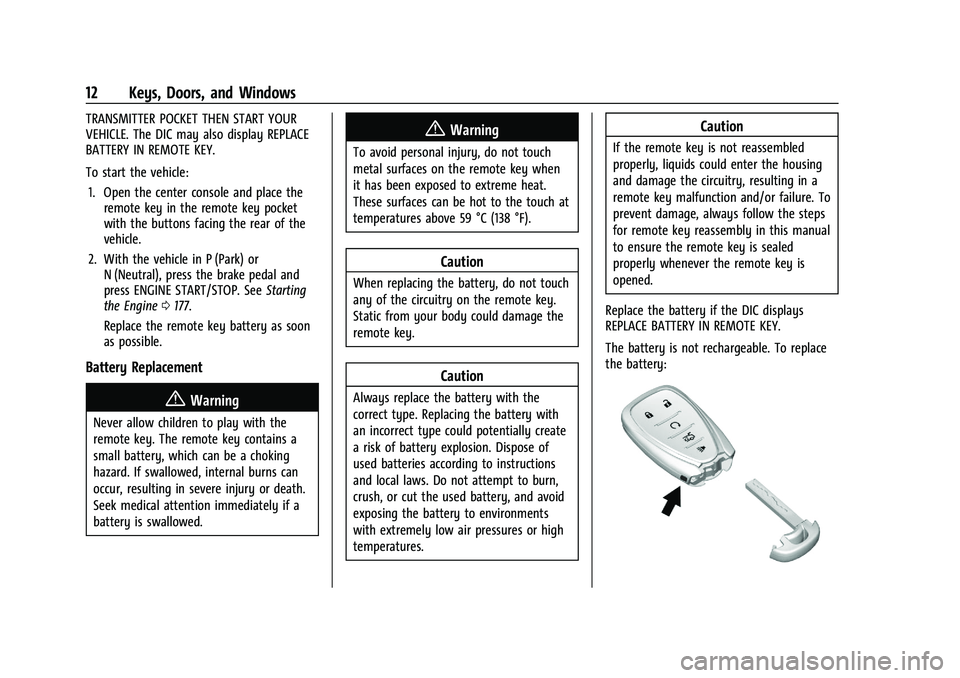
The battery is not rechargeable. To replace
the battery:
Page 18 of 332
Chevrolet Malibu Owner Manual (GMNA-Localizing-U.S./Canada-
16273584) - 2023 - CRC - 9/28/22
Keys, Doors, and Windows 17
Delayed locking can only be turned on when
the Open Door Anti-Lockout feature has
been turned off.
When
Qis pressed on the power door lock
switch with the door open, a chime will
sound three times indicating that delayed
locking is active.
The doors will then lock automatically
five seconds after all doors are closed. If a
door is reopened before five seconds have
elapsed, the five-second timer will reset once
all the doors are closed again.
Press
Qon the door lock switch again,
or press
Qon the RKE transmitter, to
override this feature and lock the doors
immediately.
Delayed locking can be programmed. To
view available settings for this feature,
touch the Settings icon on the infotainment
home page. Select “Vehicle”to display the
list of available options and select “Power
Door Locks”.
Automatic Door Locks
The doors will lock automatically when all
doors are closed, the ignition is on, and the
vehicle is shifted out of P (Park). If a vehicle door is unlocked, and then
opened and closed, the doors will lock either
when your foot is removed from the brake
or the vehicle speed becomes faster than
13 km/h (8 mph).
To unlock the doors:
.PressKon the power door lock switch.
.Shift the transmission into P (Park).
Automatic door locking cannot be disabled.
Automatic door unlocking can be
programmed. To view available settings for
this feature, touch the Settings icon on the
infotainment home page. Select “Vehicle”to
display the list of available options and
select “Power Door Locks”.
Lockout Protection
If the ignition is on or in accessory mode
and the power door lock switch is pressed
with the driver door open, all the doors will
lock and only the driver door will unlock.
If the vehicle is off and locking is requested
while a door is open, when all doors are
closed the vehicle will check for remote keys
inside. If an remote key is detected and the
number of remote keys inside has not
reduced, the driver door will unlock and the
horn will chirp three times. Lockout Protection can be manually
overridden with the driver door open by
pressing and holding
Qon the power door
lock switch.
Open Door Anti-Lockout
If Open Door Anti-Lockout has been turned
on and the vehicle is off, the driver door is
open, and locking is requested, all the doors
will lock and the driver door will remain
open. The Open Door Anti-Lockout feature
can be turned on or off. To view available
settings from the infotainment screen, touch
the Settings > Vehicle > Power Door Locks.
Safety Locks
The rear door safety locks prevent
passengers from opening the rear doors
from inside the vehicle.
Page 33 of 332
Chevrolet Malibu Owner Manual (GMNA-Localizing-U.S./Canada-
16273584) - 2023 - CRC - 9/28/22
32 Seats and Restraints
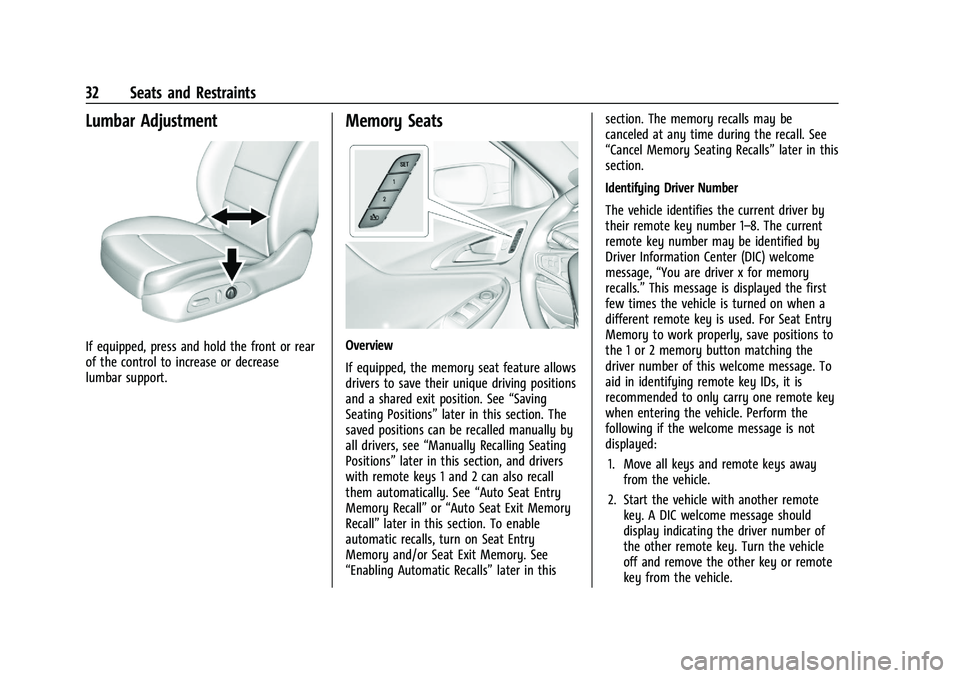
Lumbar Adjustment
If equipped, press and hold the front or rear
of the control to increase or decrease
lumbar support.
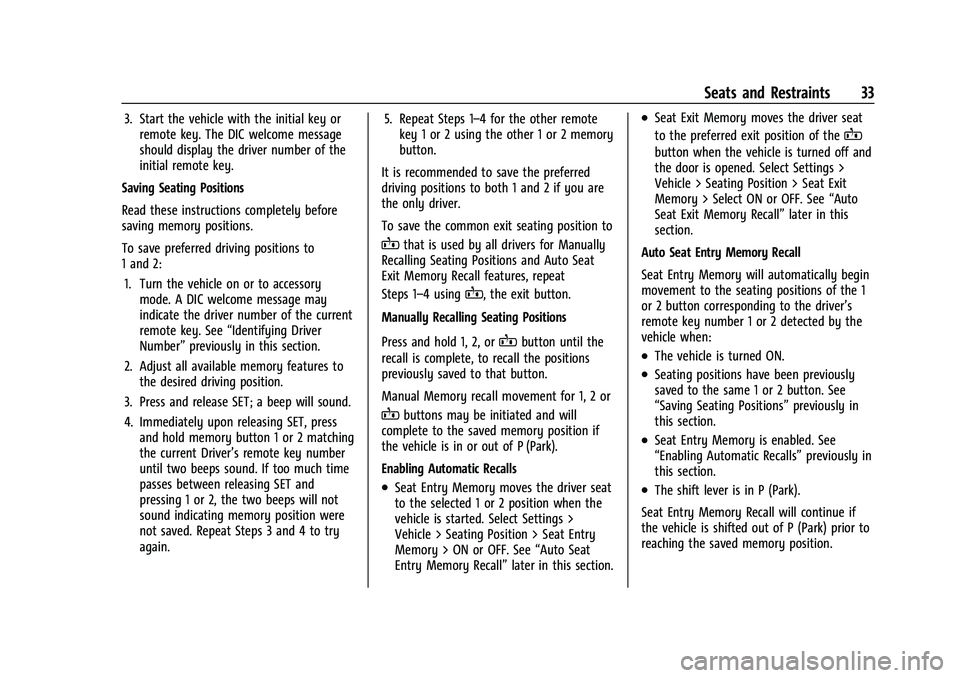
Memory Seats
Overview
If equipped, the memory seat feature allows
drivers to save their unique driving positions
and a shared exit position. See“Saving
Seating Positions” later in this section. The
saved positions can be recalled manually by
all drivers, see “Manually Recalling Seating
Positions” later in this section, and drivers
with remote keys 1 and 2 can also recall
them automatically. See “Auto Seat Entry
Memory Recall” or“Auto Seat Exit Memory
Recall” later in this section. To enable
automatic recalls, turn on Seat Entry
Memory and/or Seat Exit Memory. See
“Enabling Automatic Recalls” later in thissection. The memory recalls may be
canceled at any time during the recall. See
“Cancel Memory Seating Recalls”
later in this
section.
Identifying Driver Number
The vehicle identifies the current driver by
their remote key number 1–8. The current
remote key number may be identified by
Driver Information Center (DIC) welcome
message, “You are driver x for memory
recalls.” This message is displayed the first
few times the vehicle is turned on when a
different remote key is used. For Seat Entry
Memory to work properly, save positions to
the 1 or 2 memory button matching the
driver number of this welcome message. To
aid in identifying remote key IDs, it is
recommended to only carry one remote key
when entering the vehicle. Perform the
following if the welcome message is not
displayed:
1. Move all keys and remote keys away from the vehicle.
2. Start the vehicle with another remote key. A DIC welcome message should
display indicating the driver number of
the other remote key. Turn the vehicle
off and remove the other key or remote
key from the vehicle.
Page 34 of 332
Chevrolet Malibu Owner Manual (GMNA-Localizing-U.S./Canada-
16273584) - 2023 - CRC - 9/28/22
Seats and Restraints 33
3. Start the vehicle with the initial key orremote key. The DIC welcome message
should display the driver number of the
initial remote key.
Saving Seating Positions
Read these instructions completely before
saving memory positions.
To save preferred driving positions to
1 and 2: 1. Turn the vehicle on or to accessory mode. A DIC welcome message may
indicate the driver number of the current
remote key. See “Identifying Driver
Number” previously in this section.
2. Adjust all available memory features to the desired driving position.
3. Press and release SET; a beep will sound.
4. Immediately upon releasing SET, press and hold memory button 1 or 2 matching
the current Driver’s remote key number
until two beeps sound. If too much time
passes between releasing SET and
pressing 1 or 2, the two beeps will not
sound indicating memory position were
not saved. Repeat Steps 3 and 4 to try
again. 5. Repeat Steps 1–4 for the other remote
key 1 or 2 using the other 1 or 2 memory
button.
It is recommended to save the preferred
driving positions to both 1 and 2 if you are
the only driver.
To save the common exit seating position to
Bthat is used by all drivers for Manually
Recalling Seating Positions and Auto Seat
Exit Memory Recall features, repeat
Steps 1–4 using
B, the exit button.
Manually Recalling Seating Positions
Press and hold 1, 2, or
Bbutton until the
recall is complete, to recall the positions
previously saved to that button.
Manual Memory recall movement for 1, 2 or
Bbuttons may be initiated and will
complete to the saved memory position if
the vehicle is in or out of P (Park).
Enabling Automatic Recalls
.Seat Entry Memory moves the driver seat
to the selected 1 or 2 position when the
vehicle is started. Select Settings >
Vehicle > Seating Position > Seat Entry
Memory > ON or OFF. See “Auto Seat
Entry Memory Recall” later in this section.
.Seat Exit Memory moves the driver seat
to the preferred exit position of the
B
button when the vehicle is turned off and
the door is opened. Select Settings >
Vehicle > Seating Position > Seat Exit
Memory > Select ON or OFF. See “Auto
Seat Exit Memory Recall” later in this
section.
Auto Seat Entry Memory Recall
Seat Entry Memory will automatically begin
movement to the seating positions of the 1
or 2 button corresponding to the driver’s
remote key number 1 or 2 detected by the
vehicle when:
.The vehicle is turned ON.
.Seating positions have been previously
saved to the same 1 or 2 button. See
“Saving Seating Positions” previously in
this section.
.Seat Entry Memory is enabled. See
“Enabling Automatic Recalls” previously in
this section.
.The shift lever is in P (Park).
Seat Entry Memory Recall will continue if
the vehicle is shifted out of P (Park) prior to
reaching the saved memory position.
Page 36 of 332
Chevrolet Malibu Owner Manual (GMNA-Localizing-U.S./Canada-
16273584) - 2023 - CRC - 9/28/22
Seats and Restraints 35
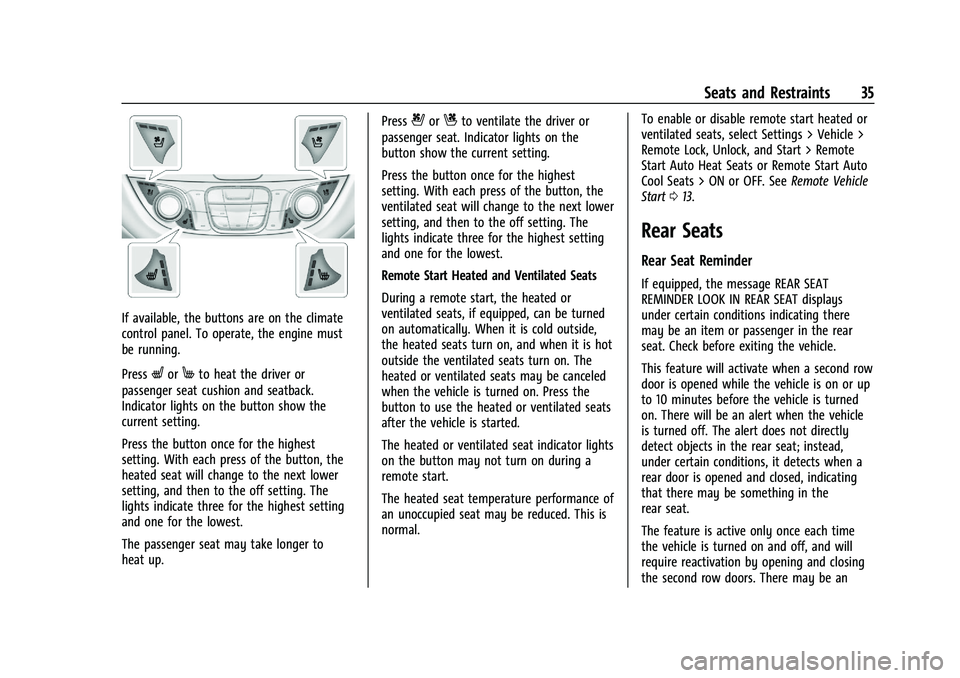
If available, the buttons are on the climate
control panel. To operate, the engine must
be running.
Press
LorMto heat the driver or
passenger seat cushion and seatback.
Indicator lights on the button show the
current setting.
Press the button once for the highest
setting. With each press of the button, the
heated seat will change to the next lower
setting, and then to the off setting. The
lights indicate three for the highest setting
and one for the lowest.
The passenger seat may take longer to
heat up. Press
{orCto ventilate the driver or
passenger seat. Indicator lights on the
button show the current setting.
Press the button once for the highest
setting. With each press of the button, the
ventilated seat will change to the next lower
setting, and then to the off setting. The
lights indicate three for the highest setting
and one for the lowest.
Remote Start Heated and Ventilated Seats
During a remote start, the heated or
ventilated seats, if equipped, can be turned
on automatically. When it is cold outside,
the heated seats turn on, and when it is hot
outside the ventilated seats turn on. The
heated or ventilated seats may be canceled
when the vehicle is turned on. Press the
button to use the heated or ventilated seats
after the vehicle is started.
The heated or ventilated seat indicator lights
on the button may not turn on during a
remote start.
The heated seat temperature performance of
an unoccupied seat may be reduced. This is
normal. To enable or disable remote start heated or
ventilated seats, select Settings > Vehicle >
Remote Lock, Unlock, and Start > Remote
Start Auto Heat Seats or Remote Start Auto
Cool Seats > ON or OFF. See
Remote Vehicle
Start 013.
Rear Seats
Rear Seat Reminder
If equipped, the message REAR SEAT
REMINDER LOOK IN REAR SEAT displays
under certain conditions indicating there
may be an item or passenger in the rear
seat. Check before exiting the vehicle.
This feature will activate when a second row
door is opened while the vehicle is on or up
to 10 minutes before the vehicle is turned
on. There will be an alert when the vehicle
is turned off. The alert does not directly
detect objects in the rear seat; instead,
under certain conditions, it detects when a
rear door is opened and closed, indicating
that there may be something in the
rear seat.
The feature is active only once each time
the vehicle is turned on and off, and will
require reactivation by opening and closing
the second row doors. There may be an
Page 40 of 332
Chevrolet Malibu Owner Manual (GMNA-Localizing-U.S./Canada-
16273584) - 2023 - CRC - 9/28/22
Seats and Restraints 39
If the vehicle is on and the brake pedal is
pressed with the vehicle in P (Park) but the
driver seat belt is not buckled, a message
displays in the Driver Information
Center (DIC) and the vehicle will be delayed
from shifting out of P (Park). Buckle the
driver seat belt to clear the message and
shift out of P (Park). Shifting from P (Park)
will be delayed once for each time the
vehicle is started.
For some fleet vehicles, the feature is
always ON and cannot be turned OFF in the
infotainment system. The vehicle will be
delayed from shifting from P (Park) each
time the driver attempts to do so while the
driver seat belt is not buckled. Turning the
vehicle off then on will not change this
condition.
On some models, Buckle to Drive may also
delay shifting out of P (Park) if a front
passenger seat belt is unbuckled. A message
displays in the DIC. Buckle the front
passenger seat belt to shift out of P (Park).
This feature may delay the vehicle from
shifting out of P (Park) if an object, such as
a briefcase, handbag, grocery bag, laptop,
or other electronic device, is on the frontpassenger seat. If this happens, remove the
object from the seat or buckle the seat belt
to shift out of P (Park).
If the driver, or on some vehicles, the
present front passenger remains unbuckled,
the DIC message will turn off after several
seconds and the vehicle can be shifted out
of P (Park). See
“Seat Belts”and“Child
Restraints” in the Index for information
about the importance of proper
restraint use.
If the driver seat belt or the front passenger
seat belt is unbuckled when driving, the seat
belt reminder chime and light(s) will come
on. See Seat Belt Reminders 085. This
feature may not function properly if the
airbag readiness light is on. See Airbag
Readiness Light 086.
How to Wear Seat Belts Properly
Follow these rules for everyone's protection.
There are additional things to know about
seat belts and children, including smaller
children and infants. If a child will be riding
in the vehicle, see Older Children054 or
Infants and Young Children 056. Review
and follow the rules for children in addition
to the following rules. It is very important for all occupants to
buckle up. Statistics show that unbelted
people are hurt more often in crashes than
those who are wearing seat belts.
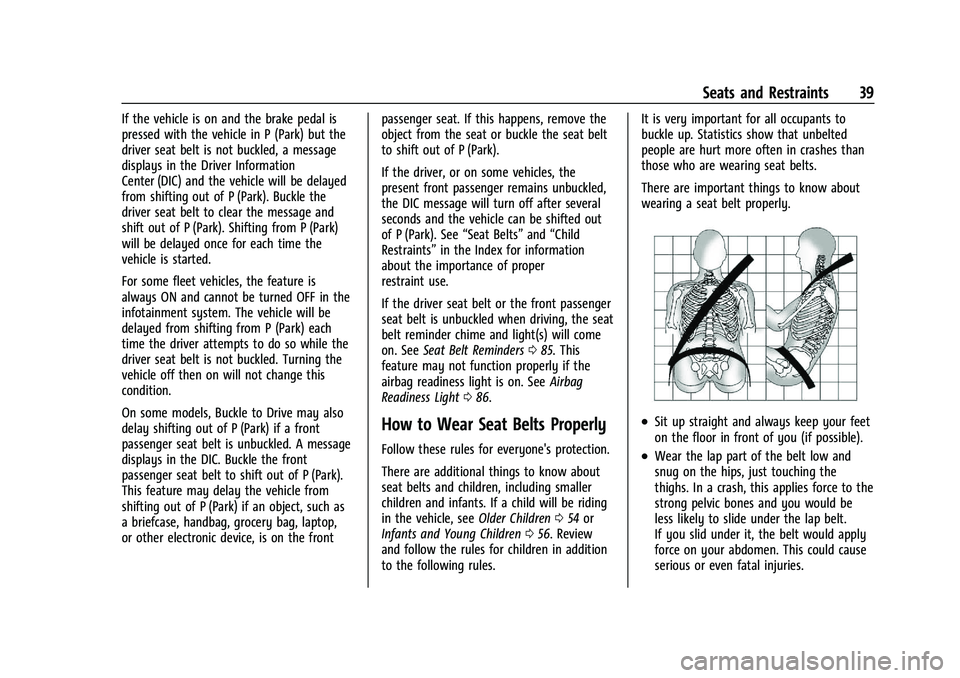
There are important things to know about
wearing a seat belt properly.
.Sit up straight and always keep your feet
on the floor in front of you (if possible).
.Wear the lap part of the belt low and
snug on the hips, just touching the
thighs. In a crash, this applies force to the
strong pelvic bones and you would be
less likely to slide under the lap belt.
If you slid under it, the belt would apply
force on your abdomen. This could cause
serious or even fatal injuries.
Page 75 of 332
Chevrolet Malibu Owner Manual (GMNA-Localizing-U.S./Canada-
16273584) - 2023 - CRC - 9/28/22
74 Instruments and Controls
Instruments and Controls
Controls
Steering Wheel Adjustment . . . . . . . . . . . . . 75
Steering Wheel Controls . . . . . . . . . . . . . . . . 75
Heated Steering Wheel . . . . . . . . . . . . . . . . . 75
Horn . . . . . . . . . . . . . . . . . . . . . . . . . . . . . . . . . . . . 75
Windshield Wiper/Washer . . . . . . . . . . . . . . 75
Clock . . . . . . . . . . . . . . . . . . . . . . . . . . . . . . . . . . . 76
Power Outlets . . . . . . . . . . . . . . . . . . . . . . . . . . 76
Wireless Charging . . . . . . . . . . . . . . . . . . . . . . 78
Warning Lights, Gauges, and Indicators
Warning Lights, Gauges, andIndicators . . . . . . . . . . . . . . . . . . . . . . . . . . . . 80
Instrument Cluster . . . . . . . . . . . . . . . . . . . . . 80
Speedometer . . . . . . . . . . . . . . . . . . . . . . . . . . . 82
Odometer . . . . . . . . . . . . . . . . . . . . . . . . . . . . . . 83
Trip Odometer . . . . . . . . . . . . . . . . . . . . . . . . . . 83
Tachometer . . . . . . . . . . . . . . . . . . . . . . . . . . . . 83
Fuel Gauge . . . . . . . . . . . . . . . . . . . . . . . . . . . . . 83
Engine Coolant Temperature Gauge . . . . 84
Voltmeter Gauge (Uplevel Cluster Only) . . . . . . . . . . . . . . . . . . . . . . . . . 85
Seat Belt Reminders . . . . . . . . . . . . . . . . . . . . 85
Airbag Readiness Light . . . . . . . . . . . . . . . . . 86
Passenger Airbag Status Indicator . . . . . . 87
Charging System Light . . . . . . . . . . . . . . . . . 87 Malfunction Indicator Lamp (Check
Engine Light) . . . . . . . . . . . . . . . . . . . . . . . . . 88
Brake System Warning Light . . . . . . . . . . . 89
Electric Parking Brake Light . . . . . . . . . . . . 90
Service Electric Parking Brake Light . . . . . 90
Antilock Brake System (ABS) Warning Light . . . . . . . . . . . . . . . . . . . . . . . . . . . . . . . . . 90
Lane Keep Assist (LKA) Light . . . . . . . . . . . . 91
Vehicle Ahead Indicator . . . . . . . . . . . . . . . . . 91
Pedestrian Ahead Indicator . . . . . . . . . . . . . 91
Traction Off Light . . . . . . . . . . . . . . . . . . . . . . . 91
StabiliTrak OFF Light . . . . . . . . . . . . . . . . . . . 92
Traction Control System (TCS)/StabiliTrak Light . . . . . . . . . . . . . . . . . . . . . . . . . . . . . . . . . . 92
Engine Coolant Temperature Warning Light (Uplevel Cluster Only) . . . . . . . . . . 92
Tire Pressure Light . . . . . . . . . . . . . . . . . . . . . . 93
Engine Oil Pressure Light . . . . . . . . . . . . . . . 93
Low Fuel Warning Light . . . . . . . . . . . . . . . . 94
Security Light . . . . . . . . . . . . . . . . . . . . . . . . . . 94
High-Beam On Light . . . . . . . . . . . . . . . . . . . . 94
Lamps On Reminder . . . . . . . . . . . . . . . . . . . . 95
Cruise Control Light . . . . . . . . . . . . . . . . . . . . 95
Door Ajar Light (Uplevel) . . . . . . . . . . . . . . . 95
Information Displays
Driver Information Center (DIC) (Base Level) . . . . . . . . . . . . . . . . . . . . . . . . . . . . . . . . . 95
Driver Information Center (DIC) (Uplevel) . . . . . . . . . . . . . . . . . . . . . . . . . . . . . 98
Vehicle Messages
Vehicle Messages . . . . . . . . . . . . . . . . . . . . . 100
Engine Power Messages . . . . . . . . . . . . . . . 101
Vehicle Speed Messages . . . . . . . . . . . . . . . 101
Page 76 of 332
Chevrolet Malibu Owner Manual (GMNA-Localizing-U.S./Canada-
16273584) - 2023 - CRC - 9/28/22
Instruments and Controls 75
Controls
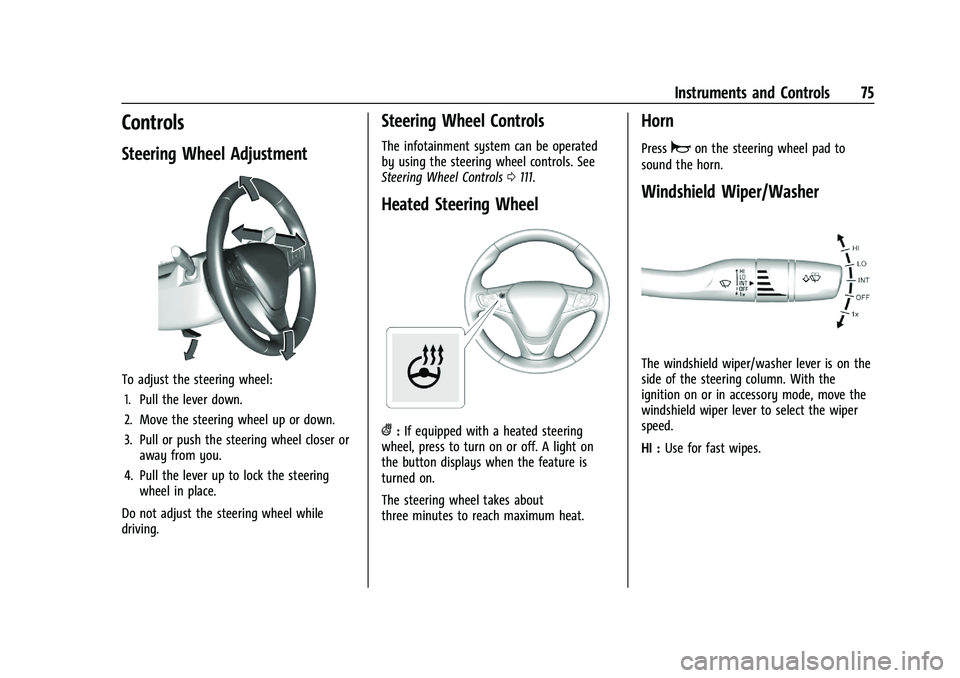
Steering Wheel Adjustment
To adjust the steering wheel:1. Pull the lever down.
2. Move the steering wheel up or down.
3. Pull or push the steering wheel closer or away from you.
4. Pull the lever up to lock the steering wheel in place.
Do not adjust the steering wheel while
driving.
Steering Wheel Controls
The infotainment system can be operated
by using the steering wheel controls. See
Steering Wheel Controls 0111.
Heated Steering Wheel
(:If equipped with a heated steering
wheel, press to turn on or off. A light on
the button displays when the feature is
turned on.
The steering wheel takes about
three minutes to reach maximum heat.
Horn
Pressaon the steering wheel pad to
sound the horn.
Windshield Wiper/Washer
The windshield wiper/washer lever is on the
side of the steering column. With the
ignition on or in accessory mode, move the
windshield wiper lever to select the wiper
speed.
HI : Use for fast wipes.