air filter CHEVROLET MALIBU LIMITED 2016 8.G Owners Manual
[x] Cancel search | Manufacturer: CHEVROLET, Model Year: 2016, Model line: MALIBU LIMITED, Model: CHEVROLET MALIBU LIMITED 2016 8.GPages: 360, PDF Size: 6.15 MB
Page 168 of 360
Chevrolet Malibu Limited Owner Manual (GMNA-Localizing-U.S/Canada-
9086425) - 2016 - crc - 7/30/15
Climate Controls 167
Climate Controls
Climate Control Systems
Climate Control Systems . . . . . 167
Dual Automatic ClimateControl System . . . . . . . . . . . . . 170
Air Vents
Air Vents . . . . . . . . . . . . . . . . . . . . . 173
Maintenance
Passenger Compartment AirFilter . . . . . . . . . . . . . . . . . . . . . . . . 174
Service . . . . . . . . . . . . . . . . . . . . . . . 175
Climate Control Systems
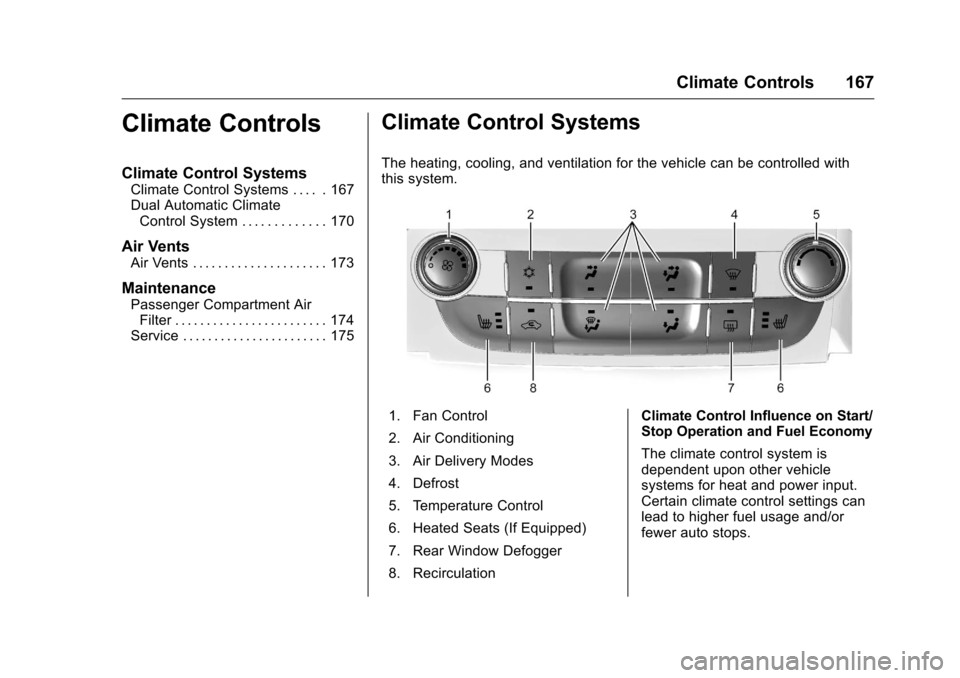
The heating, cooling, and ventilation for the vehicle can be controlled with
this system.
1. Fan Control
2. Air Conditioning
3. Air Delivery Modes
4. Defrost
5. Temperature Control
6. Heated Seats (If Equipped)
7. Rear Window Defogger
8. Recirculation Climate Control Influence on Start/
Stop Operation and Fuel Economy
The climate control system is
dependent upon other vehicle
systems for heat and power input.
Certain climate control settings can
lead to higher fuel usage and/or
fewer auto stops.
Page 175 of 360
Chevrolet Malibu Limited Owner Manual (GMNA-Localizing-U.S/Canada-
9086425) - 2016 - crc - 7/30/15
174 Climate Controls
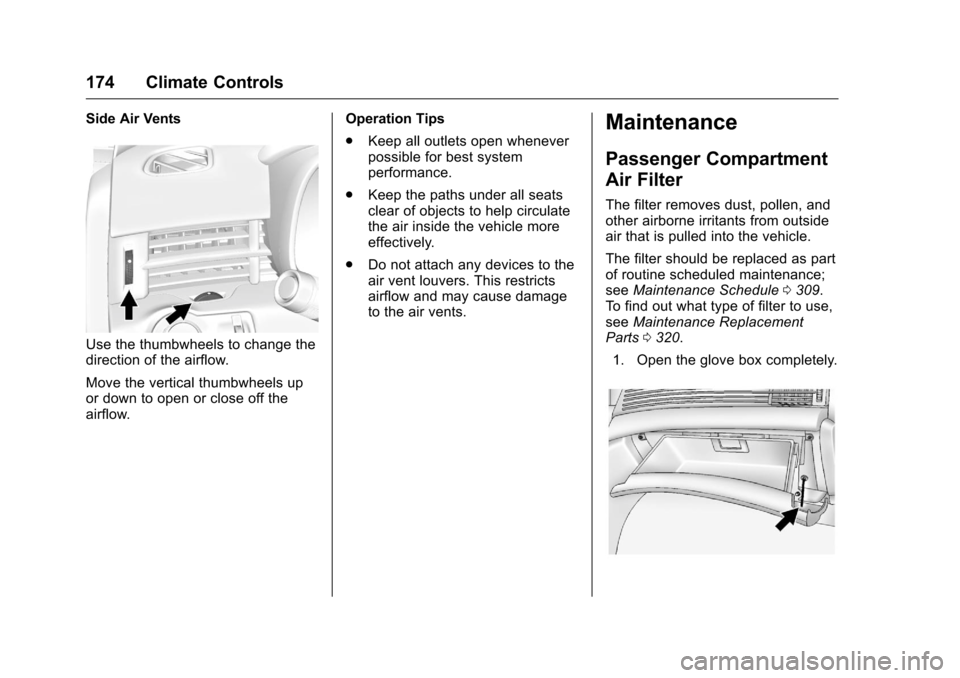
Side Air Vents
Use the thumbwheels to change the
direction of the airflow.
Move the vertical thumbwheels up
or down to open or close off the
airflow.Operation Tips
.
Keep all outlets open whenever
possible for best system
performance.
. Keep the paths under all seats
clear of objects to help circulate
the air inside the vehicle more
effectively.
. Do not attach any devices to the
air vent louvers. This restricts
airflow and may cause damage
to the air vents.
Maintenance
Passenger Compartment
Air Filter
The filter removes dust, pollen, and
other airborne irritants from outside
air that is pulled into the vehicle.
The filter should be replaced as part
of routine scheduled maintenance;
see Maintenance Schedule 0309.
To find out what type of filter to use,
see Maintenance Replacement
Parts 0320.
1. Open the glove box completely.
Page 176 of 360
Chevrolet Malibu Limited Owner Manual (GMNA-Localizing-U.S/Canada-
9086425) - 2016 - crc - 7/30/15
Climate Controls 175
2. Disconnect the glove box doordampener string from the glove
box door assembly. A pen or
pencil may be inserted through
the end of the dampener string
to prevent the string from
slipping inside the door
assembly.
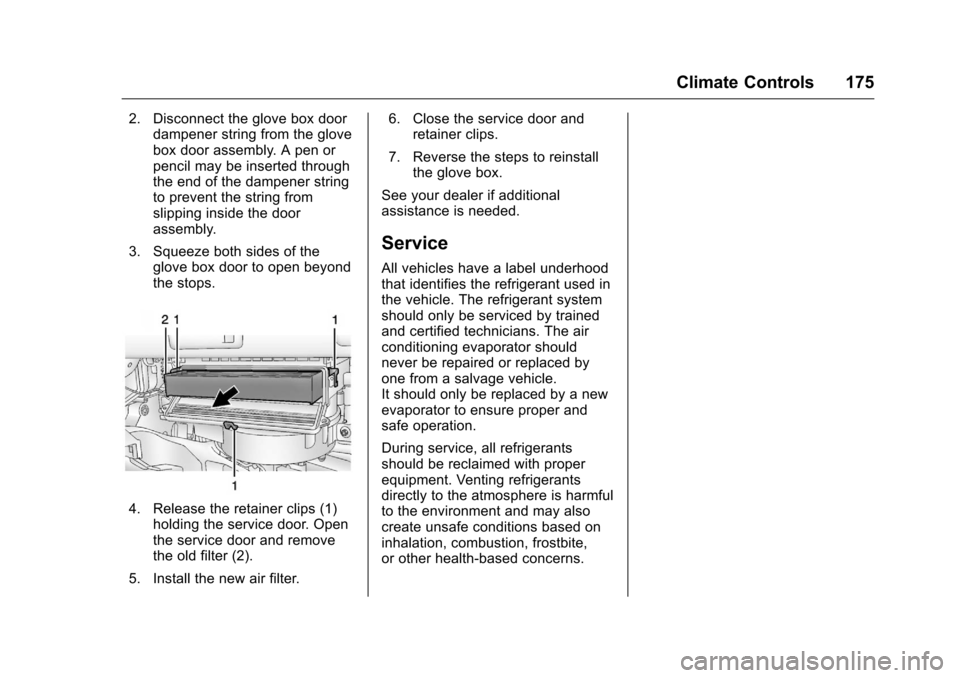
3. Squeeze both sides of the glove box door to open beyond
the stops.
4. Release the retainer clips (1)holding the service door. Open
the service door and remove
the old filter (2).
5. Install the new air filter. 6. Close the service door and
retainer clips.
7. Reverse the steps to reinstall the glove box.
See your dealer if additional
assistance is needed.
Service
All vehicles have a label underhood
that identifies the refrigerant used in
the vehicle. The refrigerant system
should only be serviced by trained
and certified technicians. The air
conditioning evaporator should
never be repaired or replaced by
one from a salvage vehicle.
It should only be replaced by a new
evaporator to ensure proper and
safe operation.
During service, all refrigerants
should be reclaimed with proper
equipment. Venting refrigerants
directly to the atmosphere is harmful
to the environment and may also
create unsafe conditions based on
inhalation, combustion, frostbite,
or other health-based concerns.
Page 226 of 360
Chevrolet Malibu Limited Owner Manual (GMNA-Localizing-U.S/Canada-
9086425) - 2016 - crc - 7/30/15
Vehicle Care 225
Vehicle Care
General Information
General Information . . . . . . . . . . 226
California Proposition65 Warning . . . . . . . . . . . . . . . . . 226
California Perchlorate Materials Requirements . . . . . 226
Accessories and Modifications . . . . . . . . . . . . . . . . 226
Vehicle Checks
Doing Your OwnService Work . . . . . . . . . . . . . . . 227
Hood . . . . . . . . . . . . . . . . . . . . . . . . . 227
Engine Compartment Overview . . . . . . . . . . . . . . . . . . . . 229
Engine Oil . . . . . . . . . . . . . . . . . . . . 230
Engine Oil Life System . . . . . . . 232
Automatic Transmission Fluid . . . . . . . . . . . . . . . . . . . . . . . . 233
Engine Air Cleaner/Filter . . . . . . 233
Cooling System . . . . . . . . . . . . . . 234
Engine Coolant . . . . . . . . . . . . . . . 235
Engine Overheating . . . . . . . . . . 238
Washer Fluid . . . . . . . . . . . . . . . . . 239
Brakes . . . . . . . . . . . . . . . . . . . . . . . 240
Brake Fluid . . . . . . . . . . . . . . . . . . . 240
Battery - North America . . . . . . 241
Starter Switch Check . . . . . . . . . 243 Automatic Transmission Shift
Lock Control Function
Check . . . . . . . . . . . . . . . . . . . . . . . 243
Ignition Transmission Lock Check . . . . . . . . . . . . . . . . . . . . . . . 243
Park Brake and P (Park) Mechanism Check . . . . . . . . . . 243
Wiper Blade Replacement . . . . 244
Headlamp Aiming
Headlamp Aiming . . . . . . . . . . . . 245
Bulb Replacement
Bulb Replacement . . . . . . . . . . . . 245
Halogen Bulbs . . . . . . . . . . . . . . . . 245
High Intensity Discharge (HID) Lighting . . . . . . . . . . . . . . . . . . . . . 245
LED Lighting . . . . . . . . . . . . . . . . . 245
Headlamps, Front Turn Signal, Sidemarker, and Parking
Lamps . . . . . . . . . . . . . . . . . . . . . . 246
Fog Lamps . . . . . . . . . . . . . . . . . . . 248
Taillamps, Turn Signal, Stoplamps, and Back-Up
Lamps (LS and LT) . . . . . . . . . . 249
Taillamps, Turn Signal, Stoplamps, and Back-Up
Lamps (LTZ) . . . . . . . . . . . . . . . . 250
License Plate Lamp . . . . . . . . . . 251
Replacement Bulbs . . . . . . . . . . . 252
Electrical System
High Voltage Devices and
Wiring . . . . . . . . . . . . . . . . . . . . . . . 253
Electrical System Overload . . . 253
Fuses . . . . . . . . . . . . . . . . . . . . . . . . 253
Engine Compartment Fuse Block . . . . . . . . . . . . . . . . . . . . . . . . 254
Instrument Panel Fuse Block . . . . . . . . . . . . . . . . . . . . . . . . 258
Wheels and Tires
Tires . . . . . . . . . . . . . . . . . . . . . . . . . . 260
All-Season Tires . . . . . . . . . . . . . . 261
Winter Tires . . . . . . . . . . . . . . . . . . 261
Summer Tires . . . . . . . . . . . . . . . . 261
Tire Sidewall Labeling . . . . . . . . 262
Tire Designations . . . . . . . . . . . . . 264
Tire Terminology andDefinitions . . . . . . . . . . . . . . . . . . 264
Tire Pressure . . . . . . . . . . . . . . . . . 267
Tire Pressure for High-Speed Operation . . . . . . . . . . . . . . . . . . . 268
Tire Pressure Monitor System . . . . . . . . . . . . . . . . . . . . . . 269
Tire Pressure Monitor Operation . . . . . . . . . . . . . . . . . . . 270
Tire Inspection . . . . . . . . . . . . . . . . 273
Tire Rotation . . . . . . . . . . . . . . . . . 273
When It Is Time for New Tires . . . . . . . . . . . . . . . . . . . . . . . . 274
Buying New Tires . . . . . . . . . . . . . 275
Page 231 of 360
Chevrolet Malibu Limited Owner Manual (GMNA-Localizing-U.S/Canada-
9086425) - 2016 - crc - 7/30/15
230 Vehicle Care
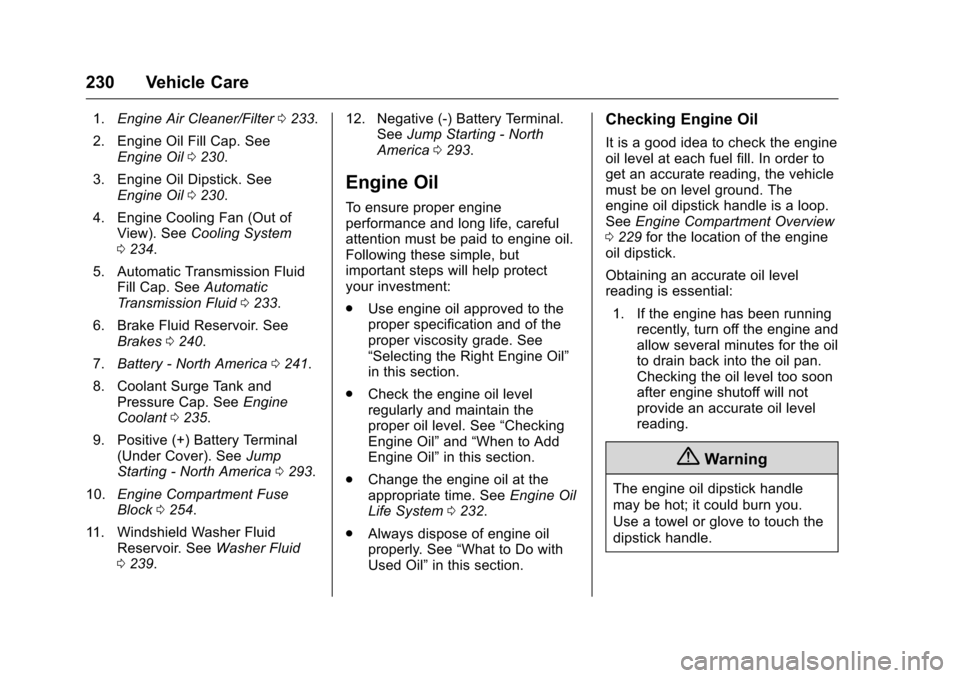
1.Engine Air Cleaner/Filter 0233.
2. Engine Oil Fill Cap. See Engine Oil 0230.
3. Engine Oil Dipstick. See Engine Oil 0230.
4. Engine Cooling Fan (Out of View). See Cooling System
0 234.
5. Automatic Transmission Fluid Fill Cap. See Automatic
Transmission Fluid 0233.
6. Brake Fluid Reservoir. See Brakes 0240.
7. Battery - North America 0241.
8. Coolant Surge Tank and Pressure Cap. See Engine
Coolant 0235.
9. Positive (+) Battery Terminal (Under Cover). See Jump
Starting - North America 0293.
10. Engine Compartment Fuse
Block 0254.
11. Windshield Washer Fluid Reservoir. See Washer Fluid
0 239. 12. Negative (-) Battery Terminal.
SeeJump Starting - North
America 0293.
Engine Oil
To ensure proper engine
performance and long life, careful
attention must be paid to engine oil.
Following these simple, but
important steps will help protect
your investment:
.
Use engine oil approved to the
proper specification and of the
proper viscosity grade. See
“Selecting the Right Engine Oil”
in this section.
. Check the engine oil level
regularly and maintain the
proper oil level. See “Checking
Engine Oil” and“When to Add
Engine Oil” in this section.
. Change the engine oil at the
appropriate time. See Engine Oil
Life System 0232.
. Always dispose of engine oil
properly. See “What to Do with
Used Oil” in this section.
Checking Engine Oil
It is a good idea to check the engine
oil level at each fuel fill. In order to
get an accurate reading, the vehicle
must be on level ground. The
engine oil dipstick handle is a loop.
SeeEngine Compartment Overview
0 229 for the location of the engine
oil dipstick.
Obtaining an accurate oil level
reading is essential:
1. If the engine has been running recently, turn off the engine and
allow several minutes for the oil
to drain back into the oil pan.
Checking the oil level too soon
after engine shutoff will not
provide an accurate oil level
reading.
{Warning
The engine oil dipstick handle
may be hot; it could burn you.
Use a towel or glove to touch the
dipstick handle.
Page 234 of 360
Chevrolet Malibu Limited Owner Manual (GMNA-Localizing-U.S/Canada-
9086425) - 2016 - crc - 7/30/15
Vehicle Care 233
How to Reset the Engine Oil
Life System
Reset the system whenever the
engine oil is changed so that the
system can calculate the next
engine oil change. To reset the
system:1. Turn the ignition to ON/RUN with the engine off.
2. Press the DIC MENU button on the turn signal lever to enter
the Vehicle Information Menu.
Use the thumbwheel to scroll
through the menu items until
you reach REMAINING
OIL LIFE.
3. Press the SET/CLR button to reset the oil life at 100%.
4. Turn the ignition to LOCK/OFF.
The system is reset when the
CHANGE ENGINE OIL SOON
message is off and the REMAINING
OIL LIFE 100% message is
displayed. If the CHANGE ENGINE OIL SOON
message comes back on when the
vehicle is started, the engine oil life
system has not been reset. Repeat
the procedure.
Automatic Transmission
Fluid
It is not necessary to check the
transmission fluid level.
A transmission fluid leak is the only
reason for fluid loss. If a leak
occurs, take the vehicle to your
dealer and have it repaired as soon
as possible.
Change the fluid at the intervals
listed in
Maintenance Schedule
0 309, and be sure to use the fluid
listed in Recommended Fluids and
Lubricants 0319.
Engine Air Cleaner/Filter
The engine air cleaner/filter is in the
engine compartment on the
passenger side of the vehicle. See
Engine Compartment Overview
0229.
When to Inspect the Engine Air
Cleaner/Filter
For intervals on changing and
inspecting the engine air cleaner/
filter, see Maintenance Schedule
0 309.
How to Inspect the Engine Air
Cleaner/Filter
Do not start the engine or have the
engine running with the engine air
cleaner/filter housing open. Before
removing the engine air cleaner/
filter, make sure that the engine air
cleaner/filter housing and nearby
components are free of dirt and
debris. Remove the engine air
cleaner/filter. Lightly tap and shake
the engine air cleaner/filter (away
from the vehicle), to release loose
dust and dirt. Inspect the engine air
cleaner/filter for damage, and
replace if damaged. Do not clean
the engine air cleaner/filter or
components with water or
compressed air.
Page 235 of 360
Chevrolet Malibu Limited Owner Manual (GMNA-Localizing-U.S/Canada-
9086425) - 2016 - crc - 7/30/15
234 Vehicle Care
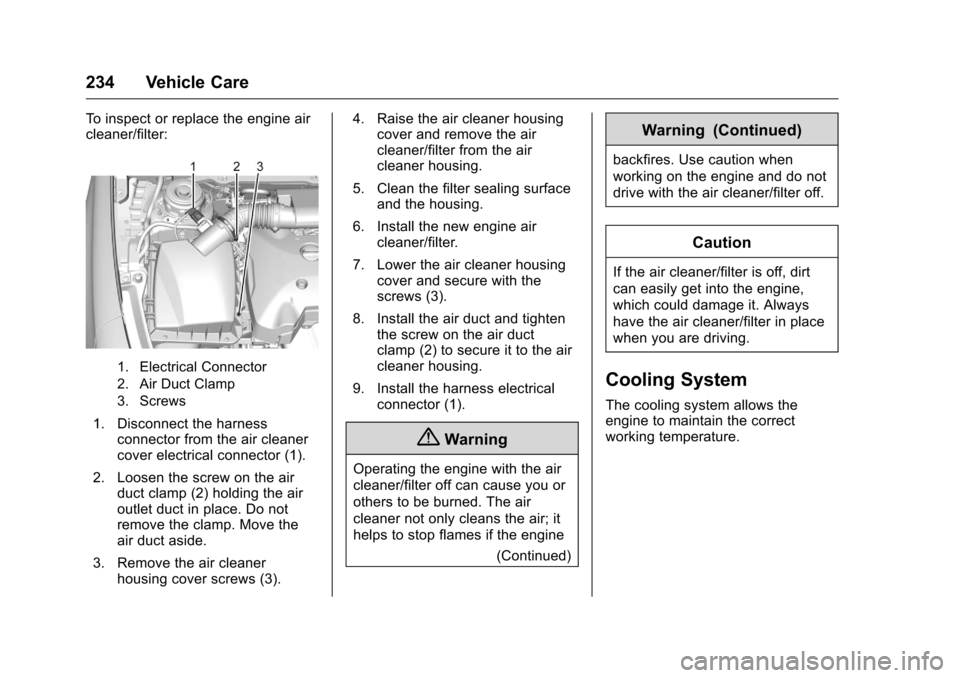
To inspect or replace the engine air
cleaner/filter:
1. Electrical Connector
2. Air Duct Clamp
3. Screws
1. Disconnect the harnessconnector from the air cleaner
cover electrical connector (1).
2. Loosen the screw on the air duct clamp (2) holding the air
outlet duct in place. Do not
remove the clamp. Move the
air duct aside.
3. Remove the air cleaner housing cover screws (3). 4. Raise the air cleaner housing
cover and remove the air
cleaner/filter from the air
cleaner housing.
5. Clean the filter sealing surface and the housing.
6. Install the new engine air cleaner/filter.
7. Lower the air cleaner housing cover and secure with the
screws (3).
8. Install the air duct and tighten the screw on the air duct
clamp (2) to secure it to the air
cleaner housing.
9. Install the harness electrical connector (1).
{Warning
Operating the engine with the air
cleaner/filter off can cause you or
others to be burned. The air
cleaner not only cleans the air; it
helps to stop flames if the engine
(Continued)
Warning (Continued)
backfires. Use caution when
working on the engine and do not
drive with the air cleaner/filter off.
Caution
If the air cleaner/filter is off, dirt
can easily get into the engine,
which could damage it. Always
have the air cleaner/filter in place
when you are driving.
Cooling System
The cooling system allows the
engine to maintain the correct
working temperature.
Page 311 of 360
Chevrolet Malibu Limited Owner Manual (GMNA-Localizing-U.S/Canada-
9086425) - 2016 - crc - 7/30/15
310 Service and Maintenance
a year and the oil life system must
be reset. Your trained dealer
technician can perform this work.
If the engine oil life system is reset
accidentally, service the vehicle
within 5 000 km/3,000 mi since the
last service. Reset the oil life
system when the oil is changed.
SeeEngine Oil Life System 0232.
Tire Rotation and Required
Services Every 12 000 km/
7,500 mi
Rotate the tires, if recommended for
the vehicle, and perform the
following services. See Tire
Rotation 0273.
. Check engine oil level and oil
life percentage. If needed,
change engine oil and filter, and
reset oil life system. See Engine
Oil 0230 andEngine Oil Life
System 0232. .
Check engine coolant level. See
Engine Coolant 0235.
. Check windshield washer fluid
level. See Washer Fluid 0239.
. Visually inspect windshield wiper
blades for wear, cracking,
or contamination. See Exterior
Care 0298. Replace worn or
damaged wiper blades. See
Wiper Blade Replacement
0 244.
. Check tire inflation pressures.
See Tire Pressure 0267.
. Inspect tire wear. See Tire
Inspection 0273.
. Visually check for fluid leaks.
. Inspect engine air cleaner filter.
See Engine Air Cleaner/Filter
0 233.
. Inspect brake system. See
Exterior Care 0298. .
Visually inspect steering,
suspension, and chassis
components for damaged, loose,
or missing parts or signs of
wear. See Exterior Care 0298.
. Check restraint system
components. See Safety System
Check 061.
. Visually inspect fuel system for
damage or leaks.
. Visually inspect exhaust system
and nearby heat shields for
loose or damaged parts.
. Lubricate body components. See
Exterior Care 0298.
. Check starter switch. See Starter
Switch Check 0243.
. Check automatic transmission
shift lock control function. See
Automatic Transmission Shift
Lock Control Function Check
0243.
Page 313 of 360
Chevrolet Malibu Limited Owner Manual (GMNA-Localizing-U.S/Canada-
9086425) - 2016 - crc - 7/30/15
312 Service and Maintenance
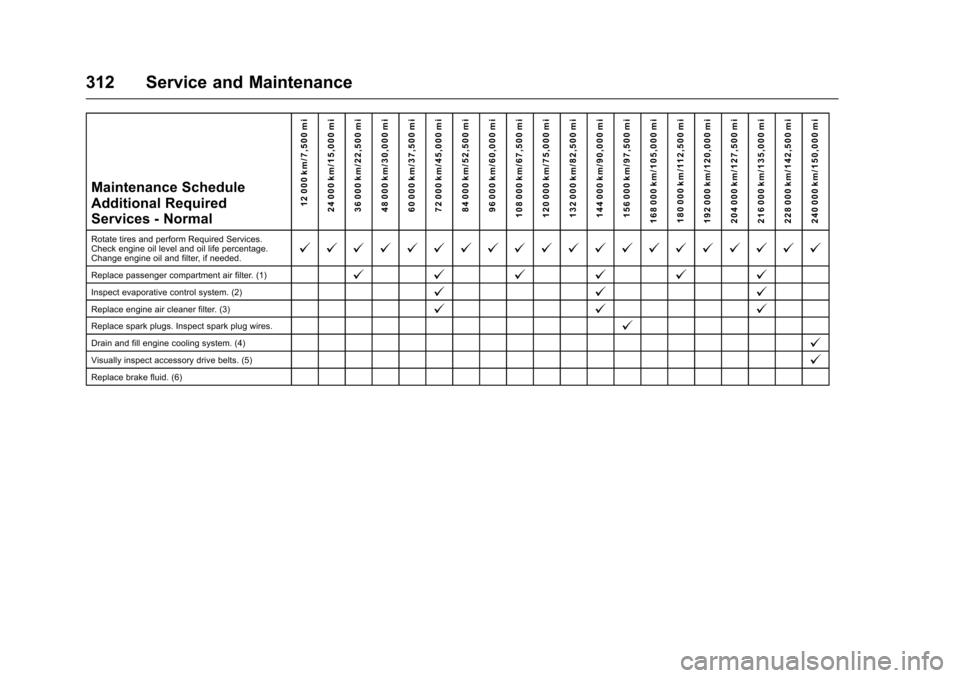
Maintenance Schedule
Additional Required
Services - Normal12 000 km/7,500 mi
24 000 km/15,000 mi
36 000 km/22,500 mi
48 000 km/30,000 mi
60 000 km/37,500 mi
72 000 km/45,000 mi
84 000 km/52,500 mi
96 000 km/60,000 mi
108 000 km/67,500 mi
120 000 km/75,000 mi
132 000 km/82,500 mi
144 000 km/90,000 mi
156 000 km/97,500 mi
168 000 km/105,000 mi 180 000 km/112,500 mi
192 000 km/120,000 mi
204 000 km/127,500 mi
216 000 km/135,000 mi
228 000 km/142,500 mi
240 000 km/150,000 mi
Rotate tires and perform Required Services.
Check engine oil level and oil life percentage.
Change engine oil and filter, if needed.@ @ @ @ @ @ @ @ @ @ @ @ @ @ @ @ @ @ @ @
Replace passenger compartment air filter. (1)@ @@@@@
Inspect evaporative control system. (2)@ @@
Replace engine air cleaner filter. (3)@@@
Replace spark plugs. Inspect spark plug wires.@
Drain and fill engine cooling system. (4)@
Visually inspect accessory drive belts. (5)@
Replace brake fluid. (6)
Page 314 of 360
Chevrolet Malibu Limited Owner Manual (GMNA-Localizing-U.S/Canada-
9086425) - 2016 - crc - 7/30/15
Service and Maintenance 313
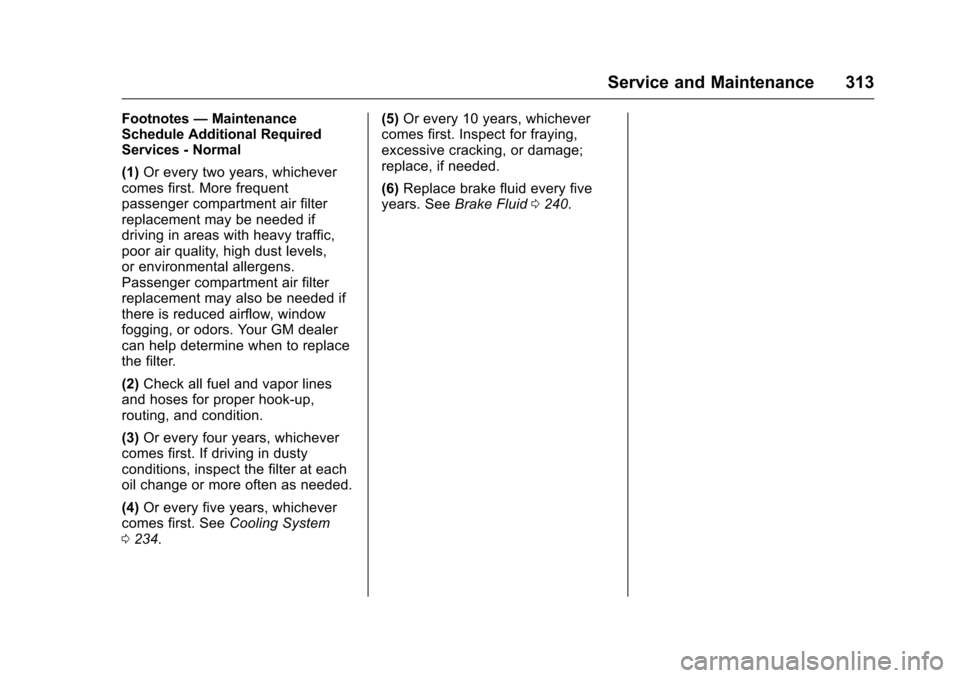
Footnotes—Maintenance
Schedule Additional Required
Services - Normal
(1) Or every two years, whichever
comes first. More frequent
passenger compartment air filter
replacement may be needed if
driving in areas with heavy traffic,
poor air quality, high dust levels,
or environmental allergens.
Passenger compartment air filter
replacement may also be needed if
there is reduced airflow, window
fogging, or odors. Your GM dealer
can help determine when to replace
the filter.
(2) Check all fuel and vapor lines
and hoses for proper hook-up,
routing, and condition.
(3) Or every four years, whichever
comes first. If driving in dusty
conditions, inspect the filter at each
oil change or more often as needed.
(4) Or every five years, whichever
comes first. See Cooling System
0 234. (5)
Or every 10 years, whichever
comes first. Inspect for fraying,
excessive cracking, or damage;
replace, if needed.
(6) Replace brake fluid every five
years. See Brake Fluid 0240.