3800 engine CHEVROLET MONTE CARLO 2003 6.G User Guide
[x] Cancel search | Manufacturer: CHEVROLET, Model Year: 2003, Model line: MONTE CARLO, Model: CHEVROLET MONTE CARLO 2003 6.GPages: 394, PDF Size: 2.73 MB
Page 267 of 394

As in the chart shown previously, if you have the
3400 V6 engine, SAE 5W-30 is the only viscosity grade
recommended for your vehicle. You should look for
and use only oils which have the API Starburst symbol
and which are also identi®ed as SAE 5W-30. If you
cannot ®nd such SAE 5W-30 oils, you can use an
SAE 10W-30 oil which has the API Starburst symbol, if
it's going to be 0ÉF (-18ÉC) or above. Do not use
other viscosity grade oils, such as SAE 10W-40 or
SAE 20W-50 under any conditions.
As shown in the following chart, if you have the
3800 V6 engine, SAE 10W-30 is the viscosity grade
recommended for your vehicle. However, you can use
SAE 5W-30 if it's going to be colder than 60ÉF
(16ÉC) before your next oil change. When it's very cold,
colder than 0ÉF (-18ÉC), you should use an SAE 5W-30
oil. These numbers on an oil container show its
viscosity, or thickness. Do not use other viscosity grade
oils, such as SAE 10W-40 or SAE 20W-50 under any
conditions.
3800 (Code K) V6 Engine
5-19
Page 273 of 394
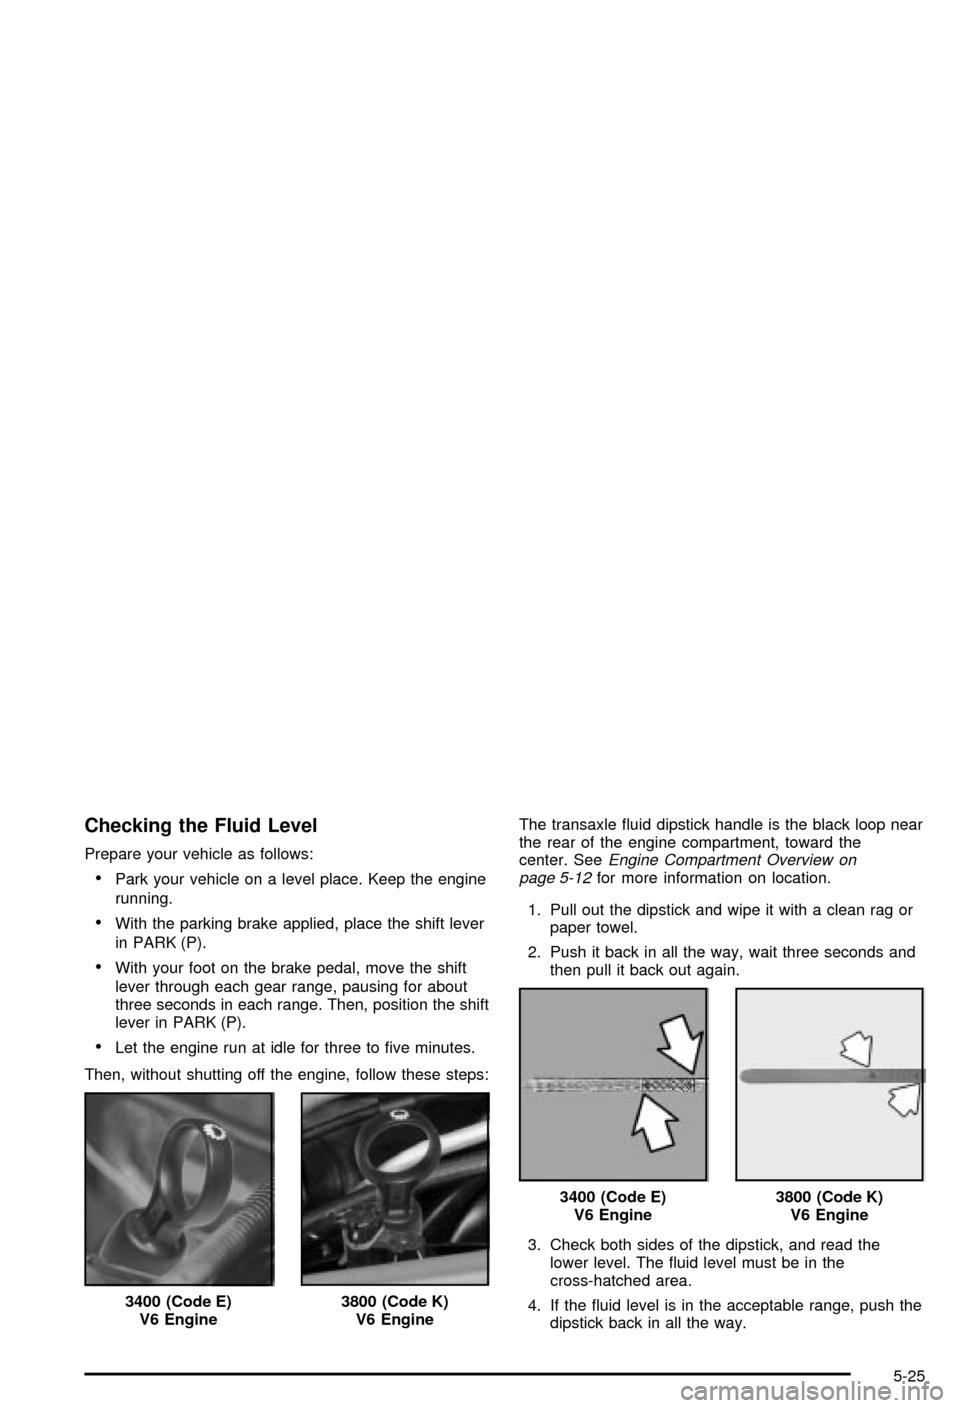
Checking the Fluid Level
Prepare your vehicle as follows:
·Park your vehicle on a level place. Keep the engine
running.
·With the parking brake applied, place the shift lever
in PARK (P).
·With your foot on the brake pedal, move the shift
lever through each gear range, pausing for about
three seconds in each range. Then, position the shift
lever in PARK (P).
·Let the engine run at idle for three to ®ve minutes.
Then, without shutting off the engine, follow these steps:The transaxle ¯uid dipstick handle is the black loop near
the rear of the engine compartment, toward the
center. See
Engine Compartment Overview on
page 5-12for more information on location.
1. Pull out the dipstick and wipe it with a clean rag or
paper towel.
2. Push it back in all the way, wait three seconds and
then pull it back out again.
3. Check both sides of the dipstick, and read the
lower level. The ¯uid level must be in the
cross-hatched area.
4. If the ¯uid level is in the acceptable range, push the
dipstick back in all the way. 3400 (Code E)
V6 Engine
3800 (Code K)
V6 Engine
3400 (Code E)
V6 Engine3800 (Code K)
V6 Engine
5-25
Page 280 of 394
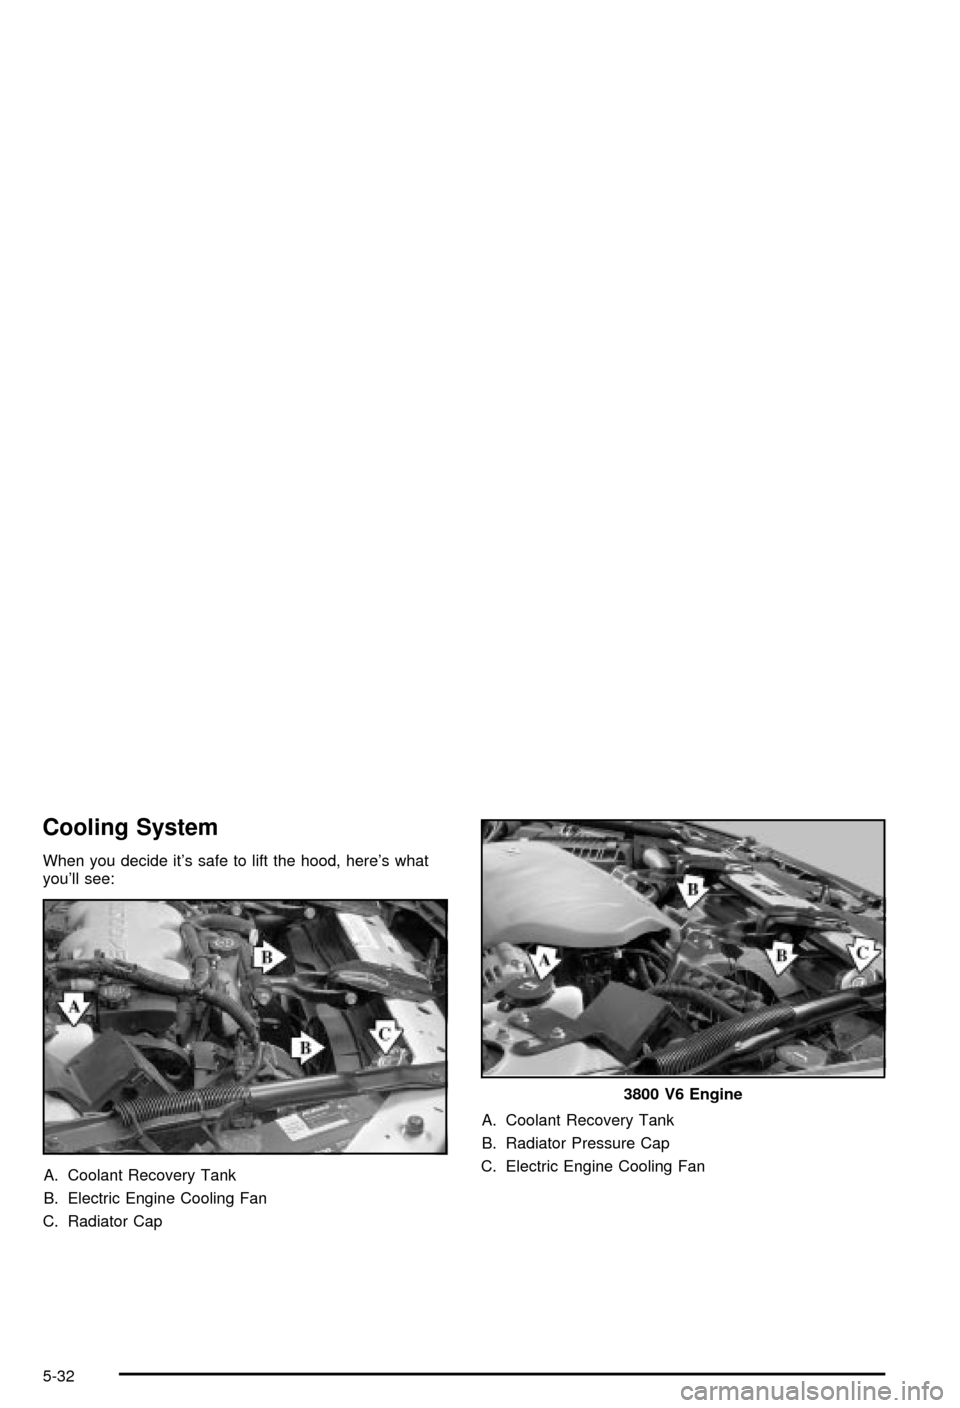
Cooling System
When you decide it's safe to lift the hood, here's what
you'll see:
A. Coolant Recovery Tank
B. Electric Engine Cooling Fan
C. Radiator CapA. Coolant Recovery Tank
B. Radiator Pressure Cap
C. Electric Engine Cooling Fan
3800 V6 Engine
5-32
Page 286 of 394
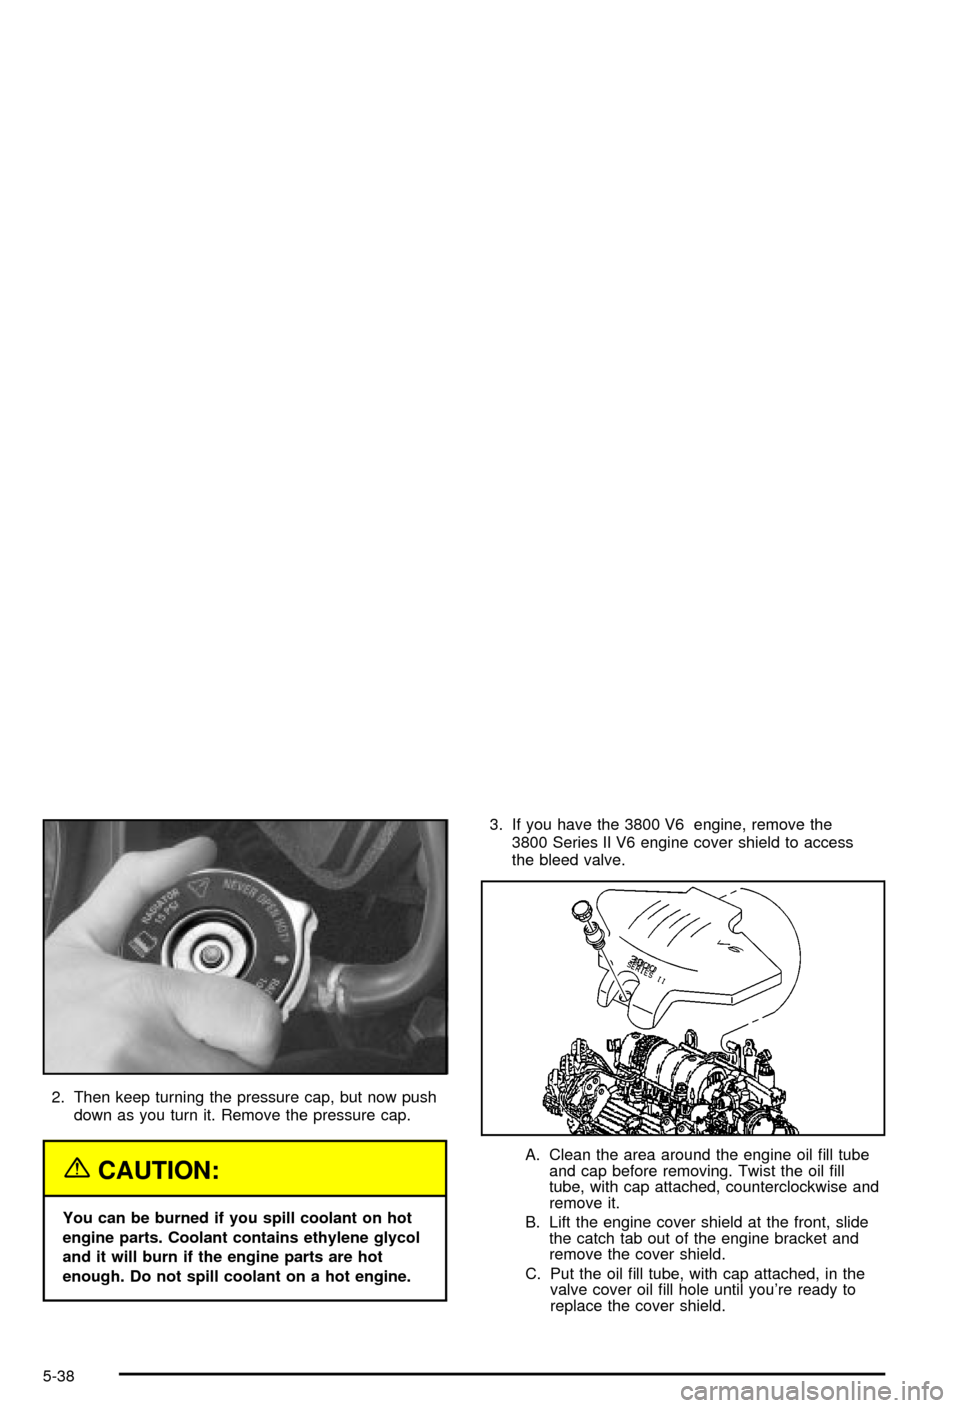
2. Then keep turning the pressure cap, but now push
down as you turn it. Remove the pressure cap.
{CAUTION:
You can be burned if you spill coolant on hot
engine parts. Coolant contains ethylene glycol
and it will burn if the engine parts are hot
enough. Do not spill coolant on a hot engine.3. If you have the 3800 V6 engine, remove the
3800 Series II V6 engine cover shield to access
the bleed valve.
A. Clean the area around the engine oil ®ll tube
and cap before removing. Twist the oil ®ll
tube, with cap attached, counterclockwise and
remove it.
B. Lift the engine cover shield at the front, slide
the catch tab out of the engine bracket and
remove the cover shield.
C. Put the oil ®ll tube, with cap attached, in the
valve cover oil ®ll hole until you're ready to
replace the cover shield.
5-38
Page 287 of 394
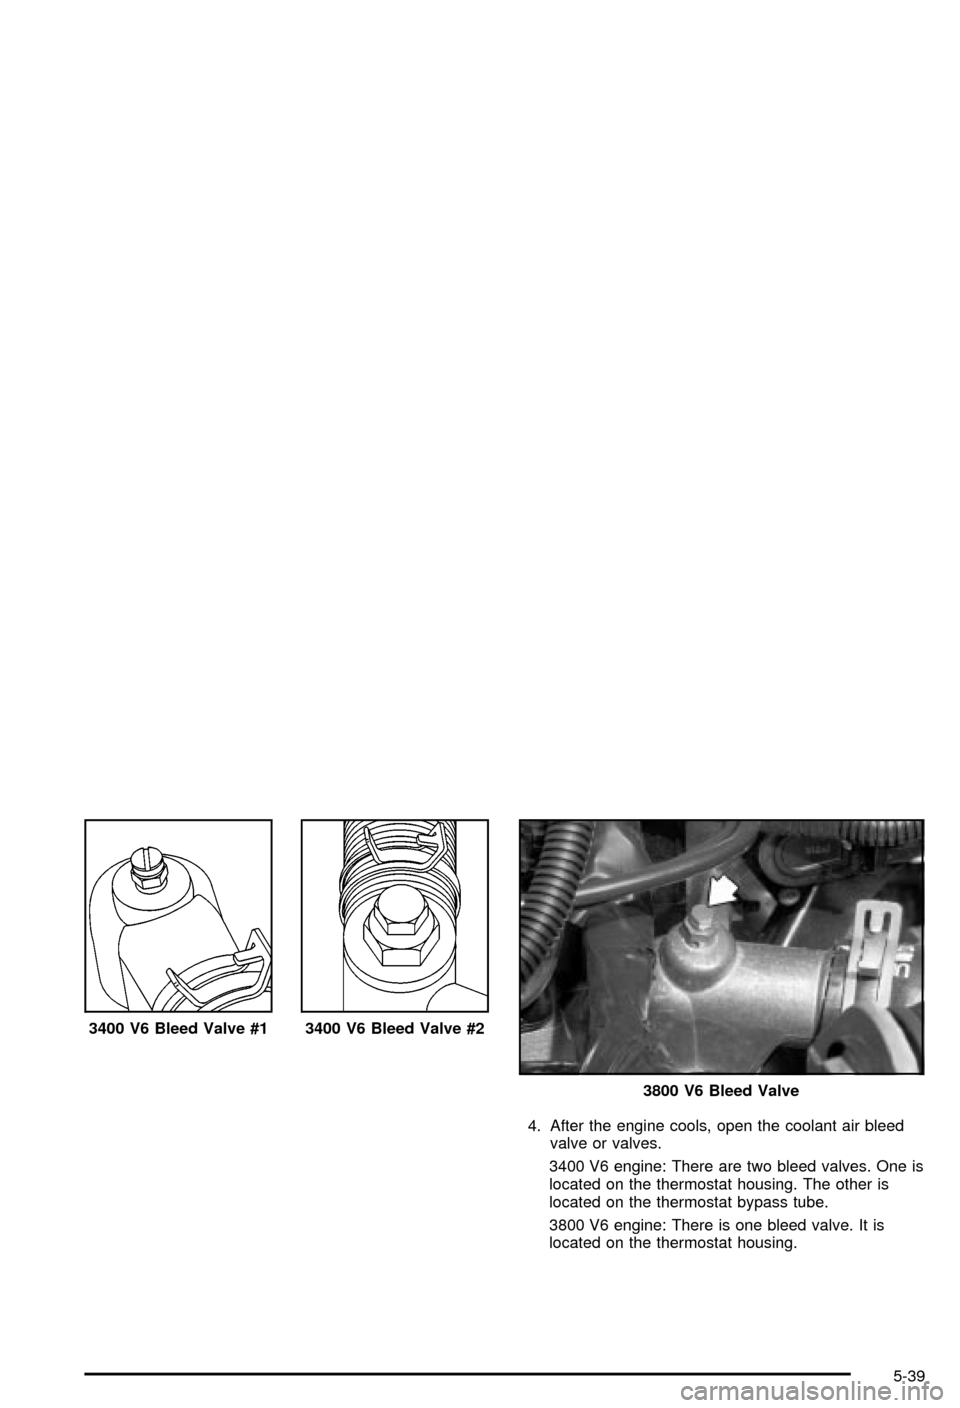
4. After the engine cools, open the coolant air bleed
valve or valves.
3400 V6 engine: There are two bleed valves. One is
located on the thermostat housing. The other is
located on the thermostat bypass tube.
3800 V6 engine: There is one bleed valve. It is
located on the thermostat housing. 3400 V6 Bleed Valve #1
3400 V6 Bleed Valve #2
3800 V6 Bleed Valve
5-39
Page 288 of 394
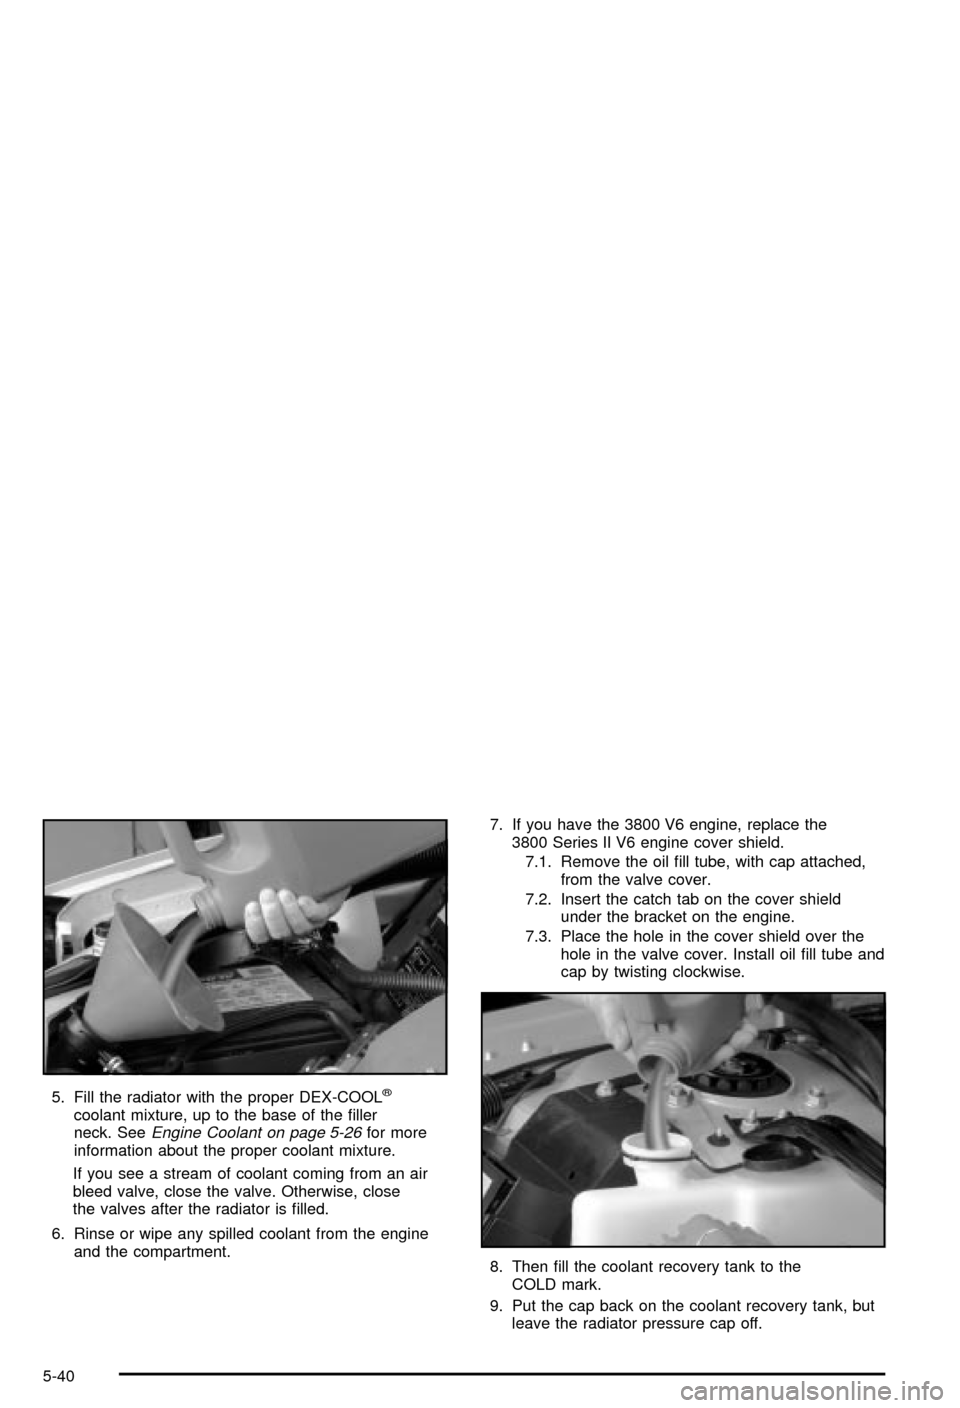
5. Fill the radiator with the proper DEX-COOLž
coolant mixture, up to the base of the ®ller
neck. SeeEngine Coolant on page 5-26for more
information about the proper coolant mixture.
If you see a stream of coolant coming from an air
bleed valve, close the valve. Otherwise, close
the valves after the radiator is ®lled.
6. Rinse or wipe any spilled coolant from the engine
and the compartment.7. If you have the 3800 V6 engine, replace the
3800 Series II V6 engine cover shield.
7.1. Remove the oil ®ll tube, with cap attached,
from the valve cover.
7.2. Insert the catch tab on the cover shield
under the bracket on the engine.
7.3. Place the hole in the cover shield over the
hole in the valve cover. Install oil ®ll tube and
cap by twisting clockwise.
8. Then ®ll the coolant recovery tank to the
COLD mark.
9. Put the cap back on the coolant recovery tank, but
leave the radiator pressure cap off.
5-40
Page 290 of 394

Power Steering Fluid
The power steering ¯uid reservoir is located toward the
rear of the engine compartment, on the passenger's
side of the vehicle.
It will have the above symbol on its cap. See
Engine
Compartment Overview on page 5-12.
When to Check Power Steering Fluid
It is not necessary to regularly check power steering ¯uid
unless you suspect there is a leak in the system or
you hear an unusual noise. A ¯uid loss in this systemcould indicate a problem. Have the system inspected
and repaired. See
Engine Compartment Overview
on page 5-12for reservoir location.
How to Check Power Steering Fluid
Turn the key off, let the engine compartment cool down,
wipe the cap and the top of the reservoir clean, then
unscrew the cap and wipe the dipstick with a clean rag.
Replace the cap and completely tighten it. Then
remove the cap again and look at the ¯uid level on the
dipstick.
When the 3400 V6 engine compartment is hot, the level
should be at the H (hot) mark. When it's cold, the
level should be at the C (cold) mark. If the ¯uid is at the
ADD mark, you should add ¯uid.
For the 3800 V6 engine, the level should be at the HOT
mark when the engine compartment is hot. If the ¯uid
is at the ADD mark, you should add ¯uid.
What to Use
To determine what kind of ¯uid to use, seePart D: Recommended Fluids and Lubricants on
page 6-16. Always use the proper ¯uid. Failure to
use the proper ¯uid can cause leaks and damage
hoses and seals.
5-42
Page 346 of 394
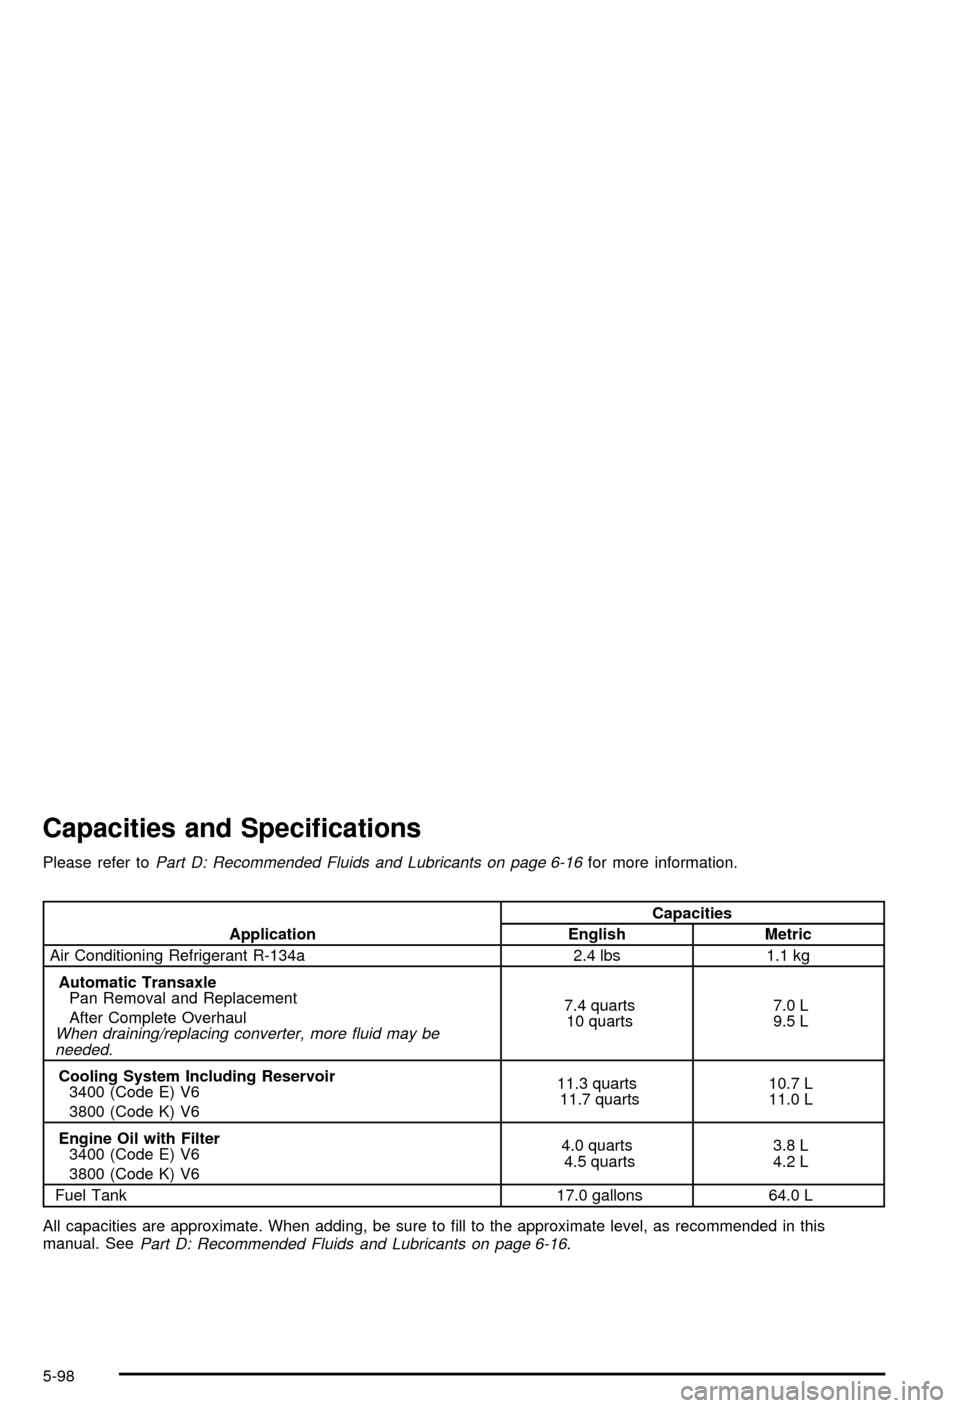
Capacities and Speci®cations
Please refer toPart D: Recommended Fluids and Lubricants on page 6-16for more information.
ApplicationCapacities
English Metric
Air Conditioning Refrigerant R-134a 2.4 lbs 1.1 kg
Automatic Transaxle
Pan Removal and Replacement
After Complete Overhaul
When draining/replacing converter, more ¯uid may be
needed.
7.4 quarts
10 quarts7.0 L
9.5 L
Cooling System Including Reservoir
3400 (Code E) V6
3800 (Code K) V611.3 quarts
11.7 quarts10.7 L
11.0 L
Engine Oil with Filter
3400 (Code E) V6
3800 (Code K) V64.0 quarts
4.5 quarts3.8 L
4.2 L
Fuel Tank 17.0 gallons 64.0 L
All capacities are approximate. When adding, be sure to ®ll to the approximate level, as recommended in this
manual. See
Part D: Recommended Fluids and Lubricants on page 6-16.
5-98
Page 347 of 394
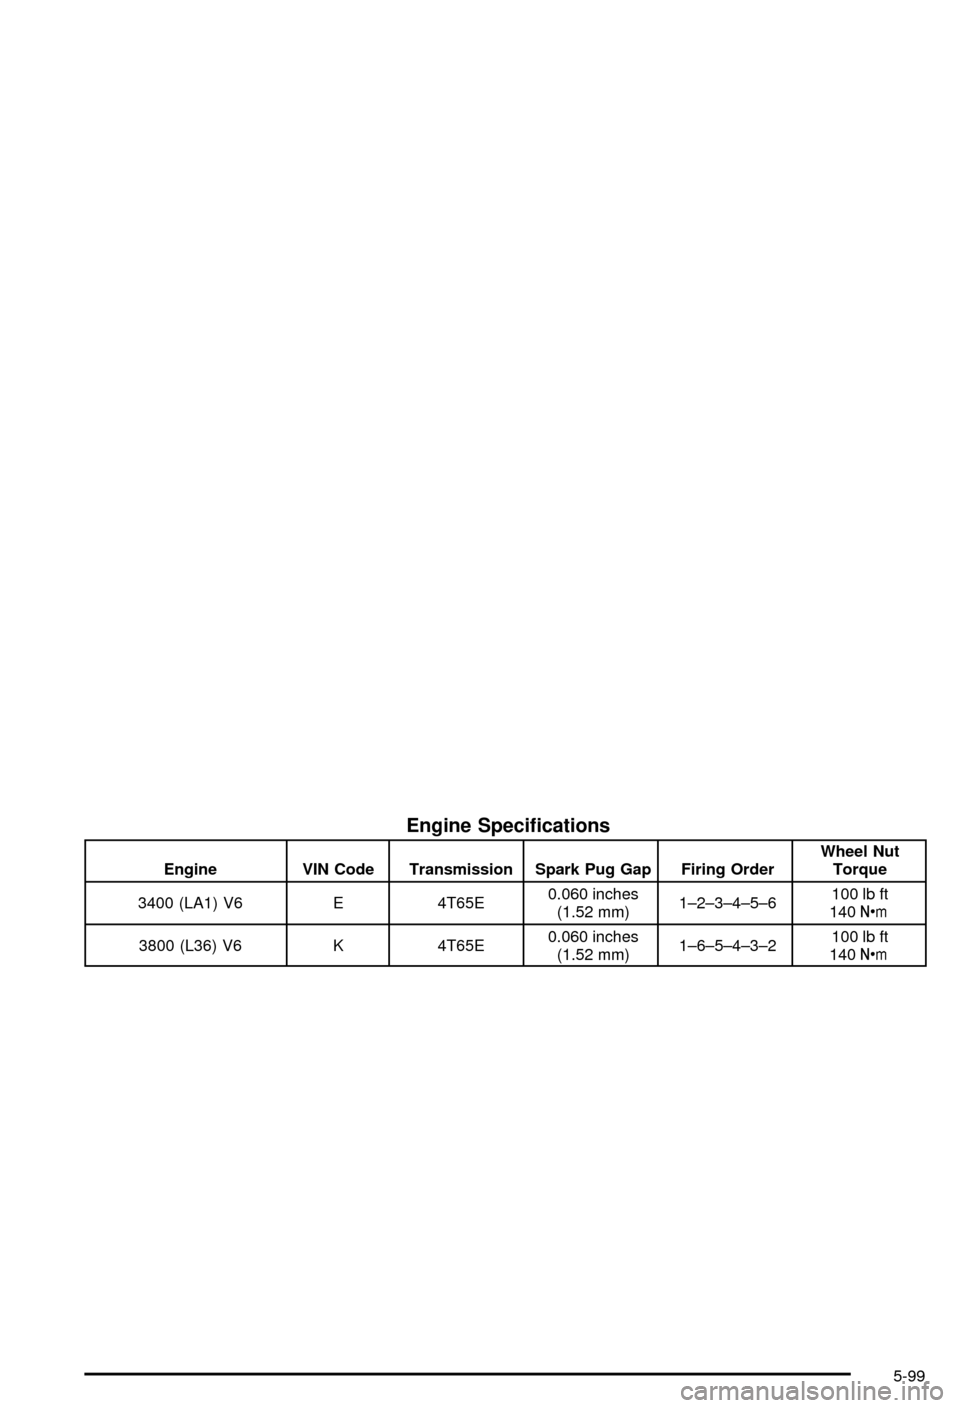
Engine Speci®cations
Engine VIN Code Transmission Spark Pug Gap Firing OrderWheel Nut
Torque
3400 (LA1) V6 E 4T65E0.060 inches
(1.52 mm)1±2±3±4±5±6100 lb ft
140Y
3800 (L36) V6 K 4T65E0.060 inches
(1.52 mm)1±6±5±4±3±2100 lb ft
140Y
5-99
Page 391 of 394

Safety Belts (cont.)
How to Wear Safety Belts Properly................1-16
Questions and Answers About
Safety Belts.............................................1-15
Rear Safety Belt Comfort Guides for Children
and Small Adults......................................1-26
Rear Seat Passengers.................................1-23
Right Front Passenger Position......................1-23
Safety Belt Extender....................................1-28
Safety Belt Use During Pregnancy.................1-22
Safety Belts Are for Everyone.......................1-10
Safety Chains.................................................4-37
Safety Warnings and Symbols.............................. iii
Scheduled Maintenance..................................... 6-5
Seatback Latches............................................. 1-6
Seat............................................................... 1-6
Head Restraints............................................ 1-6
Seats.............................................................. 1-7
Easy Entry Seat............................................ 1-7
Heated Seats............................................... 1-4
Manual Lumbar............................................. 1-3
Manual........................................................ 1-2
Reclining Seatbacks...................................... 1-4
Seatback Latches.......................................... 1-6
Six-Way Power Seats.................................... 1-3
Split Folding Rear Seat.................................. 1-8
Securing a Child Restraint................................1-43
Designed for the LATCH System...................1-43
Rear Seat Position......................................1-43
Right Front Seat Position..............................1-46Securing a Child Restraint (cont.)
Selecting Outside Air or Recirculation................3-23
Selecting the Fan Speed..................................3-23
Service Bulletins.............................................7-10
Service Manuals............................................... 7-9
Service........................................................... 5-3
Adding Equipment to the Outside of
Your Vehicle.............................................. 5-4
Doing Your Own Work................................... 5-3
Engine Soon Light.......................................3-38
Message....................................................3-49
Publications Ordering Information..................... 7-9
Traction System Warning Message.................3-44
Vehicle Soon Message.................................3-51
Setting Preset Stations....................3-59, 3-70, 3-80
Setting the Time.............................................3-56
Setting the Tone (Bass/Treble)..........3-59, 3-70, 3-80
SETTINGS (Display Current Settings)................2-42
Sheet Metal Damage.......................................5-87
Shifting Into Park (P).......................................2-25
Shifting Out of Park (P)...................................2-27
Skidding........................................................4-14
Some Other Rainy Weather Tips.......................4-18
Special Fabric Cleaning Problems.....................5-83
Speci®cations, Capacities.................................5-98
Speedometer..................................................3-33
Split Folding Rear Seat..................................... 1-8
Starter Switch Check.......................................6-12
Starting Your 3400 V6 Engine...........................2-18
Starting Your 3800 Series II V6 Engine..............2-19
13