maintenance CHEVROLET MONTE CARLO 2003 6.G User Guide
[x] Cancel search | Manufacturer: CHEVROLET, Model Year: 2003, Model line: MONTE CARLO, Model: CHEVROLET MONTE CARLO 2003 6.GPages: 394, PDF Size: 2.73 MB
Page 251 of 394

Service
Your dealer knows your vehicle best and wants you to
be happy with it. We hope you will go to your dealer
for all your service needs. You will get genuine GM parts
and GM-trained and supported service people.
We hope you will want to keep your GM vehicle all GM.
Genuine GM parts have one of these marks:
Doing Your Own Service Work
If you want to do some of your own service work, you'll
want to use the proper service manual. It tells you
much more about how to service your vehicle than this
manual can. To order the proper service manual,
see
Service Publications Ordering Information on
page 7-9.
Your vehicle has an air bag system. Before attempting
to do your own service work, see
Servicing Your Air
Bag-Equipped Vehicle on page 1-56.
You should keep a record with all parts receipts and list
the mileage and the date of any service work you
perform. See
Part E: Maintenance Record on page 6-17.
{CAUTION:
You can be injured and your vehicle could be
damaged if you try to do service work on a
vehicle without knowing enough about it.
·Be sure you have sufficient knowledge,
experience, the proper replacement parts
and tools before you attempt any vehicle
maintenance task.
CAUTION: (Continued)
5-3
Page 252 of 394
CAUTION: (Continued)
·
Be sure to use the proper nuts, bolts and
other fasteners. ªEnglishº and ªmetricº
fasteners can be easily confused. If you
use the wrong fasteners, parts can later
break or fall off. You could be hurt.
Adding Equipment to the Outside of
Your Vehicle
Things you might add to the outside of your vehicle can
affect the air¯ow around it. This may cause wind
noise and affect windshield washer performance. Check
with your dealer before adding equipment to the
outside of your vehicle.
Fuel
Use of the recommended fuel is an important part of the
proper maintenance of your vehicle.
Gasoline Octane
Use regular unleaded gasoline with a posted octane
of 87 or higher. If the octane is less than 87, you may
get a heavy knocking noise when you drive. If this
occurs, use a gasoline rated at 87 octane or higher as
soon as possible. Otherwise, you might damage
your engine. A little pinging noise when you accelerate
or drive uphill is considered normal. This does not
indicate a problem exists or that a higher-octane fuel is
necessary. If you are using 87 octane or higher-octane
fuel and hear heavy knocking, your engine needs
service.
5-4
Page 271 of 394
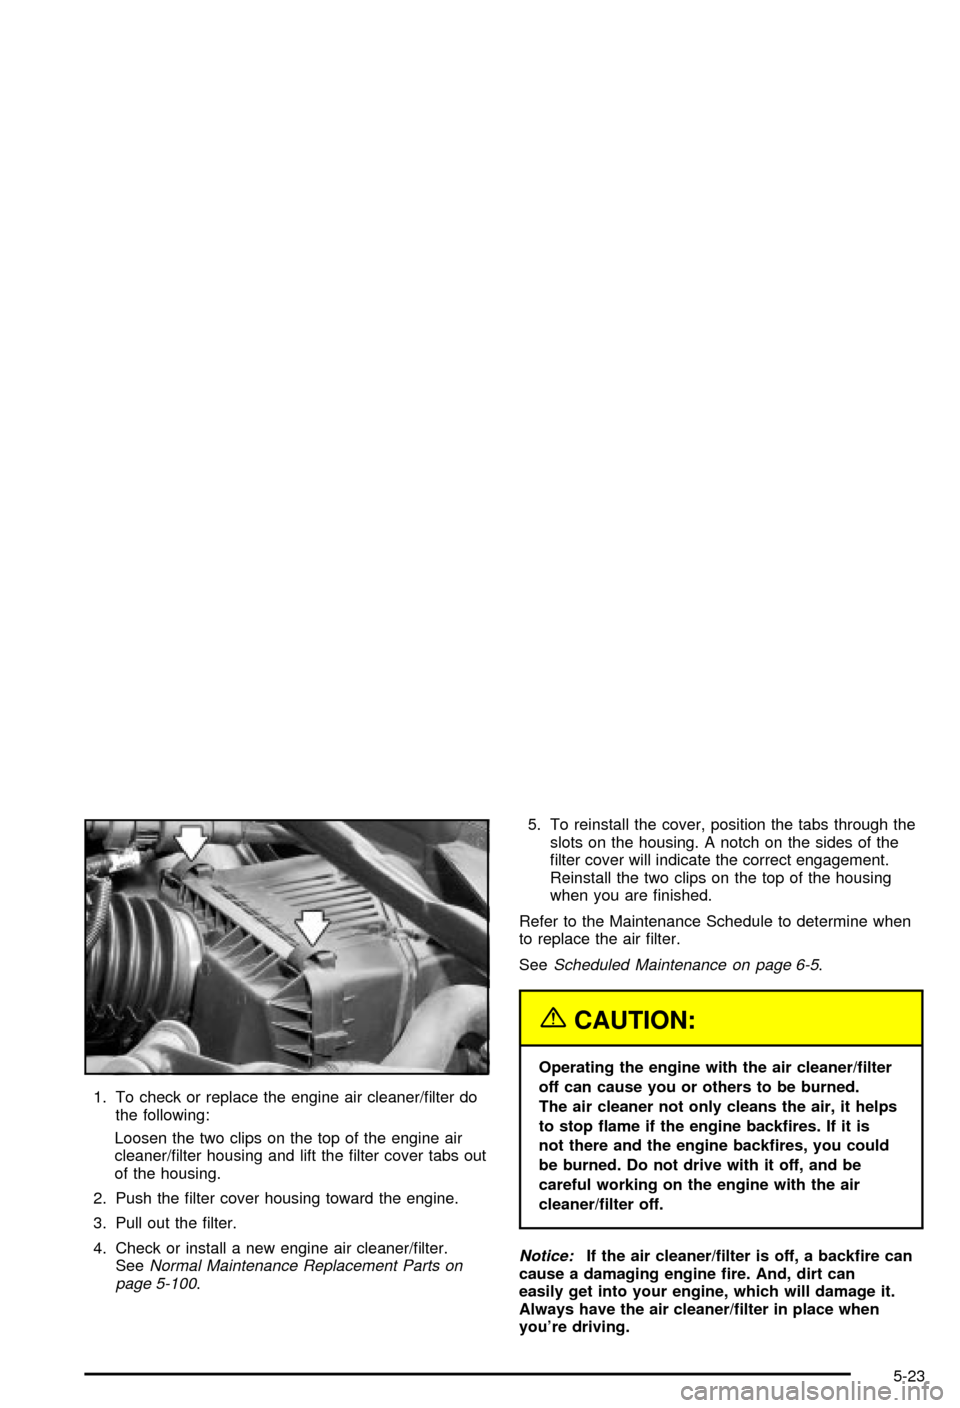
1. To check or replace the engine air cleaner/®lter do
the following:
Loosen the two clips on the top of the engine air
cleaner/®lter housing and lift the ®lter cover tabs out
of the housing.
2. Push the ®lter cover housing toward the engine.
3. Pull out the ®lter.
4. Check or install a new engine air cleaner/®lter.
See
Normal Maintenance Replacement Parts on
page 5-100.5. To reinstall the cover, position the tabs through the
slots on the housing. A notch on the sides of the
®lter cover will indicate the correct engagement.
Reinstall the two clips on the top of the housing
when you are ®nished.
Refer to the Maintenance Schedule to determine when
to replace the air ®lter.
See
Scheduled Maintenance on page 6-5.
{CAUTION:
Operating the engine with the air cleaner/®lter
off can cause you or others to be burned.
The air cleaner not only cleans the air, it helps
to stop ¯ame if the engine back®res. If it is
not there and the engine back®res, you could
be burned. Do not drive with it off, and be
careful working on the engine with the air
cleaner/®lter off.
Notice:If the air cleaner/®lter is off, a back®re can
cause a damaging engine ®re. And, dirt can
easily get into your engine, which will damage it.
Always have the air cleaner/®lter in place when
you're driving.
5-23
Page 272 of 394

Automatic Transaxle Fluid
When to Check and Change
A good time to check your automatic transaxle ¯uid
level is when the engine oil is changed.
Change both the ¯uid and ®lter every 50,000 miles
(83 000 km) if the vehicle is mainly driven under one or
more of these conditions:
·In heavy city traffic where the outside temperature
regularly reaches 90ÉF (32ÉC) or higher.
·In hilly or mountainous terrain.
·When doing frequent trailer towing.
·Uses such as found in taxi, police or delivery
service.
If you do not use your vehicle under any of
these conditions, change the ¯uid and ®lter at
100,000 miles (166 000 km).
See
Scheduled Maintenance on page 6-5.
How to Check
Because this operation can be a little difficult, you may
choose to have this done at the dealership service
department.If you do it yourself, be sure to follow all the instructions
here, or you could get a false reading on the dipstick.
Notice:Too much or too little ¯uid can damage
your transaxle. Too much can mean that some of the
¯uid could come out and fall on hot engine or
exhaust system parts, starting a ®re. Too little ¯uid
could cause the transaxle to overheat. Be sure
to get an accurate reading if you check your
transaxle ¯uid.
Wait at least 30 minutes before checking the transaxle
¯uid level if you have been driving:
·When outside temperatures are above 90ÉF (32ÉC).
·At high speed for quite a while.
·In heavy traffic ± especially in hot weather.
·While pulling a trailer.
To get the right reading, the ¯uid should be at
normal operating temperature, which is 180ÉF to 200ÉF
(82ÉC to 93ÉC).
Get the vehicle warmed up by driving about 15 miles
(24 km) when outside temperatures are above 50ÉF
(10ÉC). If it's colder than 50ÉF (10ÉC), you may have to
drive longer.
5-24
Page 274 of 394

How to Add Fluid
Refer to the Maintenance Schedule to determine
what kind of transaxle ¯uid to use. See
Part D: Recommended Fluids and Lubricants
on page 6-16.
If the ¯uid level is low, add only enough of the proper
¯uid to bring the level into the cross-hatched area on
the dipstick.
1. Pull out the dipstick.
2. Using a long-neck funnel, add enough ¯uid at the
dipstick hole to bring it to the proper level.
It doesn't take much ¯uid, generally less than
one pint (0.5 L).
Don't over®ll.
Notice:
We recommend you use only ¯uid labeled
DEXRONž±III, because ¯uid with that label is
made especially for your automatic transaxle.
Damage caused by ¯uid other than DEXRON
ž±III is
not covered by your new vehicle warranty.
3. After adding ¯uid, recheck the ¯uid level as
described under ªHow to Checkº earlier in this
section.
4. When the correct ¯uid level is obtained, push the
dipstick back in all the way.
Engine Coolant
The cooling system in your vehicle is ®lled with
DEX-COOLžengine coolant. This coolant is designed
to remain in your vehicle for 5 years or 150,000 miles
(240 000 km), whichever occurs ®rst, if you add
only DEX-COOL
žextended life coolant.
The following explains your cooling system and how to
add coolant when it is low. If you have a problem
with engine overheating or if you need to add coolant to
your radiator, see
Engine Overheating on page 5-29.
A 50/50 mixture of clean, drinkable water and
DEX-COOL
žcoolant will:
·Give freezing protection down to-34ÉF (-37ÉC).
·Give boiling protection up to 265ÉF (129ÉC).
·Protect against rust and corrosion.
·Help keep the proper engine temperature.
·Let the warning lights and gages work as they
should.
5-26
Page 295 of 394

Replacing Brake System Parts
The braking system on a vehicle is complex. Its many
parts have to be of top quality and work well together if
the vehicle is to have really good braking. Your
vehicle was designed and tested with top-quality GM
brake parts. When you replace parts of your braking
system Ð for example, when your brake linings
wear down and you need new ones put in Ð be sure
you get new approved GM replacement parts. If
you don't, your brakes may no longer work properly.
For example, if someone puts in brake linings that are
wrong for your vehicle, the balance between your
front and rear brakes can change Ð for the worse. The
braking performance you've come to expect can
change in many other ways if someone puts in the
wrong replacement brake parts.
Battery
Your new vehicle comes with a maintenance free
ACDelcožbattery. When it's time for a new battery, get
one that has the replacement number shown on the
original battery's label. We recommend an ACDelco
ž
battery. SeeEngine Compartment Overview on
page 5-12for battery location.
Warning:Battery posts, terminals and related
accessories contain lead and lead compounds,
chemicals known to the State of California to cause
cancer and reproductive harm. Wash hands after
handling.
Vehicle Storage
If you're not going to drive your vehicle for 25 days or
more, remove the black, negative (-) cable from
the battery. This will help keep your battery from
running down.
{CAUTION:
Batteries have acid that can burn you and gas
that can explode. You can be badly hurt if you
aren't careful. See ªJump Startingº next for
tips on working around a battery without
getting hurt.
Contact your dealer to learn how to prepare your
vehicle for longer storage periods.
Also, for your audio system, see
Theft-Deterrent
Feature on page 3-89.
5-47
Page 306 of 394
Windshield Wiper Blade
Replacement
Windshield wiper blades should be inspected at least
twice a year for wear or cracking. See ªWindshield
Wipers, Blade Checkº under
At Least Twice a Year on
page 6-11for more information.
Replacement blades come in different types and are
removed in different ways. For proper type and length,
see
Normal Maintenance Replacement Parts on
page 5-100. Here's how to remove the wiper blades:
1. Turn on the wipers to the low wipe setting.
2. Turn off the ignition while the wipers are at the
outer positions of the wiper pattern. The blades
are more accessible for removal/replacement while
in this position.
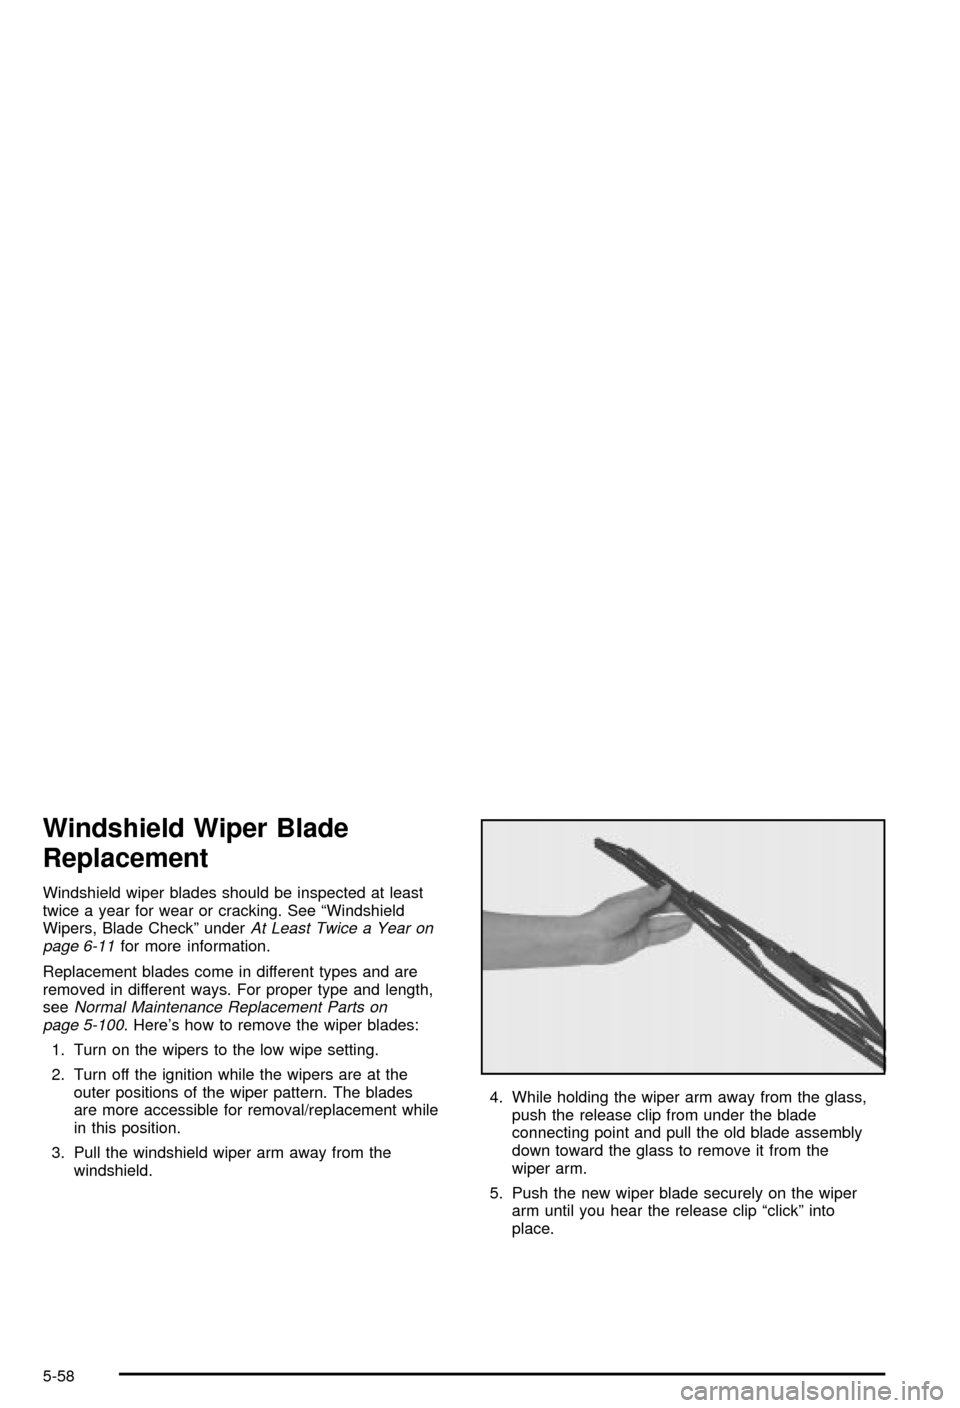
3. Pull the windshield wiper arm away from the
windshield.4. While holding the wiper arm away from the glass,
push the release clip from under the blade
connecting point and pull the old blade assembly
down toward the glass to remove it from the
wiper arm.
5. Push the new wiper blade securely on the wiper
arm until you hear the release clip ªclickº into
place.
5-58
Page 309 of 394

Tire Pressure Monitor System
If your vehicle has the tire pressure monitor system,
it can alert you to a large change in the pressure of
one tire. The system²learnsº the pressure for each tire
throughout the operating speed range of your vehicle.
The system normally takes between 45 and 90 minutes
of driving to learn the tire pressures. This time may
be longer depending on your individual driving habits.
Learning need not be accumulated during a single
trip. Once learned, the system will remember the tire
pressures until the system is recalibrated.
After the system has learned tire pressures with
properly in¯ated tires, the LOW TIRE PRESSURE
message will come on if the pressure in one tire
becomes 12 psi (83 kPa) lower than the other
three tires. The tire pressure monitor system won't alert
you if the pressure in more than one tire is low, if the
system is not properly calibrated, or if the vehicle
is moving faster than 70 mph (110 km/h).
The tire pressure monitor system detects differences
in tire rotation speeds that are caused by changes in tire
pressure. The system can alert you about a low
tire Ð but it doesn't replace normal tire maintenance.
See
Tires on page 5-59.When the LOW TIRE PRESSURE message comes on,
you should stop as soon as you can and check all
your tires for damage. (If a tire is ¯at, see
If a Tire Goes
Flat on page 5-69.) Also check the tire pressure in all
four tires as soon as you can. SeeIn¯ation -- Tire
Pressure on page 5-60.
The LOW TIRE PRESSURE message will also be
displayed (while the ignition is on) until you reset
(calibrate) the system.
Don't reset the tire pressure monitor system without ®rst
correcting the cause of the problem and checking
and adjusting the pressure in all four tires. If you reset
the system when the tire pressures are incorrect,
the system will not work properly and may not alert you
when a tire is low.
Any time you adjust a tire's pressure, rotate your tires,
or have one or more tires repaired or replaced, you'll
need to reset (calibrate) the tire pressure monitor
system. You'll also need to reset the system whenever
you buy new tires and whenever the vehicle's battery
has been disconnected.
5-61
Page 311 of 394

Tire Inspection and Rotation
Tires should be rotated every 7,500 miles (12 500 km).
Any time you notice unusual wear, rotate your tires
as soon as possible and check wheel alignment. Also
check for damaged tires or wheels. See
When It Is Time
for New Tires on page 5-64andWheel Replacement
on page 5-67for more information.
The purpose of regular rotation is to achieve more
uniform wear for all tires on the vehicle. The ®rst rotation
is the most important. See ªPart A: Scheduled
Maintenance Services,º in Section 6, for scheduled
rotation intervals.
When rotating your tires, always use the correct rotation
pattern shown here.Don't include the compact spare tire in your tire rotation.
After the tires have been rotated, adjust the front and
rear in¯ation pressures as shown on the Tire-Loading
Information label.
Reset the Tire In¯ation Monitor System. See
Tire
Pressure Monitor System on page 5-61.
Make certain that all wheel nuts are properly tightened.
See ªWheel Nut Torqueº under
Capacities and
Speci®cations on page 5-98.
{CAUTION:
Rust or dirt on a wheel, or on the parts to
which it is fastened, can make wheel nuts
become loose after a time. The wheel could
come off and cause an accident. When you
change a wheel, remove any rust or dirt from
places where the wheel attaches to the vehicle.
In an emergency, you can use a cloth or a
paper towel to do this; but be sure to use a
scraper or wire brush later, if you need to, to
get all the rust or dirt off. See ªChanging a Flat
Tireº in the Index.
5-63
Page 317 of 394

Tire Chains
Notice:Use tire chains only where legal and only
when you must. Use only SAE Class ªSº type chains
that are the proper size for your tires. Install them
on the front tires and tighten them as tightly as
possible with the ends securely fastened. Drive
slowly and follow the chain manufacturer's
instructions. If you can hear the chains contacting
your vehicle, stop and retighten them. If the contact
continues, slow down until it stops. Driving too
fast or spinning the wheels with chains on will
damage your vehicle.
If a Tire Goes Flat
It's unusual for a tire to ªblowoutº while you're driving,
especially if you maintain your tires properly. If air goes
out of a tire, it's much more likely to leak out slowly.
But if you should ever have a ªblowout,º here are a few
tips about what to expect and what to do:
If a front tire fails, the ¯at tire will create a drag that
pulls the vehicle toward that side. Take your foot off the
accelerator pedal and grip the steering wheel ®rmly.
Steer to maintain lane position, and then gently brake to
a stop well out of the traffic lane.A rear blowout, particularly on a curve, acts much like a
skid and may require the same correction you'd use
in a skid. In any rear blowout, remove your foot from the
accelerator pedal. Get the vehicle under control by
steering the way you want the vehicle to go. It may be
very bumpy and noisy, but you can still steer. Gently
brake to a stop, well off the road if possible.
{CAUTION:
Lifting a vehicle and getting under it to do
maintenance or repairs is dangerous without
the appropriate safety equipment and training.
The jack provided with your vehicle is
designed only for changing a ¯at tire. If it is
used for anything else, you or others could be
badly injured or killed if the vehicle slips off
the jack. Use the jack provided with your
vehicle only for changing a ¯at tire.
If a tire goes ¯at, the next part shows how to use your
jacking equipment to change a ¯at tire safely.
5-69