key CHEVROLET MONTE CARLO 2003 6.G Owner's Manual
[x] Cancel search | Manufacturer: CHEVROLET, Model Year: 2003, Model line: MONTE CARLO, Model: CHEVROLET MONTE CARLO 2003 6.GPages: 394, PDF Size: 2.73 MB
Page 89 of 394

Notice:Driving with the parking brake on can
cause your rear brakes to overheat. You may have
to replace them, and you could also damage
other parts of your vehicle.
If you are towing a trailer and parking on any hill, see
Towing a Trailer on page 4-34. That section shows what
to do ®rst to keep the trailer from moving.
Shifting Into Park (P)
{CAUTION:
It can be dangerous to get out of your vehicle
if the shift lever is not fully in PARK (P) with
the parking brake ®rmly set. Your vehicle can
roll. If you have left the engine running, the
vehicle can move suddenly. You or others
could be injured. To be sure your vehicle will
not move, even when you are on fairly level
ground, use the steps that follow. If you are
pulling a trailer, see ªTowing a Trailerº in the
Index.1. Hold the brake pedal down with your right foot and
set the parking brake.
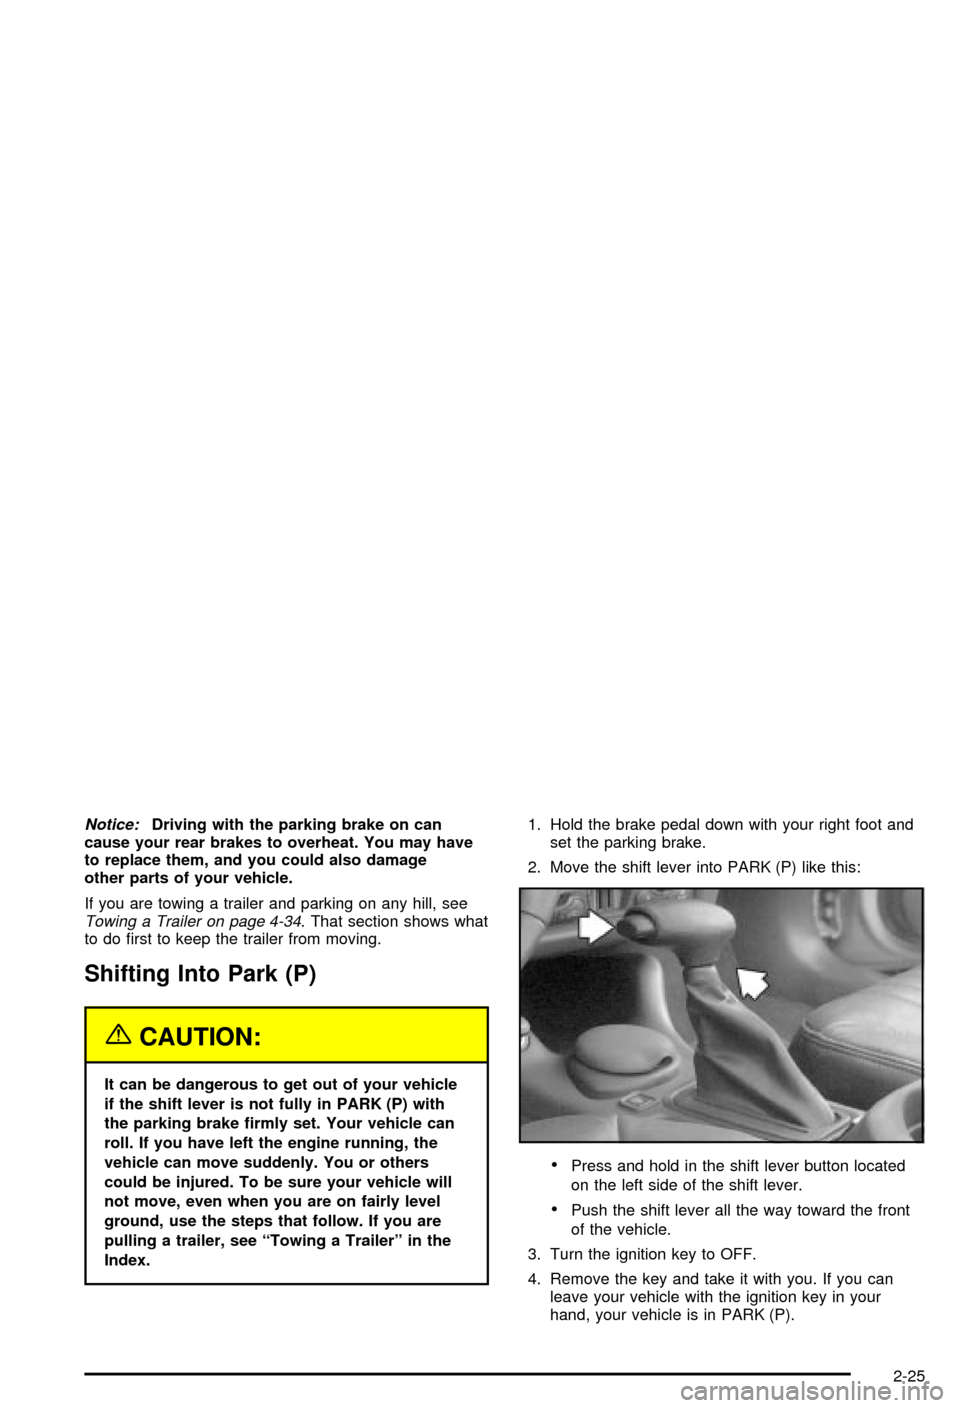
2. Move the shift lever into PARK (P) like this:
·Press and hold in the shift lever button located
on the left side of the shift lever.
·Push the shift lever all the way toward the front
of the vehicle.
3. Turn the ignition key to OFF.
4. Remove the key and take it with you. If you can
leave your vehicle with the ignition key in your
hand, your vehicle is in PARK (P).
2-25
Page 91 of 394

Shifting Out of Park (P)
Your vehicle has an automatic transaxle shift lock
control system. You must fully apply your regular brakes
before you can shift from PARK (P) when the ignition
is in ON. See
Automatic Transaxle Operation on
page 2-21.
If you cannot shift out of PARK (P), ease pressure on
the shift lever by pushing it all the way into PARK (P)
while keeping the brake pedal pushed down. Then move
the shift lever out of PARK (P), being sure to press
the shift lever button.
If you ever hold the brake pedal down but still can't shift
out of PARK (P), try this:
1. Turn the ignition key to ACC.
2. Apply and hold the brake pedal until the end
of Step 4.
3. Shift to NEUTRAL (N).
4. Start the engine and shift to the drive gear
you want.
5. Have the vehicle ®xed as soon as you can.
Parking Over Things That Burn
{CAUTION:
Things that can burn could touch hot exhaust
parts under your vehicle and ignite. Do not
park over papers, leaves, dry grass or other
things that can burn.
2-27
Page 103 of 394

Resetting Defaults
To reset HomeLinkžto default settings do the following:
1. Hold down the two outside buttons for about
20 seconds until the indicator light begins to ¯ash.
2. Continue to hold both buttons until the HomeLink
ž
indicator light turns off.
3. Release both buttons.
For questions or comments, contact HomeLink
ž
at 1-800-355-3515, or on the internet at
www.homelink.com.
Storage Areas
Glove Box
Use the key to lock and unlock the glove box. To open,
lift the latch.
Center Console Storage Area
The console has cupholders and a cassette tape
storage area. To open the console's storage area, press
the latch located toward the front of the console lid on
the driver's side of the vehicle.
Rear Storage Area
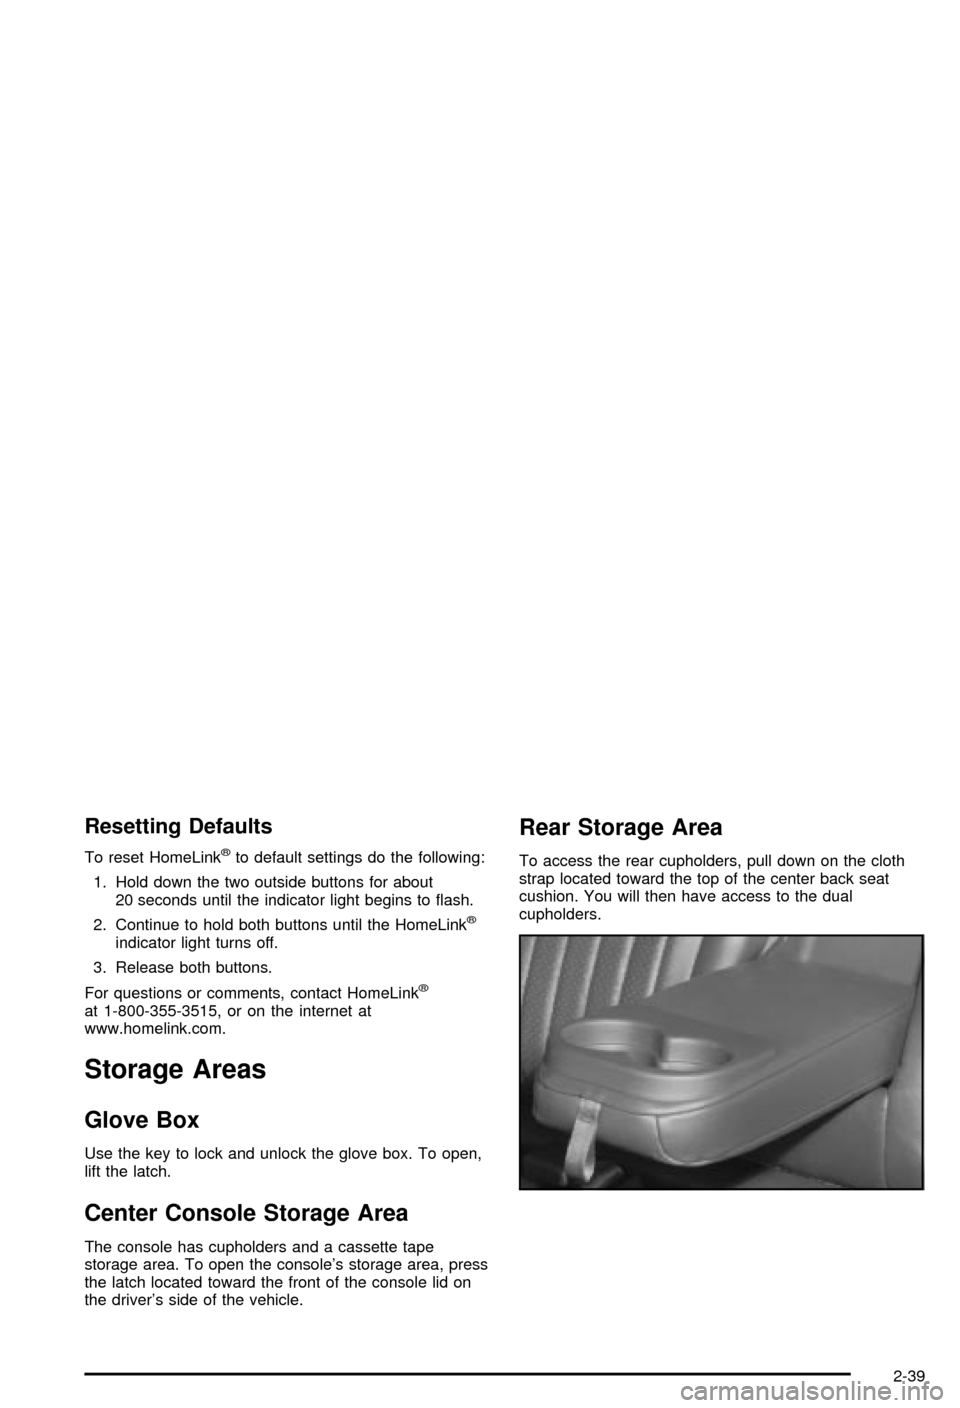
To access the rear cupholders, pull down on the cloth
strap located toward the top of the center back seat
cushion. You will then have access to the dual
cupholders.
2-39
Page 105 of 394

Open/Express:To activate the express-open feature,
press the switch rearward. You can stop the sunroof
before it is completely open by pushing the switch
forward.
Vent:Your sunroof also has a vent feature. It can be
activated from the closed sunroof position by pressing
the switch once rearward. To close, push and hold
the sunroof switch forward. When using this feature, the
sunshade should be fully opened in the rear position.
The sunshade can be opened manually by sliding
it rearward, or automatically, by opening the power
sunroof. You will need to close the sunshade manually
by sliding it forward.
Close:To close the sunroof, push the switch forward
and hold until the sunroof motor stops, or release
the switch when the desired position has been reached.
Vehicle Personalization
Some of the convenience features can be reset or
customized to perform according to your preference.
The features you can program depend upon the options
that came with your vehicle. The following list shows
features that can be reset or customized along with
those options.
·Settings (Available for All)
·GM Oil Life System Reset (Available for All)
·Low Tire Pressure Reset
·Delayed Headlamp Illumination (Available for All)
·Automatic Door Lock and Unlock (Available for All)
·Remote Visual Veri®cation (Available with Remote
Keyless Entry)
·Remote Audible Veri®cation (Available with Remote
Keyless Entry)
·Content Theft Operation (Available with Content
Theft System)
·Trunk Jamb (Available with Content Theft System)
·Horn Chirp On Timer (Available with Remote
Keyless Entry)
·Remote Keyless Entry Transmitter Programming
(Available with Remote Keyless Entry)
·Return to Original Factory Settings
(Available for All)
·Exit Vehicle Customization Mode
2-41
Page 109 of 394

FOB LIGHT (Remote Visual
Veri®cation)
This feature allows the exterior lights to ¯ash when the
remote keyless entry transmitter is used to lock or
unlock the vehicle, or to program no veri®cation.
Programmable Modes
Mode 1:OFF
Mode 2:On ± One ¯ash for each remote
lock/two ¯ashes for each remote unlock.
Your vehicle was originally programmed to Mode 2.
The mode may have been changed since then.
To determine the current mode, or to change the mode,
do the following:
1. Scroll, using the SEEK PSCAN up or down arrows,
until FOB LIGHT appears on the display.2. Press the 1 PREV or 2 NEXT button to enter the
submenu. The current selection will have an
asterisk (*) next to it. If you do not wish to change
the current mode, you can either exit the
programming mode by following the directions later
in this section or program the next feature
available on your vehicle.
3. Scroll, using the 1 PREV or 2 NEXT buttons,
through the modes to change the current mode.
4. With your preference displayed, press the TUNE
DISP button to select. A chime will be heard to
verify the new setting. The new selection will
be displayed with an asterisk (*) for one second.
If your vehicle has the optional content theft-deterrent
system, the ®rst time a remote UNLOCK command
is received, three ¯ashes will be seen and three horn
chirps heard to indicate an alarm condition has occurred
since last arming. See
Content Theft-Deterrent on
page 2-14.
The mode you selected is now set. You can either exit
the programming mode by following the instructions
later in this section or program the next feature available
on your vehicle.
2-45
Page 110 of 394

FOB HORN (Remote Audible
Veri®cation)
This feature allows the horn to chirp when the remote
keyless entry transmitter is used to lock or unlock
the vehicle, or to program no veri®cation.
Programmable Modes
Mode 1:OFF
Mode 2:PARTIAL ± One chirp for each remote LOCK
command/no chirp for remote UNLOCK command.
Mode 3:FULL ± One chirp for each remote LOCK
command/two chirps for the ®rst remote UNLOCK
command.
Your vehicle was originally programmed to Mode 1.
The mode may have been changed since then.
To determine the current mode, or to change the mode,
do the following:
1. Scroll, using the SEEK PSCAN up or down arrows,
until FOB HORN appears on the display.2. Press the 1 PREV or 2 NEXT button to enter the
submenu. The current selection will have an
asterisk (*) next to it. If you do not wish to change
the current mode, you can either exit the
programming mode by following the directions later
in this section or program the next feature
available on your vehicle.
3. Scroll, using the 1 PREV or 2 NEXT buttons,
through the modes to change the current mode.
4. With your preference displayed, press the TUNE
DISP button to select. A chime will be heard to
verify the new setting. The new selection will
be displayed with an asterisk (*) for one second.
If your vehicle has the optional content theft-deterrent
system, the ®rst time a remote UNLOCK command
is received, three ¯ashes will be seen and three horn
chirps heard to indicate an alarm condition has occurred
since last arming. See
Content Theft-Deterrent on
page 2-14.
The mode you selected is now set. You can either exit
the programming mode by following the instructions
later in this section or program the next feature available
on your vehicle.
2-46
Page 113 of 394

CHIRP (Horn Chirp Timer)
This feature allows you to choose between short or long
horn chirp sounds when the remote keyless entry
transmitter is used.
Programmable Modes
Mode 1:SHORT
Mode 2:LONG
Your vehicle was originally programmed to Mode 1.
The mode may have been changed since then.
To determine the current mode, or to change the mode,
do the following:
1. Scroll, using the SEEK PSCAN up or down arrows,
until CHIRP appears on the display.
2. Press the 1 PREV or 2 NEXT button to enter the
submenu. The current selection will have an
asterisk (*) next to it. If you do not wish to change
the current mode, you can either exit the
programming mode by following the directions later
in this section or program the next feature
available on your vehicle.
3. Scroll, using the 1 PREV or 2 NEXT buttons,
through the modes to change the current mode.4. With your preference displayed, press the TUNE
DISP button to select. A chime will be heard to
verify the new setting. The new selection will
be displayed with an asterisk (*) for one second.
The mode you selected is now set. You can either exit
the programming mode by following the instructions
later in this section or program the next feature available
on your vehicle.
ORIG. SET (Return to the Original
Settings)
This feature allows you to return all customization
feature settings back to their original factory settings.
To reset do the following:
1. Scroll, using the SEEK PSCAN up or down arrows,
until ORIG. SET appears on the display.
2. Press the 1 PREV or 2 NEXT button to enter the
submenu. SET ALL will appear.
3. With your preference displayed, press the TUNE
DISP button to select. A chime will be heard to
verify the new setting. The new selection will
be displayed with an asterisk (*) for one second.
The original factory settings are now reset. You can
either exit the programming mode by following the
instructions later in this section or program the next
feature available on your vehicle.
2-49
Page 114 of 394

FOB PROG (Remote Keyless Entry
Transmitter Programming)
This feature allows you to match the remote keyless
entry transmitter to your vehicle. To match the
transmitter do the following:
1. Scroll, using the SEEK PSCAN up or down arrows,
until FOB PROG appears on the display.
2. Press the 1 PREV or 2 NEXT button to enter the
submenu. BEGIN will be displayed.
3. Press the TUNE DISP button to start programming.
When the message PUSH FOB ¯ashes, press and
hold the LOCK and UNLOCK buttons on the
®rst transmitter at the same time for 15 seconds.
A chime will be heard to verify the transmitter
is learned.
4. Repeat Step 3 for each additional transmitter.
The transmitter is programmed now. You can either exit
the programming mode by following the instructions
later in this section or program the next feature available
on your vehicle.
EXIT (Exit Feature
Customization Mode)
This feature allows you to exit the vehicle customization
programming. To exit do the following:
·Scroll until EXIT appears on the display.
·Press the TUNE DISP button to exit programming.
A chime will be heard to verify the exit.
2-50
Page 120 of 394

Hazard Warning Flashers
Your hazard warning ¯ashers let you warn others. They
also let police know you have a problem. Your front
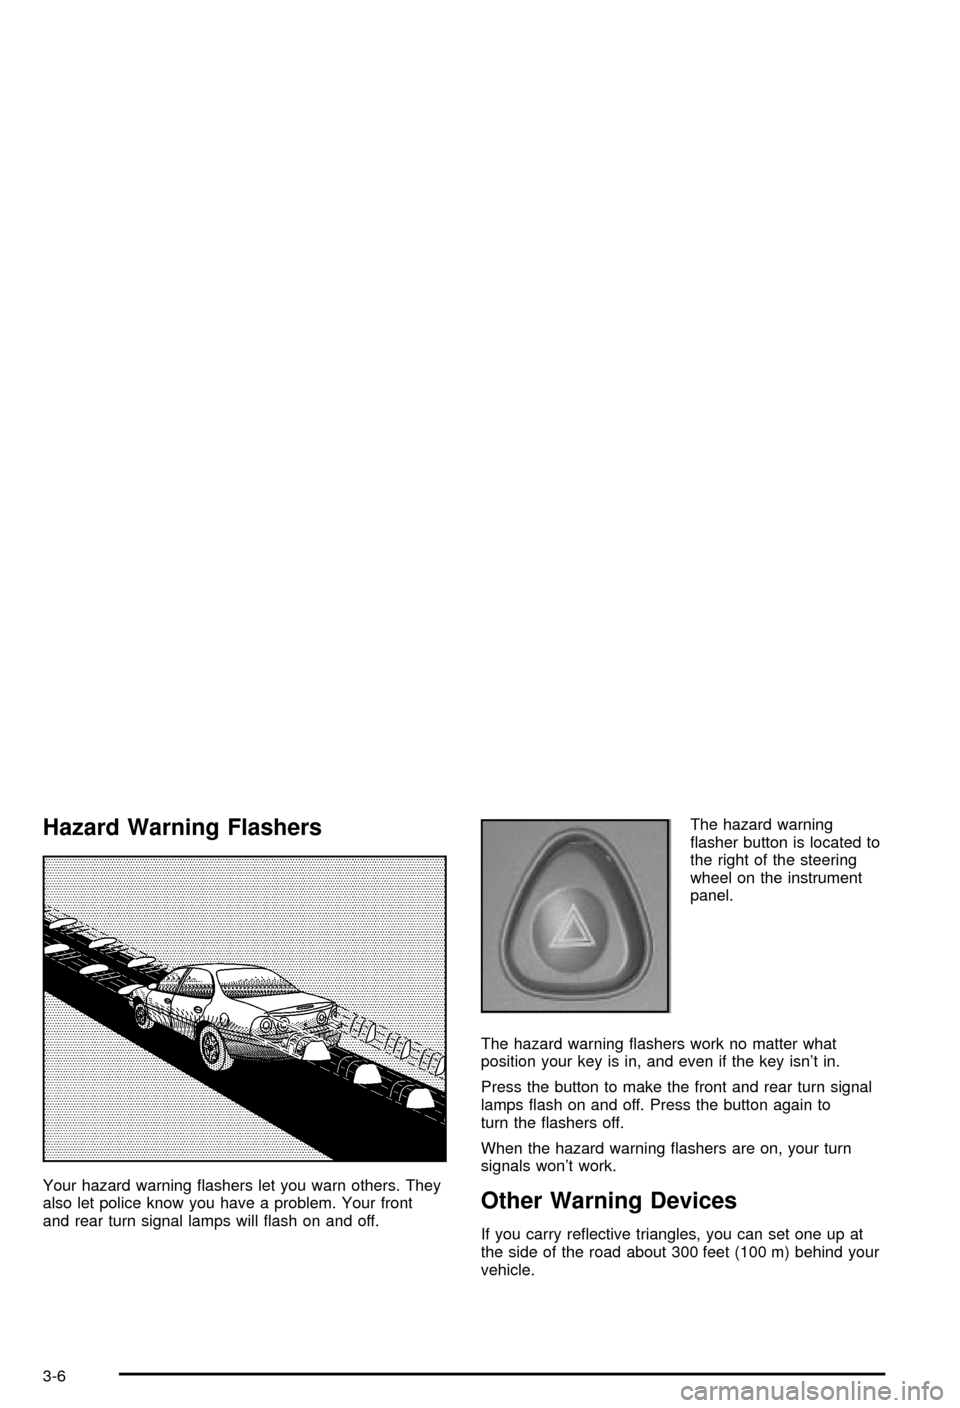
and rear turn signal lamps will ¯ash on and off.The hazard warning
¯asher button is located to
the right of the steering
wheel on the instrument
panel.
The hazard warning ¯ashers work no matter what
position your key is in, and even if the key isn't in.
Press the button to make the front and rear turn signal
lamps ¯ash on and off. Press the button again to
turn the ¯ashers off.
When the hazard warning ¯ashers are on, your turn
signals won't work.Other Warning Devices
If you carry re¯ective triangles, you can set one up at
the side of the road about 300 feet (100 m) behind your
vehicle.
3-6
Page 123 of 394

Headlamp High/Low-Beam Changer
To change your headlamps from low beams to
high beams, or from high to low, pull the multifunction
lever all the way toward you. Then release it.
While the high beams are
on, this light will appear on
the instrument panel
cluster.
This light works only while the key is in ON. The fog
lamps (if equipped) are not illuminated when the
high beams are on.
Flash-to-Pass Feature
With the turn signal lever in the low-beam position, pull
the lever toward you momentarily to switch to
high-beam, (to signal you are going to pass).
If the headlamps are on, they will return to low-beam
when the lever is released. This feature operates even if
the headlamps are off.
3-9