horn CHEVROLET MONTE CARLO 2003 6.G Owners Manual
[x] Cancel search | Manufacturer: CHEVROLET, Model Year: 2003, Model line: MONTE CARLO, Model: CHEVROLET MONTE CARLO 2003 6.GPages: 394, PDF Size: 2.73 MB
Page 69 of 394

L(Remote Alarm):Press this button to activate an
alarm. The ignition must be in OFF or ACC for the
remote alarm to work. When you press the remote
button, the headlamps will ¯ash, the horn will sound
repeatedly and your interior lamps will turn on attracting
attention if you need it. The alarm will continue until
one of the following occurs:
·The remote alarm button is pressed a second time,
·the vehicle's ignition is turned to ON or
·an alarm period of 110 seconds has elapsed.
V(Trunk Release):Press the button to release
the trunk.
Operating the remote keyless entry transmitter may
interact with the content theft-deterrent system, if your
vehicle has this option. See
Content Theft-Deterrent
on page 2-14.
Transmitter Veri®cation
This feature provides feedback that a command has
been received by the vehicle. The headlamps and
back-up lamps will ¯ash on every lock and on the ®rst
unlock command. The horn will also sound once
for every lock and twice for the ®rst unlock command.
Silent operation and other options may be selected
for this feature. See
Vehicle Personalization on
page 2-41.
If your vehicle has the optional content theft-deterrent
system, the ®rst time the remote unlock is received,
three ¯ashes from the headlamps will be seen and three
chirps will be heard to indicate an alarm condition has
occurred since last arming. See
Content Theft-Deterrent
on page 2-14.
2-5
Page 71 of 394

Battery Replacement
Under normal use, the battery in your remote keyless
entry transmitter should last about three years.
You can tell the battery is weak if the transmitter won't
work at the normal range in any location. If you have
to get close to your vehicle before the transmitter works,
it's probably time to change the battery.
Notice:When replacing the battery, use care not to
touch any of the circuitry. Static from your body
transferred to these surfaces may damage the
transmitter.
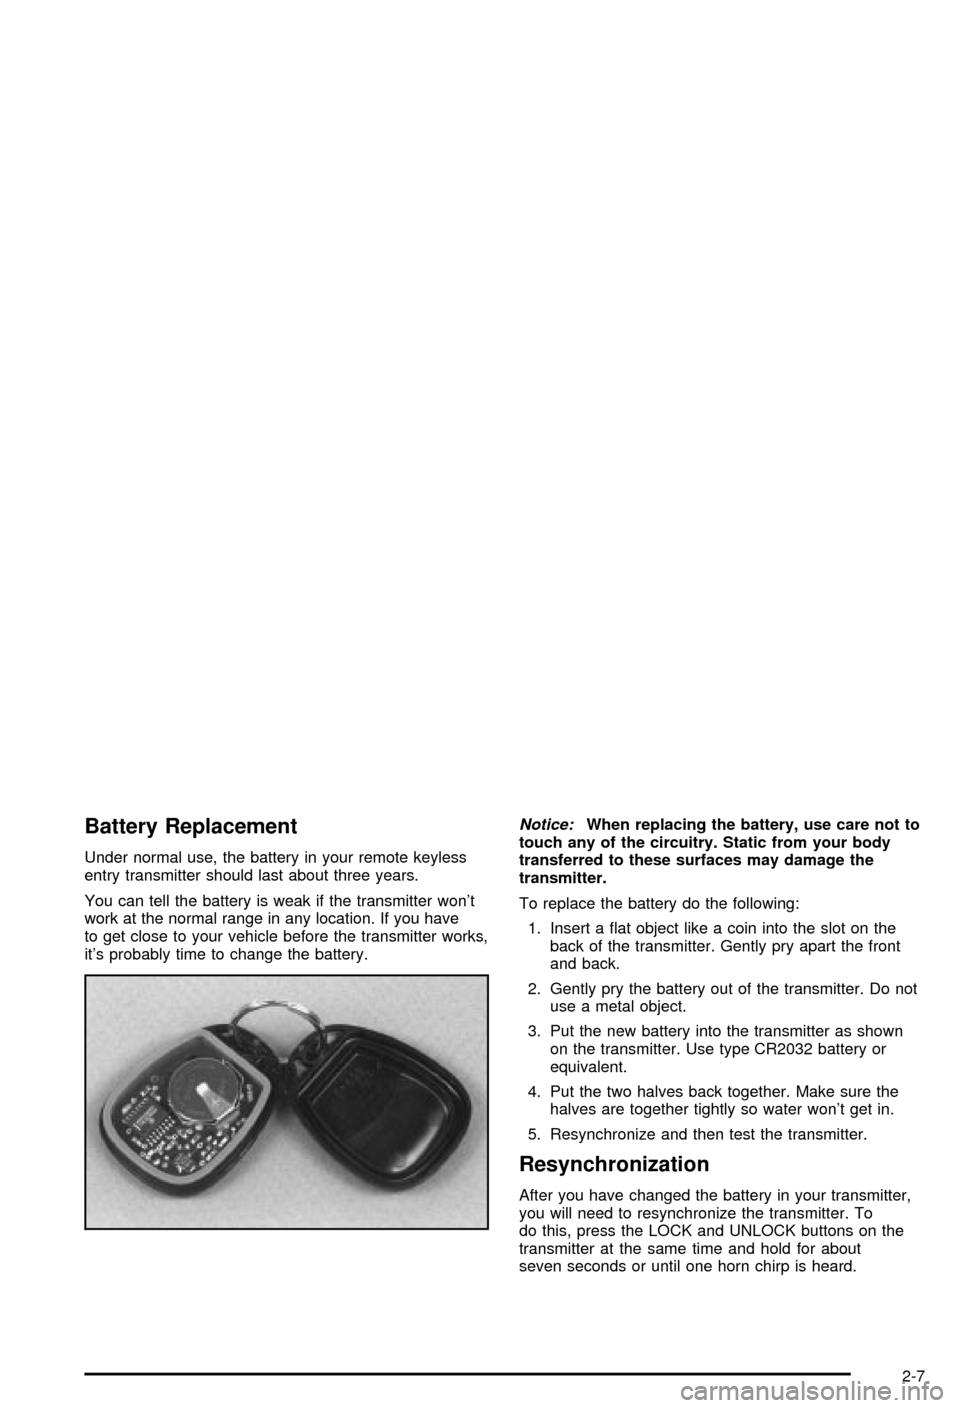
To replace the battery do the following:
1. Insert a ¯at object like a coin into the slot on the
back of the transmitter. Gently pry apart the front
and back.
2. Gently pry the battery out of the transmitter. Do not
use a metal object.
3. Put the new battery into the transmitter as shown
on the transmitter. Use type CR2032 battery or
equivalent.
4. Put the two halves back together. Make sure the
halves are together tightly so water won't get in.
5. Resynchronize and then test the transmitter.
Resynchronization
After you have changed the battery in your transmitter,
you will need to resynchronize the transmitter. To
do this, press the LOCK and UNLOCK buttons on the
transmitter at the same time and hold for about
seven seconds or until one horn chirp is heard.
2-7
Page 79 of 394

Once armed, the alarm will go off if someone tries to
enter the vehicle (without using the remote keyless entry
transmitter or a key) or turns the ignition on with an
incorrect key. The horn will sound and the headlamps
and back-up lamps will ¯ash for approximately
two minutes.
When the alarm is armed, the trunk may be opened
with the remote keyless entry transmitter. If you use the
key to open the trunk, the alarm will sound. The
power door lock switches are also disabled. You must
use your remote keyless entry transmitter or your key to
unlock the doors when the system is armed.
Arming with the Power Lock Switch
Your alarm system will arm when you use either power
lock switch to lock the doors while any door or the
trunk is open and the key is removed from the ignition.
The light on the radio ¯ashes quickly to let you know
when the system is ready to arm with the power
door lock switches. The light on the radio will stop
¯ashing and stay on when you press the bottom of the
power lock switch, to let you know the system is
arming. After all doors and the trunk are closed and
locked, the light on the radio will ¯ash slowly to let you
know the system is armed.
Arming with the Remote Keyless Entry
Transmitter
Your alarm system will arm when you use your remote
keyless entry transmitter to lock the doors, if the key
is not in the ignition. The light on the radio will turn on to
let you know the system is arming. After all doors and
the trunk are closed and locked, the light on the
radio will begin ¯ashing at a very slow rate to let you
know the system is armed.
Disarming with the Remote Keyless
Entry Transmitter
Your alarm system will disarm when you use your
remote keyless entry transmitter to unlock the doors.
The light on the radio will go off to let you know
the system is no longer armed.
The ®rst time a remote UNLOCK command is received,
three ¯ashes will be seen and three horn chirps
heard to indicate an alarm condition has occurred since
last arming.
Disarming with Your Key
Your alarm system will disarm when you use your key
to unlock the doors. The light on the radio will go
off to let you know the system is no longer armed.
2-15
Page 105 of 394

Open/Express:To activate the express-open feature,
press the switch rearward. You can stop the sunroof
before it is completely open by pushing the switch
forward.
Vent:Your sunroof also has a vent feature. It can be
activated from the closed sunroof position by pressing
the switch once rearward. To close, push and hold
the sunroof switch forward. When using this feature, the
sunshade should be fully opened in the rear position.
The sunshade can be opened manually by sliding
it rearward, or automatically, by opening the power
sunroof. You will need to close the sunshade manually
by sliding it forward.
Close:To close the sunroof, push the switch forward
and hold until the sunroof motor stops, or release
the switch when the desired position has been reached.
Vehicle Personalization
Some of the convenience features can be reset or
customized to perform according to your preference.
The features you can program depend upon the options
that came with your vehicle. The following list shows
features that can be reset or customized along with
those options.
·Settings (Available for All)
·GM Oil Life System Reset (Available for All)
·Low Tire Pressure Reset
·Delayed Headlamp Illumination (Available for All)
·Automatic Door Lock and Unlock (Available for All)
·Remote Visual Veri®cation (Available with Remote
Keyless Entry)
·Remote Audible Veri®cation (Available with Remote
Keyless Entry)
·Content Theft Operation (Available with Content
Theft System)
·Trunk Jamb (Available with Content Theft System)
·Horn Chirp On Timer (Available with Remote
Keyless Entry)
·Remote Keyless Entry Transmitter Programming
(Available with Remote Keyless Entry)
·Return to Original Factory Settings
(Available for All)
·Exit Vehicle Customization Mode
2-41
Page 109 of 394

FOB LIGHT (Remote Visual
Veri®cation)
This feature allows the exterior lights to ¯ash when the
remote keyless entry transmitter is used to lock or
unlock the vehicle, or to program no veri®cation.
Programmable Modes
Mode 1:OFF
Mode 2:On ± One ¯ash for each remote
lock/two ¯ashes for each remote unlock.
Your vehicle was originally programmed to Mode 2.
The mode may have been changed since then.
To determine the current mode, or to change the mode,
do the following:
1. Scroll, using the SEEK PSCAN up or down arrows,
until FOB LIGHT appears on the display.2. Press the 1 PREV or 2 NEXT button to enter the
submenu. The current selection will have an
asterisk (*) next to it. If you do not wish to change
the current mode, you can either exit the
programming mode by following the directions later
in this section or program the next feature
available on your vehicle.
3. Scroll, using the 1 PREV or 2 NEXT buttons,
through the modes to change the current mode.
4. With your preference displayed, press the TUNE
DISP button to select. A chime will be heard to
verify the new setting. The new selection will
be displayed with an asterisk (*) for one second.
If your vehicle has the optional content theft-deterrent
system, the ®rst time a remote UNLOCK command
is received, three ¯ashes will be seen and three horn
chirps heard to indicate an alarm condition has occurred
since last arming. See
Content Theft-Deterrent on
page 2-14.
The mode you selected is now set. You can either exit
the programming mode by following the instructions
later in this section or program the next feature available
on your vehicle.
2-45
Page 110 of 394

FOB HORN (Remote Audible
Veri®cation)
This feature allows the horn to chirp when the remote
keyless entry transmitter is used to lock or unlock
the vehicle, or to program no veri®cation.
Programmable Modes
Mode 1:OFF
Mode 2:PARTIAL ± One chirp for each remote LOCK
command/no chirp for remote UNLOCK command.
Mode 3:FULL ± One chirp for each remote LOCK
command/two chirps for the ®rst remote UNLOCK
command.
Your vehicle was originally programmed to Mode 1.
The mode may have been changed since then.
To determine the current mode, or to change the mode,
do the following:
1. Scroll, using the SEEK PSCAN up or down arrows,
until FOB HORN appears on the display.2. Press the 1 PREV or 2 NEXT button to enter the
submenu. The current selection will have an
asterisk (*) next to it. If you do not wish to change
the current mode, you can either exit the
programming mode by following the directions later
in this section or program the next feature
available on your vehicle.
3. Scroll, using the 1 PREV or 2 NEXT buttons,
through the modes to change the current mode.
4. With your preference displayed, press the TUNE
DISP button to select. A chime will be heard to
verify the new setting. The new selection will
be displayed with an asterisk (*) for one second.
If your vehicle has the optional content theft-deterrent
system, the ®rst time a remote UNLOCK command
is received, three ¯ashes will be seen and three horn
chirps heard to indicate an alarm condition has occurred
since last arming. See
Content Theft-Deterrent on
page 2-14.
The mode you selected is now set. You can either exit
the programming mode by following the instructions
later in this section or program the next feature available
on your vehicle.
2-46
Page 113 of 394

CHIRP (Horn Chirp Timer)
This feature allows you to choose between short or long
horn chirp sounds when the remote keyless entry
transmitter is used.
Programmable Modes
Mode 1:SHORT
Mode 2:LONG
Your vehicle was originally programmed to Mode 1.
The mode may have been changed since then.
To determine the current mode, or to change the mode,
do the following:
1. Scroll, using the SEEK PSCAN up or down arrows,
until CHIRP appears on the display.
2. Press the 1 PREV or 2 NEXT button to enter the
submenu. The current selection will have an
asterisk (*) next to it. If you do not wish to change
the current mode, you can either exit the
programming mode by following the directions later
in this section or program the next feature
available on your vehicle.
3. Scroll, using the 1 PREV or 2 NEXT buttons,
through the modes to change the current mode.4. With your preference displayed, press the TUNE
DISP button to select. A chime will be heard to
verify the new setting. The new selection will
be displayed with an asterisk (*) for one second.
The mode you selected is now set. You can either exit
the programming mode by following the instructions
later in this section or program the next feature available
on your vehicle.
ORIG. SET (Return to the Original
Settings)
This feature allows you to return all customization
feature settings back to their original factory settings.
To reset do the following:
1. Scroll, using the SEEK PSCAN up or down arrows,
until ORIG. SET appears on the display.
2. Press the 1 PREV or 2 NEXT button to enter the
submenu. SET ALL will appear.
3. With your preference displayed, press the TUNE
DISP button to select. A chime will be heard to
verify the new setting. The new selection will
be displayed with an asterisk (*) for one second.
The original factory settings are now reset. You can
either exit the programming mode by following the
instructions later in this section or program the next
feature available on your vehicle.
2-49
Page 115 of 394

Instrument Panel Overview...............................3-4
Hazard Warning Flashers................................3-6
Other Warning Devices...................................3-6
Horn.............................................................3-7
Tilt Wheel.....................................................3-7
Turn Signal/Multifunction Lever.........................3-7
Exterior Lamps.............................................3-15
Interior Lamps..............................................3-17
Accessory Power Outlets...............................3-20
Auxiliary Power Connection (Power Drop).........3-21
Ashtrays and Cigarette Lighter........................3-21
Climate Controls............................................3-22
Dual Climate Control System..........................3-22
Passenger Compartment Air Filter...................3-28
Warning Lights, Gages and Indicators.............3-30
Instrument Panel Cluster................................3-31
Speedometer and Odometer...........................3-33
Tachometer.................................................3-33
Safety Belt Reminder Light.............................3-34
Air Bag Readiness Light................................3-34
Voltmeter Gage............................................3-35
Brake System Warning Light..........................3-36
Anti-Lock Brake System Warning Light.............3-37Traction Control System (TCS)
Warning Light...........................................3-37
Engine Coolant Temperature Gage..................3-38
Malfunction Indicator Lamp.............................3-38
Oil Pressure Indicator Light............................3-42
Cruise Control Light......................................3-43
Fuel Gage...................................................3-43
Message Center.............................................3-44
Service Traction System Warning Message......3-44
Traction Active Message................................3-45
Battery Warning Message..............................3-45
Hot Coolant Temperature Warning Message.....3-46
Low Oil Pressure Message............................3-46
Low Engine Oil Level Message.......................3-47
Change Engine Oil Message..........................3-47
Low Tire Message........................................3-48
Door Ajar Warning Message...........................3-48
Trunk Ajar Warning Message.........................3-49
Security Message.........................................3-49
Low Washer Fluid Warning Message...............3-50
Low Fuel Warning Message...........................3-50
Low Brake Fluid Warning Message.................3-51
Service Vehicle Soon Message.......................3-51
Highbeam Out Warning Message....................3-52
Section 3 Instrument Panel
3-1
Page 121 of 394

Horn
Press near or on the horn symbols on your steering
wheel pad to sound the horn.
Tilt Wheel
A tilt steering wheel allows you to adjust the steering
wheel before you drive. You can raise the steering wheel
to the highest level to give your legs more room when
you exit and enter. The lever to adjust it is located on the
left side of the steering column.
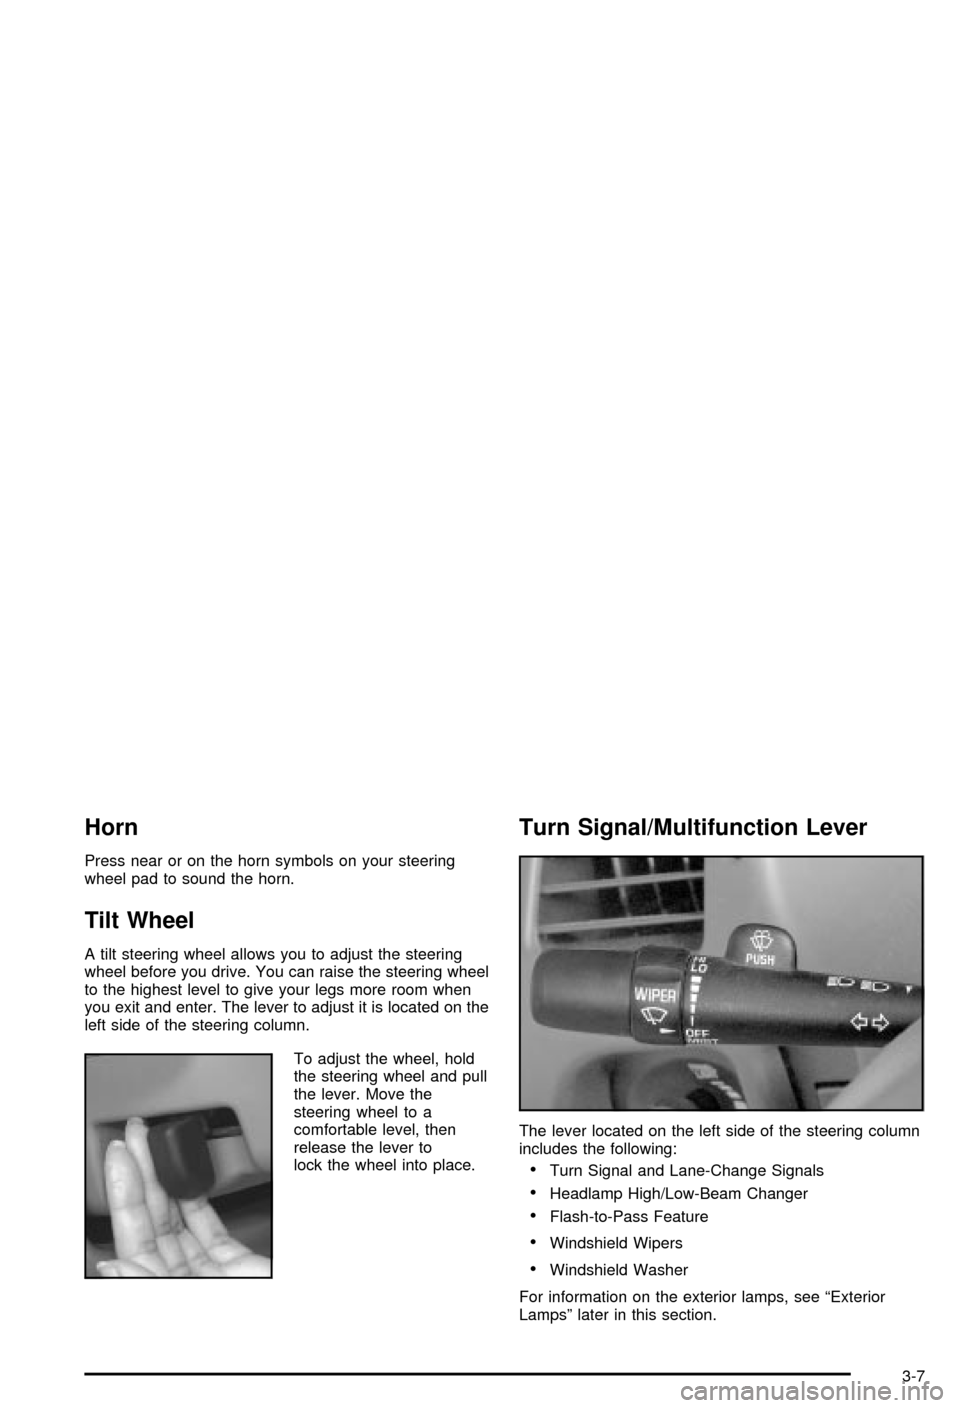
To adjust the wheel, hold
the steering wheel and pull
the lever. Move the
steering wheel to a
comfortable level, then
release the lever to
lock the wheel into place.
Turn Signal/Multifunction Lever
The lever located on the left side of the steering column
includes the following:
·Turn Signal and Lane-Change Signals
·Headlamp High/Low-Beam Changer
·Flash-to-Pass Feature
·Windshield Wipers
·Windshield Washer
For information on the exterior lamps, see ªExterior
Lampsº later in this section.
3-7
Page 344 of 394

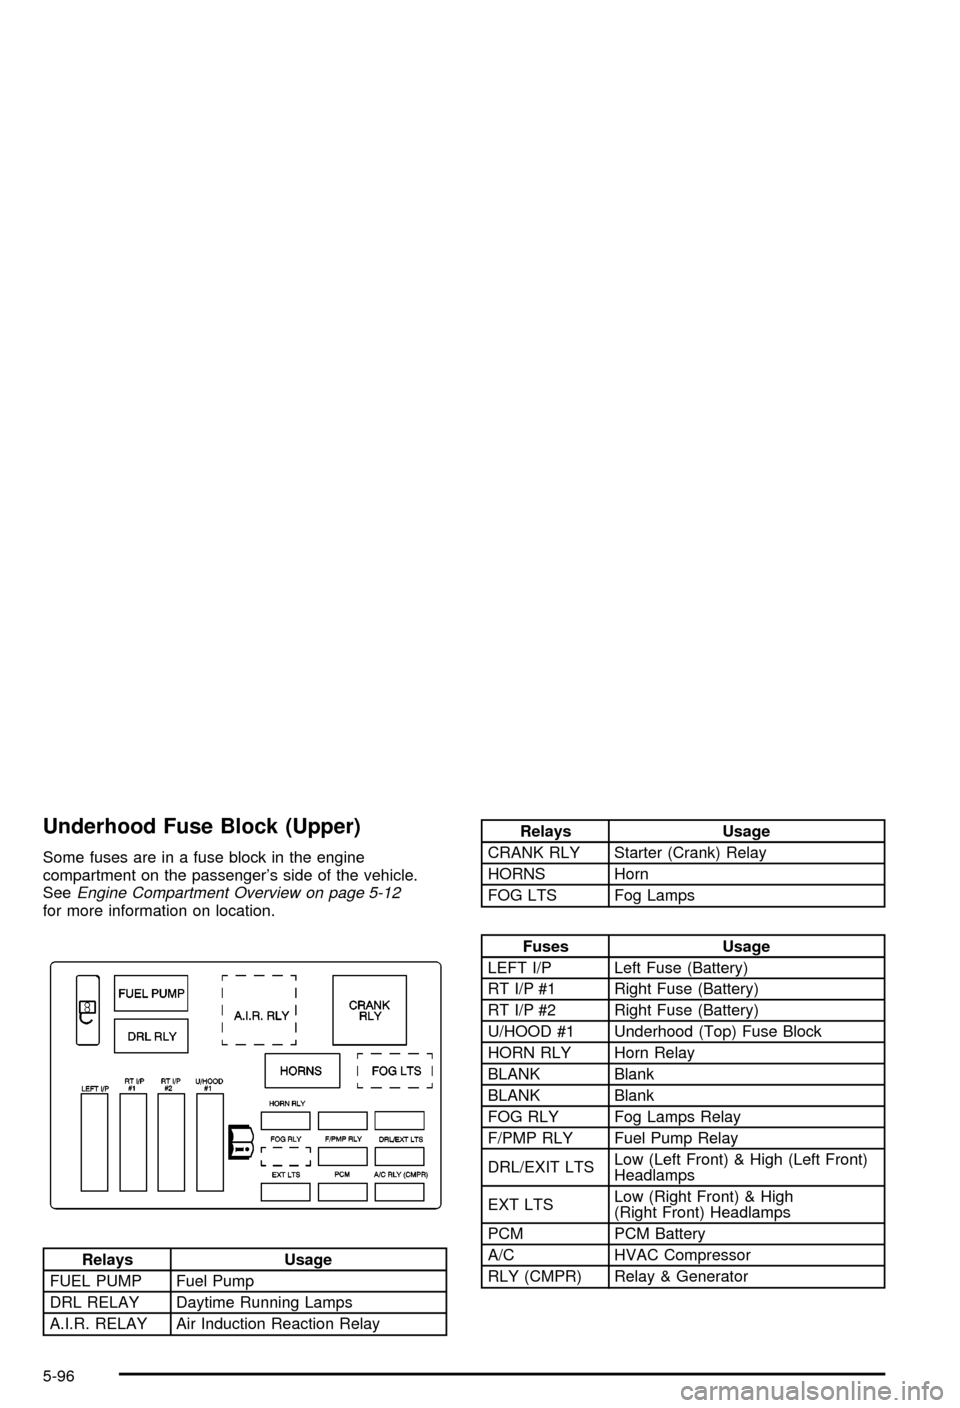
Underhood Fuse Block (Upper)
Some fuses are in a fuse block in the engine
compartment on the passenger's side of the vehicle.
See
Engine Compartment Overview on page 5-12for more information on location.
Relays Usage
FUEL PUMP Fuel Pump
DRL RELAY Daytime Running Lamps
A.I.R. RELAY Air Induction Reaction Relay
Relays Usage
CRANK RLY Starter (Crank) Relay
HORNS Horn
FOG LTS Fog Lamps
Fuses Usage
LEFT I/P Left Fuse (Battery)
RT I/P #1 Right Fuse (Battery)
RT I/P #2 Right Fuse (Battery)
U/HOOD #1 Underhood (Top) Fuse Block
HORN RLY Horn Relay
BLANK Blank
BLANK Blank
FOG RLY Fog Lamps Relay
F/PMP RLY Fuel Pump Relay
DRL/EXIT LTSLow (Left Front) & High (Left Front)
Headlamps
EXT LTSLow (Right Front) & High
(Right Front) Headlamps
PCM PCM Battery
A/C HVAC Compressor
RLY (CMPR) Relay & Generator
5-96