display CHEVROLET MONTE CARLO 2006 6.G User Guide
[x] Cancel search | Manufacturer: CHEVROLET, Model Year: 2006, Model line: MONTE CARLO, Model: CHEVROLET MONTE CARLO 2006 6.GPages: 392, PDF Size: 2.34 MB
Page 156 of 392
DIC Operation and Displays
The DIC has different displays which can be accessed
by pressing the DIC buttons located on the instrument
panel, to the right of the instrument panel cluster.
DIC Buttons
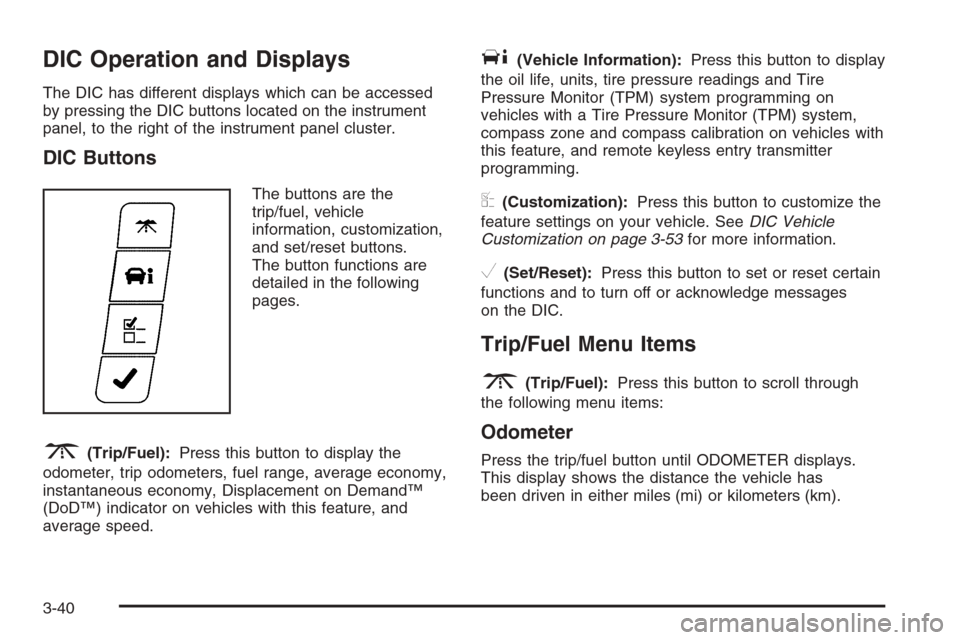
The buttons are the
trip/fuel, vehicle
information, customization,
and set/reset buttons.
The button functions are
detailed in the following
pages.
3(Trip/Fuel):Press this button to display the
odometer, trip odometers, fuel range, average economy,
instantaneous economy, Displacement on Demand™
(DoD™) indicator on vehicles with this feature, and
average speed.
T(Vehicle Information):Press this button to display
the oil life, units, tire pressure readings and Tire
Pressure Monitor (TPM) system programming on
vehicles with a Tire Pressure Monitor (TPM) system,
compass zone and compass calibration on vehicles with
this feature, and remote keyless entry transmitter
programming.
U(Customization):Press this button to customize the
feature settings on your vehicle. SeeDIC Vehicle
Customization on page 3-53for more information.
V(Set/Reset):Press this button to set or reset certain
functions and to turn off or acknowledge messages
on the DIC.
Trip/Fuel Menu Items
3
(Trip/Fuel):Press this button to scroll through
the following menu items:
Odometer
Press the trip/fuel button until ODOMETER displays.
This display shows the distance the vehicle has
been driven in either miles (mi) or kilometers (km).
3-40
Page 157 of 392
Trip A and Trip B
Press the trip/fuel button until TRIP A or TRIP B
displays. This display shows the current distance
traveled in either miles (mi) or kilometers (km) since the
last reset for each trip odometer. Both trip odometers
can be used at the same time.
Each trip odometer can be reset to zero separately by
pressing the set/reset button while the desired trip
odometer is displayed.
The trip odometer has a feature called the retro-active
reset. This can be used to set the trip odometer to
the number of miles (kilometers) driven since the ignition
was last turned on. This can be used if the trip
odometer is not reset at the beginning of the trip.
To use the retro-active reset feature, press and hold
the set/reset button for at least two seconds. The trip
odometer will display the number of miles (mi) or
kilometers (km) driven since the ignition was last turned
on and the vehicle was moving. Once the vehicle begins
moving, the trip odometer will accumulate mileage.
For example, if the vehicle was driven 5 miles (8 km)
before it is started again, and then the retro-active reset
feature is activated, the display will show 5 miles (8 km).
As the vehicle begins moving, the display will then
increase to 5.1 miles (8.2 km), 5.2 miles (8.4 km), etc.If the retro-active reset feature is activated after the
vehicle is started, but before it begins moving, the display
will show the number of miles (mi) or kilometers (km)
that were driven during the last ignition cycle.
Fuel Range
Press the trip/fuel button until FUEL RANGE displays.
This display shows the approximate number of
remaining miles (mi) or kilometers (km) the vehicle can
be driven without refueling.
The fuel range estimate is based on an average of the
vehicle’s fuel economy over recent driving history
and the amount of fuel remaining in the fuel tank.
This estimate will change if driving conditions change.
For example, if driving in traffic and making frequent
stops, this display may read one number, but if
the vehicle is driven on a freeway, the number may
change even though the same amount of fuel is in the
fuel tank. This is because different driving conditions
produce different fuel economies. Generally, freeway
driving produces better fuel economy than city driving.
If your vehicle is low on fuel, the FUEL LEVEL LOW
message will be displayed. See “FUEL LEVEL LOW”
underDIC Warnings and Messages on page 3-46
for more information.
3-41
Page 158 of 392
Average Economy
Press the trip/fuel button until AVG ECONOMY displays.
This display shows the approximate average miles per
gallon (mpg) or liters per 100 kilometers (L/100 km).
This number is calculated based on the number of mpg
(L/100 km) recorded since the last time this menu item
was reset. To reset AVG ECONOMY, press and hold the
set/reset button. The display will return to zero.
Instantaneous Economy and Displacement
on Demand™ (DoD™) Indicator
Press the trip/fuel button until INST ECONOMY displays.
If your vehicle has a V8 engine, INST ECONOMY
8CYL MODE will display. This display shows the current
fuel economy at a particular moment and will change
frequently as driving conditions change. This display
shows the instantaneous fuel economy in miles
per gallon (mpg) or liters per 100 kilometers (L/100 km).
Unlike average economy, this screen cannot be reset.If your vehicle has a V8 engine, a Displacement on
Demand™ (DoD™) indicator will display on the right side
of the DIC, while INST ECONOMY displays on the left
side. DoD™ allows the engine to operate on either four or
eight cylinders, depending on your driving demands.
When DoD™ is active, 4CYL MODE will display on the
DIC. When DoD™ is inactive, 8CYL MODE will
display. SeeDisplacement on Demand™ (DoD™)
(5.3L V8 Engine) on page 2-21for more information.
Average Speed
Press the trip/fuel button until AVERAGE SPEED
displays. This display shows the average speed of the
vehicle in miles per hour (mph) or kilometers per
hour (km/h). This average is calculated based on the
various vehicle speeds recorded since the last reset of
this value. To reset the value, press and hold the
set/reset button. The display will return to zero.
Blank Display
This display shows no information.
3-42
Page 159 of 392
Vehicle Information Menu Items
T
(Vehicle Information):Press this button to scroll
through the following menu items:
Oil Life
Press the vehicle information button until OIL LIFE
REMAINING displays. This display shows an estimate
of the oil’s remaining useful life. If you see 99% OIL LIFE
REMAINING on the display, that means 99% of the
current oil life remains. The engine oil life system
will alert you to change your oil on a schedule consistent
with your driving conditions.
When the remaining oil life is low, the CHANGE
ENGINE OIL SOON message will appear on the display.
See “CHANGE ENGINE OIL SOON” underDIC
Warnings and Messages on page 3-46. You should
change your oil as soon as possible. SeeEngine Oil on
page 5-17. In addition to the engine oil life system
monitoring the oil life, additional maintenance is
recommended in the Maintenance Schedule in this
manual. SeeScheduled Maintenance on page 6-4for
more information.
Remember, you must reset the OIL LIFE yourself after
each oil change. It will not reset itself. Also, be
careful not to reset the OIL LIFE accidentally at any
time other than when the oil has just been changed.It cannot be reset accurately until the next oil change.
To reset the engine oil life system, seeEngine Oil
Life System on page 5-20.
Units
Press the vehicle information button until UNITS
displays. This display allows you to select between
English or Metric units of measurement. Once in this
display, press the set/reset button to select between
ENGLISH or METRIC units.
Tire Pressure
If your vehicle has a Tire Pressure Monitor (TPM)
system, the pressure for each tire can be viewed in the
DIC. The tire pressure will be shown in either pounds
per square inch (psi) or kilopascals (kPa). Press
the vehicle information button until the DIC shows the
tire pressure for the front tires. Press the vehicle
information button again to view the pressure for the
rear tires.
If a low or high tire pressure condition is detected by the
system while driving, a message advising you to check
the pressure in a speci�c tire will appear in the display.
SeeIn�ation - Tire Pressure on page 5-60andDIC
Warnings and Messages on page 3-46for more
information.
3-43
Page 160 of 392
Learn Tire Positions
If your vehicle has a Tire Pressure Monitor (TPM) system,
after rotating the tires or after replacing a tire or sensor,
the system must re-learn the tire positions. To re-learn
the tire positions, seeTire Pressure Monitor System on
page 5-62.SeeTire Inspection and Rotation on
page 5-66andDIC Warnings and Messages on
page 3-46for more information.
Compass Zone
Your vehicle may have this feature. Under certain
circumstances, such as during a long distance
cross-country trip, it will be necessary to compensate for
compass variance and reset the zone. To change the
compass zone through the DIC, seeDIC Compass
on page 3-45.
Compass Calibration
The compass can be manually calibrated. To calibrate
the compass through the DIC, seeDIC Compass
on page 3-45.
Remote Key
This display allows you to match the remote keyless
entry transmitter to your vehicle. To match a remote
keyless entry transmitter to your vehicle, do the
following:
1. Press the vehicle information button until
PRESS
VTO RELEARN REMOTE KEY displays.
2. Press the set/reset button.
The message REMOTE KEY LEARNING ACTIVE
will display.
3. Press and hold the lock and unlock buttons on the
�rst transmitter at the same time for approximately
15 seconds.
A chime will sound indicating that the transmitter is
matched.
4. To match additional transmitters at this time, repeat
Step 3.
Each vehicle can have a maximum of eight
transmitters matched to it.
5. To exit the programming mode, you must cycle the
key to OFF.
Blank Display
This display shows no information.
3-44
Page 161 of 392
Customization Menu Items
U
(Customization):Press this button to enter the
feature settings menu. This display allows you to
customize the feature settings on your vehicle. SeeDIC
Vehicle Customization on page 3-53for more
information.
DIC Compass
Your vehicle may have a compass in the Driver
Information Center (DIC).
Compass Zone
Under certain circumstances, such as during a long
distance cross-country trip, it will be necessary to
compensate for compass variance and reset the zone
through the DIC.
Compass variance is the difference between the earth’s
magnetic north and true geographic north. If not
adjusted to account for compass variance, the compass
in the vehicle could give false readings.
In order to do this, the compass must be set or
calibrated to the variance zone in which the vehicle is
traveling.To adjust for compass variance, use the following
procedure:
Compass Variance Procedure
1. Press the vehicle information button until
PRESS
VTO CHANGE COMPASS ZONE displays.
2. Find the vehicle’s current location and variance
zone number on the map.
Zones 1 through 15 are available.
3-45
Page 162 of 392
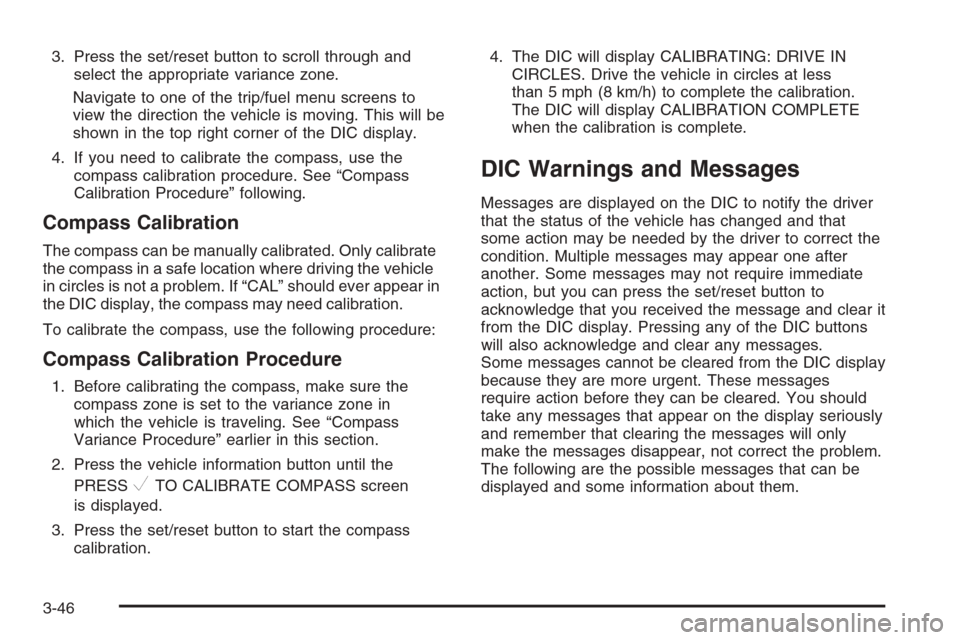
3. Press the set/reset button to scroll through and
select the appropriate variance zone.
Navigate to one of the trip/fuel menu screens to
view the direction the vehicle is moving. This will be
shown in the top right corner of the DIC display.
4. If you need to calibrate the compass, use the
compass calibration procedure. See “Compass
Calibration Procedure” following.
Compass Calibration
The compass can be manually calibrated. Only calibrate
the compass in a safe location where driving the vehicle
in circles is not a problem. If “CAL” should ever appear in
the DIC display, the compass may need calibration.
To calibrate the compass, use the following procedure:
Compass Calibration Procedure
1. Before calibrating the compass, make sure the
compass zone is set to the variance zone in
which the vehicle is traveling. See “Compass
Variance Procedure” earlier in this section.
2. Press the vehicle information button until the
PRESS
VTO CALIBRATE COMPASS screen
is displayed.
3. Press the set/reset button to start the compass
calibration.4. The DIC will display CALIBRATING: DRIVE IN
CIRCLES. Drive the vehicle in circles at less
than 5 mph (8 km/h) to complete the calibration.
The DIC will display CALIBRATION COMPLETE
when the calibration is complete.
DIC Warnings and Messages
Messages are displayed on the DIC to notify the driver
that the status of the vehicle has changed and that
some action may be needed by the driver to correct the
condition. Multiple messages may appear one after
another. Some messages may not require immediate
action, but you can press the set/reset button to
acknowledge that you received the message and clear it
from the DIC display. Pressing any of the DIC buttons
will also acknowledge and clear any messages.
Some messages cannot be cleared from the DIC display
because they are more urgent. These messages
require action before they can be cleared. You should
take any messages that appear on the display seriously
and remember that clearing the messages will only
make the messages disappear, not correct the problem.
The following are the possible messages that can be
displayed and some information about them.
3-46
Page 163 of 392
AUTOMATIC LIGHT CONTROL OFF
This message will display when the automatic
headlamps are turned off. SeeDaytime Running Lamps
(DRL)/Automatic Headlamp System on page 3-14for
more information.
AUTOMATIC LIGHT CONTROL ON
This message will display when the automatic
headlamps are turned on. SeeDaytime Running Lamps
(DRL)/Automatic Headlamp System on page 3-14for
more information.
CHANGE ENGINE OIL SOON
This message will display when service is required for
the vehicle. See your GM dealer. SeeEngine Oil
on page 5-17andScheduled Maintenance on page 6-4
for more information.
Acknowledging the CHANGE ENGINE OIL SOON
message will not reset the OIL LIFE REMAINING.
That must be done at the OIL LIFE screen under the
vehicle information menu. See “Oil Life” underDIC
Operation and Displays on page 3-40andEngine Oil
Life System on page 5-20.
CHECK TIRE PRESSURE
If your vehicle has a Tire Pressure Monitor (TPM) system,
this message will display when the tire pressure in one of
the tires needs to be checked. This message will also
display LEFT FRONT, RIGHT FRONT, LEFT REAR, or
RIGHT REAR to indicate which tire needs to be checked.
You can receive more than one tire pressure message at
a time. To read the other messages that may have been
sent at the same time, press the set/reset button. If a tire
pressure message appears on the DIC, stop as soon as
you can. Have the tire pressures checked and set to
those shown on your Tire Loading Information Label.
SeeTires on page 5-54,Loading Your Vehicle on
page 4-29, andIn�ation - Tire Pressure on page 5-60.
The DIC display also shows the tire pressure values for
the front and rear tires by pressing the vehicle information
button. SeeDIC Operation and Displays on page 3-40.
If the tire pressure is low, the low tire pressure warning
light will come on. SeeTire Pressure Light on page 3-34.
DRIVER DOOR OPEN
This message will display when the driver’s door is not
closed properly. When this message appears, you
should make sure that the driver’s door is closed
completely.
3-47
Page 164 of 392
ENGINE HOT A/C
(Air Conditioning) OFF
This message will display when the engine coolant
becomes hotter than the normal operating temperature.
To avoid added strain on a hot engine, the air
conditioning compressor is automatically turned off.
When the coolant temperature returns to normal,
the A/C operation will automatically resume. You can
continue to drive your vehicle. If this message continues
to appear, have the system repaired by your GM dealer
as soon as possible to avoid compressor damage.
ENGINE OIL LOW ADD OIL
This message will display when the vehicle’s engine oil
is low. Fill the oil to the proper level as soon as
possible. SeeEngine Compartment Overview on
page 5-12for the engine oil �ll location. Also, see
Engine Oil on page 5-17for information on the kind of
oil to use and the proper oil level.
ENGINE OVERHEATED IDLE ENGINE
Notice:If you drive your vehicle while the engine is
overheating, severe engine damage may occur. If an
overheat warning appears on the instrument panel
cluster and/or DIC, stop the vehicle as soon as
possible. Do not increase the engine speed above
normal idling speed. SeeEngine Overheating on
page 5-29for more information.This message will display when the engine coolant
temperature is too hot. Stop and allow the vehicle to idle
until it cools down.
ENGINE OVERHEATED STOP ENGINE
Notice:If you drive your vehicle while the engine
is overheating, severe engine damage may occur.
If an overheat warning appears on the instrument
panel cluster and/or DIC, stop the vehicle as soon as
possible. Do not increase the engine speed above
normal idling speed. SeeEngine Overheating
on page 5-29for more information.
This message will display along with a continuous
chime when the engine has overheated. Stop and turn
the engine off immediately to avoid severe engine
damage. SeeEngine Overheating on page 5-29.
ENGINE POWER IS REDUCED
This message will display when the vehicle’s engine
power is reduced. Reduced engine power can affect the
vehicle’s ability to accelerate. If this message is on,
but there is no reduction in performance, proceed
to your destination. The performance may be reduced
the next time the vehicle is driven. The vehicle may
be driven at a reduced speed while this message is on,
but acceleration and speed may be reduced. Anytime
this message stays on, the vehicle should be taken
to your GM dealer for service as soon as possible.
3-48
Page 165 of 392
ERROR
This message will display while viewing the odometer or
trip odometers if there is a problem with the instrument
panel cluster. See your GM dealer for service.
FUEL LEVEL LOW
This message will display when your vehicle is low on
fuel. You should re�ll the fuel tank as soon as possible.
SeeFuel Gage on page 3-38andFilling the Tank on
page 5-8for more information.
HOOD OPEN
If your vehicle has the remote start feature, this
message will display when the hood is not closed
properly. When this message appears, you should make
sure that the hood is closed completely. SeeHood
Release on page 5-11.
ICE POSSIBLE DRIVE WITH CARE
This message will display when the outside air
temperature is cold enough to create icy road conditions.
Adjust your driving accordingly.
OIL PRESSURE LOW STOP ENGINE
Notice:If you drive your vehicle while the engine
oil pressure is low, severe engine damage may
occur. If a low oil pressure warning appears on the
Driver Information Center (DIC), stop the vehicle
as soon as possible. Do not drive the vehicle until
the cause of the low oil pressure is corrected.
SeeEngine Oil on page 5-17for more information.
This message will display when the vehicle’s engine
oil pressure is low. The oil pressure light will also appear
on the instrument panel cluster. SeeOil Pressure
Light on page 3-37.
Stop the vehicle immediately, as engine damage can
result from driving a vehicle with low oil pressure. Have
the vehicle serviced by your GM dealer as soon as
possible when this message is displayed.
PASSENGER DOOR OPEN
This message will display when the passenger’s door
is not closed properly. When this message appears,
you should make sure that the passenger’s door
is closed completely.
3-49