radio controls CHEVROLET MONTE CARLO 2006 6.G Owners Manual
[x] Cancel search | Manufacturer: CHEVROLET, Model Year: 2006, Model line: MONTE CARLO, Model: CHEVROLET MONTE CARLO 2006 6.GPages: 392, PDF Size: 2.34 MB
Page 118 of 392
Tire Pressure Light.......................................3-34
Malfunction Indicator Lamp.............................3-34
Oil Pressure Light.........................................3-37
Security Light...............................................3-37
Fog Lamp Light............................................3-38
Cruise Control Light......................................3-38
Highbeam On Light.......................................3-38
Fuel Gage...................................................3-38
Driver Information Center (DIC).......................3-39
DIC Operation and Displays...........................3-40
DIC Compass..............................................3-45
DIC Warnings and Messages.........................3-46
DIC Vehicle Customization.............................3-53Audio System(s).............................................3-59
Setting the Time (Without Date Display)...........3-60
Setting the Time (With Date Display)...............3-61
Radio with CD (Base)...................................3-62
Radio with CD (MP3)....................................3-67
Theft-Deterrent Feature..................................3-82
Audio Steering Wheel Controls.......................3-83
Radio Reception...........................................3-83
Care of Your CDs.........................................3-84
Care of the CD Player...................................3-84
Backglass Antenna.......................................3-85
XM™ Satellite Radio Antenna System.............3-85
Section 3 Instrument Panel
3-2
Page 175 of 392
Exiting the Feature Settings Menu
The feature settings menu will be exited when any of
the following occurs:
The vehicle is shifted out of PARK (P).
The vehicle is no longer in RUN.
The trip/fuel or vehicle information DIC buttons are
pressed.
The end of the feature settings menu is reached
and exited.
A 40 second time period has elapsed with no
selection made.
Audio System(s)
Determine which radio your vehicle has and then read
the pages following to familiarize yourself with its
features.
Driving without distraction is a necessity for a safer
driving experience. SeeDefensive Driving on page 4-2.
By taking a few moments to read this manual and
get familiar with your vehicle’s audio system, you can
use it with less effort, as well as take advantage of
its features. While your vehicle is parked, set up your
audio system by presetting your favorite radio stations,
setting the tone, and adjusting the speakers.Then, when driving conditions permit, you can tune to
your favorite stations using the presets and steering
wheel controls if the vehicle has them.
{CAUTION:
This system provides you with a far greater
access to audio stations and song listings.
Giving extended attention to entertainment
tasks while driving can cause a crash and you
or others can be injured or killed. Always keep
your eyes on the road and your mind on the
drive — avoid engaging in extended searching
while driving.
Keeping your mind on the drive is important for safe
driving. For more information, seeDefensive Driving on
page 4-2.
3-59
Page 176 of 392
Here are some ways in which you can help avoid
distraction while driving.
While your vehicle is parked:
Familiarize yourself with all of its controls.
Familiarize yourself with its operation.
Set up your audio system by presetting your
favorite radio stations, setting the tone, and
adjusting the speakers. Then, when driving
conditions permit, you can tune to your favorite
radio stations using the presets and steering wheel
controls if the vehicle has them.
Notice:Before adding any sound equipment to
your vehicle, such as an audio system, CD player,
CB radio, mobile telephone, or two-way radio, make
sure that it can be added by checking with your
dealer. Also, check federal rules covering mobile
radio and telephone units. If sound equipment can
be added, it is very important to do it properly.
Added sound equipment may interfere with
the operation of your vehicle’s engine, radio, or
other systems, and even damage them. Your
vehicle’s systems may interfere with the operation
of sound equipment that has been added.Notice:The chime signals related to safety belts,
parking brake, and other functions of your vehicle
operate through the radio/entertainment system.
If that equipment is replaced or additional equipment
is added to your vehicle, the chimes may not
work. Make sure that replacement or additional
equipment is compatible with your vehicle before
installing it. SeeAccessories and Modifications
on page 5-3.
Your vehicle has a feature called Retained Accessory
Power (RAP). With RAP, the audio system can be
played even after the ignition is turned off. SeeRetained
Accessory Power (RAP) on page 2-19for more
information.
Setting the Time
(Without Date Display)
If your vehicle has a base AM/FM radio with a single
CD player and preset buttons numbered one through
six, the radio will have a clock button for setting the time.
You can set the time by following these steps:
1. Press the clock button until the hour numbers begin
�ashing on the display. Press the clock button a
second time and the minute numbers will begin
�ashing on the display.
3-60
Page 185 of 392
Storing a Radio Station as a Favorite
Drivers are encouraged to set up their radio station
favorites while the vehicle is parked. Tune to your
favorite stations using the presets, favorites button, and
steering wheel controls if the vehicle has this feature.
SeeDefensive Driving on page 4-2.
FAV (Favorites):A maximum of 36 stations can be
programmed as favorites using the six pushbuttons
positioned below the radio station frequency labels and
by using the radio favorites page button (FAV button).
Press the FAV button to go through up to six pages
of favorites, each having six favorite stations available
per page. Each page of favorites can contain any
combination of AM, FM, or XM™ (if equipped) stations.
To store a station as a favorite, perform the
following steps:
1. Tune to the desired radio station.
2. Press the FAV button to display the page where
you want the station stored.
3. Press and hold one of the six pushbuttons until you
hear a beep. Whenever that pushbutton is pressed
and released, the station that was set will return.
4. Repeat the steps for each pushbutton radio station
you want stored as a favorite.The number of favorites pages can be setup using the
MENU button. To setup the number of favorites
pages, perform the following steps:
1. Press the MENU button to display the radio
setup menu.
2. Press the pushbutton located below the
FAV 1-6 label.
3. Select the desired number of favorites pages by
pressing the pushbutton located below the
displayed page numbers.
4. Press the FAV button, or let the menu time out, to
return to the original main radio screen showing the
radio station frequency labels and to begin the
process of programming your favorites for the
chosen amount of numbered pages.
Setting the Tone (Bass/Treble)
BASS/MID/TREB (Bass, Midrange, or Treble):To
adjust bass, midrange, or treble, press the tune knob
until the tone control labels appear on the display.
Continue pressing to highlight the desired label, or
press the pushbutton positioned under the desired label.
Turn the tune knob clockwise or counterclockwise to
adjust the highlighted setting. You can also adjust the
highlighted setting by pressing either the SEEK, FWD or
REV button until the desired levels are obtained. If a
station’s frequency is weak, or if there is static, decrease
the treble.
3-69
Page 186 of 392
To quickly adjust bass, midrange, or treble to the middle
position, press the pushbutton positioned under the
BASS, MID, or TREB label for more than two seconds.
You will hear a beep and the level will be adjusted to the
middle position.
To quickly adjust all tone and speaker controls to the
middle position, press the tune knob for more than
two seconds until you hear a beep.
EQ (Equalization):Press this button to select preset
equalization settings.
To return to the manual mode, press the EQ button until
Manual appears on the display or start to manually adjust
the bass, midrange, or treble by pressing the tune knob.
Adjusting the Speakers (Balance/Fade)
BAL/FADE (Balance/Fade):To adjust balance or fade,
press the tune knob until the speaker control labels
appear on the display. Continue pressing to highlight the
desired label, or press the pushbutton positioned under
the desired label. Turn the tune knob clockwise or
counterclockwise to adjust the highlighted setting. You
can also adjust the highlighted setting by pressing either
the SEEK, FWD, or REV button until the desired levels
are obtained.
To quickly adjust balance or fade to the middle position,
press the pushbutton positioned under the BAL or FADE
label for more than two seconds. You will hear a beep
and the level will be adjusted to the middle position.To quickly adjust all speaker and tone controls to the
middle position, press the tune knob for more than
two seconds until you hear a beep.
Finding a Category (CAT) Station
CAT (Category):The CAT button is used to �nd XM™
stations while the radio is in the XM™ mode. To �nd
XM™ channels within a desired category, perform
the following:
1. Press the BAND button until the XM™ frequency is
displayed. Press the CAT button to display the
category labels on the radio display. Continue
pressing the CAT button until the desired category
name is displayed.
2. Press either of the two buttons below the desired
category label to immediately tune to the �rst
XM™ station associated with that category.
3. Rotate the tune knob, press the buttons below the
right or left arrows displayed, or press the right or
left SEEK buttons to go to the next or previous
XM™ station within the selected category.
4. To exit the category search mode, press the FAV
button or BAND button to display your favorites
again.
3-70
Page 199 of 392
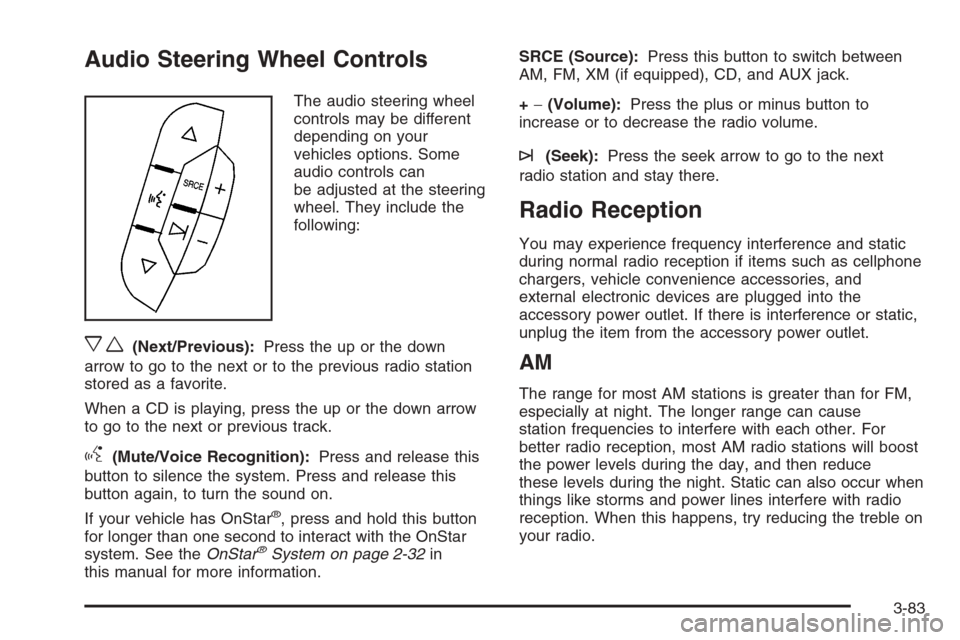
Audio Steering Wheel Controls
The audio steering wheel
controls may be different
depending on your
vehicles options. Some
audio controls can
be adjusted at the steering
wheel. They include the
following:
xw(Next/Previous):Press the up or the down
arrow to go to the next or to the previous radio station
stored as a favorite.
When a CD is playing, press the up or the down arrow
to go to the next or previous track.
g(Mute/Voice Recognition):Press and release this
button to silence the system. Press and release this
button again, to turn the sound on.
If your vehicle has OnStar
®, press and hold this button
for longer than one second to interact with the OnStar
system. See theOnStar
®System on page 2-32in
this manual for more information.SRCE (Source):Press this button to switch between
AM, FM, XM (if equipped), CD, and AUX jack.
+−(Volume):Press the plus or minus button to
increase or to decrease the radio volume.
¨(Seek):Press the seek arrow to go to the next
radio station and stay there.
Radio Reception
You may experience frequency interference and static
during normal radio reception if items such as cellphone
chargers, vehicle convenience accessories, and
external electronic devices are plugged into the
accessory power outlet. If there is interference or static,
unplug the item from the accessory power outlet.
AM
The range for most AM stations is greater than for FM,
especially at night. The longer range can cause
station frequencies to interfere with each other. For
better radio reception, most AM radio stations will boost
the power levels during the day, and then reduce
these levels during the night. Static can also occur when
things like storms and power lines interfere with radio
reception. When this happens, try reducing the treble on
your radio.
3-83
Page 380 of 392
Audio System(s).............................................3-59
Audio Steering Wheel Controls......................3-83
Backglass Antenna......................................3-85
Care of Your CD Player...............................3-84
Care of Your CDs ........................................3-84
Radio with CD....................................3-62, 3-67
Setting the Time..................................3-60, 3-61
Theft-Deterrent Feature................................3-82
Understanding Radio Reception.....................3-83
XM™ Satellite Radio Antenna System............3-85
Automatic Door Lock.......................................2-10
Automatic Transaxle
Fluid..........................................................5-23
Operation...................................................2-22
B
Backglass Antenna..........................................3-85
Battery..........................................................5-42
Run-Down Protection...................................3-17
Before Leaving on a Long Trip.........................4-21
Brake
Anti-Lock Brake System (ABS)........................ 4-7
Emergencies................................................ 4-8
Parking......................................................2-25
System Warning Light..................................3-31
Brakes..........................................................5-40
Braking........................................................... 4-6
Braking in Emergencies..................................... 4-8Break-In, New Vehicle.....................................2-18
Bulb Replacement...........................................5-47
Back-Up Lamps...........................................5-51
Halogen Bulbs............................................5-47
Headlamp Aiming........................................5-47
Headlamps, Front Turn Signal, Sidemarker,
and Parking Lamps..................................5-48
Replacement Bulbs......................................5-51
Taillamps, Stoplamps and Back-Up Lamps......5-50
Buying New Tires...........................................5-68
C
Calibration.....................................................3-45
California Fuel.................................................. 5-5
California Proposition 65 Warning....................... 5-3
Canadian Owners................................................ ii
Capacities and Speci�cations..........................5-100
Carbon Monoxide...................2-11, 2-28, 4-24, 4-36
Care of
Safety Belts................................................5-88
Your CD Player...........................................3-84
Your CDs ...................................................3-84
Center Console Storage Area...........................2-39
Chains, Tire...................................................5-73
Charging System Light....................................3-30
Check
Engine Light...............................................3-34
Checking Things Under the Hood......................5-10
2
Page 390 of 392
Split Folding Rear Seat..................................... 1-9
Starting Your Engine.......................................2-19
Steering........................................................4-10
Steering Wheel Controls, Audio.........................3-83
Steering Wheel, Tilt Wheel................................. 3-6
Storage Areas
Center Console Storage Area........................2-39
Convenience Net.........................................2-39
Cupholder(s)...............................................2-39
Glove Box..................................................2-39
Rear Seat Armrest.......................................2-39
Stuck in Sand, Mud, Ice, or Snow.....................4-28
Sun Visors.....................................................2-14
Sunroof.........................................................2-40
T
Tachometer....................................................3-26
Taillamps
Stoplamps, and Back-Up Lamps....................5-50
TCS Warning Light..........................................3-32
Theft-Deterrent, Radio.....................................3-82
Theft-Deterrent Systems...................................2-15
Content Theft-Deterrent................................2-15
PASS-Key
®III+...........................................2-16
PASS-Key®III+ Operation.............................2-16
Tilt Wheel........................................................ 3-6Tire
Pressure Light.............................................3-34
Tires.............................................................5-54
Aluminum Wheels, Cleaning..........................5-90
Buying New Tires........................................5-68
Chains.......................................................5-73
Changing a Flat Tire....................................5-74
Cleaning....................................................5-91
Compact Spare Tire.....................................5-85
Different Size..............................................5-69
If a Tire Goes Flat.......................................5-74
In�ation - Tire Pressure................................5-60
Inspection and Rotation................................5-66
Installing the Spare Tire................................5-77
Pressure Monitor System..............................5-62
Removing the Flat Tire.................................5-77
Removing the Spare Tire and Tools...............5-76
Storing a Flat or Spare Tire and Tools............5-83
Tire Sidewall Labeling..................................5-55
Tire Terminology and De�nitions....................5-57
Uniform Tire Quality Grading.........................5-70
Wheel Alignment and Tire Balance.................5-71
Wheel Replacement.....................................5-71
When It Is Time for New Tires......................5-67
Towing
Recreational Vehicle.....................................4-34
Towing a Trailer..........................................4-36
Your Vehicle...............................................4-34
12