trunk CHEVROLET MONTE CARLO 2006 6.G Owners Manual
[x] Cancel search | Manufacturer: CHEVROLET, Model Year: 2006, Model line: MONTE CARLO, Model: CHEVROLET MONTE CARLO 2006 6.GPages: 392, PDF Size: 2.34 MB
Page 16 of 392
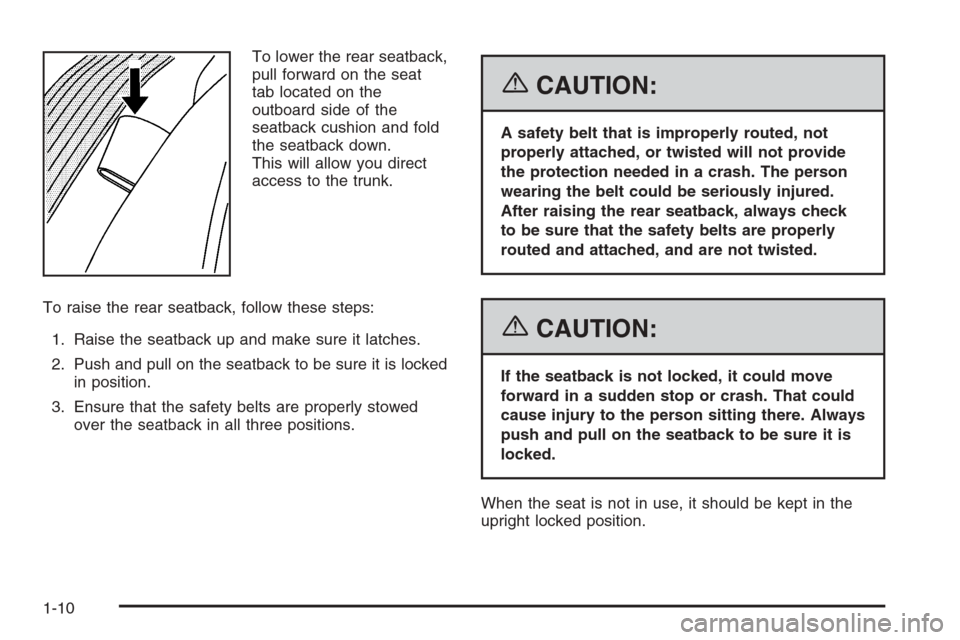
To lower the rear seatback,
pull forward on the seat
tab located on the
outboard side of the
seatback cushion and fold
the seatback down.
This will allow you direct
access to the trunk.
To raise the rear seatback, follow these steps:
1. Raise the seatback up and make sure it latches.
2. Push and pull on the seatback to be sure it is locked
in position.
3. Ensure that the safety belts are properly stowed
over the seatback in all three positions.
{CAUTION:
A safety belt that is improperly routed, not
properly attached, or twisted will not provide
the protection needed in a crash. The person
wearing the belt could be seriously injured.
After raising the rear seatback, always check
to be sure that the safety belts are properly
routed and attached, and are not twisted.
{CAUTION:
If the seatback is not locked, it could move
forward in a sudden stop or crash. That could
cause injury to the person sitting there. Always
push and pull on the seatback to be sure it is
locked.
When the seat is not in use, it should be kept in the
upright locked position.
1-10
Page 77 of 392
Keys...............................................................2-2
Remote Keyless Entry System.........................2-3
Remote Keyless Entry System Operation...........2-4
Doors and Locks.............................................2-9
Door Locks....................................................2-9
Power Door Locks........................................2-10
Automatic Door Lock.....................................2-10
Programmable Automatic Door Unlock.............2-11
Lockout Protection........................................2-11
Trunk..........................................................2-11
Windows........................................................2-13
Power Windows............................................2-14
Sun Visors...................................................2-14
Theft-Deterrent Systems..................................2-15
Content Theft-Deterrent.................................2-15
PASS-Key
®III+............................................2-16
PASS-Key®III+ Operation..............................2-16
Starting and Operating Your Vehicle................2-18
New Vehicle Break-In....................................2-18
Ignition Positions..........................................2-18
Retained Accessory Power (RAP)...................2-19
Starting the Engine.......................................2-19
Engine Coolant Heater..................................2-20
Displacement on Demand™ (DoD™)
(5.3L V8 Engine).......................................2-21
Automatic Transaxle Operation.......................2-22Parking Brake..............................................2-25
Shifting Into Park (P).....................................2-26
Shifting Out of Park (P).................................2-27
Parking Over Things That Burn.......................2-28
Engine Exhaust............................................2-28
Running the Engine While Parked...................2-29
Mirrors...........................................................2-30
Manual Rearview Mirror.................................2-30
Manual Rearview Mirror with OnStar
®..............2-30
Automatic Dimming Rearview Mirror................2-30
Automatic Dimming Rearview Mirror
with OnStar
®............................................2-31
Outside Power Mirrors...................................2-31
Outside Convex Mirror...................................2-32
Outside Heated Mirrors..................................2-32
OnStar
®System.............................................2-32
Universal Home Remote System......................2-34
Universal Home Remote System Operation......2-35
Storage Areas................................................2-39
Glove Box...................................................2-39
Cupholder(s)................................................2-39
Center Console Storage Area.........................2-39
Rear Seat Armrest........................................2-39
Convenience Net..........................................2-39
Sunroof.........................................................2-40
Section 2 Features and Controls
2-1
Page 80 of 392
At times you may notice a decrease in range. This is
normal for any remote keyless entry system. If the
transmitter does not work or if you have to stand closer
to your vehicle for the transmitter to work, try this:
Check the distance. You may be too far from your
vehicle. You may need to stand closer during
rainy or snowy weather.
Check the location. Other vehicles or objects may
be blocking the signal. Take a few steps to the
left or right, hold the transmitter higher, and
try again.
Check to determine if battery replacement is
necessary. See “Battery Replacement” under
Remote Keyless Entry System Operation on
page 2-4.
If you are still having trouble, see your dealer or a
quali�ed technician for service.
Remote Keyless Entry System
Operation
The vehicle’s doors can be locked and unlocked, and
the trunk can be unlatched from about 3 feet (1 m) up to
65 feet (20 m) away with the remote keyless entry
transmitter.
If your vehicle has the remote start feature you can also
start your vehicle with the remote keyless entry
transmitter. Your remote keyless entry transmitter, with
the remote start button, provides an increased range
of 195 feet (60 m) away. However, the range may
be less while the vehicle is running. As a result, you
may need to be closer to your vehicle to turn it off than
you were to turn it on.
There are other conditions which can affect the
performance of the transmitter. SeeRemote Keyless
Entry System on page 2-3.
2-4
Page 81 of 392
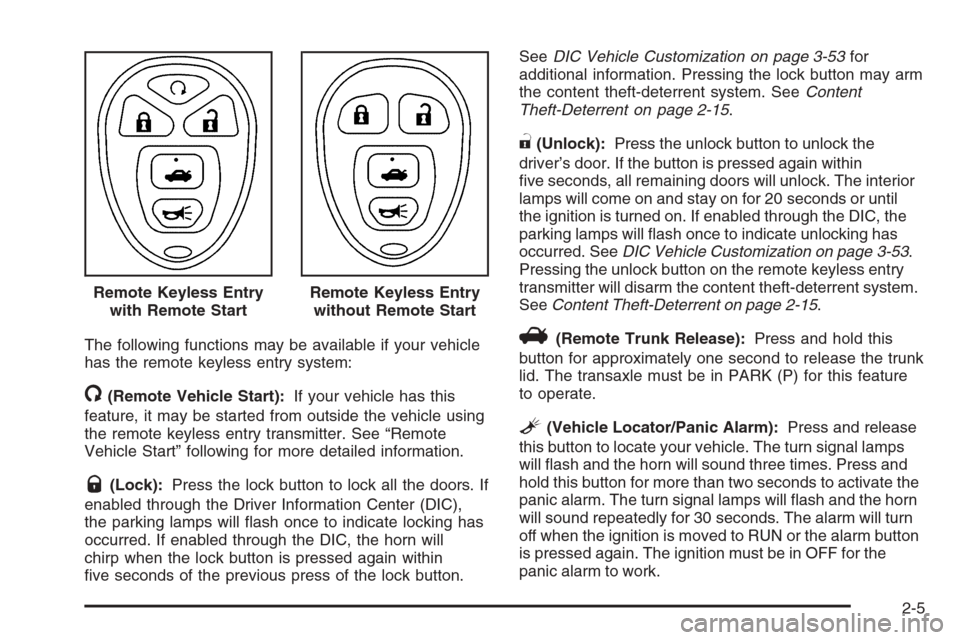
The following functions may be available if your vehicle
has the remote keyless entry system:
/(Remote Vehicle Start):If your vehicle has this
feature, it may be started from outside the vehicle using
the remote keyless entry transmitter. See “Remote
Vehicle Start” following for more detailed information.
Q(Lock):Press the lock button to lock all the doors. If
enabled through the Driver Information Center (DIC),
the parking lamps will �ash once to indicate locking has
occurred. If enabled through the DIC, the horn will
chirp when the lock button is pressed again within
�ve seconds of the previous press of the lock button.SeeDIC Vehicle Customization on page 3-53for
additional information. Pressing the lock button may arm
the content theft-deterrent system. SeeContent
Theft-Deterrent on page 2-15.
"(Unlock):Press the unlock button to unlock the
driver’s door. If the button is pressed again within
�ve seconds, all remaining doors will unlock. The interior
lamps will come on and stay on for 20 seconds or until
the ignition is turned on. If enabled through the DIC, the
parking lamps will �ash once to indicate unlocking has
occurred. SeeDIC Vehicle Customization on page 3-53.
Pressing the unlock button on the remote keyless entry
transmitter will disarm the content theft-deterrent system.
SeeContent Theft-Deterrent on page 2-15.
V(Remote Trunk Release):Press and hold this
button for approximately one second to release the trunk
lid. The transaxle must be in PARK (P) for this feature
to operate.
L(Vehicle Locator/Panic Alarm):Press and release
this button to locate your vehicle. The turn signal lamps
will �ash and the horn will sound three times. Press and
hold this button for more than two seconds to activate the
panic alarm. The turn signal lamps will �ash and the horn
will sound repeatedly for 30 seconds. The alarm will turn
off when the ignition is moved to RUN or the alarm button
is pressed again. The ignition must be in OFF for the
panic alarm to work. Remote Keyless Entry
with Remote Start
Remote Keyless Entry
without Remote Start
2-5
Page 82 of 392
Matching Transmitter(s) to Your
Vehicle
Each remote keyless entry transmitter is coded to
prevent another transmitter from unlocking your vehicle.
If a transmitter is lost or stolen, a replacement can
be purchased through your GM dealer. Remember to
bring any additional transmitters so they can also
be re-coded to match the new transmitter. Once your
dealer has coded the new transmitter, the lost
transmitter will not unlock your vehicle. The vehicle can
have a maximum of eight transmitters matched to it.
See Remote Key underDIC Operation and Displays on
page 3-40.
Battery Replacement
Under normal use, the battery in your remote keyless
entry transmitter should last about four years.
You can tell the battery is weak if the transmitter will not
work at the normal range in any location. If you have
to get close to your vehicle before the transmitter works,
it is probably time to change the battery.
The REPLACE BATTERY IN REMOTE KEY message
in the vehicle’s DIC will display if the remote keyless
entry transmitter battery is low. See “REPLACE
BATTERY IN REMOTE KEY” underDIC Warnings and
Messages on page 3-46for additional information.Notice:When replacing the battery, use care not to
touch any of the circuitry. Static from your body
transferred to these surfaces may damage the
transmitter.
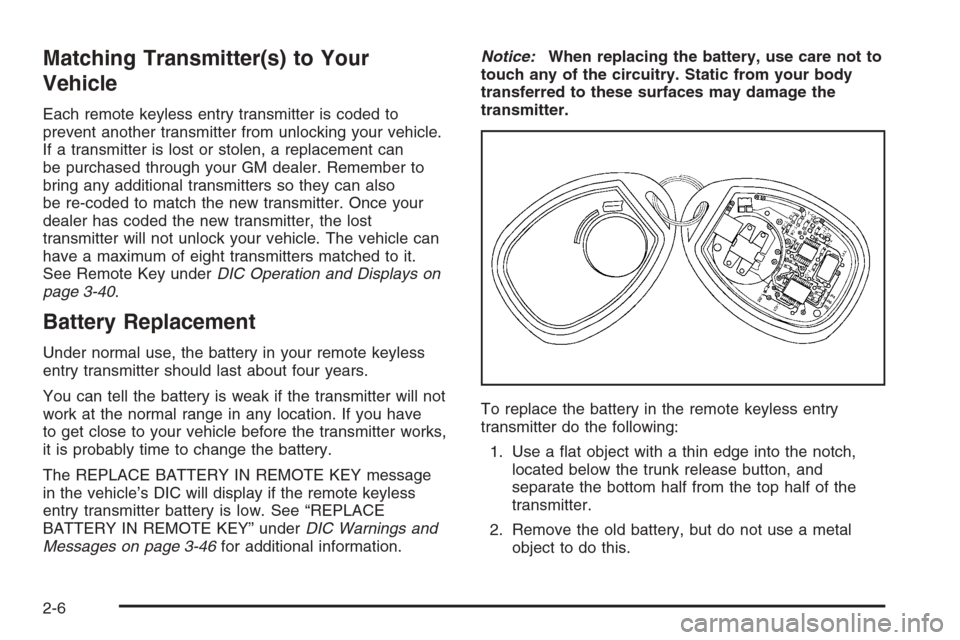
To replace the battery in the remote keyless entry
transmitter do the following:
1. Use a �at object with a thin edge into the notch,
located below the trunk release button, and
separate the bottom half from the top half of the
transmitter.
2. Remove the old battery, but do not use a metal
object to do this.
2-6
Page 87 of 392
Programmable Automatic Door
Unlock
Your vehicle is programmed so that when the shift lever
is moved into PARK (P) all doors will unlock.
With the vehicle stopped and the engine running, door
unlocking can be programmed through prompts
displayed on the Driver Information Center (DIC). These
prompts allow the driver to choose various unlock
settings. For programming information, seeDIC Vehicle
Customization on page 3-53.
Lockout Protection
To protect you from locking your key in the vehicle, this
feature stops the power door locks from locking while
the key is in the ignition and a door is open.
If a power lock switch is pressed while a door is open
and the key is in the ignition, both doors will lock
and then the driver’s door will unlock. A chime will sound
continuously until both doors are closed.
Trunk
{CAUTION:
It can be dangerous to drive with the trunk lid
open because carbon monoxide (CO) gas can
come into your vehicle. You cannot see or
smell CO. It can cause unconsciousness and
even death. If you must drive with the trunk lid
open or if electrical wiring or other cable
connections must pass through the seal
between the body and the trunk lid:
Make sure all other windows are shut.
Turn the fan on your heating or cooling
system to its highest speed and select the
control setting that will force outside air
into your vehicle. See Climate Control
System.
If you have air outlets on or under the
instrument panel, open them all the way.
SeeEngine Exhaust on page 2-28.
2-11
Page 88 of 392
Trunk Release
To open the trunk from the outside, press the open
trunk button on the remote keyless entry transmitter,
if equipped.
Remote Trunk Release
You can also open the trunk from inside the vehicle.
G(Remote Trunk Release):Press the button with
the open trunk symbol on it. The button is located
next to the exterior lamps control on the left side of the
instrument panel. The shift lever must be in PARK (P)
for the remote trunk release button to work.
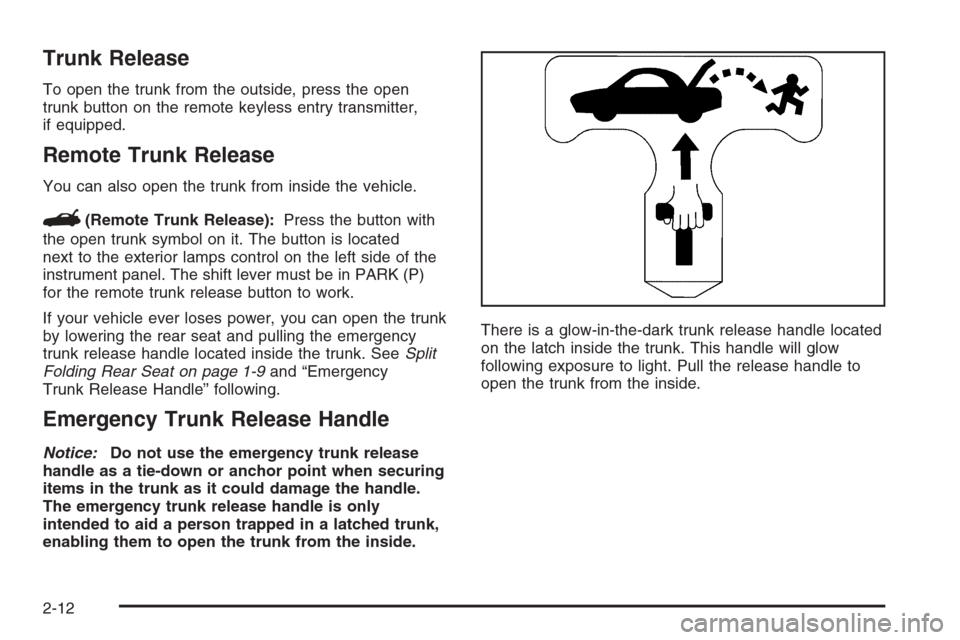
If your vehicle ever loses power, you can open the trunk
by lowering the rear seat and pulling the emergency
trunk release handle located inside the trunk. SeeSplit
Folding Rear Seat on page 1-9and “Emergency
Trunk Release Handle” following.
Emergency Trunk Release Handle
Notice:Do not use the emergency trunk release
handle as a tie-down or anchor point when securing
items in the trunk as it could damage the handle.
The emergency trunk release handle is only
intended to aid a person trapped in a latched trunk,
enabling them to open the trunk from the inside.There is a glow-in-the-dark trunk release handle located
on the latch inside the trunk. This handle will glow
following exposure to light. Pull the release handle to
open the trunk from the inside.
2-12
Page 91 of 392
Theft-Deterrent Systems
Vehicle theft is big business, especially in some cities.
Although your vehicle has a number of theft-deterrent
features, we know that nothing we put on it can make it
impossible to steal.
Content Theft-Deterrent
Your vehicle may have the optional content
theft-deterrent alarm system.
To activate the theft-deterrent system:
1. Open the door.
2. Lock the door with the power door lock switch or the
remote keyless entry transmitter. If you are using the
remote keyless entry transmitter, the door does not
need to be open.
3. Close all doors.
Once armed, the alarm will go off if someone tries to
enter the vehicle without using the remote keyless entry
transmitter or a key or turns the ignition on with an
incorrect key. The horn will sound and the turn signal
lamps will �ash for approximately two minutes.
When the alarm is armed, the trunk may be opened with
the remote keyless entry transmitter. The power door lock
switches are disabled and the doors remain locked. You
must use your remote keyless entry transmitter or your
key to unlock the doors when the system is armed.
Arming with the Power Lock Switch
The alarm system will arm when you use either power
lock switch to lock the doors while any door or the trunk
is open and the key is removed from the ignition.
Arming with the Remote Keyless Entry
Transmitter
The alarm system will arm when you use your remote
keyless entry transmitter to lock the doors, if the
key is not in the ignition.
Disarming with the Remote Keyless
Entry Transmitter
The alarm system will disarm when you use your
remote keyless entry transmitter to unlock the doors.
The �rst time a remote unlock command is received,
three �ashes will be seen and three horn chirps
heard to indicate an alarm condition has occurred since
last arming.
Disarming with Your Key
The alarm system will disarm when you use your key to
unlock the doors or insert your key in ignition and
turn it from the OFF position.
2-15
Page 115 of 392
Storage Areas
Glove Box
To open the glove box, lift up on the lever.
Cupholder(s)
Your vehicle is equipped with cupholders located
between the front seats and in the rear seat armrest.
Center Console Storage Area
The console has cupholders and a storage area. To
open the console’s storage area, press the latch located
toward the front of the console lid on the driver’s side
of the vehicle.
Rear Seat Armrest
Your vehicle has a rear seat armrest with cupholders.
To access, pull the tab on the armrest forward.
Convenience Net
The vehicle may have a convenience net located on the
back wall of the trunk.
The net is not for larger, heavier loads. Store those in
the trunk as far forward as possible.
Unhook the net so that it will lie �at when not in use.
2-39
Page 121 of 392
The main components of your instrument panel are listed here:
A. Air Vent. SeeOutlet Adjustment on page 3-22.
B. Remote Trunk Release Button. See “Remote Trunk
Release” underTrunk on page 2-11.
C. Multifunction Lever. SeeTurn Signal/Multifunction
Lever on page 3-7.
D. Instrument Panel Cluster. SeeInstrument Panel
Cluster on page 3-25.
E. Hazard Warning Flasher Button. SeeHazard
Warning Flashers on page 3-6.
F. Driver Information Center (DIC) Buttons. SeeDriver
Information Center (DIC) on page 3-39.
G. Audio System. SeeAudio System(s) on page 3-59.
H. Exterior Lamps Control. SeeExterior Lamps on
page 3-13.
I. Instrument Panel Brightness. SeeInstrument Panel
Brightness on page 3-15.
J. Traction Control On/Off Button (If Equipped). See
Traction Control System (TCS) on page 4-9.K. Tilt Steering Wheel Lever. SeeTilt Wheel on
page 3-6.
L. Steering Wheel Cruise Control (If Equipped). See
Cruise Control on page 3-10.
M. Hood Release. SeeHood Release on page 5-11.
N. Horn. SeeHorn on page 3-6.
O. Audio Steering Wheel Controls (If Equipped). See
Audio Steering Wheel Controls on page 3-83.
P. Ignition Switch. SeeIgnition Positions on page 2-18.
Q. Climate Controls. SeeClimate Control System on
page 3-19.
R. Accessory Power Outlet. SeeAccessory Power
Outlet(s) on page 3-17.
S. Automatic Transaxle Shift Lever. SeeAutomatic
Transaxle Operation on page 2-22.
T. Glove Box. SeeGlove Box on page 2-39.
3-5