wheel size CHEVROLET MONTE CARLO 2007 6.G Owners Manual
[x] Cancel search | Manufacturer: CHEVROLET, Model Year: 2007, Model line: MONTE CARLO, Model: CHEVROLET MONTE CARLO 2007 6.GPages: 456, PDF Size: 2.43 MB
Page 294 of 456
Headlamp Aiming........................................ 342
Bulb Replacement....................................... 342
Halogen Bulbs........................................... 342
Headlamps, Front Turn Signal,
Sidemarker, and Parking Lamps............. 343
Taillamps, Stoplamps and
Back-up Lamps...................................... 345
Back-Up Lamps......................................... 345
License Plate Lamp................................... 346
Replacement Bulbs................................... 346
Windshield Wiper Blade Replacement....... 347
Tires............................................................ 349
Tire Sidewall Labeling............................... 350
Tire Terminology and De�nitions............... 354
In�ation - Tire Pressure............................. 357
Tire Pressure Monitor System................... 358Tire Inspection and Rotation...................... 362
When It Is Time for New Tires.................. 364
Buying New Tires...................................... 364
Different Size Tires and Wheels................ 366
Uniform Tire Quality Grading..................... 367
Wheel Alignment and Tire Balance............ 368
Wheel Replacement.................................. 368
Tire Chains............................................... 370
If a Tire Goes Flat.................................... 371
Changing a Flat Tire................................. 372
Removing the Spare Tire and Tools.......... 373
Removing the Flat Tire and Installing
the Spare Tire....................................... 375
Storing a Flat or Spare Tire and Tools...... 382
Compact Spare Tire.................................. 384
Section 5 Service and Appearance Care
294
Page 353 of 456
Tire Size
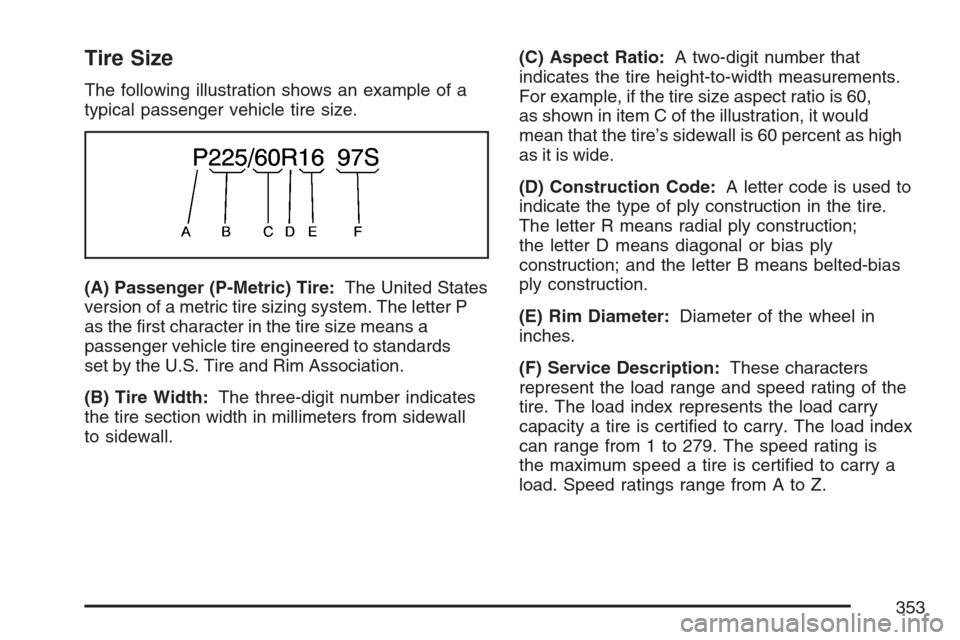
The following illustration shows an example of a
typical passenger vehicle tire size.
(A) Passenger (P-Metric) Tire:The United States
version of a metric tire sizing system. The letter P
as the �rst character in the tire size means a
passenger vehicle tire engineered to standards
set by the U.S. Tire and Rim Association.
(B) Tire Width:The three-digit number indicates
the tire section width in millimeters from sidewall
to sidewall.(C) Aspect Ratio:A two-digit number that
indicates the tire height-to-width measurements.
For example, if the tire size aspect ratio is 60,
as shown in item C of the illustration, it would
mean that the tire’s sidewall is 60 percent as high
as it is wide.
(D) Construction Code:A letter code is used to
indicate the type of ply construction in the tire.
The letter R means radial ply construction;
the letter D means diagonal or bias ply
construction; and the letter B means belted-bias
ply construction.
(E) Rim Diameter:Diameter of the wheel in
inches.
(F) Service Description:These characters
represent the load range and speed rating of the
tire. The load index represents the load carry
capacity a tire is certi�ed to carry. The load index
can range from 1 to 279. The speed rating is
the maximum speed a tire is certi�ed to carry a
load. Speed ratings range from A to Z.
353
Page 360 of 456
When the malfunction indicator is illuminated, the
system may not be able to detect or signal low
tire pressure as intended. TPMS malfunctions may
occur for a variety of reasons, including the
installation of replacement or alternate tires or
wheels on the vehicle that prevent the TPMS from
functioning properly. Always check the TPMS
malfunction telltale after replacing one or more
tires or wheels on your vehicle to ensure that the
replacement or alternate tires and wheels allow
the TPMS to continue to function properly.
A Tire and Loading Information label, attached to
your vehicle, shows the size of your vehicle’s
original equipment tires and the correct in�ation
pressure for your vehicle’s tires when they
are cold. SeeLoading Your Vehicle on page 277,
for an example of the Tire and Loading
Information label and its location on your vehicle.
Also seeIn�ation - Tire Pressure on page 357.
Your vehicle’s TPMS system can warn you about a
low tire pressure condition but it does not replace
normal tire maintenance. SeeTire Inspection and
Rotation on page 362andTires on page 349.
Notice:Do not use a tire sealant if your vehicle
has Tire Pressure Monitors. The liquid sealant
can damage the tire pressure monitor sensors.The TPMS will not function properly if one or more
of the TPMS sensors are missing or inoperable.
If the system detects a missing or inoperable
sensor, an error message SERVICE TIRE
MONITOR SYSTEM will be shown on the DIC
display. If you have replaced a tire/wheel assembly
without transferring the TPMS sensors, the error
message will be displayed. Once you re-install the
TPMS sensors, the error message should go
off. See your GM dealer for service if all TPMS
sensors are installed and the error message
comes on and stays on.
TPMS Sensor Identi�cation Codes
Each TPMS sensor has a unique identi�cation
code. Any time you replace one or more of
the TPMS sensors or rotate the vehicle’s tires,
the identi�cation codes will need to be matched
to the new tire/wheel position. The sensors
are matched, to the tire/wheel positions, in the
following order: driver’s side front tire, passenger’s
side front tire, passenger’s side rear tire, and
driver’s side rear tire using a TPMS diagnostic
tool. See your GM dealer for service.
360
Page 365 of 456
{CAUTION:
Mixing tires could cause you to lose
control while driving. If you mix tires of
different sizes, brands, or types (radial
and bias-belted tires), the vehicle may
not handle properly, and you could have
a crash. Using tires of different sizes,
brands, or types may also cause damage
to your vehicle. Be sure to use the correct
size, brand, and type of tires on all
wheels. It is all right to drive with your
compact spare temporarily, as it was
developed for use on your vehicle.
SeeCompact Spare Tire on page 384.
{CAUTION:
If you use bias-ply tires on your vehicle,
the wheel rim �anges could develop
cracks after many miles of driving. A tire
and/or wheel could fail suddenly, causing
a crash. Use only radial-ply tires with
the wheels on your vehicle.
If you must replace your vehicle’s tires with those
that do not have a TPC Spec number, make
sure they are the same size, load range, speed
rating, and construction type (radial and
bias-belted tires) as your vehicle’s original tires.
Vehicles that have a tire pressure monitoring
system may give an inaccurate low-pressure
warning if non-TPC Spec rated tires are installed
on your vehicle. Non-TPC Spec rated tires
may give a low-pressure warning that is higher or
lower than the proper warning level you would
get with TPC Spec rated tires. SeeTire Pressure
Monitor System on page 358.
365
Page 366 of 456
Your vehicle’s original equipment tires are listed
on the Tire and Loading Information Label.
This label is attached to the vehicle’s center pillar
(B-pillar). SeeLoading Your Vehicle on page 277,
for more information about the Tire and Loading
Information Label and its location on your vehicle.
Different Size Tires and Wheels
If you add wheels or tires that are a different
size than your original equipment wheels and
tires, this may affect the way your vehicle
performs, including its braking, ride and handling
characteristics, stability, and resistance to
rollover. Additionally, if your vehicle has electronic
systems such as, anti-lock brakes, traction
control, and electronic stability control, the
performance of these systems can be affected.
{CAUTION:
If you add different sized wheels, your
vehicle may not provide an acceptable
level of performance and safety if tires
not recommended for those wheels are
selected. You may increase the chance
that you will crash and suffer serious
injury. Only use GM speci�c wheel and
tire systems developed for your vehicle,
and have them properly installed by a
GM certi�ed technician.
SeeBuying New Tires on page 364and
Accessories and Modi�cations on page 296
for additional information.
366
Page 370 of 456
Tire Chains
{CAUTION:
If your vehicle has P225/55R17 or
P235/50R18 size tires, do not use tire
chains, there is not enough clearance.
Tire chains used on a vehicle without
the proper amount of clearance can cause
damage to the brakes, suspension, or
other vehicle parts. The area damaged
by the tire chains could cause you to
lose control of your vehicle and you
or others may be injured in a crash.
Use another type of traction device
only if its manufacturer recommends
it for use on your vehicle and tire size
combination and road conditions.
Follow that manufacturer’s instructions.
CAUTION: (Continued)
CAUTION: (Continued)
To help avoid damage to your vehicle,
drive slowly, readjust, or remove the
device if it is contacting your vehicle, and
do not spin your wheels. If you do �nd
traction devices that will �t, install them
on the front tires.
Notice:If your vehicle has a tire size other
than P225/55R17 or P235/50R18 size tires, use
tire chains only where legal and only when
you must. Use only SAE Class S-type chains
that are the proper size for your tires. Install
them on the front tires and tighten them
as tightly as possible with the ends securely
fastened. Drive slowly and follow the chain
manufacturer’s instructions. If you can hear
the chains contacting your vehicle, stop
and retighten them. If the contact continues,
slow down until it stops. Driving too fast
or spinning the wheels with chains on will
damage your vehicle.
370
Page 382 of 456
Storing a Flat or Spare Tire
and Tools
{CAUTION:
Storing a jack, a tire, or other equipment
in the passenger compartment of the
vehicle could cause injury. In a sudden
stop or collision, loose equipment could
strike someone. Store all these in the
proper place.
After the compact spare tire has been installed
on the vehicle, store the �at tire in the trunk.
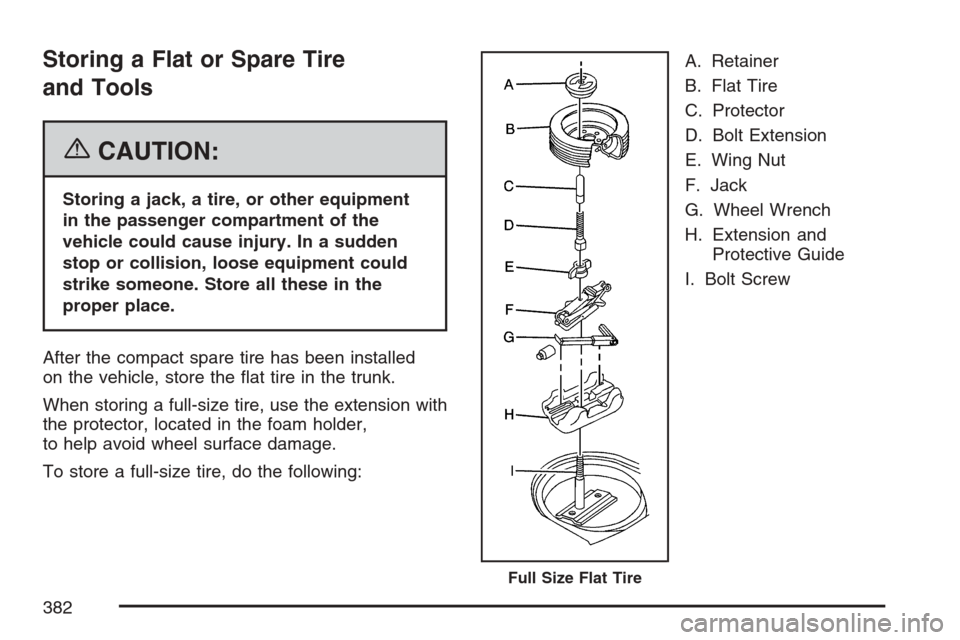
When storing a full-size tire, use the extension with
the protector, located in the foam holder,
to help avoid wheel surface damage.
To store a full-size tire, do the following:A. Retainer
B. Flat Tire
C. Protector
D. Bolt Extension
E. Wing Nut
F. Jack
G. Wheel Wrench
H. Extension and
Protective Guide
I. Bolt Screw
Full Size Flat Tire
382
Page 383 of 456
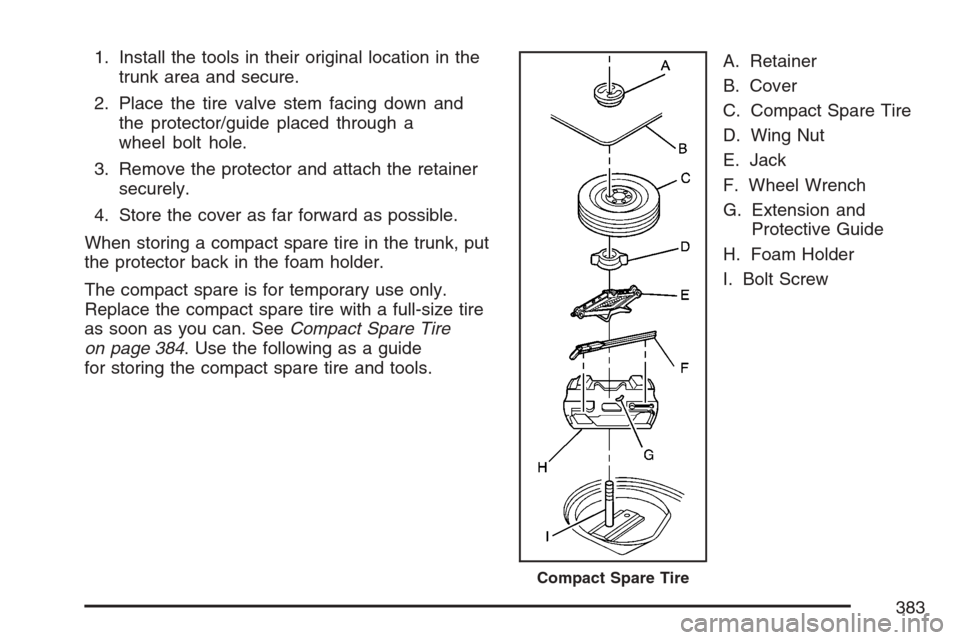
1. Install the tools in their original location in the
trunk area and secure.
2. Place the tire valve stem facing down and
the protector/guide placed through a
wheel bolt hole.
3. Remove the protector and attach the retainer
securely.
4. Store the cover as far forward as possible.
When storing a compact spare tire in the trunk, put
the protector back in the foam holder.
The compact spare is for temporary use only.
Replace the compact spare tire with a full-size tire
as soon as you can. SeeCompact Spare Tire
on page 384. Use the following as a guide
for storing the compact spare tire and tools.A. Retainer
B. Cover
C. Compact Spare Tire
D. Wing Nut
E. Jack
F. Wheel Wrench
G. Extension and
Protective Guide
H. Foam Holder
I. Bolt Screw
Compact Spare Tire
383
Page 384 of 456
Compact Spare Tire
Although the compact spare tire was fully in�ated
when your vehicle was new, it can lose air
after a time. Check the in�ation pressure regularly.
It should be 60 psi (420 kPa).
After installing the compact spare on your vehicle,
you should stop as soon as possible and make
sure your spare tire is correctly in�ated. The
compact spare is made to perform well at speeds
up to 65 mph (105 km/h) for distances up to
3,000 miles (5 000 km), so you can �nish your trip
and have your full-size tire repaired or replaced
where you want. You must calibrate the tire
in�ation monitor system after installing or removing
the compact spare. SeeTire Pressure Monitor
System on page 358for more information.
The system may not work correctly when the
compact spare is installed on the vehicle.Of course, it is best to replace your spare with a
full-size tire as soon as you can. Your spare
will last longer and be in good shape in case you
need it again.
Notice:When the compact spare is installed,
do not take your vehicle through an automatic
car wash with guide rails. The compact
spare can get caught on the rails. That can
damage the tire and wheel, and maybe
other parts of your vehicle.
Do not use your compact spare on other vehicles.
And do not mix your compact spare tire or
wheel with other wheels or tires. They will not �t.
Keep your spare tire and its wheel together.
Notice:Tire chains will not �t your compact
spare. Using them can damage your vehicle
and can damage the chains too. Do not use
tire chains on your compact spare.
384
Page 454 of 456
Shifting Into Park (P)................................... 118
Shifting Out of Park (P)............................... 120
Signals, Turn and Lane-Change.................. 150
Spare Tire
Compact.................................................. 384
Installing.................................................. 375
Removing................................................ 373
Storing..................................................... 382
Speci�cations, Capacities............................ 400
Speedometer............................................... 172
Split Folding Rear Seat................................. 16
Starting Your Engine................................... 110
Steering...................................................... 255
Steering Wheel Controls, Audio................... 240
Steering Wheel, Tilt Wheel.......................... 148
Storage Areas
Center Console Storage Area................... 140
Convenience Net..................................... 141
Cupholder(s)............................................ 140
Glove Box................................................ 140
Rear Seat Armrest................................... 140
Stuck in Sand, Mud, Ice, or Snow............... 276
Sun Visors.................................................. 104
Sunroof....................................................... 141T
Tachometer................................................. 172
Taillamps
Stoplamps, and Back-Up Lamps.............. 345
TCS Warning Light...................................... 179
Theft-Deterrent, Radio................................. 240
Theft-Deterrent Systems.............................. 105
Content Theft-Deterrent............................ 105
PASS-Key
®III+........................................ 106
PASS-Key®III+ Operation........................ 107
Tilt Wheel.................................................... 148
Tire
Pressure Light.......................................... 180
Tires........................................................... 349
Aluminum Wheels, Cleaning..................... 390
Buying New Tires..................................... 364
Chains..................................................... 370
Changing a Flat Tire................................ 372
Cleaning.................................................. 391
Compact Spare Tire................................. 384
Different Size........................................... 366
If a Tire Goes Flat................................... 371
In�ation - Tire Pressure............................ 357
454