headlamp CHEVROLET OPTRA 5 2006 1.G User Guide
[x] Cancel search | Manufacturer: CHEVROLET, Model Year: 2006, Model line: OPTRA 5, Model: CHEVROLET OPTRA 5 2006 1.GPages: 370, PDF Size: 2.32 MB
Page 223 of 370
Service............................................................5-3
Accessories and Modifications..........................5-3
California Proposition 65 Warning.....................5-3
Doing Your Own Service Work.........................5-4
Adding Equipment to the Outside of Your
Vehicle......................................................5-4
Fuel................................................................5-4
Gasoline Octane............................................5-5
Gasoline Specifications....................................5-5
California Fuel...............................................5-5
Additives.......................................................5-6
Fuels in Foreign Countries...............................5-6
Filling the Tank..............................................5-7
Filling a Portable Fuel Container.......................5-9
Checking Things Under the Hood....................5-10
Hood Release..............................................5-10
Engine Compartment Overview.......................5-12
Engine Oil...................................................5-13
Engine Air Cleaner/Filter................................5-17
Automatic Transaxle Fluid..............................5-19
Manual Transaxle Fluid..................................5-19
Hydraulic Clutch...........................................5-19
Engine Coolant.............................................5-20
Coolant Surge Tank Pressure Cap..................5-23
Engine Overheating.......................................5-23
Cooling System............................................5-24Power Steering Fluid.....................................5-29
Windshield Washer Fluid................................5-30
Brakes........................................................5-31
Battery........................................................5-34
Jump Starting...............................................5-35
Headlamp Aiming...........................................5-39
Bulb Replacement..........................................5-40
Halogen Bulbs..............................................5-40
Headlamps..................................................5-40
Front Turn Signal and Parking Lamps..............5-42
Turn Signal Lamps (Side)..............................5-43
Sidemarker Lamps (Front)..............................5-44
Sidemarker Lamps (Rear)..............................5-44
Center High-Mounted Stoplamp (CHMSL)
(Hatchback)..............................................5-45
Center High-Mounted Stoplamp (CHMSL)
(Wagon)...................................................5-46
Taillamps, Turn Signal, and Stoplamps
(Hatchback)..............................................5-46
Taillamps, Turn Signal, Stoplamps and
Back-up Lamps (Wagon)............................5-47
Taillamps, Stoplamps and Back-up Lamps
(Hatchback)..............................................5-48
Replacement Bulbs.......................................5-48
Windshield Wiper Blade Replacement..............5-49
Section 5 Service and Appearance Care
5-1
Page 224 of 370
Tires..............................................................5-50
Tire Sidewall Labeling...................................5-51
Tire Terminology and Definitions.....................5-53
Inflation - Tire Pressure.................................5-56
Tire Inspection and Rotation...........................5-57
When It Is Time for New Tires.......................5-58
Buying New Tires.........................................5-59
Different Size Tires and Wheels......................5-60
Uniform Tire Quality Grading..........................5-60
Wheel Alignment and Tire Balance..................5-61
Wheel Replacement......................................5-62
Tire Chains..................................................5-63
If a Tire Goes Flat........................................5-63
Changing a Flat Tire.....................................5-64
Removing the Spare Tire and Tools................5-66
Removing the Flat Tire and Installing the
Spare Tire................................................5-69
Storing a Flat or Spare Tire and Tools............5-73
Compact Spare Tire......................................5-73
Appearance Care............................................5-74
Cleaning the Inside of Your Vehicle.................5-74
Fabric/Carpet...............................................5-75
Leather.......................................................5-76
Instrument Panel, Vinyl, and Other Plastic
Surfaces..................................................5-76
Weatherstrips...............................................5-76Washing Your Vehicle...................................5-77
Cleaning Exterior Lamps/Lenses.....................5-77
Finish Care..................................................5-77
Windshield and Wiper Blades.........................5-78
Aluminum Wheels.........................................5-78
Tires...........................................................5-79
Sheet Metal Damage.....................................5-79
Finish Damage.............................................5-79
Underbody Maintenance................................5-79
Chemical Paint Spotting.................................5-80
Vehicle Care/Appearance Materials..................5-80
Vehicle Identi�cation......................................5-81
Vehicle Identification Number (VIN).................5-81
Service Parts Identification Label.....................5-81
Electrical System............................................5-81
Add-On Electrical Equipment..........................5-81
Headlamp Wiring..........................................5-82
Windshield Wiper Fuses................................5-82
Power Windows and Other Power Options.......5-82
Fuses and Circuit Breakers............................5-82
Instrument Panel Fuse Block..........................5-83
Engine Compartment Fuse Block....................5-85
Capacities and Speci�cations..........................5-88
Normal Maintenance Replacement Parts..........5-89
Section 5 Service and Appearance Care
5-2
Page 261 of 370
To disconnect the jumper cables from both vehicles, do
the following:
1. Disconnect the black negative (−) cable from the
vehicle that had the dead battery.
2. Disconnect the black negative (−) cable from the
vehicle with the good battery.
3. Disconnect the red positive (+) cable from the
vehicle with the good battery.
4. Disconnect the red positive (+) cable from the other
vehicle.
5. Return the caps over the positive (+) and
negative (–) terminals to their original positions.Headlamp Aiming
Headlamp aim has been preset at the factory and
should need no further adjustment.
However, if your vehicle is damaged in an accident, the
headlamp aim may be affected. Aim adjustment to
the low-beam headlamps may be necessary if it
is difficult to see the lane markers (for horizontal aim),
or if oncoming drivers flash their high-beam headlamps
at you (for vertical aim).
If you believe your headlamps need to be re-aimed, it is
recommend that you take the vehicle to your dealer
for service.
5-39
Page 262 of 370
Bulb Replacement
For the proper type of replacement bulbs, see
Replacement Bulbs on page 5-48.
For any bulb changing procedure not listed in this
section, contact your dealer.
Halogen Bulbs
{CAUTION:
Halogen bulbs have pressurized gas inside
and can burst if you drop or scratch the bulb.
You or others could be injured. Be sure to read
and follow the instructions on the bulb
package.
Headlamps
To replace a headlamp bulb, do the following:
1. Open the hood. SeeHood Release on page 5-10
for more information.
2. For wagon models, remove the two bolts from the
top of the headlamp assembly and one nut on the
inside that retains the headlamp assembly.
For hatchback models, remove the four screws and
the radiator grill. Then remove the three bolts
and the headlamp assembly.
3. Disconnect the wiring harness connector from the
rear of the bulb.
5-40
Page 263 of 370
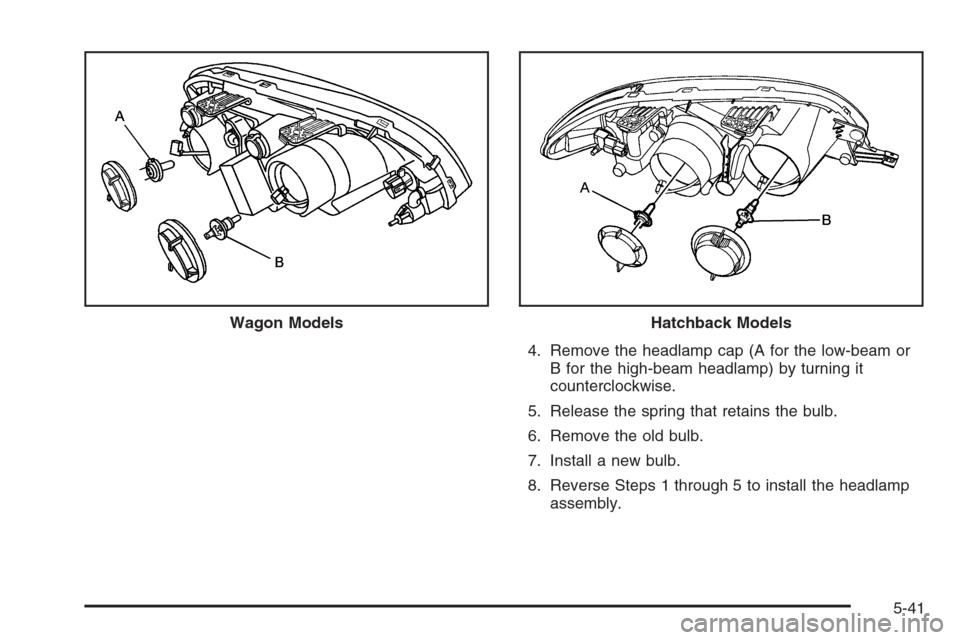
4. Remove the headlamp cap (A for the low-beam or
B for the high-beam headlamp) by turning it
counterclockwise.
5. Release the spring that retains the bulb.
6. Remove the old bulb.
7. Install a new bulb.
8. Reverse Steps 1 through 5 to install the headlamp
assembly. Wagon Models
Hatchback Models
5-41
Page 264 of 370
Front Turn Signal and Parking
Lamps
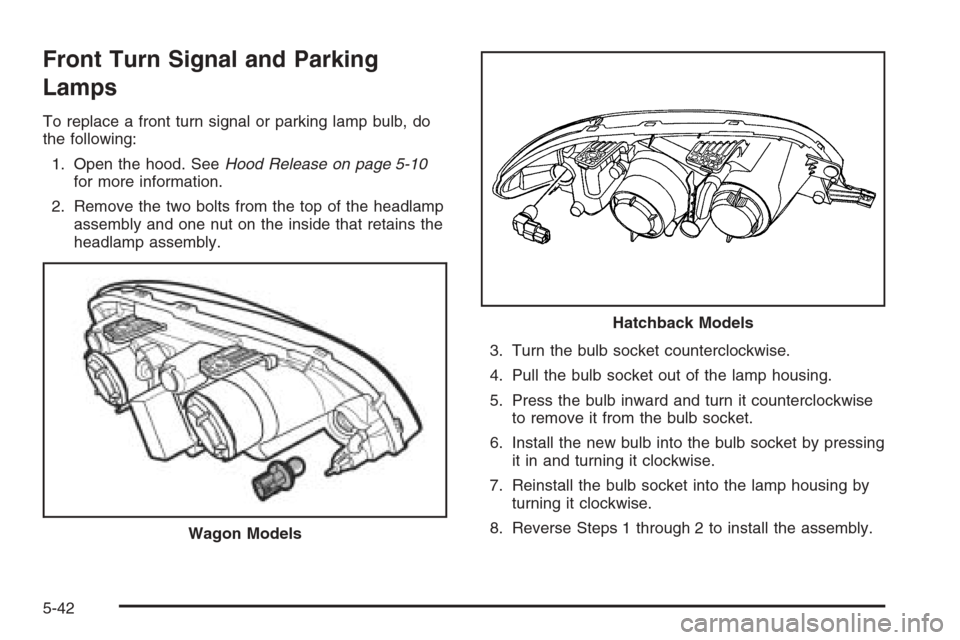
To replace a front turn signal or parking lamp bulb, do
the following:
1. Open the hood. SeeHood Release on page 5-10
for more information.
2. Remove the two bolts from the top of the headlamp
assembly and one nut on the inside that retains the
headlamp assembly.
3. Turn the bulb socket counterclockwise.
4. Pull the bulb socket out of the lamp housing.
5. Press the bulb inward and turn it counterclockwise
to remove it from the bulb socket.
6. Install the new bulb into the bulb socket by pressing
it in and turning it clockwise.
7. Reinstall the bulb socket into the lamp housing by
turning it clockwise.
8. Reverse Steps 1 through 2 to install the assembly.
Wagon Models
Hatchback Models
5-42
Page 266 of 370
Sidemarker Lamps (Front)
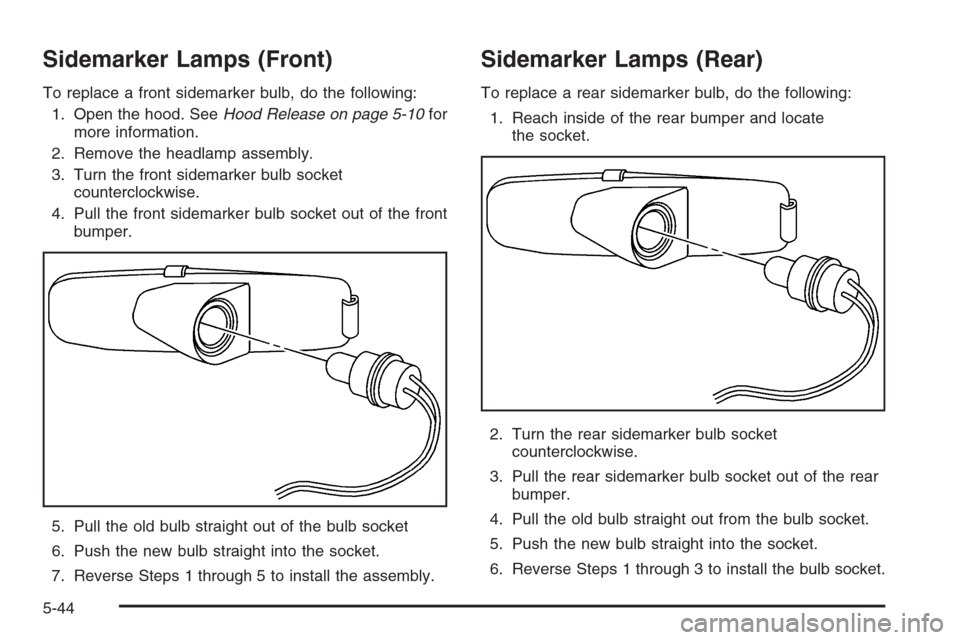
To replace a front sidemarker bulb, do the following:
1. Open the hood. SeeHood Release on page 5-10for
more information.
2. Remove the headlamp assembly.
3. Turn the front sidemarker bulb socket
counterclockwise.
4. Pull the front sidemarker bulb socket out of the front
bumper.
5. Pull the old bulb straight out of the bulb socket
6. Push the new bulb straight into the socket.
7. Reverse Steps 1 through 5 to install the assembly.
Sidemarker Lamps (Rear)
To replace a rear sidemarker bulb, do the following:
1. Reach inside of the rear bumper and locate
the socket.
2. Turn the rear sidemarker bulb socket
counterclockwise.
3. Pull the rear sidemarker bulb socket out of the rear
bumper.
4. Pull the old bulb straight out from the bulb socket.
5. Push the new bulb straight into the socket.
6. Reverse Steps 1 through 3 to install the bulb socket.
5-44
Page 270 of 370
Taillamps, Stoplamps and Back-up
Lamps (Hatchback)
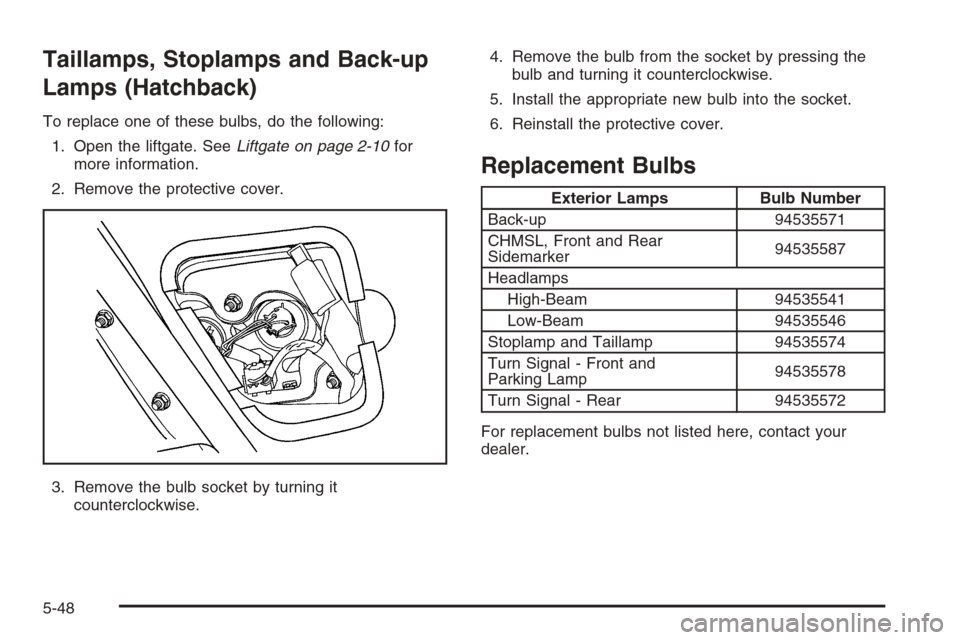
To replace one of these bulbs, do the following:
1. Open the liftgate. SeeLiftgate on page 2-10for
more information.
2. Remove the protective cover.
3. Remove the bulb socket by turning it
counterclockwise.4. Remove the bulb from the socket by pressing the
bulb and turning it counterclockwise.
5. Install the appropriate new bulb into the socket.
6. Reinstall the protective cover.
Replacement Bulbs
Exterior Lamps Bulb Number
Back-up 94535571
CHMSL, Front and Rear
Sidemarker94535587
Headlamps
High-Beam 94535541
Low-Beam 94535546
Stoplamp and Taillamp 94535574
Turn Signal - Front and
Parking Lamp94535578
Turn Signal - Rear 94535572
For replacement bulbs not listed here, contact your
dealer.
5-48
Page 284 of 370
Wheel Replacement
Replace any wheel that is bent, cracked or badly rusted
or corroded. If wheel nuts keep coming loose, the
wheel, wheel bolts and wheel nuts should be replaced.
If the wheel leaks air, replace it (except some
aluminum wheels, which can sometimes be repaired).
See your dealer if any of these conditions exist.
Your dealer will know the kind of wheel you need.
Each new wheel should have the same load-carrying
capacity, diameter, width, offset and be mounted
the same way as the one it replaces.
If you need to replace any of your wheels, wheel bolts
or wheel nuts, replace them only with new GM
original equipment parts. This way, you will be sure to
have the right wheel, wheel bolts and wheel nuts
for your vehicle.{CAUTION:
Using the wrong replacement wheels, wheel
bolts, or wheel nuts on your vehicle can be
dangerous. It could affect the braking and
handling of your vehicle, make your tires lose
air and make you lose control. You could have
a collision in which you or others could be
injured. Always use the correct wheel, wheel
bolts and wheel nuts for replacement.
Notice:The wrong wheel can also cause problems
with bearing life, brake cooling, speedometer or
odometer calibration, headlamp aim, bumper height,
vehicle ground clearance, and tire or tire chain
clearance to the body and chassis.
SeeChanging a Flat Tire on page 5-64for more
information.
5-62
Page 304 of 370
Headlamp Wiring
The headlamp wiring is protected by fuses, one for each
headlamp, in the fuse block. An electrical overload
will cause the lamps to turn off. If this happens, have
your headlamp wiring checked right away.
Windshield Wiper Fuses
The windshield wiper motor is protected by an internal
circuit breaker and a fuse. If the motor overheats due to
heavy snow, etc., the wiper will stop until the motor
cools. If the overload is caused by some electrical
problem and not snow, etc., be sure to get it fixed.
Power Windows and Other Power
Options
Circuit breakers in the fuse block protect the power
windows and other power accessories. When the current
load is too heavy, the circuit breaker opens and
closes, protecting the circuit until the problem is fixed or
goes away.
Fuses and Circuit Breakers
The wiring circuits in your vehicle are protected from
short circuits by a combination of fuses, circuit breakers
and fusible thermal links in the wiring itself.
Look at the silver-colored band inside the fuse. If the
band is broken or melted, replace the fuse. Be sure you
replace a bad fuse with a new one of the identical
size and rating.
There are spare fuses provided in the engine
compartment fuse block. If you ever have a problem on
the road and do not have a spare fuse, you can borrow
one that has the same amperage. Just pick a feature of
your vehicle that you can get along without — like the
radio or cigarette lighter — and use its fuse, if it is the
correct amperage. Replace it as soon as you can.
There are two fuse blocks in your vehicle: the instrument
panel fuse block and the engine compartment fuse
block.
There is a fuse puller located on the engine
compartment fuse block. It can be used to easily
remove fuses from the fuse block.
5-82