instrument cluster CHEVROLET OPTRA 5 2007 1.G Owners Manual
[x] Cancel search | Manufacturer: CHEVROLET, Model Year: 2007, Model line: OPTRA 5, Model: CHEVROLET OPTRA 5 2007 1.GPages: 422, PDF Size: 2.39 MB
Page 69 of 422
There is an airbag
readiness light on the
instrument panel cluster,
which shows the
airbag symbol.
The system checks the airbag electrical system for
malfunctions. The light tells you if there is an
electrical problem. SeeAirbag Readiness Light on
page 164for more information.Where Are the Airbags?
The driver’s airbag is in the middle of the
steering wheel.
69
Page 81 of 422
{CAUTION:
If the airbag readiness light in the
instrument panel cluster ever comes on
and stays on, it means that something
may be wrong with the airbag system.
If this ever happens, have the vehicle
serviced promptly, because an adult-size
person sitting in the right front passenger’s
seat may not have the protection of the
frontal airbag and side airbag (if equipped).
SeeAirbag Readiness Light on page 164
for more on this, including important safety
information.A thick layer of additional material such as a
blanket, or aftermarket equipment such as seat
covers, seat heaters, and seat massagers
can affect how well the passenger sensing system
operates. Remove any additional material from
the seat cushion before reinstalling or securing the
child restraint or small occupant. You may want
to consider not using seat covers or other
aftermarket equipment if your vehicle has the
passenger sensing system. SeeAdding Equipment
to Your Airbag-Equipped Vehicle on page 83for
more information about modifications that can
affect how the system operates.
81
Page 97 of 422
Door Ajar Reminder
If one of the doors on is
not closed properly
while the ignition is on,
the door ajar light
on the instrument panel
cluster comes on
and stays on until the
doors are closed.
SeeDoor Ajar Light on page 177for additional
information.
Rear Door Security Locks
Your vehicle has rear
door security locks
on each rear door that
prevent passengers
from opening the
rear doors from
the inside.
97
Page 110 of 422
Automatic Transaxle Operation
If your vehicle has an
automatic transaxle, the
shift lever is located
on the console between
the seats.
Your vehicle may also have an electronic shift
position indicator that displays the position of the
shift lever. This indicator is located to the right
of the trip odometer on the instrument panel
cluster.
Movement between certain positions requires
pushing the shift lever to the passenger side while
shifting. This prevents you from changing
positions unexpectedly by blocking the straight
movement of the shift lever while the vehicle
is moving.PARK (P):This position locks the front wheels.
It is the best position to use when the start
your engine because your vehicle cannot move
easily.
{CAUTION:
It is dangerous to get out of your vehicle
if the shift lever is not fully in PARK (P)
with the parking brake �rmly set. Your
vehicle can roll.
Do not leave your vehicle when the engine
is running unless you have to. If you have
left the engine running, the vehicle can
move suddenly. You or others could be
injured. To be sure your vehicle will not
move, even when you are on fairly level
ground, always set your parking brake
and move the shift lever to PARK (P).
SeeShifting Into Park (P) (Automatic
Transaxle) on page 117.
110
Page 113 of 422
Hold Mode
If your vehicle’s transaxle has a hold mode, select
this mode to drive with some characteristics of a
manual transaxle. With hold mode turned on, the
automatic transaxle stays in a specific gear range.
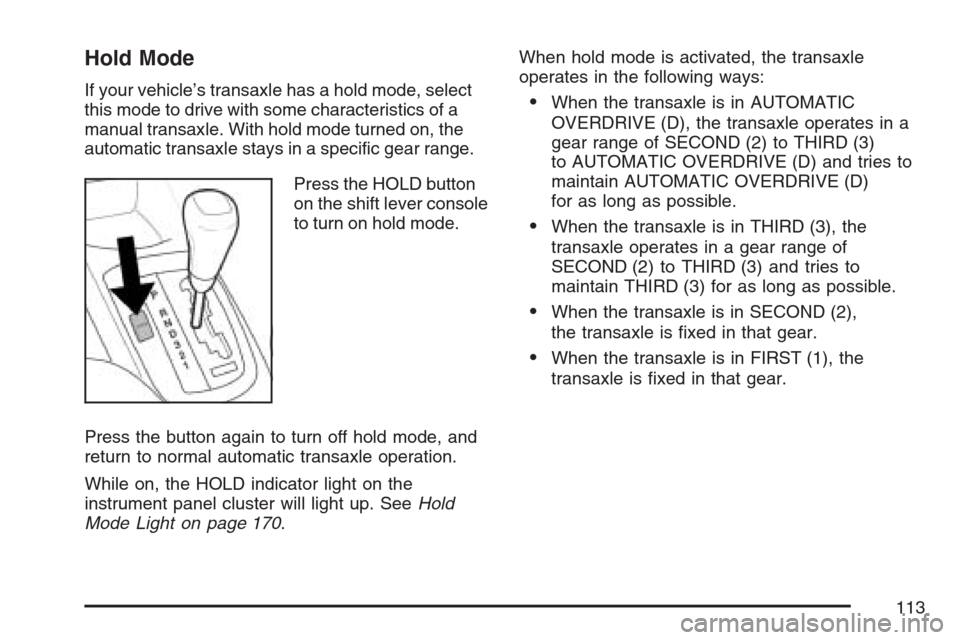
Press the HOLD button
on the shift lever console
to turn on hold mode.
Press the button again to turn off hold mode, and
return to normal automatic transaxle operation.
While on, the HOLD indicator light on the
instrument panel cluster will light up. SeeHold
Mode Light on page 170.When hold mode is activated, the transaxle
operates in the following ways:•When the transaxle is in AUTOMATIC
OVERDRIVE (D), the transaxle operates in a
gear range of SECOND (2) to THIRD (3)
to AUTOMATIC OVERDRIVE (D) and tries to
maintain AUTOMATIC OVERDRIVE (D)
for as long as possible.
•When the transaxle is in THIRD (3), the
transaxle operates in a gear range of
SECOND (2) to THIRD (3) and tries to
maintain THIRD (3) for as long as possible.
•When the transaxle is in SECOND (2),
the transaxle is fixed in that gear.
•When the transaxle is in FIRST (1), the
transaxle is fixed in that gear.
113
Page 133 of 422
Instrument Panel Overview........................ 136
Hazard Warning Flashers.......................... 140
Other Warning Devices............................. 140
Horn.......................................................... 140
Tilt Wheel.................................................. 141
Turn Signal/Multifunction Lever.................. 141
Turn and Lane-Change Signals................. 142
Headlamp High/Low-Beam Changer.......... 142
Flash-to-Pass............................................ 143
Windshield Wipers..................................... 143
Windshield Washer.................................... 144
Rear Window Wiper/Washer
(Hatchback and Wagon Only)................ 145
Cruise Control........................................... 145
Exterior Lamps.......................................... 148
Headlamps on Reminder........................... 149
Daytime Running Lamps (DRL)................. 149
Fog Lamps................................................ 150
Instrument Panel Brightness...................... 150
Dome Lamp.............................................. 151
Map Lamps............................................... 151
Inadvertent Power Battery Saver............... 152Accessory Power Outlet(s)........................ 152
Ashtray(s) and Cigarette Lighter................ 153
Clock......................................................... 154
Climate Controls......................................... 155
Climate Control System............................. 155
Outlet Adjustment...................................... 159
Passenger Compartment Air Filter............. 159
Warning Lights, Gages, and Indicators........ 161
Instrument Panel Cluster........................... 161
Speedometer and Odometer...................... 163
Trip Odometer........................................... 163
Tachometer............................................... 163
Safety Belt Reminder Light........................ 164
Safety Belt Reminder Tone....................... 164
Airbag Readiness Light............................. 164
Passenger Airbag Status Indicator............. 165
Charging System Light.............................. 167
Brake System Warning Light..................... 168
Anti-Lock Brake System Warning Light........ 169
Speed Sensitive Power Steering (SSPS)
Warning Light......................................... 170
Section 3 Instrument Panel
133
Page 137 of 422
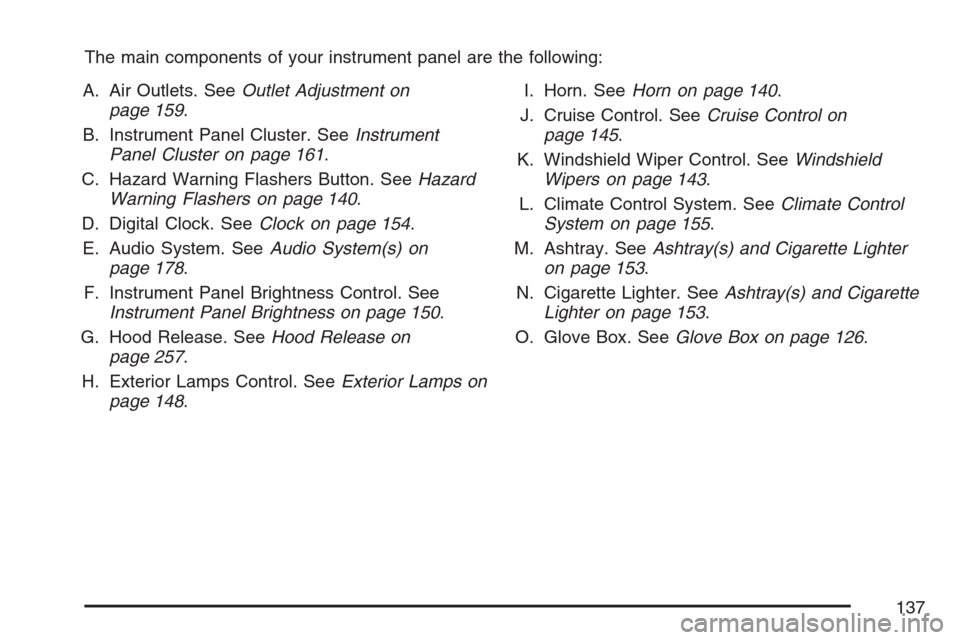
The main components of your instrument panel are the following:
A. Air Outlets. SeeOutlet Adjustment on
page 159.
B. Instrument Panel Cluster. SeeInstrument
Panel Cluster on page 161.
C. Hazard Warning Flashers Button. SeeHazard
Warning Flashers on page 140.
D. Digital Clock. SeeClock on page 154.
E. Audio System. SeeAudio System(s) on
page 178.
F. Instrument Panel Brightness Control. See
Instrument Panel Brightness on page 150.
G. Hood Release. SeeHood Release on
page 257.
H. Exterior Lamps Control. SeeExterior Lamps on
page 148.I. Horn. SeeHorn on page 140.
J. Cruise Control. SeeCruise Control on
page 145.
K. Windshield Wiper Control. SeeWindshield
Wipers on page 143.
L. Climate Control System. SeeClimate Control
System on page 155.
M. Ashtray. SeeAshtray(s) and Cigarette Lighter
on page 153.
N. Cigarette Lighter. SeeAshtray(s) and Cigarette
Lighter on page 153.
O. Glove Box. SeeGlove Box on page 126.
137
Page 139 of 422
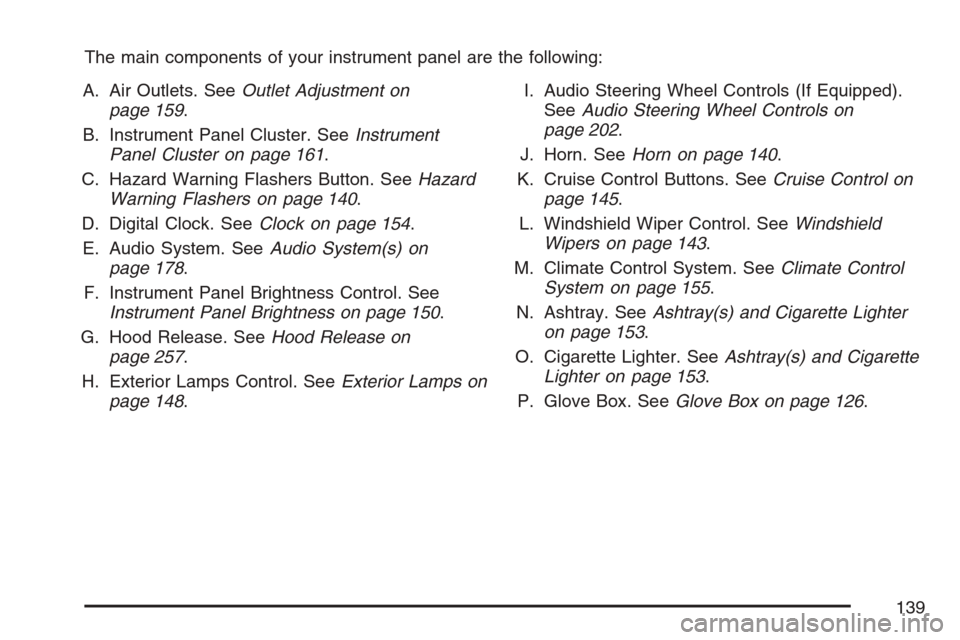
The main components of your instrument panel are the following:
A. Air Outlets. SeeOutlet Adjustment on
page 159.
B. Instrument Panel Cluster. SeeInstrument
Panel Cluster on page 161.
C. Hazard Warning Flashers Button. SeeHazard
Warning Flashers on page 140.
D. Digital Clock. SeeClock on page 154.
E. Audio System. SeeAudio System(s) on
page 178.
F. Instrument Panel Brightness Control. See
Instrument Panel Brightness on page 150.
G. Hood Release. SeeHood Release on
page 257.
H. Exterior Lamps Control. SeeExterior Lamps on
page 148.I. Audio Steering Wheel Controls (If Equipped).
SeeAudio Steering Wheel Controls on
page 202.
J. Horn. SeeHorn on page 140.
K. Cruise Control Buttons. SeeCruise Control on
page 145.
L. Windshield Wiper Control. SeeWindshield
Wipers on page 143.
M. Climate Control System. SeeClimate Control
System on page 155.
N. Ashtray. SeeAshtray(s) and Cigarette Lighter
on page 153.
O. Cigarette Lighter. SeeAshtray(s) and Cigarette
Lighter on page 153.
P. Glove Box. SeeGlove Box on page 126.
139
Page 142 of 422
Turn and Lane-Change Signals
The turn signal has two upward (for right) and
two downward (for left) positions. These positions
let you signal a turn or a lane change.
To signal a turn, move the lever all the way up
or down.
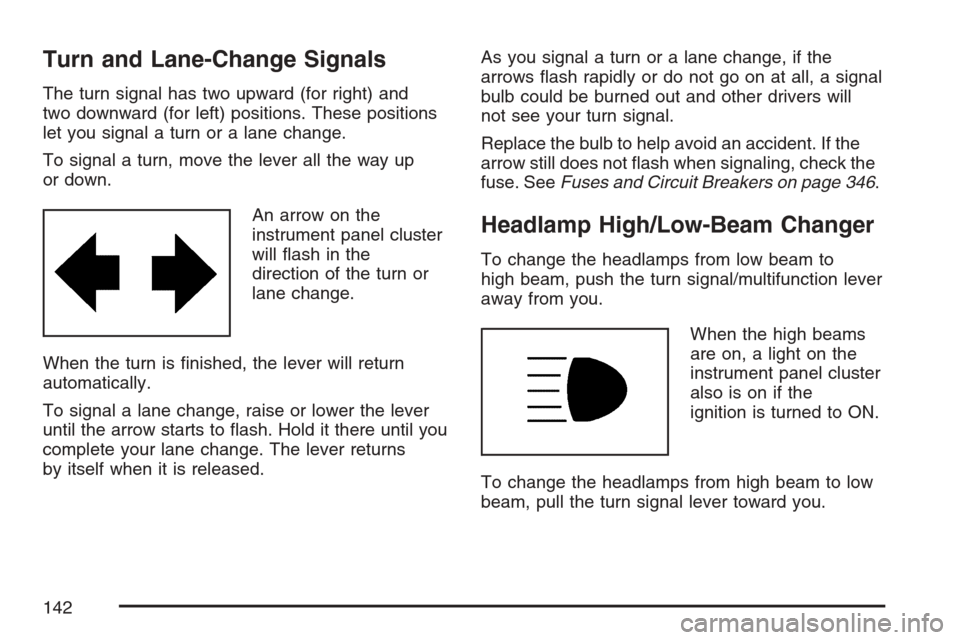
An arrow on the
instrument panel cluster
will flash in the
direction of the turn or
lane change.
When the turn is finished, the lever will return
automatically.
To signal a lane change, raise or lower the lever
until the arrow starts to flash. Hold it there until you
complete your lane change. The lever returns
by itself when it is released.As you signal a turn or a lane change, if the
arrows flash rapidly or do not go on at all, a signal
bulb could be burned out and other drivers will
not see your turn signal.
Replace the bulb to help avoid an accident. If the
arrow still does not flash when signaling, check the
fuse. SeeFuses and Circuit Breakers on page 346.
Headlamp High/Low-Beam Changer
To change the headlamps from low beam to
high beam, push the turn signal/multifunction lever
away from you.
When the high beams
are on, a light on the
instrument panel cluster
also is on if the
ignition is turned to ON.
To change the headlamps from high beam to low
beam, pull the turn signal lever toward you.
142
Page 146 of 422
Setting Cruise Control
{CAUTION:
If you leave your cruise control on when
you are not using cruise, you might hit a
button and go into cruise when you do not
want to. You could be startled and even
lose control. Keep the cruise control switch
off until you want to use cruise control.
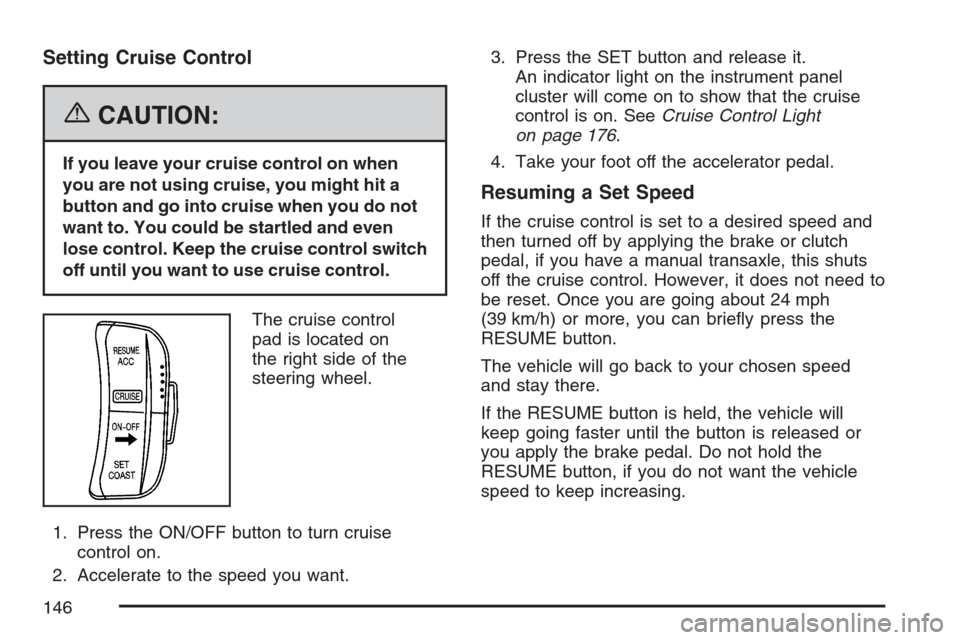
The cruise control
pad is located on
the right side of the
steering wheel.
1. Press the ON/OFF button to turn cruise
control on.
2. Accelerate to the speed you want.3. Press the SET button and release it.
An indicator light on the instrument panel
cluster will come on to show that the cruise
control is on. SeeCruise Control Light
on page 176.
4. Take your foot off the accelerator pedal.
Resuming a Set Speed
If the cruise control is set to a desired speed and
then turned off by applying the brake or clutch
pedal, if you have a manual transaxle, this shuts
off the cruise control. However, it does not need to
be reset. Once you are going about 24 mph
(39 km/h) or more, you can briefly press the
RESUME button.
The vehicle will go back to your chosen speed
and stay there.
If the RESUME button is held, the vehicle will
keep going faster until the button is released or
you apply the brake pedal. Do not hold the
RESUME button, if you do not want the vehicle
speed to keep increasing.
146