Orlando CHEVROLET ORLANDO 2012 1.G Owner's Manual
[x] Cancel search | Manufacturer: CHEVROLET, Model Year: 2012, Model line: ORLANDO, Model: CHEVROLET ORLANDO 2012 1.GPages: 378, PDF Size: 6.68 MB
Page 21 of 378
Black plate (15,1)Chevrolet Orlando Owner Manual - 2012
In Brief 1-15
SeeManual Mode on page 9‑24.
Up‐Shift Light
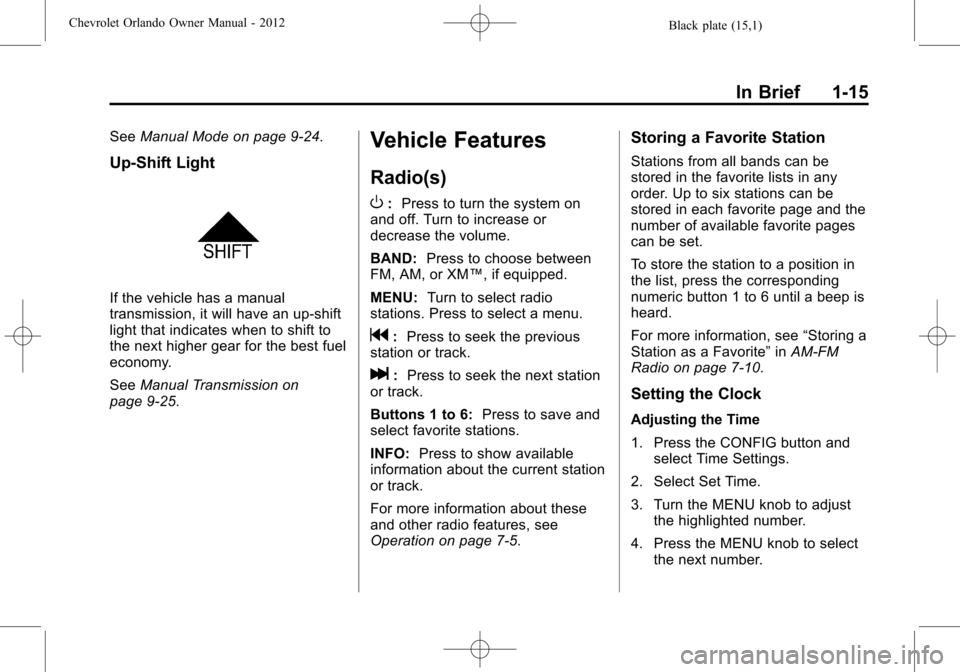
If the vehicle has a manual
transmission, it will have an up-shift
light that indicates when to shift to
the next higher gear for the best fuel
economy.
SeeManual Transmission on
page 9‑25.
Vehicle Features
Radio(s)
O
: Press to turn the system on
and off. Turn to increase or
decrease the volume.
BAND: Press to choose between
FM, AM, or XM™, if equipped.
MENU: Turn to select radio
stations. Press to select a menu.
g: Press to seek the previous
station or track.
l: Press to seek the next station
or track.
Buttons 1 to 6: Press to save and
select favorite stations.
INFO: Press to show available
information about the current station
or track.
For more information about these
and other radio features, see
Operation on page 7‑5.
Storing a Favorite Station
Stations from all bands can be
stored in the favorite lists in any
order. Up to six stations can be
stored in each favorite page and the
number of available favorite pages
can be set.
To store the station to a position in
the list, press the corresponding
numeric button 1 to 6 until a beep is
heard.
For more information, see “Storing a
Station as a Favorite” inAM-FM
Radio on page 7‑10.
Setting the Clock
Adjusting the Time
1. Press the CONFIG button and select Time Settings.
2. Select Set Time.
3. Turn the MENU knob to adjust the highlighted number.
4. Press the MENU knob to select the next number.
Page 22 of 378
Black plate (16,1)Chevrolet Orlando Owner Manual - 2012
1-16 In Brief
5. To save the time and return tothe Time Settings menu, press
the BACK button at any time or
press the MENU knob after
adjusting the minutes.
Setting the 12/24 Hour Format
1. Press the CONFIG button and select Time Settings.
2. Highlight 12/24 Hour Format.
3. Press the MENU knob to select the 12 hour or 24 hour display
format.
For more information, see Clock on
page 5‑5.
Satellite Radio
Vehicles with an XM™ satellite radio
tuner and a valid XM satellite radio
subscription can receive XM
programming.
XM Satellite Radio Service
XM is a satellite radio service based
in the 48 contiguous United States
and 10 Canadian provinces. XM
satellite radio has a wide variety of programming and commercial-free
music, coast to coast, and in
digital-quality sound. A fee is
required to receive the XM service.
For more information refer to:
.www.xmradio.com or call
1-800-929-2100 (U.S.).
.www.xmradio.ca or call
1-877-438-9677 (Canada).
For more information, see Satellite
Radio on page 7‑12.
Portable Audio Devices
Some vehicles have a 3.5 mm
(1/8 in) auxiliary input and a USB
port located in the center console.
External devices such as iPods®,
laptop computers, MP3 players, CD
changers, and USB drives may be
connected, depending on the audio
system.
For more information, see Auxiliary
Devices on page 7‑18.
Bluetooth®
The Bluetooth system allows users
with a Bluetooth-enabled cell phone
to make and receive hands-free
calls using the vehicle audio system
and controls.
The Bluetooth-enabled cell phone
must be paired with the in-vehicle
Bluetooth system before it can be
used in the vehicle. Not all phones
will support all functions.
See Bluetooth (Voice Recognition)
on page 7‑26 orBluetooth
(Infotainment Controls) on
page 7‑23 orBluetooth (Overview)
on page 7‑21.
Page 23 of 378
Black plate (17,1)Chevrolet Orlando Owner Manual - 2012
In Brief 1-17
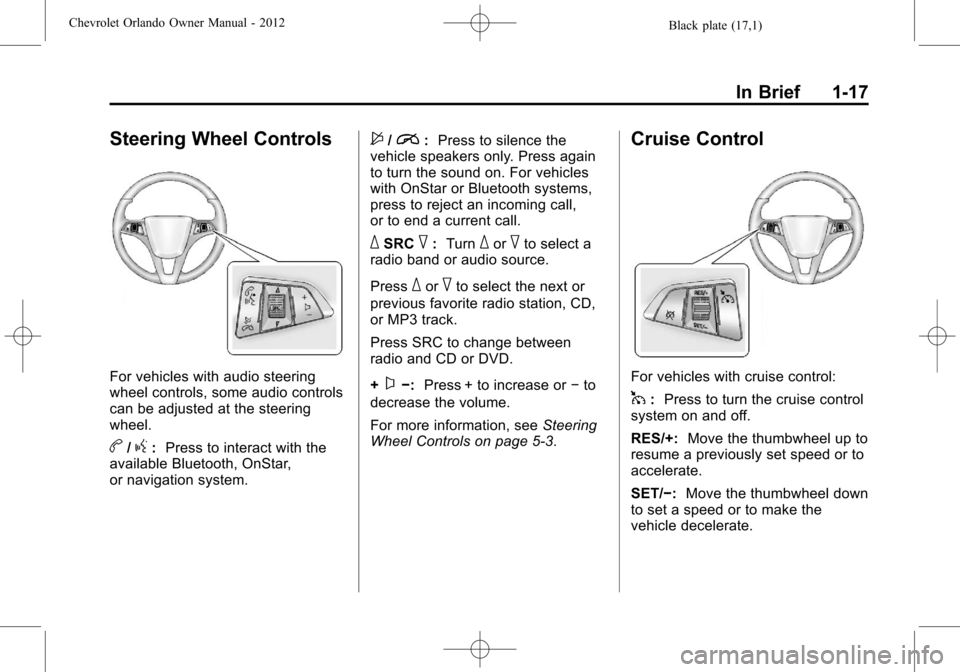
Steering Wheel Controls
For vehicles with audio steering
wheel controls, some audio controls
can be adjusted at the steering
wheel.
b/g:Press to interact with the
available Bluetooth, OnStar,
or navigation system.
$/i: Press to silence the
vehicle speakers only. Press again
to turn the sound on. For vehicles
with OnStar or Bluetooth systems,
press to reject an incoming call,
or to end a current call.
_SRC^: Turn_or^to select a
radio band or audio source.
Press
_or^to select the next or
previous favorite radio station, CD,
or MP3 track.
Press SRC to change between
radio and CD or DVD.
+
x−: Press + to increase or −to
decrease the volume.
For more information, see Steering
Wheel Controls on page 5‑3.
Cruise Control
For vehicles with cruise control:
1: Press to turn the cruise control
system on and off.
RES/+: Move the thumbwheel up to
resume a previously set speed or to
accelerate.
SET/−: Move the thumbwheel down
to set a speed or to make the
vehicle decelerate.
Page 24 of 378
Black plate (18,1)Chevrolet Orlando Owner Manual - 2012
1-18 In Brief
*:Press to disengage cruise
control without erasing the set
speed from memory.
See Cruise Control on page 9‑32.
Navigation System
If the vehicle has a navigation
system, there is a separate
navigation system manual that
includes information on the radio,
audio players, and navigation
system.
The navigation system provides
detailed maps of most major
freeways and roads. After a
destination has been set, the
system provides turn-by-turn
instructions for reaching the
destination. In addition, the system
can help locate a variety of points of
interest (POIs), such as banks,
airports, restaurants, and more.
See the navigation system manual
for more information.
Driver Information
Center (DIC)
The DIC display is located in the
center of the instrument panel
cluster. It shows the status of many
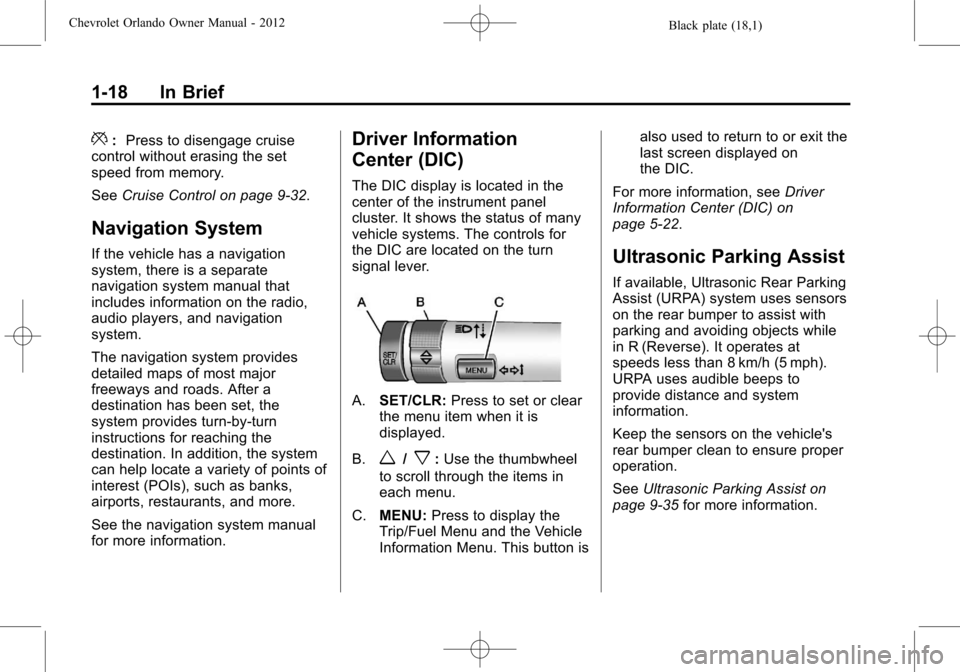
vehicle systems. The controls for
the DIC are located on the turn
signal lever.
A.SET/CLR: Press to set or clear
the menu item when it is
displayed.
B.
w/x: Use the thumbwheel
to scroll through the items in
each menu.
C. MENU: Press to display the
Trip/Fuel Menu and the Vehicle
Information Menu. This button is also used to return to or exit the
last screen displayed on
the DIC.
For more information, see Driver
Information Center (DIC) on
page 5‑22.
Ultrasonic Parking Assist
If available, Ultrasonic Rear Parking
Assist (URPA) system uses sensors
on the rear bumper to assist with
parking and avoiding objects while
in R (Reverse). It operates at
speeds less than 8 km/h (5 mph).
URPA uses audible beeps to
provide distance and system
information.
Keep the sensors on the vehicle's
rear bumper clean to ensure proper
operation.
See Ultrasonic Parking Assist on
page 9‑35 for more information.
Page 25 of 378
Black plate (19,1)Chevrolet Orlando Owner Manual - 2012
In Brief 1-19
Storage Compartments
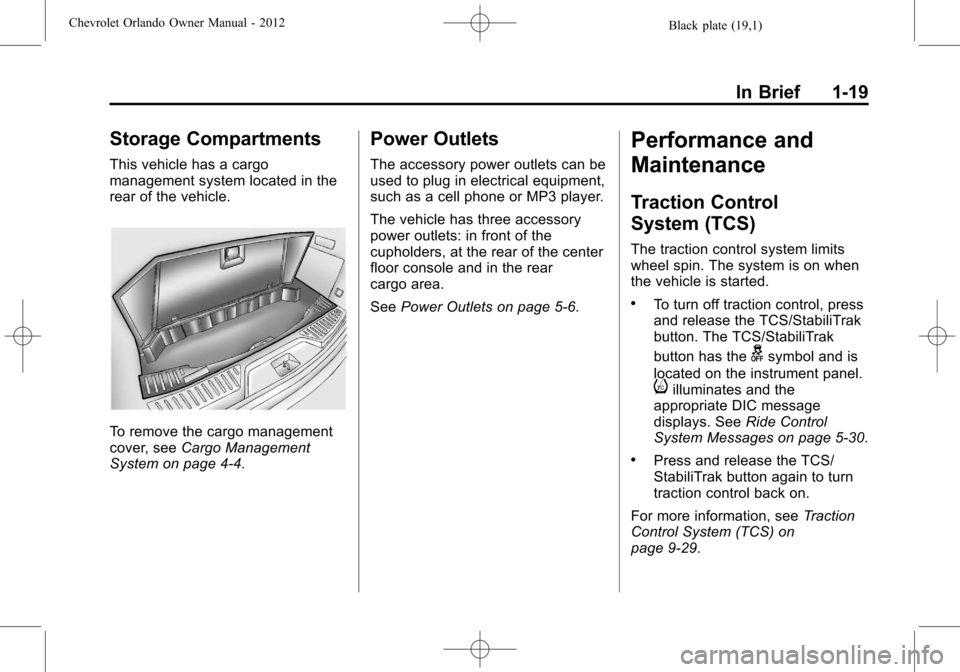
This vehicle has a cargo
management system located in the
rear of the vehicle.
To remove the cargo management
cover, seeCargo Management
System on page 4‑4.
Power Outlets
The accessory power outlets can be
used to plug in electrical equipment,
such as a cell phone or MP3 player.
The vehicle has three accessory
power outlets: in front of the
cupholders, at the rear of the center
floor console and in the rear
cargo area.
See Power Outlets on page 5‑6.
Performance and
Maintenance
Traction Control
System (TCS)
The traction control system limits
wheel spin. The system is on when
the vehicle is started.
.To turn off traction control, press
and release the TCS/StabiliTrak
button. The TCS/StabiliTrak
button has the
gsymbol and is
located on the instrument panel.
iilluminates and the
appropriate DIC message
displays. See Ride Control
System Messages on page 5‑30.
.Press and release the TCS/
StabiliTrak button again to turn
traction control back on.
For more information, see Traction
Control System (TCS) on
page 9‑29.
Page 26 of 378
Black plate (20,1)Chevrolet Orlando Owner Manual - 2012
1-20 In Brief
StabiliTrak®System
The StabiliTrak system assists with
directional control of the vehicle in
difficult driving conditions. The
system is on when the vehicle is
started.
.To turn off both Traction Control
and StabiliTrak, press and hold
the TCS/StabiliTrak button, until
iandgilluminate and the
appropriate DIC message
displays. See Ride Control
System Messages on page 5‑30.
The TCS/StabiliTrak button has
the
gsymbol and is located on
the instrument panel,
.Press the TCS/StabiliTrak button
again to turn on both systems.
For more information, see
StabiliTrak
®System on page 9‑31.
Tire Pressure Monitor
This vehicle may have a Tire
Pressure Monitor System (TPMS).
The TPMS warning light alerts you
to a significant loss in pressure of
one of the vehicle's tires. If the
warning light comes on, stop as
soon as possible and inflate the
tires to the recommended pressure
shown on the Tire and Loading
Information label. See Vehicle Load
Limits on page 9‑10. The warning
light will remain on until the tire
pressure is corrected.
During cooler conditions, the low tire
pressure warning light may appear
when the vehicle is first started and
then turn off. This may be an early indicator that the tire pressures are
getting low and the tires need to be
inflated to the proper pressure.
The TPMS does not replace normal
monthly tire maintenance. It is the
driver
’s responsibility to maintain
correct tire pressures.
See Tire Pressure Monitor System
on page 10‑45.Tire Sealant and
Compressor Kit
This vehicle may come with a spare
tire and tire changing equipment or
a tire sealant and compressor kit.
The kit can be used to temporarily
seal small punctures in the tread
area of the tire.
See Tire Sealant and Compressor
Kit on page 10‑58 for complete
operating information.
If the vehicle came with a spare tire
and tire changing equipment, see If
a Tire Goes Flat on page 10‑56.
Page 27 of 378
Black plate (21,1)Chevrolet Orlando Owner Manual - 2012
In Brief 1-21
Engine Oil Life System
The engine oil life system calculates
engine oil life based on vehicle use
and displays the CHANGE ENGINE
OIL SOON DIC message or
Code 82 DIC message when it is
time to change the engine oil and
filter. The oil life system should be
reset to 100% only following an oil
change.
Resetting the Oil Life System
1. Turn the ignition to ON/RUN withthe engine off.
2. Press the DIC MENU button on the turn signal lever to enter the
Vehicle Information Menu. Use
the thumbwheel to scroll through
the menu items until you reach
REMAINING OIL LIFE.
3. Press the SET/CLR button to reset the oil life at 100%.
4. Turn the ignition to LOCK/OFF.
See Engine Oil Life System on
page 10‑9.
Driving for Better Fuel
Economy
Driving habits can affect fuel
mileage. Here are some driving
tips to get the best fuel economy
possible.
.Avoid fast starts and accelerate
smoothly.
.Brake gradually and avoid
abrupt stops.
.Avoid idling the engine for long
periods of time.
.When road and weather
conditions are appropriate,
use cruise control.
.Always follow posted speed
limits or drive more slowly when
conditions require.
.Keep vehicle tires properly
inflated.
.Combine several trips into a
single trip.
.Replace the vehicle's tires with
the same TPC Spec number
molded into the tire's sidewall
near the size.
.Follow recommended scheduled
maintenance.
Roadside Assistance
Program
U.S.: 1-800-243-8872
TTY Users: 1-888-889-2438
Canada: 1-800-268-6800
As the owner of a new Chevrolet,
you are automatically enrolled in the
Roadside Assistance program.
See Roadside Assistance Program
on page 13‑5 for more information.
Roadside Assistance and OnStar
If you have an active OnStar
subscription, press the
Qbutton
and the current GPS location will be
sent to an OnStar advisor who will
assess your problem, contact
Page 28 of 378
Black plate (22,1)Chevrolet Orlando Owner Manual - 2012
1-22 In Brief
Roadside Assistance, and relay
your exact location to get the help
you need.
Online Owner Center
The Online Owner Center is a
complimentary service that includes
online service reminders, vehicle
maintenance tips, online owner
manual, special privileges,
and more.
Sign up today at:
U.S.: chevrolet.com (click on
“Owners,”then“Manage My
Chevrolet/Owners Login”)
Canada: chevroletowner.caOnStar®
If equipped, this vehicle has a
comprehensive, in-vehicle system
that can connect to a live Advisor
for Emergency, Security, Navigation,
Connection, and Diagnostic
Services. See OnStar Overview on
page 14‑1 for more information.
Page 29 of 378
Black plate (1,1)Chevrolet Orlando Owner Manual - 2012
Keys, Doors, and Windows 2-1
Keys, Doors, and
Windows
Keys and Locks
Keys . . . . . . . . . . . . . . . . . . . . . . . . . . 2-2
Remote Keyless Entry (RKE)System . . . . . . . . . . . . . . . . . . . . . . 2-3
Remote Keyless Entry (RKE) System Operation . . . . . . . . . . . 2-3
Remote Vehicle Start . . . . . . . . . 2-5
Door Locks . . . . . . . . . . . . . . . . . . . 2-6
Power Door Locks . . . . . . . . . . . . 2-7
Automatic Door Locks . . . . . . . . . 2-7
Safety Locks . . . . . . . . . . . . . . . . . . 2-8
Doors
Liftgate . . . . . . . . . . . . . . . . . . . . . . . . 2-8
Vehicle Security
Vehicle Security . . . . . . . . . . . . . . . 2-9
Vehicle Alarm System . . . . . . . . . 2-9
Immobilizer . . . . . . . . . . . . . . . . . . 2-10
Immobilizer Operation . . . . . . . 2-10
Exterior Mirrors
Convex Mirrors . . . . . . . . . . . . . . 2-11
Manual Mirrors . . . . . . . . . . . . . . . 2-11
Power Mirrors . . . . . . . . . . . . . . . . 2-11
Folding Mirrors . . . . . . . . . . . . . . . 2-12
Heated Mirrors . . . . . . . . . . . . . . . 2-12
Interior Mirrors
Manual Rearview Mirror . . . . . . 2-12
Automatic Dimming Rearview Mirror . . . . . . . . . . . . . . . . . . . . . . . 2-12
Child-View Mirror . . . . . . . . . . . . 2-13
Windows
Windows . . . . . . . . . . . . . . . . . . . . . 2-14
Power Windows . . . . . . . . . . . . . 2-14
Sun Visors . . . . . . . . . . . . . . . . . . . 2-17
Roof
Sunroof . . . . . . . . . . . . . . . . . . . . . . 2-17
Page 30 of 378
Black plate (2,1)Chevrolet Orlando Owner Manual - 2012
2-2 Keys, Doors, and Windows
Keys and Locks
Keys
{WARNING
Leaving children in a vehicle with
the ignition key is dangerous for
many reasons. Children or others
could be badly injured or even
killed. They could operate the
power windows or other controls
or even make the vehicle move.
The windows will function with the
keys in the ignition and children
could be seriously injured or killed
if caught in the path of a closing
window. Do not leave the keys in
a vehicle with children.
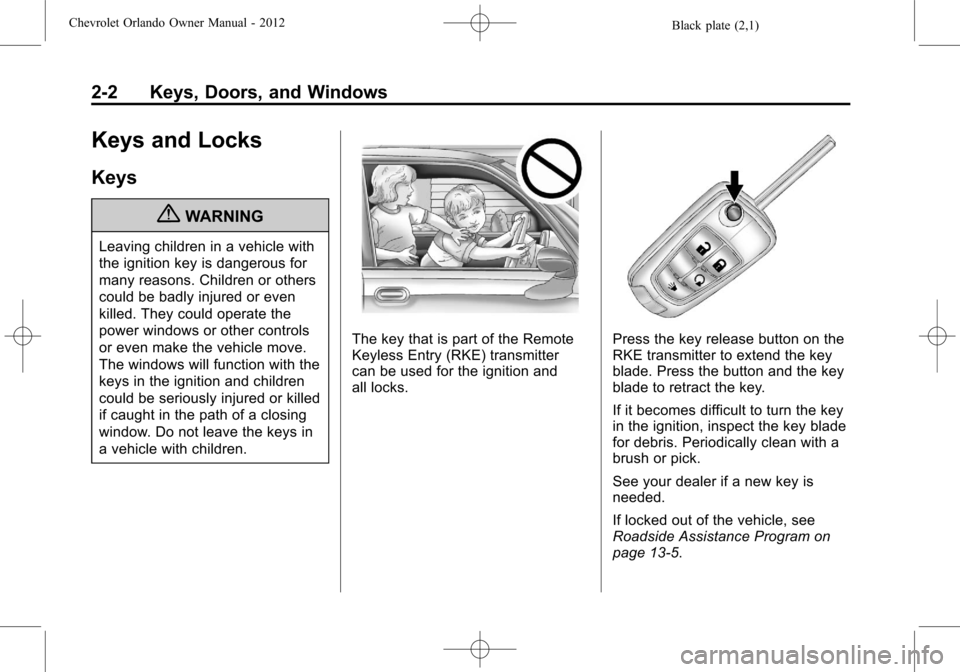
The key that is part of the Remote
Keyless Entry (RKE) transmitter
can be used for the ignition and
all locks.Press the key release button on the
RKE transmitter to extend the key
blade. Press the button and the key
blade to retract the key.
If it becomes difficult to turn the key
in the ignition, inspect the key blade
for debris. Periodically clean with a
brush or pick.
See your dealer if a new key is
needed.
If locked out of the vehicle, see
Roadside Assistance Program on
page 13‑5.