airbag CHEVROLET ORLANDO 2012 1.G Owner's Manual
[x] Cancel search | Manufacturer: CHEVROLET, Model Year: 2012, Model line: ORLANDO, Model: CHEVROLET ORLANDO 2012 1.GPages: 378, PDF Size: 6.68 MB
Page 116 of 378
Black plate (12,1)Chevrolet Orlando Owner Manual - 2012
5-12 Instruments and Controls
Passenger Safety Belt
Reminder Light
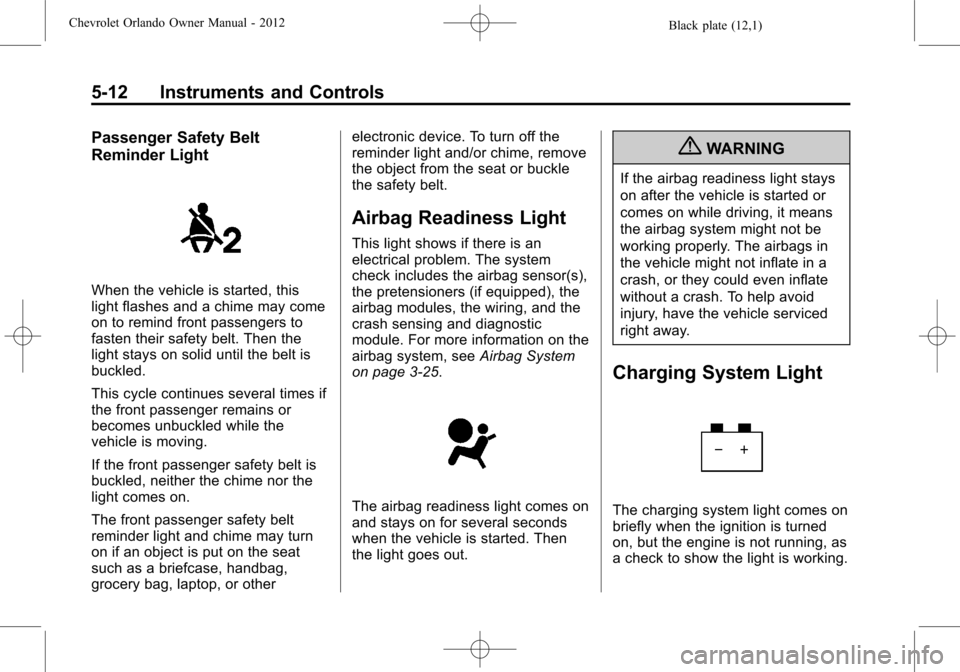
When the vehicle is started, this
light flashes and a chime may come
on to remind front passengers to
fasten their safety belt. Then the
light stays on solid until the belt is
buckled.
This cycle continues several times if
the front passenger remains or
becomes unbuckled while the
vehicle is moving.
If the front passenger safety belt is
buckled, neither the chime nor the
light comes on.
The front passenger safety belt
reminder light and chime may turn
on if an object is put on the seat
such as a briefcase, handbag,
grocery bag, laptop, or otherelectronic device. To turn off the
reminder light and/or chime, remove
the object from the seat or buckle
the safety belt.
Airbag Readiness Light
This light shows if there is an
electrical problem. The system
check includes the airbag sensor(s),
the pretensioners (if equipped), the
airbag modules, the wiring, and the
crash sensing and diagnostic
module. For more information on the
airbag system, see
Airbag System
on page 3‑25.
The airbag readiness light comes on
and stays on for several seconds
when the vehicle is started. Then
the light goes out.
{WARNING
If the airbag readiness light stays
on after the vehicle is started or
comes on while driving, it means
the airbag system might not be
working properly. The airbags in
the vehicle might not inflate in a
crash, or they could even inflate
without a crash. To help avoid
injury, have the vehicle serviced
right away.
Charging System Light
The charging system light comes on
briefly when the ignition is turned
on, but the engine is not running, as
a check to show the light is working.
Page 130 of 378
Black plate (26,1)Chevrolet Orlando Owner Manual - 2012
5-26 Instruments and Controls
Vehicle Messages
Vehicle Messages (Base
Level)
DIC messages display when the
status of the vehicle has changed
and action may be needed to
correct the condition. Multiple
messages appear one after another.
Press any of the DIC buttons on the
turn signal lever to acknowledge
and clear them from the display.
More urgent messages cannot be
cleared from the DIC display. All
messages should be taken
seriously. Clearing messages will
not correct the problem.
On the base level cluster, vehicle
messages appear as code numbers.
25:Left front turn indicator failure
26: Left rear turn indicator failure
27: Right front turn indicator failure
28: Right rear turn indicator failure 35:
Replace battery in radio remote
control
75: Service air conditioner
79: Engine oil low —Add oil
81: Service transmission
82: Change engine oil soon
84: Engine power is reduced
95: Service airbag
134: Park assist fault —Clean
bumper
136: Service parking assist
Vehicle Messages
(Uplevel)
DIC messages display when the
status of the vehicle has changed
and action may be needed to
correct the condition. Multiple
messages appear one after another.
Press any of the DIC buttons on the
turn signal lever to acknowledge
and clear them from the display. More urgent messages cannot
be cleared from the DIC display.
All messages should be taken
seriously. Clearing messages will
not correct the problem.
On the uplevel cluster, vehicle
messages are displayed as text.
The messages and information
about them follow.
Battery Voltage and
Charging Messages
BATTERY SAVER ACTIVE
This message displays when the
vehicle has detected that the battery
voltage is dropping beyond a
reasonable point. The battery saver
system starts reducing certain
features of the vehicle that you may
be able to notice. At the point that
features are disabled, this message
is displayed. It means that the
vehicle is trying to save the charge
in the battery. Turn off unnecessary
accessories to allow the battery to
recharge.
Page 134 of 378
Black plate (30,1)Chevrolet Orlando Owner Manual - 2012
5-30 Instruments and Controls
Ride Control System
Messages
SERVICE TRACTION
CONTROL
This message displays when there
is a problem with the Traction
Control System (TCS). SeeTraction
Control System (TCS) on
page 9‑29.
SERVICE STABILITRAK
This message displays if there is a
problem with the StabiliTrak system.
See StabiliTrak
®System on
page 9‑31.
Airbag System Messages
SERVICE AIRBAG
This message displays if there is a
problem with the airbag system.
Take the vehicle to your dealer for
service.
Security Messages
THEFT ATTEMPTED
This message displays if the vehicle
detects a tamper condition.
Service Vehicle Messages
SERVICE AC SYSTEM
This message displays if there is a
problem with the air conditioning
system. Take the vehicle to your
dealer for service.
SERVICE POWER STEERING
This message displays if there is a
problem with the power steering
system. Take the vehicle to your
dealer for service.
SERVICE STEERING
COLUMN LOCK
This message displays if there is a
problem with the steering column
lock. Take the vehicle to your dealer
for service.
SERVICE VEHICLE SOON
This message displays if there is a
problem with the vehicle. Take the
vehicle to your dealer for service.
Starting the Vehicle
Messages
TURN STEERING WHEEL
TURN KEY OFF THEN ON
This message displays when the
steering column is locked. Try
turning the steering wheel while
turning the vehicle off and then back
on to unlock the steering column.
TURN STEERING WHEEL
START VEHICLE AGAIN
This message displays when the
steering column is locked. Try
turning the steering wheel while
starting the vehicle to unlock the
steering column.
Page 203 of 378
Black plate (15,1)Chevrolet Orlando Owner Manual - 2012
Driving and Operating 9-15
above 110 km/h (68 mph)
should be limited to
five minutes per use.
.Avoid making hard stops for
the first 322 km (200 mi) or
so. During this time the new
brake linings are not yet
broken in. Hard stops with
new linings can mean
premature wear and earlier
replacement. Follow this
breaking-in guideline every
time you get new brake
linings.
.Do not tow a trailer during
break-in. SeeDriving
Characteristics and Towing
Tips on page 9‑41 for the
trailer towing capabilities of
your vehicle and more
information.
Following break‐in, engine speed
and load can be gradually
increased.
Ignition Positions
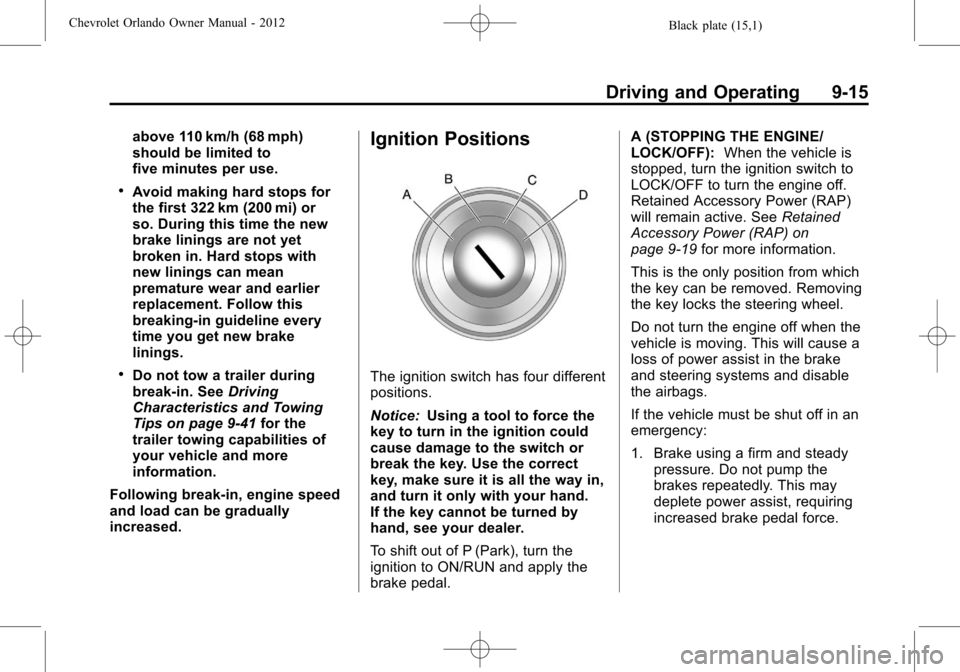
The ignition switch has four different
positions.
Notice: Using a tool to force the
key to turn in the ignition could
cause damage to the switch or
break the key. Use the correct
key, make sure it is all the way in,
and turn it only with your hand.
If the key cannot be turned by
hand, see your dealer.
To shift out of P (Park), turn the
ignition to ON/RUN and apply the
brake pedal. A (STOPPING THE ENGINE/
LOCK/OFF):
When the vehicle is
stopped, turn the ignition switch to
LOCK/OFF to turn the engine off.
Retained Accessory Power (RAP)
will remain active. See Retained
Accessory Power (RAP) on
page 9‑19 for more information.
This is the only position from which
the key can be removed. Removing
the key locks the steering wheel.
Do not turn the engine off when the
vehicle is moving. This will cause a
loss of power assist in the brake
and steering systems and disable
the airbags.
If the vehicle must be shut off in an
emergency:
1. Brake using a firm and steady pressure. Do not pump the
brakes repeatedly. This may
deplete power assist, requiring
increased brake pedal force.
Page 204 of 378
Black plate (16,1)Chevrolet Orlando Owner Manual - 2012
9-16 Driving and Operating
2. Shift the vehicle to neutral. Thiscan be done while the vehicle is
moving. After shifting to neutral,
firmly apply the brakes and steer
the vehicle to a safe location.
3. Come to a complete stop. Shift to P (Park) with an automatic
transmission, or Neutral with a
manual transmission. Turn the
ignition to LOCK/OFF.
4. Set the parking brake. See Parking Brake on page 9‑28.
{WARNING
Turning off the vehicle while
moving may cause loss of power
assist in the brake and steering
systems and disable the airbags.
While driving, only shut the
vehicle off in an emergency.
If the vehicle cannot be pulled over,
and must be shut off while driving,
turn the ignition to ACC/
ACCESSORY. The ignition switch can bind in the
LOCK/OFF position with the key
removed and wheels turned off
center. If this happens, move the
steering wheel from right to left
while turning the key to ACC/
ACCESSORY. If this does not work,
then the vehicle needs service.
B (ACC/ACCESSORY):
This
position provides power to some of
the electrical accessories. It unlocks
the steering wheel. To move the key
from ACC/ACCESSORY to LOCK/
OFF, the shift lever must be in
P (Park).
C (ON/RUN): The ignition switch
stays in this position when the
engine is running. This position can
be used to operate the electrical
accessories, as well as to display
some warning and indicator lights. This position can also be used for
service and diagnostics, and to
verify the proper operation of the
malfunction indicator lamp as may
be required for emission inspection
purposes.
The battery could be drained if the
key is left in the ACC/ACCESSORY
or ON/RUN position with the engine
off. The vehicle might not restart if
the battery is allowed to drain for an
extended period of time.
D (START):
This position starts the
engine. When the engine starts,
release the key. The ignition switch
will return to ON/RUN for normal
driving.
A warning tone sounds when the
driver door is opened and the key is
in the ignition.
Page 234 of 378
Black plate (46,1)Chevrolet Orlando Owner Manual - 2012
9-46 Driving and Operating
are, seal the holes when the
hitch is removed. If the holes
are not sealed, dirt, water, and
deadly carbon monoxide (CO)
from the exhaust can get into the
vehicle. SeeEngine Exhaust on
page 9‑21.
Safety Chains
Always attach chains between the
vehicle and the trailer. Cross the
safety chains under the tongue of
the trailer to help prevent the tongue
from contacting the road if it
becomes separated from the hitch.
Leave enough slack so the rig can
turn. Never allow safety chains to
drag on the ground.
Trailer Brakes
Does the trailer have its own
brakes? Be sure to read and follow
the instructions for the trailer brakes
so they are installed, adjusted, and
maintained properly.
Because the vehicle has antilock
brakes, do not tap into the vehicle's
brake system. If this is done, both
brake systems will not work well,
or at all.
Conversions and
Add-Ons
Add-On Electrical
Equipment
Notice: Do not add anything
electrical to the vehicle unless
you check with your dealer first.
Some electrical equipment can
damage the vehicle and the
damage would not be covered by
the vehicle's warranty. Some
add-on electrical equipment can
keep other components from
working as they should.
Add-on equipment can drain the
vehicle's 12‐volt battery, even if the
vehicle is not operating.
The vehicle has an airbag system.
Before attempting to add anything
electrical to the vehicle, see
Servicing the Airbag-Equipped
Vehicle on page 3‑31 andAdding
Equipment to the Airbag-Equipped
Vehicle on page 3‑31.
Page 236 of 378
Black plate (2,1)Chevrolet Orlando Owner Manual - 2012
10-2 Vehicle Care
Different Size Tires andWheels . . . . . . . . . . . . . . . . . . . 10-52
Uniform Tire Quality Grading . . . . . . . . . . . . . . . . . . . 10-53
Wheel Alignment and Tire
Balance . . . . . . . . . . . . . . . . . . . 10-55
Wheel Replacement . . . . . . . . 10-55
Tire Chains . . . . . . . . . . . . . . . . . 10-56
If a Tire Goes Flat . . . . . . . . . . 10-56
Tire Sealant and Compressor Kit . . . . . . . . . . . 10-58
Storing the Tire Sealant and Compressor Kit . . . . . . . . . . . 10-65
Tire Changing . . . . . . . . . . . . . . 10-66
Full-Size Spare Tire . . . . . . . . 10-72
Jump Starting
Jump Starting . . . . . . . . . . . . . . 10-73
Towing
Towing the Vehicle . . . . . . . . . 10-76
Recreational Vehicle Towing . . . . . . . . . . . . . . . . . . . . 10-76
Appearance Care
Exterior Care . . . . . . . . . . . . . . . 10-79
Interior Care . . . . . . . . . . . . . . . . 10-82
Floor Mats . . . . . . . . . . . . . . . . . . 10-85
General Information
For service and parts needs, visit
your dealer. You will receive
genuine GM parts and GM-trained
and supported service people.
Genuine GM parts have one of
these marks:
Accessories and
Modifications
Adding non‐dealer accessories or
making modifications to the vehicle
can affect vehicle performance and
safety, including such things as
airbags, braking, stability, ride and
handling, emissions systems,
aerodynamics, durability, and
electronic systems like antilock
brakes, traction control, and stability
control. These accessories or
modifications could even cause
malfunction or damage not covered
by the vehicle warranty.
Damage to vehicle components
resulting from modifications or the
installation or use of non‐GM
certified parts, including control
module or software modifications, is
not covered under the terms of the
vehicle warranty and may affect
remaining warranty coverage for
affected parts.
Page 237 of 378
Black plate (3,1)Chevrolet Orlando Owner Manual - 2012
Vehicle Care 10-3
GM Accessories are designed to
complement and function with other
systems on the vehicle. See your
dealer to accessorize the vehicle
using genuine GM Accessories
installed by a dealer technician.
Also, seeAdding Equipment to the
Airbag-Equipped Vehicle on
page 3‑31.Vehicle Checks
Doing Your Own
Service Work
{WARNING
It can be dangerous to work on
your vehicle if you do not have
the proper knowledge, service
manual, tools, or parts. Always
follow owner manual procedures
and consult the service manual
for your vehicle before doing any
service work. If doing some of your own service
work, use the proper service
manual. It tells you much more
about how to service the vehicle
than this manual can. To order the
proper service manual, see
Service
Publications Ordering Information
on page 13‑11.
This vehicle has an airbag system.
Before attempting to do your own
service work, see Servicing the
Airbag-Equipped Vehicle on
page 3‑31.
Keep a record with all parts receipts
and list the mileage and the date of
any service work performed. See
Maintenance Records on
page 11‑16.
Page 267 of 378
Black plate (33,1)Chevrolet Orlando Owner Manual - 2012
Vehicle Care 10-33
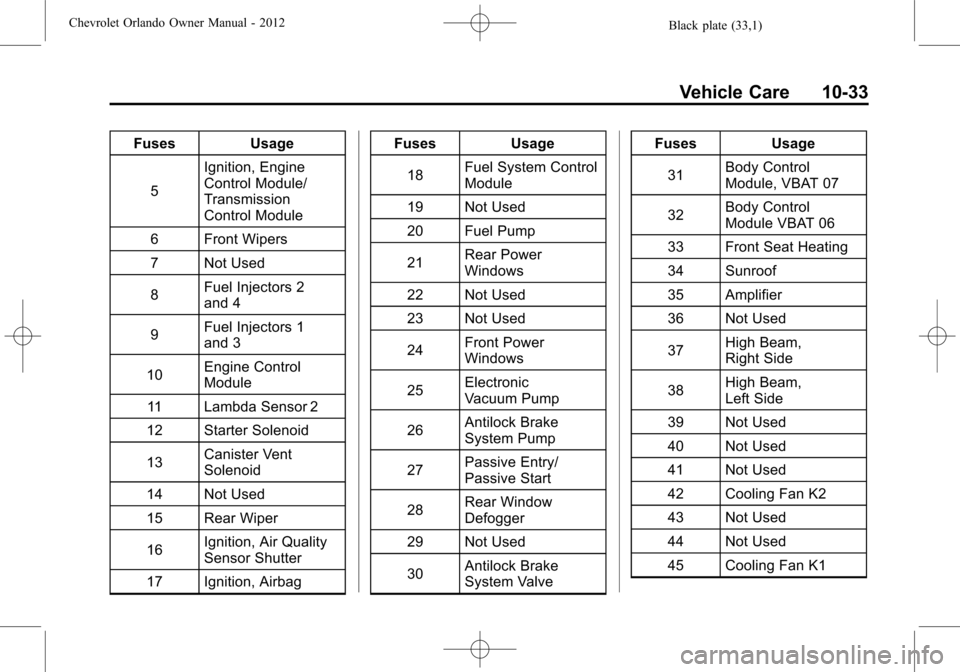
FusesUsage
5 Ignition, Engine
Control Module/
Transmission
Control Module
6 Front Wipers
7 Not Used
8 Fuel Injectors 2
and 4
9 Fuel Injectors 1
and 3
10 Engine Control
Module
11 Lambda Sensor 2
12 Starter Solenoid
13 Canister Vent
Solenoid
14 Not Used
15 Rear Wiper
16 Ignition, Air Quality
Sensor Shutter
17 Ignition, Airbag Fuses
Usage
18 Fuel System Control
Module
19 Not Used
20 Fuel Pump
21 Rear Power
Windows
22 Not Used
23 Not Used
24 Front Power
Windows
25 Electronic
Vacuum Pump
26 Antilock Brake
System Pump
27 Passive Entry/
Passive Start
28 Rear Window
Defogger
29 Not Used
30 Antilock Brake
System Valve Fuses
Usage
31 Body Control
Module, VBAT 07
32 Body Control
Module VBAT 06
33 Front Seat Heating
34 Sunroof
35 Amplifier
36 Not Used
37 High Beam,
Right Side
38 High Beam,
Left Side
39 Not Used
40 Not Used
41 Not Used
42 Cooling Fan K2
43 Not Used
44 Not Used
45 Cooling Fan K1
Page 270 of 378
Black plate (36,1)Chevrolet Orlando Owner Manual - 2012
10-36 Vehicle Care
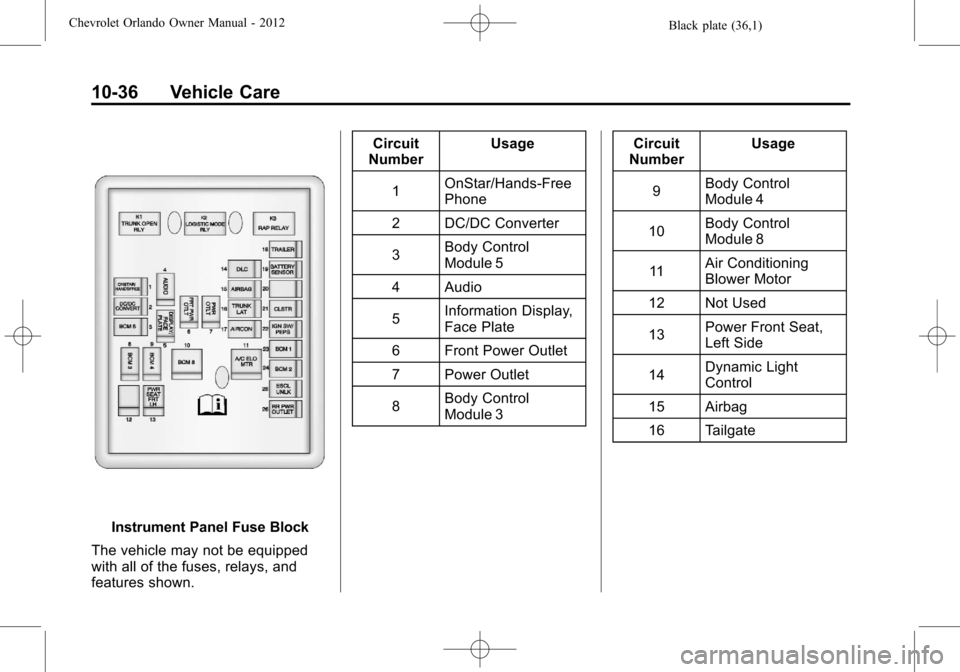
Instrument Panel Fuse Block
The vehicle may not be equipped
with all of the fuses, relays, and
features shown. Circuit
Number Usage
1 OnStar/Hands‐Free
Phone
2 DC/DC Converter
3 Body Control
Module 5
4 Audio
5 Information Display,
Face Plate
6 Front Power Outlet
7 Power Outlet
8 Body Control
Module 3 Circuit
Number Usage
9 Body Control
Module 4
10 Body Control
Module 8
11 Air Conditioning
Blower Motor
12 Not Used
13 Power Front Seat,
Left Side
14 Dynamic Light
Control
15 Airbag
16 Tailgate