parking brake CHEVROLET ORLANDO 2012 1.G Owner's Manual
[x] Cancel search | Manufacturer: CHEVROLET, Model Year: 2012, Model line: ORLANDO, Model: CHEVROLET ORLANDO 2012 1.GPages: 378, PDF Size: 6.68 MB
Page 291 of 378

Black plate (57,1)Chevrolet Orlando Owner Manual - 2012
Vehicle Care 10-57
WARNING (Continued)
changing a flat tire. If it is used for
anything else, you or others could
be badly injured or killed if the
vehicle slips off the jack. If a jack
is provided with the vehicle, only
use it for changing a flat tire.
If a tire goes flat, avoid further tire
and wheel damage by driving slowly
to a level place, well off the road,
if possible. Turn on the hazard
warning flashers. See Hazard
Warning Flashers on page 6‑3.
{WARNING
Changing a tire can be
dangerous. The vehicle can slip
off the jack and roll over or fall
causing injury or death. Find a
level place to change the tire. To
help prevent the vehicle from
moving:
1. Set the parking brake firmly.
2. Put an automatic transmission in P (Park) or a
manual transmission in
1 (First) or R (Reverse).
3. Turn off the engine and do not restart while the vehicle
is raised.
4. Do not allow passengers to remain in the vehicle.
5. Place wheel blocks on both sides of the tire at the
opposite corner of the tire
being changed. This vehicle may come with a jack
and spare tire or a tire sealant and
compressor kit. To use the jacking
equipment to change a spare tire
safely, follow the instructions below.
Then see
Tire Changing on
page 10‑66. To use the tire sealant
and compressor kit, see Tire
Sealant and Compressor Kit on
page 10‑58.
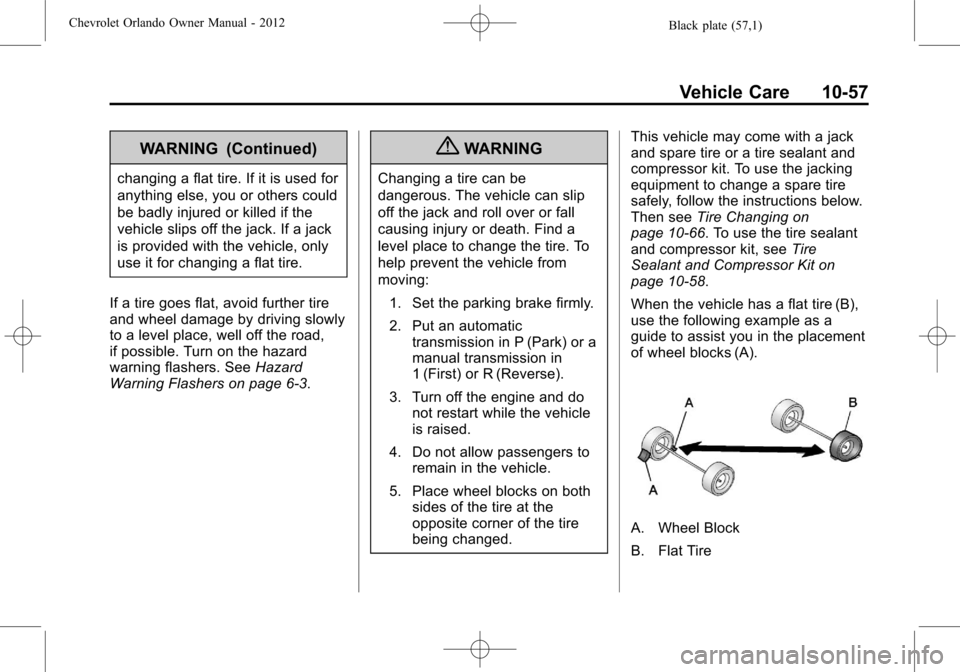
When the vehicle has a flat tire (B),
use the following example as a
guide to assist you in the placement
of wheel blocks (A).
A. Wheel Block
B. Flat Tire
Page 308 of 378

Black plate (74,1)Chevrolet Orlando Owner Manual - 2012
10-74 Vehicle Care
The positive jump start connection
is under a trim cover. Open the
cover door to expose the terminal.
1. Check the other vehicle. It musthave a 12-volt battery with a
negative ground system.
Notice: Only use a vehicle that
has a 12-volt system with a
negative ground for jump
starting. If the other vehicle does
not have a 12-volt system with a
negative ground, both vehicles
can be damaged.
2. Position the two vehicles so that they are not touching.
3. Set the parking brake firmly and put the shift lever in P (Park)
with an automatic transmission,
or neutral with a manual
transmission. See Shifting Into
Park (Automatic Transmission)
on page 9‑19 with an automatic
transmission, or Parking on
page 9‑21 with a manual
transmission. Notice:
If any accessories are left
on or plugged in during the jump
starting procedure, they could be
damaged. The repairs would not
be covered by the vehicle
warranty. Whenever possible,
turn off or unplug all accessories
on either vehicle when jump
starting the vehicle.
4. Turn the ignition to LOCK/OFF.
Turn off all lights and
accessories in both vehicles,
except the hazard warning
flashers if needed.
{WARNING
An electric fan can start up even
when the engine is not running
and can injure you. Keep hands,
clothing and tools away from any
underhood electric fan.
{WARNING
Using a match near a battery can
cause battery gas to explode.
People have been hurt doing this,
and some have been blinded.
Use a flashlight if you need more
light.
Be sure the battery has enough
water. You do not need to add
water to the battery installed in
your new vehicle. But if a battery
has filler caps, be sure the right
amount of fluid is there. If it is low,
add water to take care of that
first. If you do not, explosive gas
could be present.
Battery fluid contains acid that
can burn you. Do not get it on
you. If you accidentally get it in
your eyes or on your skin, flush
the place with water and get
medical help immediately.
Page 312 of 378

Black plate (78,1)Chevrolet Orlando Owner Manual - 2012
10-78 Vehicle Care
3. Turn the ignition to ACC/ACCESSORY.
4. To prevent the battery from draining while the vehicle is
being towed, remove fuses 21,
22, 23, and 24 from the
instrument panel fuse block. See
Instrument Panel Fuse Block on
page 10‑35.
Remember to reinstall the fuses
once the destination has been
reached.
Notice: If 105 km/h (65 mph) is
exceeded while towing the
vehicle, it could be damaged.
Never exceed 105 km/h (65 mph)
while towing the vehicle.
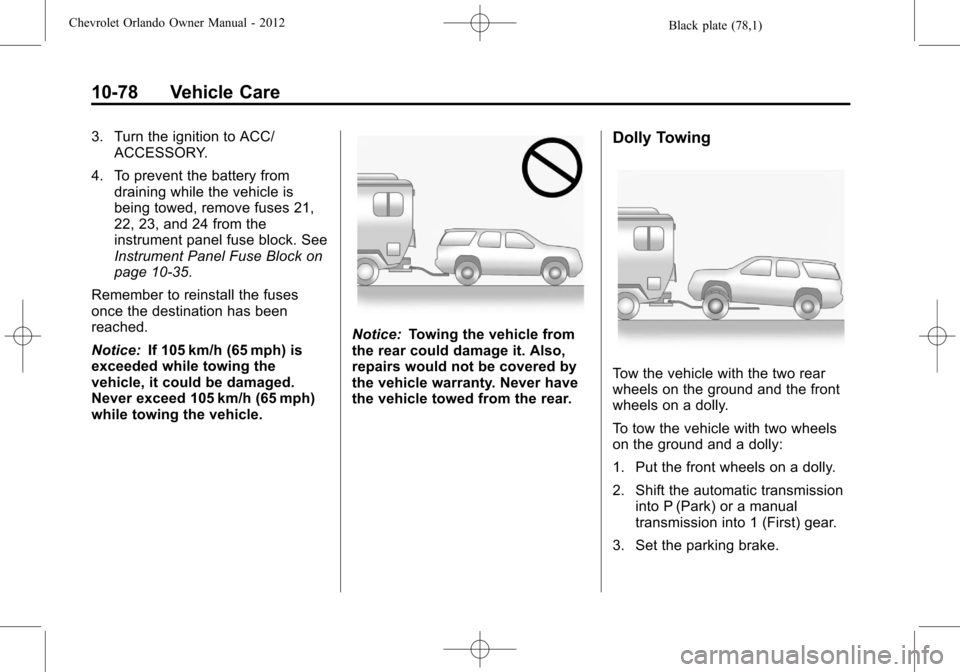
Notice: Towing the vehicle from
the rear could damage it. Also,
repairs would not be covered by
the vehicle warranty. Never have
the vehicle towed from the rear.
Dolly Towing
Tow the vehicle with the two rear
wheels on the ground and the front
wheels on a dolly.
To tow the vehicle with two wheels
on the ground and a dolly:
1. Put the front wheels on a dolly.
2. Shift the automatic transmission into P (Park) or a manual
transmission into 1 (First) gear.
3. Set the parking brake.
Page 313 of 378

Black plate (79,1)Chevrolet Orlando Owner Manual - 2012
Vehicle Care 10-79
4. Clamp the steering wheel in astraight-ahead position with a
clamping device designed for
towing.
5. Remove the key from the ignition.
6. Secure the vehicle to the dolly.
7. Release the parking brake.
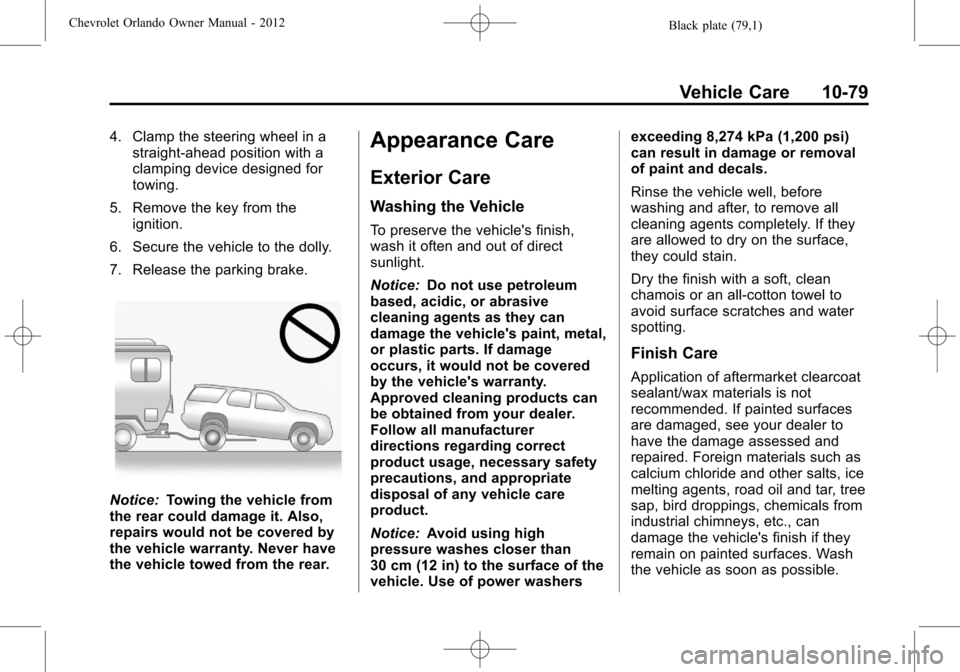
Notice: Towing the vehicle from
the rear could damage it. Also,
repairs would not be covered by
the vehicle warranty. Never have
the vehicle towed from the rear.
Appearance Care
Exterior Care
Washing the Vehicle
To preserve the vehicle's finish,
wash it often and out of direct
sunlight.
Notice: Do not use petroleum
based, acidic, or abrasive
cleaning agents as they can
damage the vehicle's paint, metal,
or plastic parts. If damage
occurs, it would not be covered
by the vehicle's warranty.
Approved cleaning products can
be obtained from your dealer.
Follow all manufacturer
directions regarding correct
product usage, necessary safety
precautions, and appropriate
disposal of any vehicle care
product.
Notice: Avoid using high
pressure washes closer than
30 cm (12 in) to the surface of the
vehicle. Use of power washers exceeding 8,274 kPa (1,200 psi)
can result in damage or removal
of paint and decals.
Rinse the vehicle well, before
washing and after, to remove all
cleaning agents completely. If they
are allowed to dry on the surface,
they could stain.
Dry the finish with a soft, clean
chamois or an all-cotton towel to
avoid surface scratches and water
spotting.
Finish Care
Application of aftermarket clearcoat
sealant/wax materials is not
recommended. If painted surfaces
are damaged, see your dealer to
have the damage assessed and
repaired. Foreign materials such as
calcium chloride and other salts, ice
melting agents, road oil and tar, tree
sap, bird droppings, chemicals from
industrial chimneys, etc., can
damage the vehicle's finish if they
remain on painted surfaces. Wash
the vehicle as soon as possible.
Page 325 of 378

Black plate (5,1)Chevrolet Orlando Owner Manual - 2012
Service and Maintenance 11-5
.Visually inspect steering,
suspension, and chassis
components for damaged, loose,
or missing parts or signs of
wear. SeeExterior Care on
page 10‑79.
.Check restraint system
components. See Safety System
Check on page 3‑24.
.Visually inspect fuel system for
damage or leaks.
.Visually inspect exhaust system
and nearby heat shields for
loose or damaged parts.
.Lubricate body components. See
Exterior Care on page 10‑79.
.Check starter switch. See Starter
Switch Check on page 10‑22.
.Check automatic transmission
shift lock control function. See
Automatic Transmission Shift
Lock Control Function Check on
page 10‑23.
.Check ignition transmission lock.
See Ignition Transmission Lock
Check on page 10‑23.
.Check parking brake and
automatic transmission park
mechanism. See Park Brake and
P (Park) Mechanism Check on
page 10‑23.
.Check accelerator pedal for
damage, high effort, or binding.
Replace if needed.
.Visually inspect gas strut for
signs of wear, cracks, or other
damage. Check the hold open
ability of the strut. See your
dealer if service is required.
.Check tire sealant expiration
date, if equipped. See Tire
Sealant and Compressor Kit on
page 10‑58.
.Inspect sunroof track and seal,
if equipped. See Sunroof on
page 2‑17.
Page 368 of 378

Black plate (2,1)Chevrolet Orlando Owner Manual - 2012
i-2 INDEX
Blade Replacement, Wiper . . . 10-24
Bluetooth . . . . . . . . . . 7-21, 7-23, 7-26
BrakeSystem Warning Light . . . . . . . . 5-15
Brakes . . . . . . . . . . . . . . . . . . . . . . . . 10-19 Antilock . . . . . . . . . . . . . . . . . . . . . . . 9-27
Assist . . . . . . . . . . . . . . . . . . . . . . . . . 9-29
Fluid . . . . . . . . . . . . . . . . . . . . . . . . 10-20
Parking . . . . . . . . . . . . . . . . . . . . . . . 9-28
System Messages . . . . . . . . . . . . 5-27
Braking . . . . . . . . . . . . . . . . . . . . . . . . . 9-3
Break-In, New Vehicle . . . . . . . . . 9-14
Bulb Replacement . . . . . . . . . . . . 10-30
Back-up Lamps . . . . . . . . . . . . . 10-29
Fog Lamps . . . . . . . . . . . . . . . . . 10-27
Halogen Bulbs . . . . . . . . . . . . . . 10-25
Headlamp Aiming . . . . . . . . . . . 10-25
Headlamps . . . . . . . . . . . . . . . . . 10-25
Headlamps, Front TurnSignal, Sidemarker, and
Parking Lamps . . . . . . . . . . . . 10-26
License Plate Lamps . . . . . . . 10-30
Taillamps, Turn Signal, Sidemarker, and
Stoplamps . . . . . . . . . . . . . . . . 10-27
Buying New Tires . . . . . . . . . . . . . 10-51C
Calibration . . . . . . . . . . . . . . . . . . . . . . 5-5
Capacities and Specifications . . . . . . . . . . . . . . . . 12-2
Carbon Monoxide Engine Exhaust . . . . . . . . . . . . . . . 9-21
Liftgate . . . . . . . . . . . . . . . . . . . . . . . . 2-8
Winter Driving . . . . . . . . . . . . . . . . . 9-8
Cargo Cover . . . . . . . . . . . . . . . . . . . . . . . . . . 4-2
Management System . . . . . . . . . . 4-4
Cautions, Danger, and Warnings . . . . . . . . . . . . . . . . . . . . . . . . iv
CD Player . . . . . . . . . . . . . . . . . . . . . 7-16
Center Console Storage . . . . . . . . 4-2
Chains, Tire . . . . . . . . . . . . . . . . . . 10-56
Charging System Light . . . . . . . . 5-12
Check Engine Light . . . . . . . . . . . . . . . . . . 5-13
IgnitionTransmission Lock . . . . . . . . 10-23 Child Restraints
Infants and Young
Children . . . . . . . . . . . . . . . . . . . . . 3-35
Lower Anchors and Tethers for Children . . . . . . . . . 3-41
Older Children . . . . . . . . . . . . . . . . 3-33
Securing . . . . . . . . . . . . . . . . 3-46, 3-49
Systems . . . . . . . . . . . . . . . . . . . . . . 3-38
Child-View Mirror . . . . . . . . . . . . . . 2-13
Cigarette Lighter . . . . . . . . . . . . . . . . 5-7
Circuit Breakers . . . . . . . . . . . . . . 10-31
Cleaning Exterior Care . . . . . . . . . . . . . . . 10-79
Interior Care . . . . . . . . . . . . . . . . 10-82
Climate Control Systems . . . . . . . 8-1 Air Conditioning . . . . . . . . . . . . . . . 8-1
Automatic . . . . . . . . . . . . . . . . . . . . . . 8-3
Heating . . . . . . . . . . . . . . . . . . . . . . . . 8-1
Clock . . . . . . . . . . . . . . . . . . . . . . . . . . . 5-5
Cluster, Instrument . . . . . . . . . . . . . 5-9
Clutch, Hydraulic . . . . . . . . . . . . . 10-11
Collision Damage Repair . . . . . . 13-9
Page 374 of 378

Black plate (8,1)Chevrolet Orlando Owner Manual - 2012
i-8 INDEX
OnStar®(cont'd)
Navigation . . . . . . . . . . . . . . . . . . . . 14-2
Overview . . . . . . . . . . . . . . . . . . . . . 14-1
Security . . . . . . . . . . . . . . . . . . . . . . 14-2
System, In Brief . . . . . . . . . . . . . . 1-22
Operation, Infotainment System . . . . . . . . . . . . . . . . . . . . . . . . 7-5
Ordering Service Publications . . . . . . . . .13-11
Outlets Power . . . . . . . . . . . . . . . . . . . . . . . . . 5-6
Overheating, Engine . . . . . . . . . . 10-17
Overview, Infotainment System . . . . . . . . . . . . . . . . . . . . 7-2, 7-4
Overview, OnStar
®. . . . . . . . . . . . 14-1
P
Park Shifting Into . . . . . . . . . . . . . . . . . . . 9-19
Shifting Out of . . . . . . . . . . . . . . . . 9-20
Parking . . . . . . . . . . . . . . . . . . . . . . . . 9-21 Assist, Ultrasonic . . . . . . . . . . . . . 9-35
Brake . . . . . . . . . . . . . . . . . . . . . . . . . 9-28
Brake and P (Park)Mechanism Check . . . . . . . . 10-23
Over Things That Burn . . . . . . . 9-21 Personalization
Vehicle . . . . . . . . . . . . . . . . . . . . . . . 5-32
Phone Bluetooth . . . . . . . . . 7-21, 7-23, 7-26
Power Door Locks . . . . . . . . . . . . . . . . . . . . 2-7
Mirrors . . . . . . . . . . . . . . . . . . . . . . . . 2-11
Outlets . . . . . . . . . . . . . . . . . . . . . . . . 5-6
Protection, Battery . . . . . . . . . . . . . 6-6
Reduced Engine Light . . . . . . . . 5-20
Retained Accessory (RAP) . . . 9-19
Seat Adjustment . . . . . . . . . . . . . . . 3-5
Windows . . . . . . . . . . . . . . . . . . . . . 2-14
Power Steering Warning Lights . . . . . . . . . . . . . . . . . . . . . . . . 5-17
Pregnancy, Using Safety
Belts . . . . . . . . . . . . . . . . . . . . . . . . . 3-23
Privacy Radio FrequencyIdentification (RFID) . . . . . . . 13-15
Program
Courtesy Transportation . . . . . . 13-8
R
Radio FrequencyIdentification (RFID) . . . . . . . . 13-15
Statement . . . . . . . . . . . . . . . . . . 13-15
Radios AM-FM Radio . . . . . . . . . . . . . . . . . 7-10
Reception . . . . . . . . . . . . . . . . . . . . 7-15
Satellite . . . . . . . . . . . . . . . . . . . . . . . 7-12
Reading Lamps . . . . . . . . . . . . . . . . . 6-5
Rear Window Washer/Wiper . . . . 5-5
Rearview Mirrors . . . . . . . . . . . . . . 2-12 Automatic Dimming . . . . . . . . . . . 2-12
Reclining Seatbacks . . . . . . . . . . . . 3-5
Recommended Fuel . . . . . . . . . . . . . . . . . . . . . . . . . . 9-37
Recommended Fluids and
Lubricants . . . . . . . . . . . . . . . . . . . 11-13
Records Maintenance . . . . . . . . . . . . . . . . .11-16
Recreational Vehicle
Towing . . . . . . . . . . . . . . . . . . . . . . 10-76
Reduced Engine Power Light . . . . . . . . . . . . . . . . . . . . . . . . . 5-20
Reimbursement Program, GM Mobility . . . . . . . . . . . . . . . . . . 13-5