change wheel CHEVROLET ORLANDO 2012 1.G Owners Manual
[x] Cancel search | Manufacturer: CHEVROLET, Model Year: 2012, Model line: ORLANDO, Model: CHEVROLET ORLANDO 2012 1.GPages: 378, PDF Size: 6.68 MB
Page 5 of 378

Black plate (5,1)Chevrolet Orlando Owner Manual - 2012
Introduction v
Vehicle Symbol Chart
Here are some additional symbols
that may be found on the vehicle
and what they mean. For more
information on the symbol, refer to
the Index.
9:Airbag Readiness Light
#:Air Conditioning
!:Antilock Brake System (ABS)
%:Audio Steering Wheel Controls
or OnStar®
$: Brake System Warning Light
":Charging System
I:Cruise Control
B: Engine Coolant Temperature
O:Exterior Lamps
#:Fog Lamps
.: Fuel Gauge
+:Fuses
3: Headlamp High/Low-Beam
Changer
j: LATCH System Child
Restraints
*: Malfunction Indicator Lamp
::Oil Pressure
}:Power
/:Remote Vehicle Start
>:Safety Belt Reminders
7:Tire Pressure Monitor
d:Traction Control/StabiliTrak®
M:Windshield Washer Fluid
Page 9 of 378

Black plate (3,1)Chevrolet Orlando Owner Manual - 2012
In Brief 1-3
A.Air Vents on page 8‑6.
B. Turn and Lane-Change Lever. See Turn and Lane-Change
Signals on page 6‑4.
Headlamp High/Low-Beam
Changer on page 6‑2.
C. Instrument Cluster on page 5‑9.
D. Windshield Wiper/Washer on
page 5‑3.
Rear Window Wiper/Washer on
page 5‑5.
E. Infotainment on page 7‑1.
F. Infotainment Display.
G. Light Sensor. See Automatic
Headlamp System on page 6‑3.
H. Instrument Panel Storage on
page 4‑1.
USB Port and Auxiliary Input
Jack (Inside Instrument Panel
Storage). See Auxiliary Devices
on page 7‑18. I.
CD Player on page 7‑16.
J. TCS/StabiliTrak Button. See StabiliTrak
®System on
page 9‑31.
K. Exterior Lamp Controls on
page 6‑1.
Instrument Panel Illumination
Control on page 6‑5.
Front Fog Lamps on page 6‑4.
L. Front Storage on page 4‑1.
M. Data Link Connector (DLC) (Out of View). See Malfunction
Indicator Lamp on page 5‑13.
N. Cruise Control on page 9‑32.
O. Steering Wheel Adjustment on
page 5‑2.
P. Horn on page 5‑3.
Q. Steering Wheel Controls on
page 5‑3. R.
Power Door Locks on page 2‑7.
S. Heated Front Seats on page 3‑7
(If Equipped).
T. Climate Control Systems on
page 8‑1.
Automatic Climate Control
System on page 8‑3.
U. Shift Lever. See Automatic
Transmission on page 9‑23 or
Manual Transmission on
page 9‑25.
V. Parking Brake on page 9‑28.
W. Power Outlets on page 5‑6.
X. Hazard Warning Flashers on
page 6‑3.
Y. Passenger Safety Belt Reminder Light. See Safety Belt
Reminders on page 5‑11.
Page 23 of 378
Black plate (17,1)Chevrolet Orlando Owner Manual - 2012
In Brief 1-17
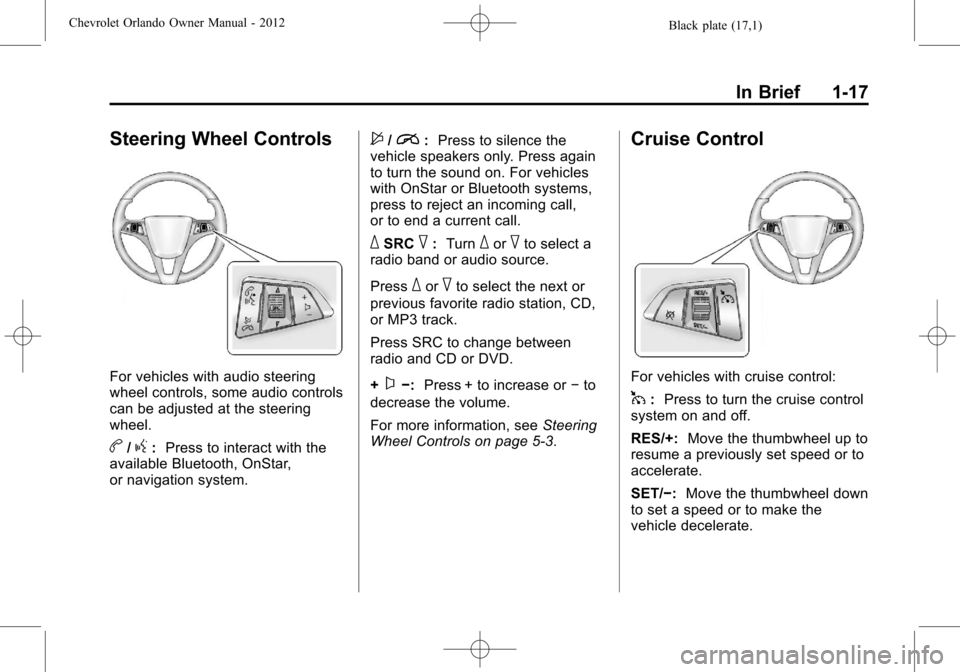
Steering Wheel Controls
For vehicles with audio steering
wheel controls, some audio controls
can be adjusted at the steering
wheel.
b/g:Press to interact with the
available Bluetooth, OnStar,
or navigation system.
$/i: Press to silence the
vehicle speakers only. Press again
to turn the sound on. For vehicles
with OnStar or Bluetooth systems,
press to reject an incoming call,
or to end a current call.
_SRC^: Turn_or^to select a
radio band or audio source.
Press
_or^to select the next or
previous favorite radio station, CD,
or MP3 track.
Press SRC to change between
radio and CD or DVD.
+
x−: Press + to increase or −to
decrease the volume.
For more information, see Steering
Wheel Controls on page 5‑3.
Cruise Control
For vehicles with cruise control:
1: Press to turn the cruise control
system on and off.
RES/+: Move the thumbwheel up to
resume a previously set speed or to
accelerate.
SET/−: Move the thumbwheel down
to set a speed or to make the
vehicle decelerate.
Page 27 of 378
Black plate (21,1)Chevrolet Orlando Owner Manual - 2012
In Brief 1-21
Engine Oil Life System
The engine oil life system calculates
engine oil life based on vehicle use
and displays the CHANGE ENGINE
OIL SOON DIC message or
Code 82 DIC message when it is
time to change the engine oil and
filter. The oil life system should be
reset to 100% only following an oil
change.
Resetting the Oil Life System
1. Turn the ignition to ON/RUN withthe engine off.
2. Press the DIC MENU button on the turn signal lever to enter the
Vehicle Information Menu. Use
the thumbwheel to scroll through
the menu items until you reach
REMAINING OIL LIFE.
3. Press the SET/CLR button to reset the oil life at 100%.
4. Turn the ignition to LOCK/OFF.
See Engine Oil Life System on
page 10‑9.
Driving for Better Fuel
Economy
Driving habits can affect fuel
mileage. Here are some driving
tips to get the best fuel economy
possible.
.Avoid fast starts and accelerate
smoothly.
.Brake gradually and avoid
abrupt stops.
.Avoid idling the engine for long
periods of time.
.When road and weather
conditions are appropriate,
use cruise control.
.Always follow posted speed
limits or drive more slowly when
conditions require.
.Keep vehicle tires properly
inflated.
.Combine several trips into a
single trip.
.Replace the vehicle's tires with
the same TPC Spec number
molded into the tire's sidewall
near the size.
.Follow recommended scheduled
maintenance.
Roadside Assistance
Program
U.S.: 1-800-243-8872
TTY Users: 1-888-889-2438
Canada: 1-800-268-6800
As the owner of a new Chevrolet,
you are automatically enrolled in the
Roadside Assistance program.
See Roadside Assistance Program
on page 13‑5 for more information.
Roadside Assistance and OnStar
If you have an active OnStar
subscription, press the
Qbutton
and the current GPS location will be
sent to an OnStar advisor who will
assess your problem, contact
Page 151 of 378
Black plate (5,1)Chevrolet Orlando Owner Manual - 2012
Infotainment System 7-5
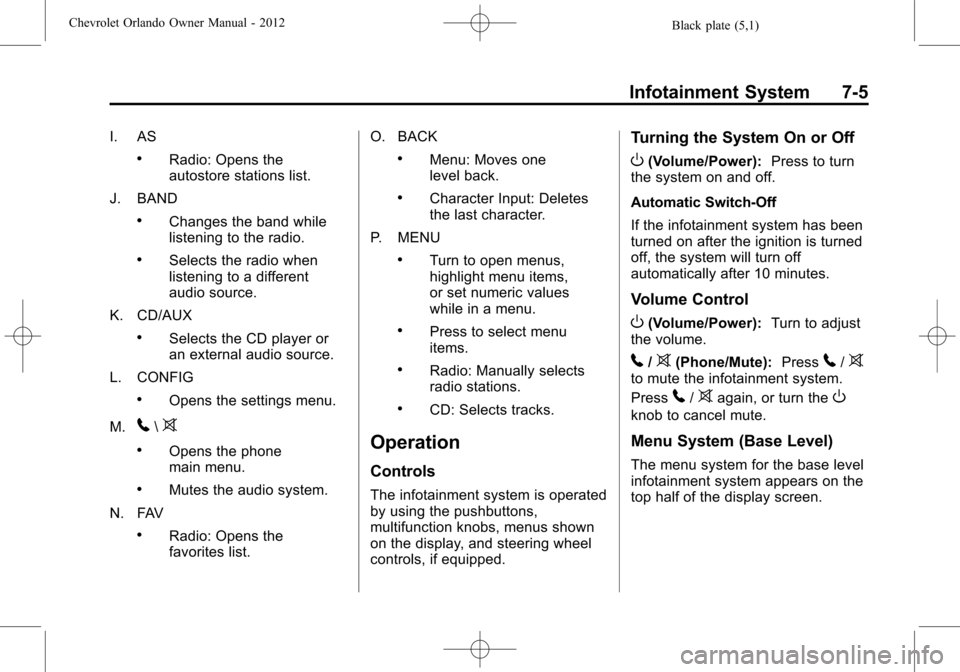
I. AS
.Radio: Opens the
autostore stations list.
J. BAND
.Changes the band while
listening to the radio.
.Selects the radio when
listening to a different
audio source.
K. CD/AUX
.Selects the CD player or
an external audio source.
L. CONFIG
.Opens the settings menu.
M.
5\>
.Opens the phone
main menu.
.Mutes the audio system.
N. FAV
.Radio: Opens the
favorites list. O. BACK
.Menu: Moves one
level back.
.Character Input: Deletes
the last character.
P. MENU
.Turn to open menus,
highlight menu items,
or set numeric values
while in a menu.
.Press to select menu
items.
.Radio: Manually selects
radio stations.
.CD: Selects tracks.
Operation
Controls
The infotainment system is operated
by using the pushbuttons,
multifunction knobs, menus shown
on the display, and steering wheel
controls, if equipped.
Turning the System On or Off
O(Volume/Power): Press to turn
the system on and off.
Automatic Switch-Off
If the infotainment system has been
turned on after the ignition is turned
off, the system will turn off
automatically after 10 minutes.
Volume Control
O(Volume/Power): Turn to adjust
the volume.
5/>(Phone/Mute): Press5/>to mute the infotainment system.
Press
5/>again, or turn theO
knob to cancel mute.
Menu System (Base Level)
The menu system for the base level
infotainment system appears on the
top half of the display screen.
Page 188 of 378
Black plate (6,1)Chevrolet Orlando Owner Manual - 2012
8-6 Climate Controls
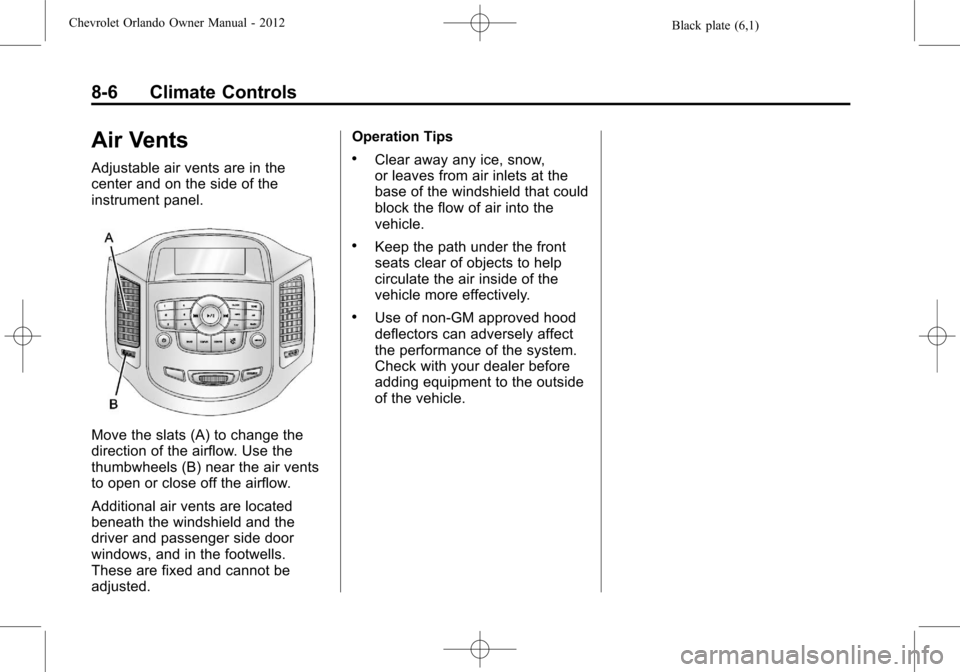
Air Vents
Adjustable air vents are in the
center and on the side of the
instrument panel.
Move the slats (A) to change the
direction of the airflow. Use the
thumbwheels (B) near the air vents
to open or close off the airflow.
Additional air vents are located
beneath the windshield and the
driver and passenger side door
windows, and in the footwells.
These are fixed and cannot be
adjusted.Operation Tips
.Clear away any ice, snow,
or leaves from air inlets at the
base of the windshield that could
block the flow of air into the
vehicle.
.Keep the path under the front
seats clear of objects to help
circulate the air inside of the
vehicle more effectively.
.Use of non-GM approved hood
deflectors can adversely affect
the performance of the system.
Check with your dealer before
adding equipment to the outside
of the vehicle.
Page 193 of 378
Black plate (5,1)Chevrolet Orlando Owner Manual - 2012
Driving and Operating 9-5
3. Then turn the steering wheel togo straight down the roadway.
Loss of Control
Skidding
There are three types of skids that
correspond to the vehicle's three
control systems:
.Braking Skid —wheels are not
rolling.
.Steering or Cornering
Skid —too much speed or
steering in a curve causes tires
to slip and lose cornering force.
.Acceleration Skid —too much
throttle causes the driving
wheels to spin. Defensive drivers avoid most skids
by taking reasonable care suited to
existing conditions, and by not
overdriving those conditions. But
skids are always possible.
If the vehicle starts to slide, follow
these suggestions:
.Ease your foot off the
accelerator pedal and quickly
steer the way you want the
vehicle to go. The vehicle may
straighten out. Be ready for a
second skid if it occurs.
.Slow down and adjust your
driving according to weather
conditions. Stopping distance
can be longer and vehicle
control can be affected when
traction is reduced by water,
snow, ice, gravel, or other material on the road. Learn to
recognize warning clues
—such
as enough water, ice, or packed
snow on the road to make a
mirrored surface —and slow
down when you have any doubt.
.Try to avoid sudden steering,
acceleration, or braking,
including reducing vehicle speed
by shifting to a lower gear. Any
sudden changes could cause
the tires to slide.
Remember: Antilock brakes help
avoid only the braking skid.
Page 198 of 378
Black plate (10,1)Chevrolet Orlando Owner Manual - 2012
9-10 Driving and Operating
For information about using tire
chains on the vehicle, seeTire
Chains on page 10‑56.
Rocking the Vehicle to Get
It Out
Turn the steering wheel left and
right to clear the area around the
front wheels. Turn off any traction or
stability system. Shift back and forth
between R (Reverse) and a forward
gear, spinning the wheels as little as
possible. To prevent transmission
wear, wait until the wheels stop
spinning before shifting gears.
Release the accelerator pedal while
shifting, and press lightly on the
accelerator pedal when the
transmission is in gear. Slowly
spinning the wheels in the forward
and reverse directions causes a
rocking motion that could free the
vehicle. If that does not get the
vehicle out after a few tries, it might
need to be towed out. If the vehicle
does need to be towed out, see
Towing the Vehicle on page 10‑76.
Vehicle Load Limits
It is very important to know how
much weight the vehicle can
carry. This weight is called the
vehicle capacity weight and
includes the weight of all
occupants, cargo, and all
nonfactory‐installed options.
Two labels on the vehicle show
how much weight it may
properly carry, the Tire and
Loading Information label and
the Certification label.
{WARNING
Do not load the vehicle any
heavier than the Gross
Vehicle Weight Rating
(GVWR), or either the
maximum front or rear Gross
Axle Weight Rating (GAWR).
This can cause systems to
break and change the way the
(Continued)
WARNING (Continued)
vehicle handles. This could
cause loss of control and a
crash. Overloading can also
shorten the life of the vehicle.
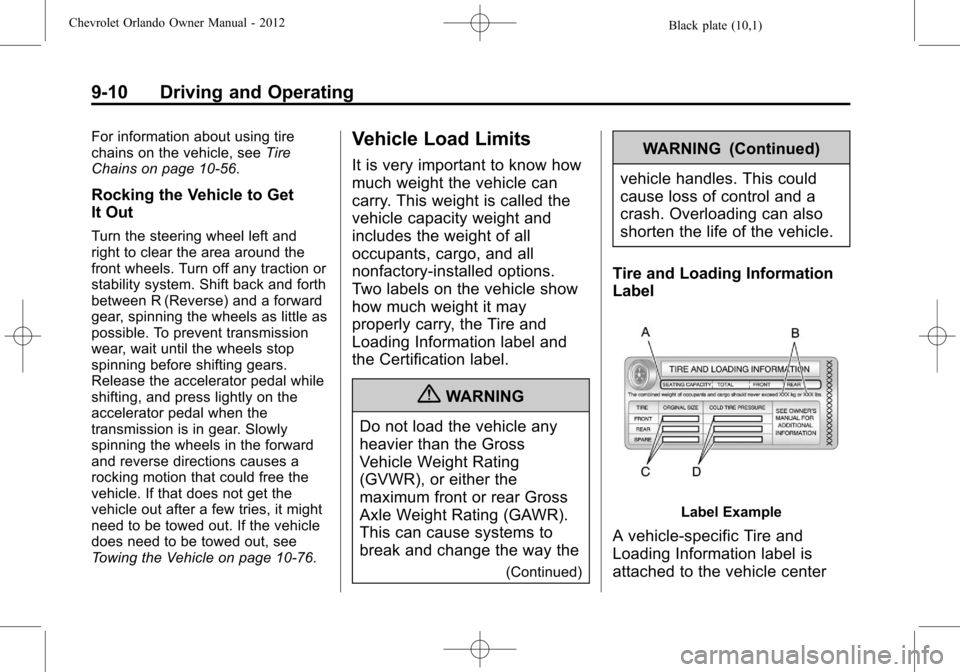
Tire and Loading Information
Label
Label Example
A vehicle-specific Tire and
Loading Information label is
attached to the vehicle center
Page 215 of 378
Black plate (27,1)Chevrolet Orlando Owner Manual - 2012
Driving and Operating 9-27
If the gear does not engage, shift
the transmission to neutral, release
the clutch pedal and press it back
down. Repeat the gear selection.
{WARNING
If you skip a gear when you
downshift, you could lose control
of the vehicle. You could injure
yourself or others. Do not shift
down more than one gear at a
time when you downshift.
Notice: Do not skip gears while
upshifting. This can cause
premature wear in the
transmission. The repairs would
not be covered by the vehicle
warranty.
Brakes
Antilock Brake
System (ABS)
This vehicle has the Antilock Brake
System (ABS), an advanced
electronic braking system that helps
prevent a braking skid.
When the engine is started and the
vehicle begins to drive away, ABS
checks itself. A momentary motor or
clicking noise might be heard while
this test is going on, and it might
even be noticed that the brake
pedal moves a little. This is normal.
If there is a problem with ABS, this
warning light stays on. See Antilock
Brake System (ABS) Warning Light
on page 5‑16. If driving safely on a wet road and it
becomes necessary to slam on the
brakes and continue braking to
avoid a sudden obstacle, a
computer senses that the wheels
are slowing down. If one of the
wheels is about to stop rolling, the
computer will separately work the
brakes at each wheel.
ABS can change the brake pressure
to each wheel, as required, faster
than any driver could. This can help
the driver steer around the obstacle
while braking hard.
As the brakes are applied, the
computer keeps receiving updates
on wheel speed and controls
braking pressure accordingly.
Remember: ABS does not change
the time needed to get a foot up to
the brake pedal or always decrease
stopping distance. If you get too
close to the vehicle in front of you,
there will not be enough time to
apply the brakes if that vehicle
Page 221 of 378
Black plate (33,1)Chevrolet Orlando Owner Manual - 2012
Driving and Operating 9-33
{WARNING
Cruise control can be dangerous
where you cannot drive safely at
a steady speed. So, do not use
the cruise control on winding
roads or in heavy traffic.
Cruise control can be dangerous
on slippery roads. On such roads,
fast changes in tire traction can
cause excessive wheel slip, and
you could lose control. Do not use
cruise control on slippery roads.
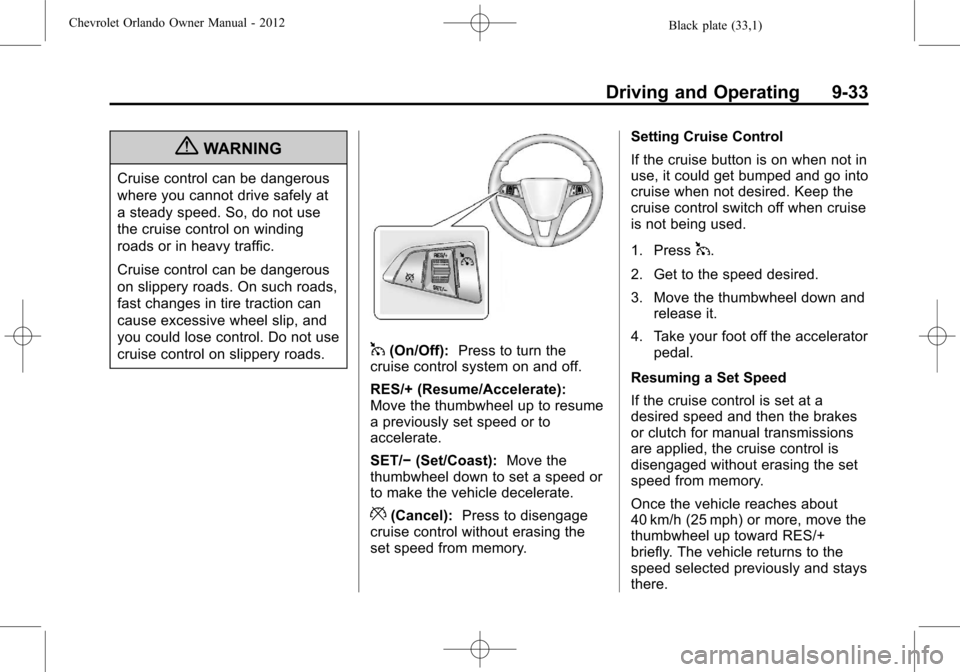
1(On/Off):Press to turn the
cruise control system on and off.
RES/+ (Resume/Accelerate):
Move the thumbwheel up to resume
a previously set speed or to
accelerate.
SET/− (Set/Coast): Move the
thumbwheel down to set a speed or
to make the vehicle decelerate.
*(Cancel): Press to disengage
cruise control without erasing the
set speed from memory. Setting Cruise Control
If the cruise button is on when not in
use, it could get bumped and go into
cruise when not desired. Keep the
cruise control switch off when cruise
is not being used.
1. Press
1.
2. Get to the speed desired.
3. Move the thumbwheel down and release it.
4. Take your foot off the accelerator pedal.
Resuming a Set Speed
If the cruise control is set at a
desired speed and then the brakes
or clutch for manual transmissions
are applied, the cruise control is
disengaged without erasing the set
speed from memory.
Once the vehicle reaches about
40 km/h (25 mph) or more, move the
thumbwheel up toward RES/+
briefly. The vehicle returns to the
speed selected previously and stays
there.