air condition CHEVROLET ORLANDO 2013 1.G User Guide
[x] Cancel search | Manufacturer: CHEVROLET, Model Year: 2013, Model line: ORLANDO, Model: CHEVROLET ORLANDO 2013 1.GPages: 372, PDF Size: 6.71 MB
Page 175 of 372
Black plate (1,1)Chevrolet Orlando Owner Manual - 2013 - CRC - 6/5/12
Climate Controls 8-1
Climate Controls
Climate Control Systems
Climate Control Systems . . . . . . 8-1
Automatic Climate ControlSystem . . . . . . . . . . . . . . . . . . . . . . 8-3
Air Vents
Air Vents . . . . . . . . . . . . . . . . . . . . . . 8-6
Climate Control
Systems
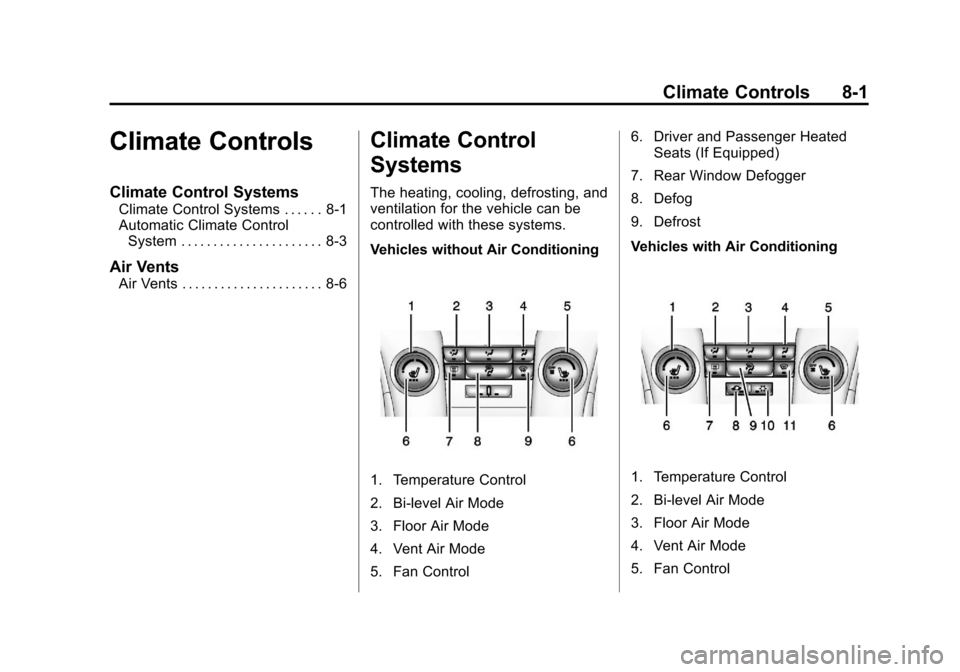
The heating, cooling, defrosting, and
ventilation for the vehicle can be
controlled with these systems.
Vehicles without Air Conditioning
1. Temperature Control
2. Bi-level Air Mode
3. Floor Air Mode
4. Vent Air Mode
5. Fan Control 6. Driver and Passenger Heated
Seats (If Equipped)
7. Rear Window Defogger
8. Defog
9. Defrost
Vehicles with Air Conditioning1. Temperature Control
2. Bi-level Air Mode
3. Floor Air Mode
4. Vent Air Mode
5. Fan Control
Page 176 of 372
Black plate (2,1)Chevrolet Orlando Owner Manual - 2013 - CRC - 6/5/12
8-2 Climate Controls
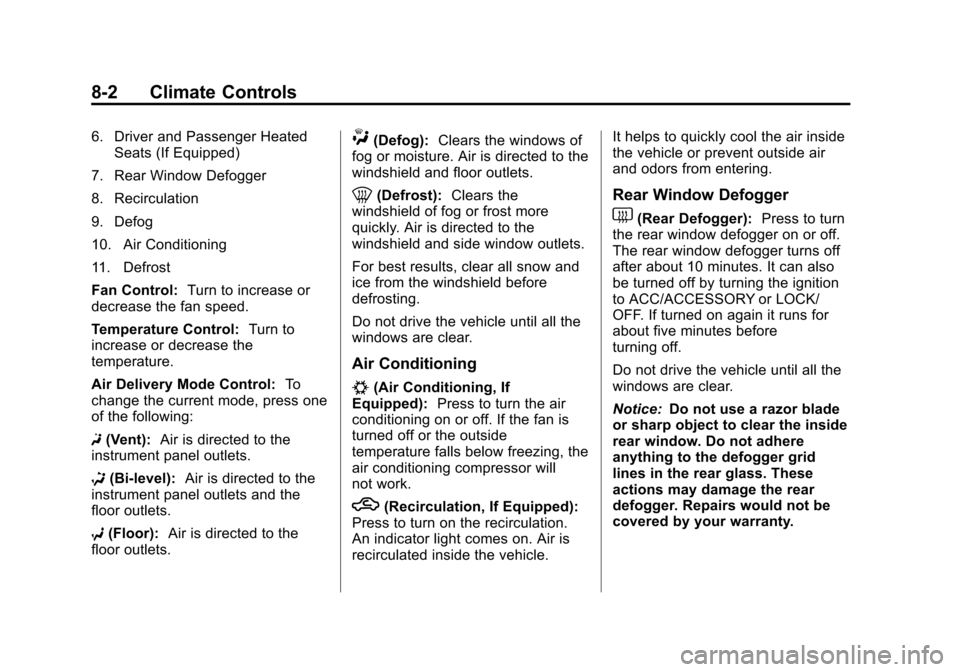
6. Driver and Passenger HeatedSeats (If Equipped)
7. Rear Window Defogger
8. Recirculation
9. Defog
10. Air Conditioning
11. Defrost
Fan Control: Turn to increase or
decrease the fan speed.
Temperature Control: Turn to
increase or decrease the
temperature.
Air Delivery Mode Control: To
change the current mode, press one
of the following:
F (Vent): Air is directed to the
instrument panel outlets.
* (Bi-level): Air is directed to the
instrument panel outlets and the
floor outlets.
7 (Floor): Air is directed to the
floor outlets.W(Defog): Clears the windows of
fog or moisture. Air is directed to the
windshield and floor outlets.
0(Defrost): Clears the
windshield of fog or frost more
quickly. Air is directed to the
windshield and side window outlets.
For best results, clear all snow and
ice from the windshield before
defrosting.
Do not drive the vehicle until all the
windows are clear.
Air Conditioning
#(Air Conditioning, If
Equipped): Press to turn the air
conditioning on or off. If the fan is
turned off or the outside
temperature falls below freezing, the
air conditioning compressor will
not work.
h(Recirculation, If Equipped):
Press to turn on the recirculation.
An indicator light comes on. Air is
recirculated inside the vehicle. It helps to quickly cool the air inside
the vehicle or prevent outside air
and odors from entering.
Rear Window Defogger
1(Rear Defogger):
Press to turn
the rear window defogger on or off.
The rear window defogger turns off
after about 10 minutes. It can also
be turned off by turning the ignition
to ACC/ACCESSORY or LOCK/
OFF. If turned on again it runs for
about five minutes before
turning off.
Do not drive the vehicle until all the
windows are clear.
Notice: Do not use a razor blade
or sharp object to clear the inside
rear window. Do not adhere
anything to the defogger grid
lines in the rear glass. These
actions may damage the rear
defogger. Repairs would not be
covered by your warranty.
Page 177 of 372
Black plate (3,1)Chevrolet Orlando Owner Manual - 2013 - CRC - 6/5/12
Climate Controls 8-3
Heated Seats (If Equipped):Press
to turn the heated seats on or off.
See Heated Front Seats on
page 3‑6
Automatic Climate
Control System
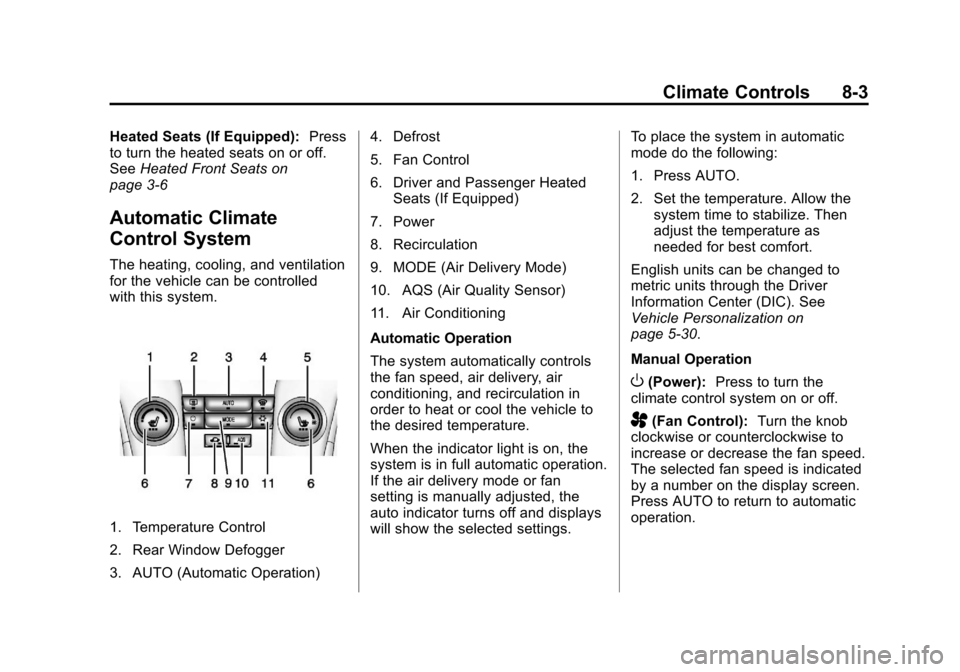
The heating, cooling, and ventilation
for the vehicle can be controlled
with this system.
1. Temperature Control
2. Rear Window Defogger
3. AUTO (Automatic Operation) 4. Defrost
5. Fan Control
6. Driver and Passenger Heated
Seats (If Equipped)
7. Power
8. Recirculation
9. MODE (Air Delivery Mode)
10. AQS (Air Quality Sensor)
11. Air Conditioning
Automatic Operation
The system automatically controls
the fan speed, air delivery, air
conditioning, and recirculation in
order to heat or cool the vehicle to
the desired temperature.
When the indicator light is on, the
system is in full automatic operation.
If the air delivery mode or fan
setting is manually adjusted, the
auto indicator turns off and displays
will show the selected settings. To place the system in automatic
mode do the following:
1. Press AUTO.
2. Set the temperature. Allow the
system time to stabilize. Then
adjust the temperature as
needed for best comfort.
English units can be changed to
metric units through the Driver
Information Center (DIC). See
Vehicle Personalization on
page 5‑30.
Manual Operation
O(Power): Press to turn the
climate control system on or off.
A(Fan Control): Turn the knob
clockwise or counterclockwise to
increase or decrease the fan speed.
The selected fan speed is indicated
by a number on the display screen.
Press AUTO to return to automatic
operation.
Page 178 of 372

Black plate (4,1)Chevrolet Orlando Owner Manual - 2013 - CRC - 6/5/12
8-4 Climate Controls
MODE (Air Delivery Mode):Press
to change the direction of the
airflow. The current mode appears
in the display screen. Automatic
operation is cancelled and manual
mode is initiated. Press AUTO to
return to automatic operation.
To change the current mode, select
one of the following:
Y(Vent): Air is directed to the
instrument panel outlets.
\(Bi-level): Air is divided
between the instrument panel
outlets and the floor outlets.
C(Tri-level): Air is divided
between the windshield, instrument
panel, and floor outlets.
[(Floor): Air is directed to the
floor outlets.
-(Defog): Clears the windows of
fog or moisture. Air is directed to the
windshield and floor outlets.
0(Defrost): Clears the
windshield of fog or frost more
quickly. Air is directed to the
windshield.
#(Air Conditioning): Press to
turn the automatic air conditioning
on or off. If the fan is turned off or
the outside temperature falls below
freezing, the air conditioning
compressor will not run.
Press AUTO to return to automatic
operation and the air conditioner
runs as needed. When the indicator
light is on, the air conditioner runs
automatically to cool the air inside
the vehicle or to dry the air needed
to defog the windshield faster.
h(Recirculation): Press to turn
on recirculation. An indicator light
comes on. Air is recirculated to
quickly cool the inside of the vehicle
or prevent outside air and odors
from entering.
Automatic Air Recirculation:
When the AUTO indicator light is
on, the air is automatically
recirculated as needed to help
quickly cool the inside of the
vehicle. AQS (Air Quality Sensor):
For
vehicles with an air quality sensor,
the climate control system adjusts to
limit some exhaust fumes from
being pulled inside your vehicle.
Press the AQS button on the
climate control to activate the air
quality sensor. The air quality
sensor will not maintain recirculation
for an extended period to prevent
the air inside the vehicle from
becoming too dry or stuffy.
To adjust the sensitivity of the
Air Quality Control, see “Climate
and Air Quality” underVehicle
Personalization on page 5‑30.
Auto Defog: The climate control
system may have a sensor to
automatically detect high humidity
inside the vehicle. When high
humidity is detected, the climate
control system may adjust to
outside air supply and turn on the
air conditioner. If the climate control
system does not detect possible
window fogging, it returns to normal
operation. To turn Auto Defog off or
Page 179 of 372
Black plate (5,1)Chevrolet Orlando Owner Manual - 2013 - CRC - 6/5/12
Climate Controls 8-5
on, see“Climate and Air Quality”
under Vehicle Personalization on
page 5‑30.
Rear Window Defogger
=(Rear Window Defogger):
Press to turn the rear window
defogger on or off.
The rear window defogger turns off
automatically after about
10 minutes. If turned on again it
runs for about five minutes before
turning off.
The rear window defogger can be
set to automatic operation; see
“Climate and Air Quality” under
Vehicle Personalization on
page 5‑30. When auto rear defog is
selected, the rear window defogger
turns on automatically when the
interior temperature is cold and the
outside temperature is about 4°C
(40°F) and below. The auto rear
defogger turns off automatically
after about 10 minutes. At higher
speeds, the rear window defogger
may stay on continuously. For vehicles with heated outside
rearview mirrors, they turn on when
the rear window defogger button is
on and help to clear fog or frost from
the surface of the mirrors. See
Heated Mirrors on page 2‑12.
Notice:
Do not try to clear frost
or other material from the inside
of the front windshield and rear
window with a razor blade or
anything else that is sharp. This
may damage the rear window
defogger grid and affect the
radio's ability to pick up stations
clearly. The repairs would not be
covered by the vehicle warranty.
Heated Seats (If Equipped): Press
to turn the heated seats on or off.
See Heated Front Seats on
page 3‑6.
Remote Start Climate Control
Operation: For vehicles with the
remote vehicle start feature, the
climate control system may run
when the vehicle is started remotely.
The system uses the driver ’s
previous settings to heat or cool the inside of the vehicle. The rear defog
may come on during remote start
based on cold ambient conditions.
The rear defog indicator light does
not come on during a remote start.
If the vehicle has front heated seats,
they may come on during a remote
start. The heated seat indicator
lights do not come on during a
remote start. See
Remote Vehicle
Start on page 2‑5 andHeated Front
Seats on page 3‑6.
Sensors
The solar sensor, located on top of
the instrument panel near the
windshield, monitors the solar heat.
The climate control system uses
the sensor information to adjust
the temperature, fan speed,
recirculation, and air delivery mode
for best comfort.
If the sensor is covered, the
automatic climate control system
may not work properly.
Page 197 of 372
Black plate (17,1)Chevrolet Orlando Owner Manual - 2013 - CRC - 6/5/12
Driving and Operating 9-17
The vehicle has a
Computer-Controlled Cranking
System. This feature assists in
starting the engine and protects
components. If the ignition key is
turned to the START position,
and then released when the
engine begins cranking, the
engine will continue cranking for
a few seconds or until the
vehicle starts. If the engine does
not start and the key is held in
START for many seconds,
cranking will be stopped after
15 seconds to prevent cranking
motor damage. To prevent gear
damage, this system also
prevents cranking if the engine
is already running. Engine
cranking can be stopped by
turning the ignition switch to
ACC/ACCESSORY or
LOCK/OFF.Notice:
Cranking the engine for
long periods of time, by returning
the key to the START position
immediately after cranking has
ended, can overheat and damage
the cranking motor, and drain the
battery. Wait at least 15 seconds
between each try, to let the
cranking motor cool down.
2. If the engine does not start after
five to 10 seconds, especially in
very cold weather (below −18°C
or 0°F), it could be flooded with
too much gasoline. Try pushing
the accelerator pedal all the way
to the floor and holding it there
as you hold the key in START
for up to a maximum of
15 seconds. Wait at least
15 seconds between each try, to
allow the cranking motor to cool
down. When the engine starts,
let go of the key or button, and
the accelerator. If the vehicle
starts briefly but then stops
again, do the same thing. This
clears the extra gasoline from
the engine. Do not race the engine immediately after starting
it. Operate the engine and
transmission gently until the oil
warms up and lubricates all
moving parts.
Engine Heater
The engine heater can help in cold
weather conditions at or below
−18°C (0°F) for easier starting and
better fuel economy during engine
warm-up. Plug in the heater at least
four hours before starting the
vehicle. An internal thermostat in
the plug-end of the cord will prevent
engine heater operation at
temperatures above
−18°C (0°F).
To Use The Engine Heater
1. Turn off the engine.
2. Open the hood and unwrap the
electrical cord stored near the air
cleaner.
3. Plug it into a normal, grounded 110-volt AC outlet.
Page 204 of 372
Black plate (24,1)Chevrolet Orlando Owner Manual - 2013 - CRC - 6/5/12
9-24 Driving and Operating
The transmission will only allow
you to shift into gears appropriate
for the vehicle speed and engine
revolutions per minute (rpm). The
transmission will not automatically
shift to the next lower gear if the
engine rpm is too high, nor to the
next higher gear when the maximum
engine rpm is reached.
If shifting is prevented for any
reason, the currently selected gear
will flash multiple times, indicating
that the transmission has not shifted
gears.
While in the DSC mode, the
transmission will automatically
downshift when the vehicle comes
to a stop. This will allow for more
power during take-off.
When accelerating the vehicle from
a stop in snowy and icy conditions,
you may want to shift into second
gear. A higher gear allows the
vehicle to gain more traction on
slippery surfaces.Manual Transmission
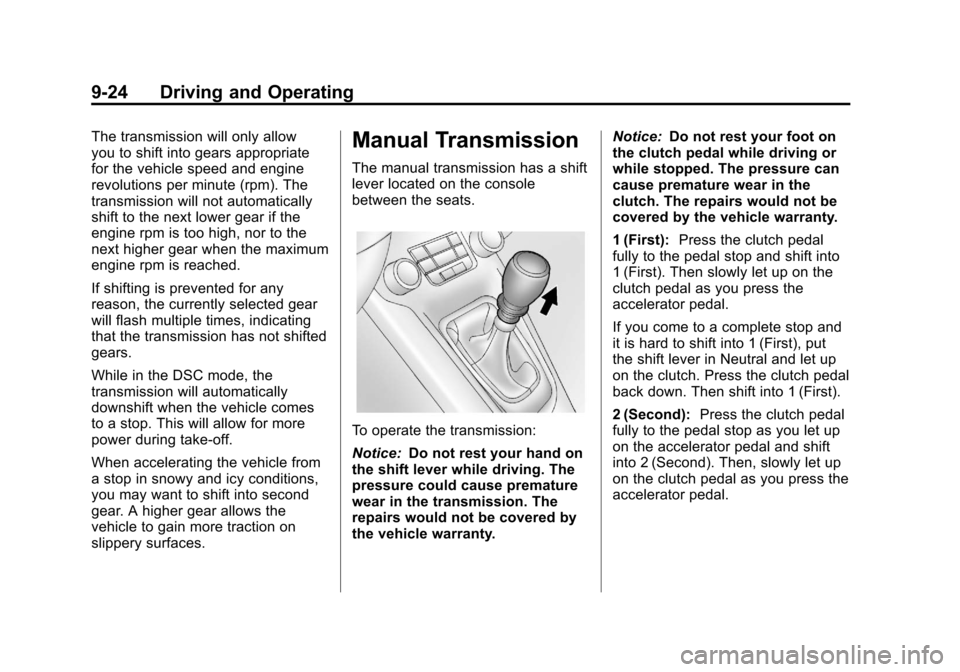
The manual transmission has a shift
lever located on the console
between the seats.
To operate the transmission:
Notice:Do not rest your hand on
the shift lever while driving. The
pressure could cause premature
wear in the transmission. The
repairs would not be covered by
the vehicle warranty. Notice:
Do not rest your foot on
the clutch pedal while driving or
while stopped. The pressure can
cause premature wear in the
clutch. The repairs would not be
covered by the vehicle warranty.
1 (First): Press the clutch pedal
fully to the pedal stop and shift into
1 (First). Then slowly let up on the
clutch pedal as you press the
accelerator pedal.
If you come to a complete stop and
it is hard to shift into 1 (First), put
the shift lever in Neutral and let up
on the clutch. Press the clutch pedal
back down. Then shift into 1 (First).
2 (Second): Press the clutch pedal
fully to the pedal stop as you let up
on the accelerator pedal and shift
into 2 (Second). Then, slowly let up
on the clutch pedal as you press the
accelerator pedal.
Page 205 of 372
Black plate (25,1)Chevrolet Orlando Owner Manual - 2013 - CRC - 6/5/12
Driving and Operating 9-25
3 (Third), 4 (Fourth), 5 (Fifth) and
6 (Sixth):Shift into 3 (Third),
4 (Fourth), 5 (Fifth) and 6 (Sixth) the
same way you do for 2 (Second).
Slowly let up on the clutch pedal as
you press the accelerator pedal.
For the best fuel economy, use
6 (Sixth) gear whenever vehicle
speed and driving conditions allow.
The vehicle may have an up-shift
light in the instrument cluster.
It shows when to shift to the next
higher gear for the best fuel
economy.
During normal driving, upshifts
should occur between 1,300 and
2,500 rpm, and downshifts should
occur between 1,500 and
1,000 rpm. To stop, let up on the accelerator
pedal and press the brake pedal.
Just before the vehicle stops, press
the clutch pedal and the brake
pedal, and shift to Neutral.
Neutral:
Use this position when
you start or idle the engine. The
shift lever is in Neutral when it is
centered in the shift pattern, not in
any gear.
R (Reverse): To back up, with the
vehicle at a complete stop, press
down the clutch pedal. Then pull up
the ring on the shift lever, and shift
into R (Reverse). Let up on the
clutch pedal slowly while pressing
the accelerator pedal.
If the gear does not engage, shift
the transmission to neutral, release
the clutch pedal and press it back
down. Repeat the gear selection.
{WARNING
If you skip a gear when you
downshift, you could lose control
of the vehicle. You could injure
yourself or others. Do not shift
down more than one gear at a
time when you downshift.
Notice: Do not skip gears
while upshifting. This can
cause premature wear in the
transmission. The repairs would
not be covered by the vehicle
warranty.
Page 214 of 372
Black plate (34,1)Chevrolet Orlando Owner Manual - 2013 - CRC - 6/5/12
9-34 Driving and Operating
To be detected, objects must be at
least 20 cm (8 in) off the ground and
below liftgate level. Objects must
also be within 2.5 m (8 ft) from the
rear bumper. The distance objects
can be detected may be less during
warmer or humid weather.
Turning the System On and Off
The URPA system can be turned on
and off using the infotainment
system controls. SeeVehicle
Personalization on page 5‑30 for
more information.
When the system is off, PARK
ASSIST OFF displays on the Driver
Information Center (DIC). The
message disappears after a short
period of time.
URPA defaults to the on setting
each time the vehicle is started.
When the System Does Not
Seem to Work Properly
The following messages may be
displayed on the DIC:
SERVICE PARKING ASSIST: If
this message occurs, check the
following conditions:
.The ultrasonic sensors are not
clean. Keep the vehicle's rear
bumper free of mud, dirt, snow,
ice, and slush. For cleaning
instructions, see Exterior Care
on page 10‑78.
.The park assist sensors are
covered by frost or ice. Frost or
ice can form around and behind
the sensors and may not always
be seen; this can occur after
washing the vehicle in cold
weather. The message may not
clear until the frost or ice has
melted.
If the above conditions do not exist,
take the vehicle to your dealer to
repair the system. PARK ASSIST OFF:
If the URPA
system does not activate due to a
temporary condition, the message
displays on the DIC. This can occur
under the following conditions:
.The driver has disabled the
system.
.A trailer was attached to the
vehicle, or an object was
hanging out of the liftgate during
the last drive cycle. Once the
object is removed, URPA will
return to normal operation.
.A tow bar is attached to the
vehicle.
.The bumper is damaged. Take
the vehicle to your dealer to
repair the system.
.Other conditions, such as
vibrations from a jackhammer or
the compression of air brakes on
a very large truck, are affecting
system performance.
Page 219 of 372
Black plate (39,1)Chevrolet Orlando Owner Manual - 2013 - CRC - 6/5/12
Driving and Operating 9-39
vehicle might fail a smog‐check test.
SeeMalfunction Indicator Lamp on
page 5‑12. If this occurs, return to
your authorized dealer for diagnosis.
If it is determined that the condition
is caused by the type of fuel used,
repairs might not be covered by the
vehicle warranty.
Fuels in Foreign
Countries
Never use leaded gasoline or any
other fuel not recommended in the
previous text on fuel. Costly repairs
caused by use of improper fuel
would not be covered by the vehicle
warranty.
To check the fuel availability, ask an
auto club, or contact a major oil
company that does business in the
country where you will be driving.
Fuel Additives
To provide cleaner air, all gasolines
in the United States are now
required to contain additives that
help prevent engine and fuel system deposits from forming, allowing the
emission control system to work
properly. In most cases, nothing
should have to be added to the fuel.
However, some gasolines contain
only the minimum amount of
additive required to meet U.S.
Environmental Protection Agency
regulations. To help keep fuel
injectors and intake valves clean
and avoid problems due to dirty
injectors or valves, look for gasoline
that is advertised as TOP TIER
Detergent Gasoline. Look for the
TOP TIER label on the fuel pump to
ensure gasoline meets enhanced
detergency standards developed by
the auto companies. A list of
marketers providing TOP TIER
Detergent Gasoline can be found at
www.toptiergas.com.
For customers who do not use TOP
TIER Detergent Gasoline regularly,
one bottle of GM Fuel System
Treatment PLUS, added to the fuel
tank at every engine oil change, can
help clean deposits from fuel
injectors and intake valves. GM Fuel
System Treatment PLUS is the only
gasoline additive recommended by
General Motors. It is available at
your dealer.
Gasolines containing oxygenates,
such as ethers and ethanol, and
reformulated gasolines might be
available in your area. We
recommend that you use these
gasolines, if they comply with the
specifications described earlier.
However, E85 (85% ethanol) and
other fuels containing more than
10% ethanol must not be used in
vehicles that were not designed for
those fuels.
Notice:
This vehicle was not
designed for fuel that contains
methanol. Do not use fuel
containing methanol. It can
corrode metal parts in the fuel
system and also damage plastic
and rubber parts. That damage
would not be covered under the
vehicle warranty.