capacities CHEVROLET ORLANDO 2013 1.G Owners Manual
[x] Cancel search | Manufacturer: CHEVROLET, Model Year: 2013, Model line: ORLANDO, Model: CHEVROLET ORLANDO 2013 1.GPages: 372, PDF Size: 6.71 MB
Page 236 of 372
Black plate (8,1)Chevrolet Orlando Owner Manual - 2013 - CRC - 6/5/12
10-8 Vehicle Care
{WARNING
The engine oil dipstick handle
may be hot; it could burn you.
Use a towel or glove to touch the
dipstick handle.
2. Pull out the dipstick and clean it with a paper towel or cloth, then
push it back in all the way.
Remove it again, keeping the tip
down, and check the level.
When to Add Engine Oil
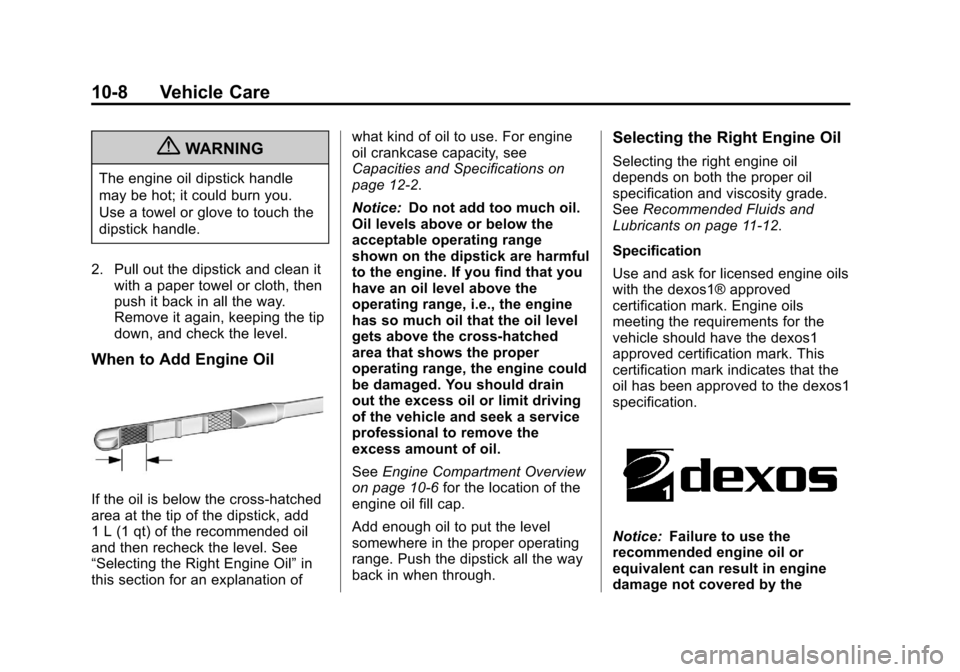
If the oil is below the cross-hatched
area at the tip of the dipstick, add
1 L (1 qt) of the recommended oil
and then recheck the level. See
“Selecting the Right Engine Oil” in
this section for an explanation of what kind of oil to use. For engine
oil crankcase capacity, see
Capacities and Specifications on
page 12‑2.
Notice:
Do not add too much oil.
Oil levels above or below the
acceptable operating range
shown on the dipstick are harmful
to the engine. If you find that you
have an oil level above the
operating range, i.e., the engine
has so much oil that the oil level
gets above the cross-hatched
area that shows the proper
operating range, the engine could
be damaged. You should drain
out the excess oil or limit driving
of the vehicle and seek a service
professional to remove the
excess amount of oil.
See Engine Compartment Overview
on page 10‑6 for the location of the
engine oil fill cap.
Add enough oil to put the level
somewhere in the proper operating
range. Push the dipstick all the way
back in when through.
Selecting the Right Engine Oil
Selecting the right engine oil
depends on both the proper oil
specification and viscosity grade.
See Recommended Fluids and
Lubricants on page 11‑12.
Specification
Use and ask for licensed engine oils
with the dexos1® approved
certification mark. Engine oils
meeting the requirements for the
vehicle should have the dexos1
approved certification mark. This
certification mark indicates that the
oil has been approved to the dexos1
specification.
Notice: Failure to use the
recommended engine oil or
equivalent can result in engine
damage not covered by the
Page 247 of 372
Black plate (19,1)Chevrolet Orlando Owner Manual - 2013 - CRC - 6/5/12
Vehicle Care 10-19
Brakes
This vehicle has disc brakes. Disc
brake pads have built-in wear
indicators that make a high-pitched
warning sound when the brake pads
are worn and new pads are needed.
The sound can come and go or be
heard all the time the vehicle is
moving, except when applying the
brake pedal firmly.
{WARNING
The brake wear warning sound
means that soon the brakes will
not work well. That could lead to
a crash. When the brake wear
warning sound is heard, have the
vehicle serviced.
Notice: Continuing to drive with
worn-out brake pads could result
in costly brake repair. Some driving conditions or climates
can cause a brake squeal when the
brakes are first applied or lightly
applied. This does not mean
something is wrong with the brakes.
Properly torqued wheel nuts are
necessary to help prevent brake
pulsation. When tires are rotated,
inspect brake pads for wear and
evenly tighten wheel nuts in the
proper sequence to torque
specifications in
Capacities and
Specifications on page 12‑2.
Brake linings should always be
replaced as complete axle sets.
Brake Pedal Travel
See your dealer if the brake pedal
does not return to normal height,
or if there is a rapid increase in
pedal travel. This could be a sign
that brake service might be
required.
Brake Adjustment
Every time the brakes are applied,
with or without the vehicle moving,
the brakes adjust for wear.
Replacing Brake System Parts
The braking system on a vehicle is
complex. Its many parts have to be
of top quality and work well together
if the vehicle is to have really good
braking. The vehicle was designed
and tested with top-quality brake
parts. When parts of the braking
system are replaced, be sure to get
new, approved replacement parts.
If this is not done, the brakes might
not work properly. For example,
installing disc brake pads that are
wrong for the vehicle, can change
the balance between the front and
rear brakes —for the worse. The
braking performance expected can
change in many other ways if the
wrong replacement brake parts are
installed.
Page 278 of 372
Black plate (50,1)Chevrolet Orlando Owner Manual - 2013 - CRC - 6/5/12
10-50 Vehicle Care
Reset the Tire Pressure Monitor
System. SeeTire Pressure
Monitor Operation on
page 10‑45.
Check that all wheel nuts are
properly tightened. See “Wheel
Nut Torque” underCapacities
and Specifications on
page 12‑2.
{WARNING
Rust or dirt on a wheel, or on the
parts to which it is fastened, can
make wheel nuts become loose
after time. The wheel could come
off and cause an accident. When
changing a wheel, remove any
rust or dirt from places where the
wheel attaches to the vehicle. In
an emergency, a cloth or a paper
towel can be used; however, use
a scraper or wire brush later to
remove all rust or dirt.
Lightly coat the center of the
wheel hub with wheel bearing
grease after a wheel change or
tire rotation to prevent corrosion
or rust build-up. Do not get
grease on the flat wheel
mounting surface or on the
wheel nuts or bolts.
When It Is Time for New
Tires
Factors such as maintenance,
temperatures, driving speeds,
vehicle loading, and road conditions
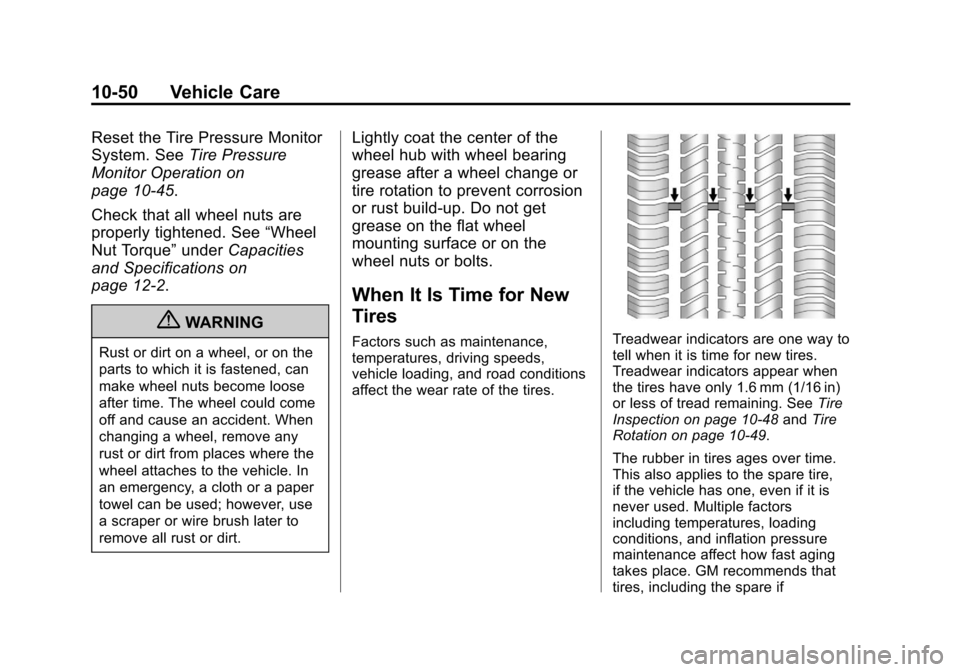
affect the wear rate of the tires.Treadwear indicators are one way to
tell when it is time for new tires.
Treadwear indicators appear when
the tires have only 1.6 mm (1/16 in)
or less of tread remaining. See Tire
Inspection on page 10‑48 andTire
Rotation on page 10‑49.
The rubber in tires ages over time.
This also applies to the spare tire,
if the vehicle has one, even if it is
never used. Multiple factors
including temperatures, loading
conditions, and inflation pressure
maintenance affect how fast aging
takes place. GM recommends that
tires, including the spare if
Page 299 of 372
Black plate (71,1)Chevrolet Orlando Owner Manual - 2013 - CRC - 6/5/12
Vehicle Care 10-71
WARNING (Continued)
aftermarket manufacturer when
using accessory locking wheel
nuts. SeeCapacities and
Specifications on page 12‑2 for
original equipment wheel nut
torque specifications.
Notice: Improperly tightened
wheel nuts can lead to brake
pulsation and rotor damage. To
avoid expensive brake repairs,
evenly tighten the wheel nuts in
the proper sequence and to the
proper torque specification. See
Capacities and Specifications on
page 12‑2 for the wheel nut
torque specification.
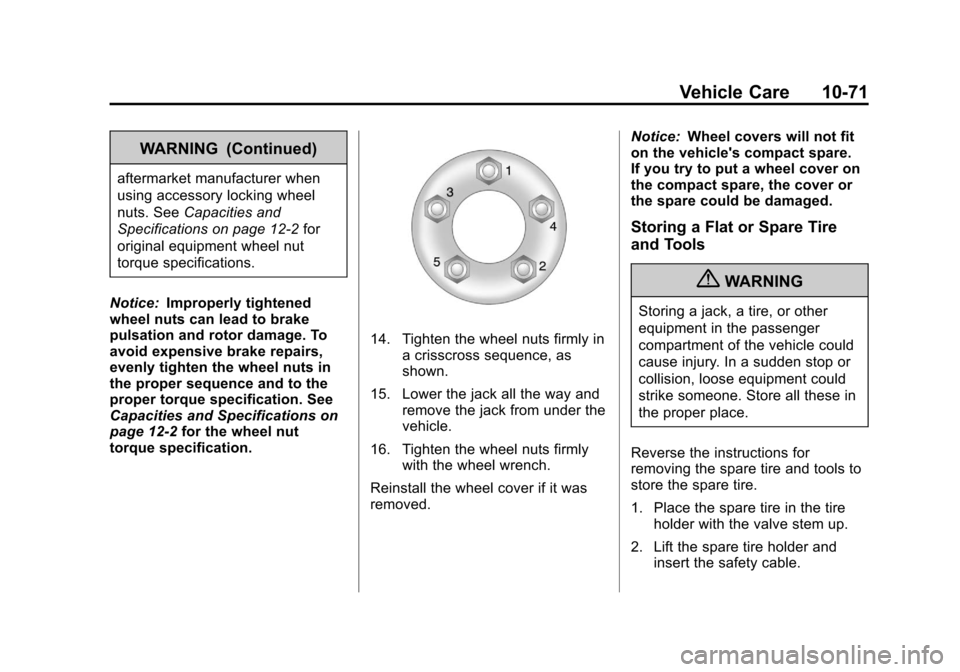
14. Tighten the wheel nuts firmly in a crisscross sequence, as
shown.
15. Lower the jack all the way and remove the jack from under the
vehicle.
16. Tighten the wheel nuts firmly with the wheel wrench.
Reinstall the wheel cover if it was
removed. Notice:
Wheel covers will not fit
on the vehicle's compact spare.
If you try to put a wheel cover on
the compact spare, the cover or
the spare could be damaged.
Storing a Flat or Spare Tire
and Tools
{WARNING
Storing a jack, a tire, or other
equipment in the passenger
compartment of the vehicle could
cause injury. In a sudden stop or
collision, loose equipment could
strike someone. Store all these in
the proper place.
Reverse the instructions for
removing the spare tire and tools to
store the spare tire.
1. Place the spare tire in the tire holder with the valve stem up.
2. Lift the spare tire holder and insert the safety cable.
Page 331 of 372
Black plate (1,1)Chevrolet Orlando Owner Manual - 2013 - CRC - 6/5/12
Technical Data 12-1
Technical Data
Vehicle Identification
Vehicle IdentificationNumber (VIN) . . . . . . . . . . . . . . 12-1
Service Parts Identification Label . . . . . . . . . . . . . . . . . . . . . . . 12-1
Vehicle Data
Capacities andSpecifications . . . . . . . . . . . . . . 12-2
Engine Drive Belt Routing . . . 12-3
Vehicle Identification
Vehicle Identification
Number (VIN)
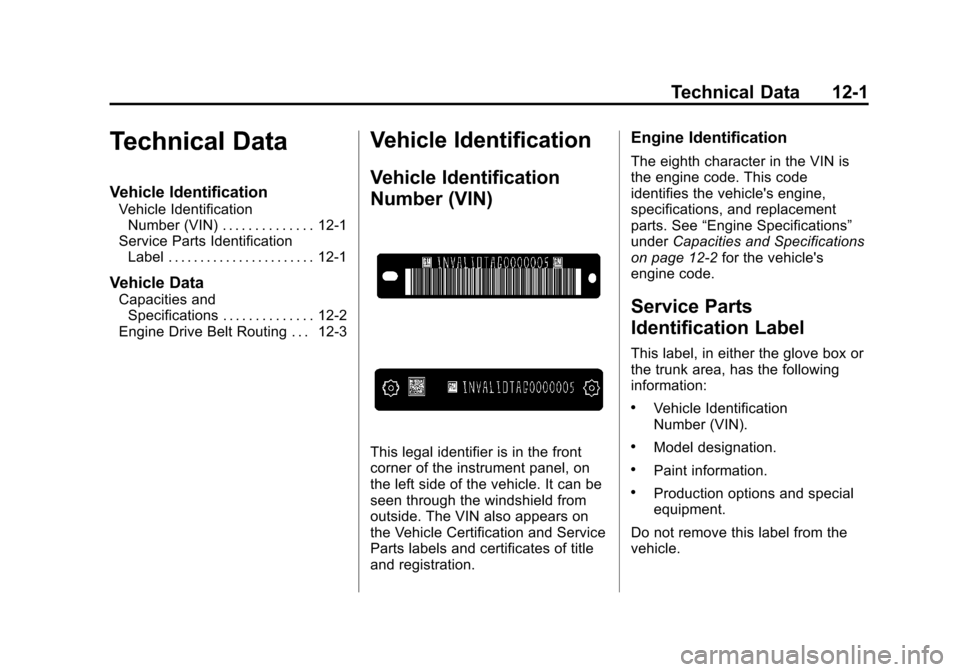
This legal identifier is in the front
corner of the instrument panel, on
the left side of the vehicle. It can be
seen through the windshield from
outside. The VIN also appears on
the Vehicle Certification and Service
Parts labels and certificates of title
and registration.
Engine Identification
The eighth character in the VIN is
the engine code. This code
identifies the vehicle's engine,
specifications, and replacement
parts. See “Engine Specifications”
under Capacities and Specifications
on page 12‑2 for the vehicle's
engine code.
Service Parts
Identification Label
This label, in either the glove box or
the trunk area, has the following
information:
.Vehicle Identification
Number (VIN).
.Model designation.
.Paint information.
.Production options and special
equipment.
Do not remove this label from the
vehicle.
Page 332 of 372
Black plate (2,1)Chevrolet Orlando Owner Manual - 2013 - CRC - 6/5/12
12-2 Technical Data
Vehicle Data
Capacities and Specifications
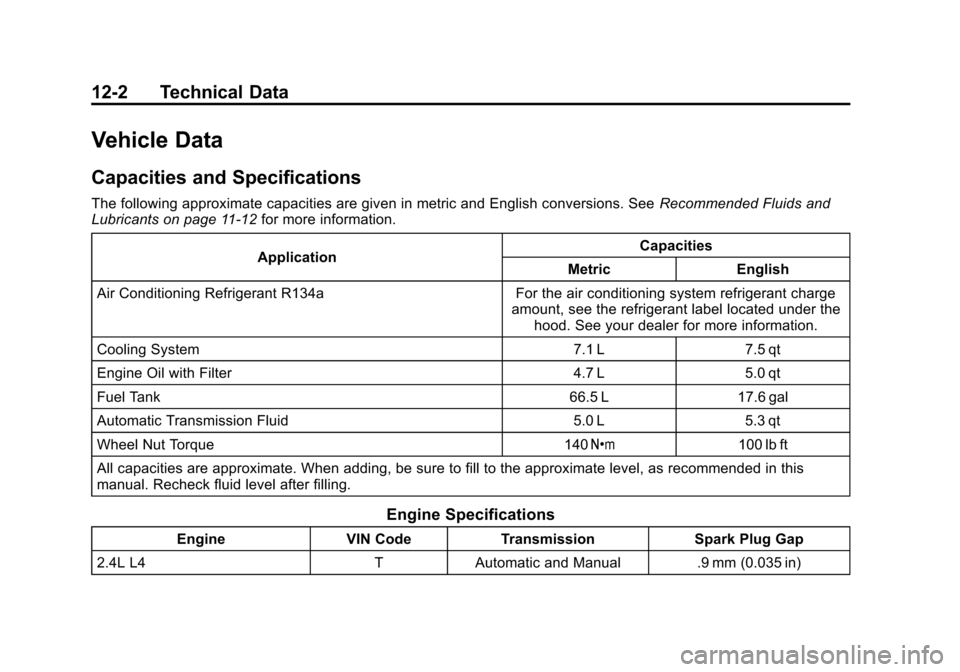
The following approximate capacities are given in metric and English conversions. SeeRecommended Fluids and
Lubricants on page 11‑12 for more information.
Application Capacities
Metric English
Air Conditioning Refrigerant R134a For the air conditioning system refrigerant charge amount, see the refrigerant label located under thehood. See your dealer for more information.
Cooling System 7.1 L 7.5 qt
Engine Oil with Filter 4.7 L 5.0 qt
Fuel Tank 66.5 L 17.6 gal
Automatic Transmission Fluid 5.0 L 5.3 qt
Wheel Nut Torque 140 Y100 lb ft
All capacities are approximate. When adding, be sure to fill to the approximate level, as recommended in this
manual. Recheck fluid level after filling.
Engine Specifications
Engine VIN CodeTransmission Spark Plug Gap
2.4L L4 TAutomatic and Manual .9 mm (0.035 in)
Page 362 of 372

Black plate (2,1)Chevrolet Orlando Owner Manual - 2013 - CRC - 6/5/12
i-2 INDEX
Brakes . . . . . . . . . . . . . . . . . . . . . . . . 10-19Antilock . . . . . . . . . . . . . . . . . . . . . . . 9-26
Assist . . . . . . . . . . . . . . . . . . . . . . . . . 9-27
Fluid . . . . . . . . . . . . . . . . . . . . . . . . 10-20
Parking . . . . . . . . . . . . . . . . . . . . . . . 9-27
System Messages . . . . . . . . . . . . 5-25
Braking . . . . . . . . . . . . . . . . . . . . . . . . . 9-3
Break-In, New Vehicle . . . . . . . . . 9-13
Bulb Replacement . . . . . . . . . . . . 10-30
Back-up Lamps . . . . . . . . . . . . . 10-29
Fog Lamps . . . . . . . . . . . . . . . . . 10-27
Halogen Bulbs . . . . . . . . . . . . . . 10-25
Headlamp Aiming . . . . . . . . . . . 10-25
Headlamps . . . . . . . . . . . . . . . . . 10-25
Headlamps, Front TurnSignal, Sidemarker, and
Parking Lamps . . . . . . . . . . . . 10-25
License Plate Lamps . . . . . . . 10-29
Taillamps, Turn Signal, Sidemarker, and
Stoplamps . . . . . . . . . . . . . . . . 10-27
Buying New Tires . . . . . . . . . . . . . 10-51C
Calibration . . . . . . . . . . . . . . . . . . . . . . 5-5
California Fuel Requirements . . . . . . . . . . . 9-38
Perchlorate MaterialsRequirements . . . . . . . . . . . . . . . 10-3
Warning . . . . . . . . . . . . . . . . . . . . . . 10-3
Camera, Rear Vision . . . . . . . . . . 9-35
Capacities and Specifications . . . . . . . . . . . . . . . . 12-2
Carbon Monoxide
Engine Exhaust . . . . . . . . . . . . . . . 9-20
Liftgate . . . . . . . . . . . . . . . . . . . . . . . . 2-8
Winter Driving . . . . . . . . . . . . . . . . . 9-7
Cargo Cover . . . . . . . . . . . . . . . . . . . . . . . . . . 4-2
Management System . . . . . . . . . . 4-4
Cautions, Danger, and Warnings . . . . . . . . . . . . . . . . . . . . . . . . iv
CD Player . . . . . . . . . . . . . . . . . . . . . 7-13
Center Console Storage . . . . . . . . 4-2
Chains, Tire . . . . . . . . . . . . . . . . . . 10-56
Charging System Light . . . . . . . . 5-11 Check
Engine Light . . . . . . . . . . . . . . . . . . 5-12
Ignition
Transmission Lock . . . . . . . . 10-23
Child Restraints Infants and YoungChildren . . . . . . . . . . . . . . . . . . . . . 3-34
Lower Anchors and Tethers for Children . . . . . . . . . 3-39
Older Children . . . . . . . . . . . . . . . . 3-32
Securing . . . . . . . . . . . . . . . . 3-44, 3-46
Systems . . . . . . . . . . . . . . . . . . . . . . 3-36
Child-View Mirror . . . . . . . . . . . . . . 2-13
Cigarette Lighter . . . . . . . . . . . . . . . . 5-6
Circuit Breakers . . . . . . . . . . . . . . 10-31
Cleaning Exterior Care . . . . . . . . . . . . . . . 10-78
Interior Care . . . . . . . . . . . . . . . . 10-82
Climate Control Systems . . . . . . . 8-1 Air Conditioning . . . . . . . . . . . . . . . 8-1
Automatic . . . . . . . . . . . . . . . . . . . . . . 8-3
Heating . . . . . . . . . . . . . . . . . . . . . . . . 8-1
Clock . . . . . . . . . . . . . . . . . . . . . . . . . . . 5-5
Cluster, Instrument . . . . . . . . . . . . . 5-8
Clutch, Hydraulic . . . . . . . . . . . . . 10-11
Collision Damage Repair . . . . . . 13-9
Page 370 of 372

Black plate (10,1)Chevrolet Orlando Owner Manual - 2013 - CRC - 6/5/12
i-10 INDEX
Service (cont'd)Maintenance, General
Information . . . . . . . . . . . . . . . . . . 11-1
Parts Identification Label . . . . . 12-1
Publications Ordering
Information . . . . . . . . . . . . . . . . .13-11
Scheduling Appointments . . . . . 13-7
Vehicle Messages . . . . . . . . . . . . 5-28
Vehicle Soon Light . . . . . . . . . . . . 5-14
Servicing the Airbag . . . . . . . . . . . 3-30
Shift Lock Control Function Check, Automatic
Transmission . . . . . . . . . . . . . . . . 10-22
Shifting
Into Park . . . . . . . . . . . . . . . . . . . . . . 9-18
Out of Park . . . . . . . . . . . . . . . . . . . 9-19
Sidemarker and Stoplamps Bulb Replacement . . . . . . . . . . 10-27
Signals, Turn and Lane-Change . . . . . . . . . . . . . . . . . 6-4
Specifications and Capacities . . . . . . . . . . . . . . . . . . . . 12-2
Speedometer . . . . . . . . . . . . . . . . . . . 5-9
StabiliTrak
OFF Light . . . . . . . . . . . . . . . . . . . . . 5-17
System . . . . . . . . . . . . . . . . . . . . . . . 9-29
Start Vehicle, Remote . . . . . . . . . . 2-5 Starter Switch Check . . . . . . . . . 10-22
Starting the Engine . . . . . . . . . . . . 9-16
Starting the Vehicle
Messsages . . . . . . . . . . . . . . . . . . . 5-29
Steering . . . . . . . . . . . . . . . . . . . . . . . . 9-3 Power, Warning Lights . . . . . . . . 5-16
Wheel Adjustment . . . . . . . . . . . . . 5-2
Wheel Controls . . . . . . . . . . . . . . . . 5-3
Storage Areas Cargo Cover . . . . . . . . . . . . . . . . . . . 4-2
Cargo Management System . . . 4-4
Center Console . . . . . . . . . . . . . . . . 4-2
Convenience Net . . . . . . . . . . . . . . 4-4
Front . . . . . . . . . . . . . . . . . . . . . . . . . . 4-1
Glove Box . . . . . . . . . . . . . . . . . . . . . 4-1
Instrument Panel . . . . . . . . . . . . . . 4-1
Roof Rack System . . . . . . . . . . . . . 4-5
Storing the Tire Sealant and Compressor Kit . . . . . . . . . 10-65
Stuck Vehicle . . . . . . . . . . . . . . . . . . . 9-8
Sun Visors . . . . . . . . . . . . . . . . . . . . . 2-16
Sunroof . . . . . . . . . . . . . . . . . . . . . . . . 2-16
Symbols . . . . . . . . . . . . . . . . . . . . . . . . . . iv
System Infotainment . . . . . . . . . . . . . . . . . . . 7-1
Roof Rack . . . . . . . . . . . . . . . . . . . . . 4-5T
Tachometer . . . . . . . . . . . . . . . . . . . . . 5-9
Taillamps
Bulb Replacement . . . . . . . . . . 10-27
Text Telephone (TTY) Users . . . 13-4
Theft-Deterrent Systems . . . . . . . 2-10 Immobilizer . . . . . . . . . . . . . . . . . . . 2-10
Third-Row Seats . . . . . . . . . . . . . . . 3-12
Time . . . . . . . . . . . . . . . . . . . . . . . . . . . . 5-5
Tires Buying New Tires . . . . . . . . . . . 10-51
Chains . . . . . . . . . . . . . . . . . . . . . . 10-56
Changing . . . . . . . . . . . . . . . . . . . 10-65
Designations . . . . . . . . . . . . . . . 10-40
Different Size . . . . . . . . . . . . . . . 10-53
Full-Size Spare . . . . . . . . . . . . . 10-72
If a Tire Goes Flat . . . . . . . . . . 10-56
Inflation Monitor System . . . . 10-45
Inspection . . . . . . . . . . . . . . . . . . 10-48
Messages . . . . . . . . . . . . . . . . . . . . 5-29
Pressure Light . . . . . . . . . . . . . . . . 5-17
Pressure Monitor System . . . 10-44
Rotation . . . . . . . . . . . . . . . . . . . . 10-49
Sealant andCompressor Kit . . . . . . . . . . . 10-58