heater CHEVROLET ORLANDO 2017 Owners Manual
[x] Cancel search | Manufacturer: CHEVROLET, Model Year: 2017, Model line: ORLANDO, Model: CHEVROLET ORLANDO 2017Pages: 372, PDF Size: 6.71 MB
Page 52 of 372
Black plate (6,1)Chevrolet Orlando Owner Manual - 2013 - CRC - 6/5/12
3-6 Seats and Restraints
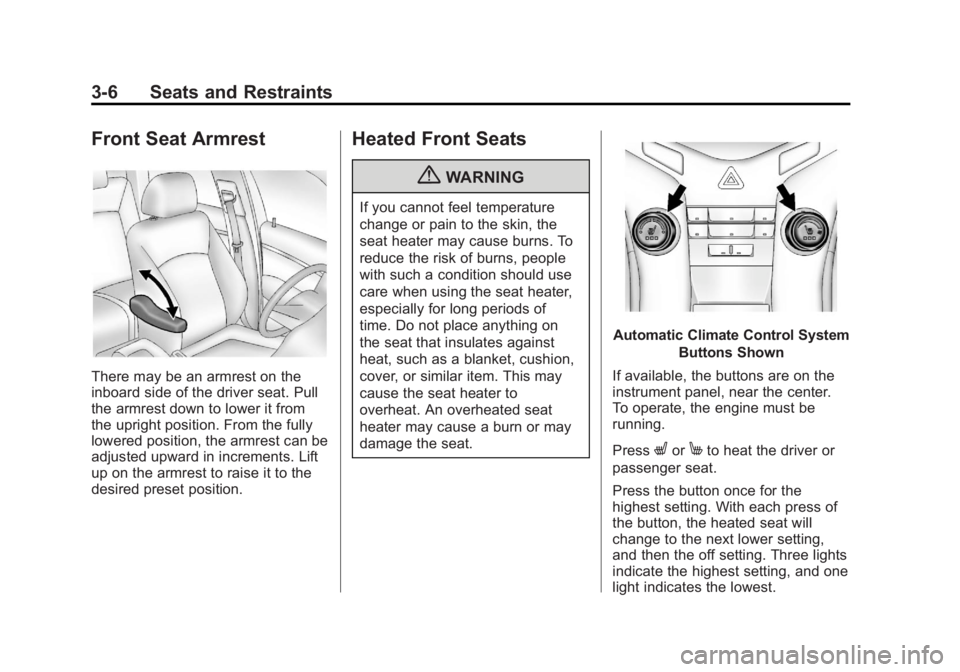
Front Seat Armrest
There may be an armrest on the
inboard side of the driver seat. Pull
the armrest down to lower it from
the upright position. From the fully
lowered position, the armrest can be
adjusted upward in increments. Lift
up on the armrest to raise it to the
desired preset position.
Heated Front Seats
{WARNING
If you cannot feel temperature
change or pain to the skin, the
seat heater may cause burns. To
reduce the risk of burns, people
with such a condition should use
care when using the seat heater,
especially for long periods of
time. Do not place anything on
the seat that insulates against
heat, such as a blanket, cushion,
cover, or similar item. This may
cause the seat heater to
overheat. An overheated seat
heater may cause a burn or may
damage the seat.
Automatic Climate Control SystemButtons Shown
If available, the buttons are on the
instrument panel, near the center.
To operate, the engine must be
running.
Press
LorMto heat the driver or
passenger seat.
Press the button once for the
highest setting. With each press of
the button, the heated seat will
change to the next lower setting,
and then the off setting. Three lights
indicate the highest setting, and one
light indicates the lowest.
Page 131 of 372
Black plate (31,1)Chevrolet Orlando Owner Manual - 2013 - CRC - 6/5/12
Instruments and Controls 5-31
Climate and Air Quality
If equipped, select the Climate and
Air Quality menu and the following
will be displayed:
.Auto Fan Speed
.Air Quality Sensor
.Remote Start Auto Heat Seats
.Auto Defog
.Auto Rear Defog
Auto Fan Speed
This will allow you to select the
automatic fan speed. This feature
sets the climate control fan speed to
maintain the interior temperature.
Press the MENU knob when Auto
Fan Speed is highlighted to open
the menu. Turn the knob to highlight
High, Medium, or Low. Press the
BACK button to confirm the
selection and move back to the
last menu. Air Quality Sensor
This will allow you to select whether
the system will operate at high or
low sensitivity. Only vehicles with
the automatic climate control will
have this option.
Press the MENU knob when Air
Quality Sensor is highlighted to
open the menu. Turn the knob to
highlight High Sensitivity or Low
Sensitivity. Press the BACK button
to confirm the selection and move
back to the last menu.
Remote Start Auto Heat Seats
On vehicles with remote start and
heated seats, the heated seats can
be set to on or off.
Press the MENU knob when
Remote Start Auto Heat Seats is
highlighted to open the menu. Turn
the knob to highlight On or Off.
Press the BACK button to confirm
the selection and move back to the
last menu.Auto Defog
When turned on and high humidity
is detected, the climate control
system may adjust to outside air
supply and turn on the air
conditioner or the heater. The fan
speed may slightly increase to help
prevent fogging. When high
humidity is no longer detected, the
system will return to its prior
operation.
Press the MENU knob when Auto
Defog is highlighted to open the
menu. Turn the knob to highlight On
or Off. Press the BACK button to
confirm the selection and move
back to the last menu.
Auto Rear Defog
When on, this feature turns on the
rear defogger at vehicle start when
the interior temperature is cold and
fog is likely. The Auto Rear Defog
function can be disabled by
pressing
1. When off, the feature
can be turned on by pressing
1.
Page 181 of 372
Black plate (1,1)Chevrolet Orlando Owner Manual - 2013 - CRC - 6/5/12
Driving and Operating 9-1
Driving and
Operating
Driving Information
Distracted Driving . . . . . . . . . . . . . 9-2
Defensive Driving . . . . . . . . . . . . . 9-2
Drunk Driving . . . . . . . . . . . . . . . . . 9-3
Control of a Vehicle . . . . . . . . . . . 9-3
Braking . . . . . . . . . . . . . . . . . . . . . . . 9-3
Steering . . . . . . . . . . . . . . . . . . . . . . . 9-3
Off-Road Recovery . . . . . . . . . . . . 9-4
Loss of Control . . . . . . . . . . . . . . . . 9-4
Driving on Wet Roads . . . . . . . . . 9-5
Highway Hypnosis . . . . . . . . . . . . 9-6
Hill and Mountain Roads . . . . . . 9-6
Winter Driving . . . . . . . . . . . . . . . . . 9-7
If the Vehicle Is Stuck . . . . . . . . . 9-8
Vehicle Load Limits . . . . . . . . . . . 9-9
Starting and Operating
New Vehicle Break-In . . . . . . . . 9-13
Ignition Positions . . . . . . . . . . . . 9-14
Starting the Engine . . . . . . . . . . 9-16
Engine Heater . . . . . . . . . . . . . . . 9-17
Retained AccessoryPower (RAP) . . . . . . . . . . . . . . . 9-18
Shifting Into Park . . . . . . . . . . . . 9-18 Shifting out of Park . . . . . . . . . . 9-19
Parking . . . . . . . . . . . . . . . . . . . . . . 9-20
Parking over Things
That Burn . . . . . . . . . . . . . . . . . . 9-20
Engine Exhaust
Engine Exhaust . . . . . . . . . . . . . . 9-20
Running the Vehicle WhileParked . . . . . . . . . . . . . . . . . . . . . 9-21
Automatic Transmission
Automatic Transmission . . . . . 9-21
Manual Mode . . . . . . . . . . . . . . . . 9-23
Manual Transmission
Manual Transmission . . . . . . . . 9-24
Brakes
Antilock BrakeSystem (ABS) . . . . . . . . . . . . . . 9-26
Parking Brake . . . . . . . . . . . . . . . 9-27
Brake Assist . . . . . . . . . . . . . . . . . 9-27
Ride Control Systems
Traction Control System (TCS) . . . . . . . . . . . . . . 9-28
StabiliTrak
®System . . . . . . . . . 9-29
Cruise Control
Cruise Control . . . . . . . . . . . . . . . 9-31
Object Detection Systems
Ultrasonic Parking Assist . . . . 9-33
Rear Vision Camera (RVC) . . . . . . . . . . . . . 9-35
Fuel
Fuel . . . . . . . . . . . . . . . . . . . . . . . . . 9-38
Recommended Fuel . . . . . . . . . 9-38
Gasoline Specifications . . . . . . 9-38
California FuelRequirements . . . . . . . . . . . . . . 9-38
Fuels in Foreign Countries . . . 9-39
Fuel Additives . . . . . . . . . . . . . . . 9-39
Filling the Tank . . . . . . . . . . . . . . 9-40
Filling a Portable Fuel Container . . . . . . . . . . . . . . . . . . . 9-41
Towing
General TowingInformation . . . . . . . . . . . . . . . . . 9-42
Driving Characteristics and Towing Tips . . . . . . . . . . . . . . . . 9-42
Trailer Towing . . . . . . . . . . . . . . . . 9-45
Towing Equipment . . . . . . . . . . . 9-46
Conversions and Add-Ons
Add-On Electrical Equipment . . . . . . . . . . . . . . . . . 9-47
Page 197 of 372
Black plate (17,1)Chevrolet Orlando Owner Manual - 2013 - CRC - 6/5/12
Driving and Operating 9-17
The vehicle has a
Computer-Controlled Cranking
System. This feature assists in
starting the engine and protects
components. If the ignition key is
turned to the START position,
and then released when the
engine begins cranking, the
engine will continue cranking for
a few seconds or until the
vehicle starts. If the engine does
not start and the key is held in
START for many seconds,
cranking will be stopped after
15 seconds to prevent cranking
motor damage. To prevent gear
damage, this system also
prevents cranking if the engine
is already running. Engine
cranking can be stopped by
turning the ignition switch to
ACC/ACCESSORY or
LOCK/OFF.Notice:
Cranking the engine for
long periods of time, by returning
the key to the START position
immediately after cranking has
ended, can overheat and damage
the cranking motor, and drain the
battery. Wait at least 15 seconds
between each try, to let the
cranking motor cool down.
2. If the engine does not start after
five to 10 seconds, especially in
very cold weather (below −18°C
or 0°F), it could be flooded with
too much gasoline. Try pushing
the accelerator pedal all the way
to the floor and holding it there
as you hold the key in START
for up to a maximum of
15 seconds. Wait at least
15 seconds between each try, to
allow the cranking motor to cool
down. When the engine starts,
let go of the key or button, and
the accelerator. If the vehicle
starts briefly but then stops
again, do the same thing. This
clears the extra gasoline from
the engine. Do not race the engine immediately after starting
it. Operate the engine and
transmission gently until the oil
warms up and lubricates all
moving parts.
Engine Heater
The engine heater can help in cold
weather conditions at or below
−18°C (0°F) for easier starting and
better fuel economy during engine
warm-up. Plug in the heater at least
four hours before starting the
vehicle. An internal thermostat in
the plug-end of the cord will prevent
engine heater operation at
temperatures above
−18°C (0°F).
To Use The Engine Heater
1. Turn off the engine.
2. Open the hood and unwrap the
electrical cord stored near the air
cleaner.
3. Plug it into a normal, grounded 110-volt AC outlet.
Page 198 of 372
Black plate (18,1)Chevrolet Orlando Owner Manual - 2013 - CRC - 6/5/12
9-18 Driving and Operating
{WARNING
Plugging the cord into an
ungrounded outlet could cause an
electrical shock. Also, the wrong
kind of extension cord could
overheat and cause a fire. You
could be seriously injured. Plug
the cord into a properly grounded
three-prong 110-volt AC outlet.
If the cord will not reach, use a
heavy-duty three-prong extension
cord rated for at least 15 amps.
4. Before starting the engine, be sure to unplug and store the
cord as it was before to keep it
away from moving engine parts.
If you do not it could be
damaged.
The length of time the heater should
remain plugged in depends on
several factors. Ask a dealer in the
area where you will be parking the
vehicle for the best advice on this.
Retained Accessory
Power (RAP)
These vehicle accessories may be
used for up to 10 minutes after the
engine is turned off:
.Audio System
.Power Windows
.Sunroof
The power windows and sunroof
will continue to work for up to
10 minutes or until any door is
opened. The radio will work when
the key is in ON/RUN or ACC/
ACCESSORY. Once the key is
turned from ON/RUN to LOCK/OFF,
the radio will continue to work for
10 minutes, or until the driver door is
opened.
Shifting Into Park
Use this procedure to shift into
P (Park):
1. Hold the brake pedal down and set the parking brake.
See Parking Brake on page 9‑27
for more information.
2. Hold the button on the shift lever and push the lever toward
the front of the vehicle into
P (Park).
3. Turn the ignition to LOCK/OFF.
Page 241 of 372
Black plate (13,1)Chevrolet Orlando Owner Manual - 2013 - CRC - 6/5/12
Vehicle Care 10-13
Cooling System
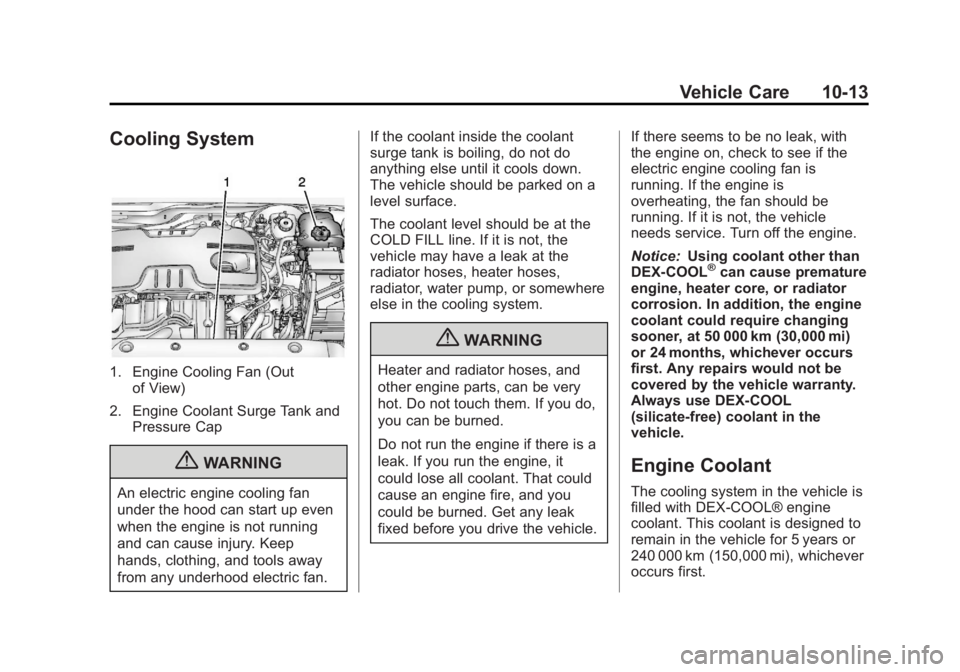
1. Engine Cooling Fan (Outof View)
2. Engine Coolant Surge Tank and Pressure Cap
{WARNING
An electric engine cooling fan
under the hood can start up even
when the engine is not running
and can cause injury. Keep
hands, clothing, and tools away
from any underhood electric fan. If the coolant inside the coolant
surge tank is boiling, do not do
anything else until it cools down.
The vehicle should be parked on a
level surface.
The coolant level should be at the
COLD FILL line. If it is not, the
vehicle may have a leak at the
radiator hoses, heater hoses,
radiator, water pump, or somewhere
else in the cooling system.
{WARNING
Heater and radiator hoses, and
other engine parts, can be very
hot. Do not touch them. If you do,
you can be burned.
Do not run the engine if there is a
leak. If you run the engine, it
could lose all coolant. That could
cause an engine fire, and you
could be burned. Get any leak
fixed before you drive the vehicle.
If there seems to be no leak, with
the engine on, check to see if the
electric engine cooling fan is
running. If the engine is
overheating, the fan should be
running. If it is not, the vehicle
needs service. Turn off the engine.
Notice:
Using coolant other than
DEX-COOL
®can cause premature
engine, heater core, or radiator
corrosion. In addition, the engine
coolant could require changing
sooner, at 50 000 km (30,000 mi)
or 24 months, whichever occurs
first. Any repairs would not be
covered by the vehicle warranty.
Always use DEX-COOL
(silicate-free) coolant in the
vehicle.
Engine Coolant
The cooling system in the vehicle is
filled with DEX-COOL® engine
coolant. This coolant is designed to
remain in the vehicle for 5 years or
240 000 km (150,000 mi), whichever
occurs first.
Page 242 of 372
Black plate (14,1)Chevrolet Orlando Owner Manual - 2013 - CRC - 6/5/12
10-14 Vehicle Care
The following explains the cooling
system and how to check and add
coolant when it is low. If there is a
problem with engine overheating,
seeEngine Overheating on
page 10‑17.
What to Use
{WARNING
Adding only plain water or some
other liquid to the cooling system
can be dangerous. Plain water
and other liquids, can boil before
the proper coolant mixture will.
The coolant warning system is set
for the proper coolant mixture.
With plain water or the wrong
mixture, the engine could get too
hot but you would not get the
overheat warning. The engine
could catch fire and you or
others could be burned. Use a
50/50 mixture of clean, drinkable
water and DEX-COOL coolant. Use a 50/50 mixture of clean,
drinkable water and DEX-COOL
coolant. If using this mixture,
nothing else needs to be added.
This mixture:
.Gives freezing protection down
to
−37°C (−34°F), outside
temperature.
.Gives boiling protection up to
129°C (265°F), engine
temperature.
.Protects against rust and
corrosion.
.Will not damage aluminum parts.
.Helps keep the proper engine
temperature.
Notice: If an improper coolant
mixture is used, the engine could
overheat and be badly damaged.
The repair cost would not be
covered by the vehicle warranty.
Too much water in the mixture
can freeze and crack the engine,
radiator, heater core, and other
parts. Never dispose of engine coolant by
putting it in the trash, pouring it on
the ground, or into sewers, streams,
or bodies of water. Have the coolant
changed by an authorized service
center, familiar with legal
requirements regarding used
coolant disposal. This will help
protect the environment and your
health.
Checking Coolant
The vehicle must be on a level
surface when checking the coolant
level.
Check to see if coolant is visible in
the coolant surge tank. If the coolant
inside the coolant surge tank is
boiling, do not do anything else until
it cools down. If coolant is visible
but the coolant level is not at or
above the COLD FILL line, add a
50/50 mixture of clean, drinkable
water and DEX-COOL coolant at the
coolant surge tank, but be sure the
cooling system is cool before this is
done. See
Cooling System on
page 10‑13.
Page 244 of 372
Black plate (16,1)Chevrolet Orlando Owner Manual - 2013 - CRC - 6/5/12
10-16 Vehicle Care
Notice:In cold weather, water
can freeze and crack the engine,
radiator, heater core and other
parts. Use the recommended
coolant and the proper coolant
mixture.
1. Remove the coolant surge tank pressure cap when the cooling
system, including the coolant
surge tank pressure cap and
upper radiator hose, is no
longer hot.
Turn the pressure cap slowly
counterclockwise about
one-quarter of a turn. If you hear
a hiss, wait for that to stop. This
will allow any pressure still left to
be vented out the
discharge hose. 2. Keep turning the pressure cap
slowly, and remove it.
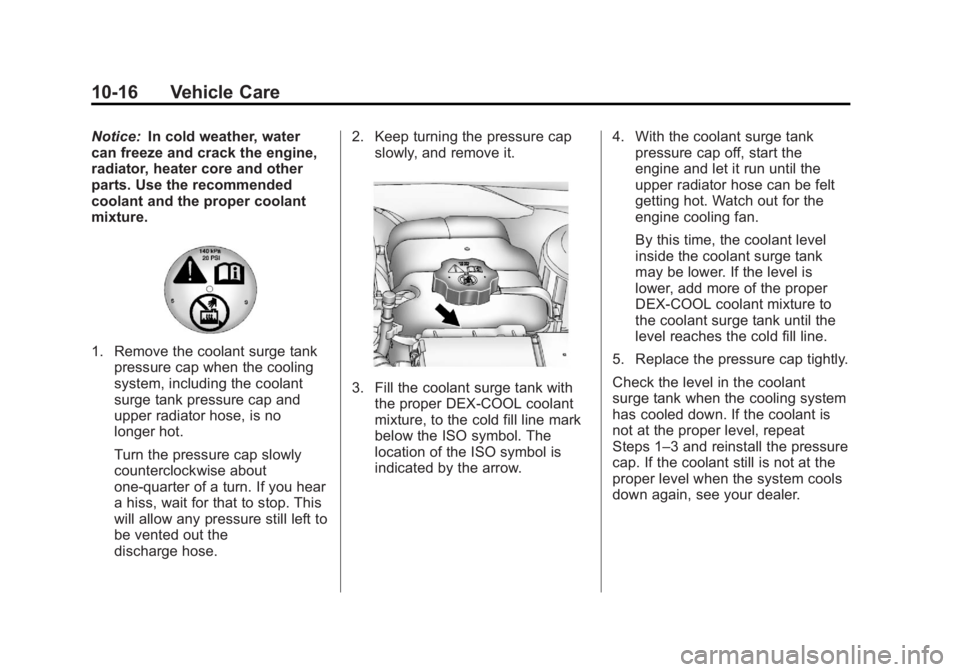
3. Fill the coolant surge tank withthe proper DEX-COOL coolant
mixture, to the cold fill line mark
below the ISO symbol. The
location of the ISO symbol is
indicated by the arrow. 4. With the coolant surge tank
pressure cap off, start the
engine and let it run until the
upper radiator hose can be felt
getting hot. Watch out for the
engine cooling fan.
By this time, the coolant level
inside the coolant surge tank
may be lower. If the level is
lower, add more of the proper
DEX-COOL coolant mixture to
the coolant surge tank until the
level reaches the cold fill line.
5. Replace the pressure cap tightly.
Check the level in the coolant
surge tank when the cooling system
has cooled down. If the coolant is
not at the proper level, repeat
Steps 1–3 and reinstall the pressure
cap. If the coolant still is not at the
proper level when the system cools
down again, see your dealer.
Page 245 of 372
Black plate (17,1)Chevrolet Orlando Owner Manual - 2013 - CRC - 6/5/12
Vehicle Care 10-17
Engine Overheating
The vehicle has an engine coolant
temperature gauge to warn of
engine overheating. SeeEngine
Coolant Temperature Gauge on
page 5‑10.
The decision may be made not
to lift the hood when this warning
appears, but instead get service
help right away. See Roadside
Assistance Program on page 13‑5.
If the decision to lift the hood is
made, make sure the vehicle is
parked on a level surface.
Then check to see if the engine
cooling fan is running. If the engine
is overheating, the fan should be
running. If they are not, do not
continue to run the engine and have
the vehicle serviced.
Notice: Engine damage from
running the engine without
coolant is not covered by the
warranty.
If Steam is Coming from the
Engine Compartment
{WARNING
Steam from an overheated engine
can burn you badly, even if you
just open the hood. Stay away
from the engine if you see or hear
steam coming from it. Just turn it
off and get everyone away from
the vehicle until it cools down.
Wait until there is no sign of
steam or coolant before you open
the hood.
If you keep driving when the
engine is overheated, the liquids
in it can catch fire. You or others
could be badly burned. Stop the
engine if it overheats, and get out
of the vehicle until the engine
is cool.
If No Steam is Coming from
the Engine Compartment
If the engine coolant temperature
gauge is in the overheat zone but
no steam can be seen or heard, the
problem may not be too serious.
Sometimes the engine can get a
little too hot when the vehicle:
.Climbs a long hill on a hot day.
.Stops after high-speed driving.
.Idles for long periods in traffic.
.Tows a trailer.
If the engine coolant temperature
gauge is in the overheat zone with
no sign of steam:
1. Turn the air conditioning off.
2. Turn the heater on to the highest temperature and to the highest
fan speed. Open the windows as
necessary.
Page 364 of 372
Black plate (4,1)Chevrolet Orlando Owner Manual - 2013 - CRC - 6/5/12
i-4 INDEX
E
Electrical Equipment,Add-On . . . . . . . . . . . . . . . . . . . . . . 9-47
Electrical System Engine CompartmentFuse Block . . . . . . . . . . . . . . . . 10-31
Fuses and Circuit
Breakers . . . . . . . . . . . . . . . . . . 10-31
Instrument Panel Fuse Block . . . . . . . . . . . . . . . . . . . . . . 10-34
Overload . . . . . . . . . . . . . . . . . . . 10-30
Emergency OnStar
®. . . . . . . . . . . . . . . . . . . . . . 14-2
Engine Air Cleaner/Filter . . . . . . . . . . . .10-11
Check and Service EngineSoon Light . . . . . . . . . . . . . . . . . . 5-12
Compartment Overview . . . . . . . 10-6
Coolant . . . . . . . . . . . . . . . . . . . . . 10-13
Coolant Temperature Gauge . . . . . . . . . . . . . . . . . . . . . . 5-10
Cooling System . . . . . . . . . . . . . 10-13
Cooling System Messages . . . 5-26
Drive Belt Routing . . . . . . . . . . . . 12-3
Exhaust . . . . . . . . . . . . . . . . . . . . . . 9-20
Heater . . . . . . . . . . . . . . . . . . . . . . . . 9-17 Engine (cont'd)
Oil Life System . . . . . . . . . . . . . . . 10-9
Oil Messages . . . . . . . . . . . . . . . . . 5-26
Overheating . . . . . . . . . . . . . . . . 10-17
Power Messages . . . . . . . . . . . . . 5-27
Pressure Light . . . . . . . . . . . . . . . . 5-18
Reduced Power Light . . . . . . . . . 5-19
Running While Parked . . . . . . . . 9-21
Starting . . . . . . . . . . . . . . . . . . . . . . . 9-16
Entry Lighting . . . . . . . . . . . . . . . . . . . 6-7
Equipment, Towing . . . . . . . . . . . . 9-46
Event Data Recorders . . . . . . . . 13-14
Exit Lighting . . . . . . . . . . . . . . . . . . . . 6-7
Extender, Safety Belt . . . . . . . . . . 3-22
Exterior Lamp Controls . . . . . . . . . 6-1
F
Filter, Engine Air Cleaner . . . . . . . . . .10-11
Flash-to-Pass . . . . . . . . . . . . . . . . . . . 6-2
Flashers, Hazard Warning . . . . . . 6-4
Flat Tire . . . . . . . . . . . . . . . . . . . . . . 10-56
Changing . . . . . . . . . . . . . . . . . . . 10-65
Floor Mats . . . . . . . . . . . . . . . . . . . . 10-85 Fluid
Automatic Transmission . . . . 10-10
Brakes . . . . . . . . . . . . . . . . . . . . . . 10-20
Washer . . . . . . . . . . . . . . . . . . . . . 10-18
Fog Lamps Bulb Replacement . . . . . . . . . . 10-27
Front . . . . . . . . . . . . . . . . . . . . . . . . . . 6-5
Folding Mirrors . . . . . . . . . . . . . . . . 2-12
Folding Seatback . . . . . . . . . . . . . . . 3-7
Front Fog Lamp Light . . . . . . . . . . . . . . . . . . . . . . . . . . 5-20
Front Seat Armrest . . . . . . . . . . . . . 3-6
Front Seats Adjustment . . . . . . . . . . . . . . . . . . . . 3-3
Heated . . . . . . . . . . . . . . . . . . . . . . . . 3-6
Front Storage . . . . . . . . . . . . . . . . . . . 4-1
Fuel . . . . . . . . . . . . . . . . . . . . . . . . . . . 9-38
Additives . . . . . . . . . . . . . . . . . . . . . 9-39
Economy Driving . . . . . . . . . . . . . 1-20
Filling a Portable FuelContainer . . . . . . . . . . . . . . . . . . . 9-41
Filling the Tank . . . . . . . . . . . . . . . 9-40
Foreign Countries . . . . . . . . . . . . 9-39
Gasoline Specifications . . . . . . . 9-38
Gauge . . . . . . . . . . . . . . . . . . . . . . . . . 5-9
Low Fuel Warning Light . . . . . . . 5-18