brake fluid CHEVROLET PLYMOUTH ACCLAIM 1993 Repair Manual
[x] Cancel search | Manufacturer: CHEVROLET, Model Year: 1993, Model line: PLYMOUTH ACCLAIM, Model: CHEVROLET PLYMOUTH ACCLAIM 1993Pages: 2438, PDF Size: 74.98 MB
Page 269 of 2438
CONTROLLER ANTI-LOCK BRAKE (CAB)
The Anti-Lock Brake Controller is a small micro-
processor based device which monitors the brake sys-
tem and controls the system while it functions in
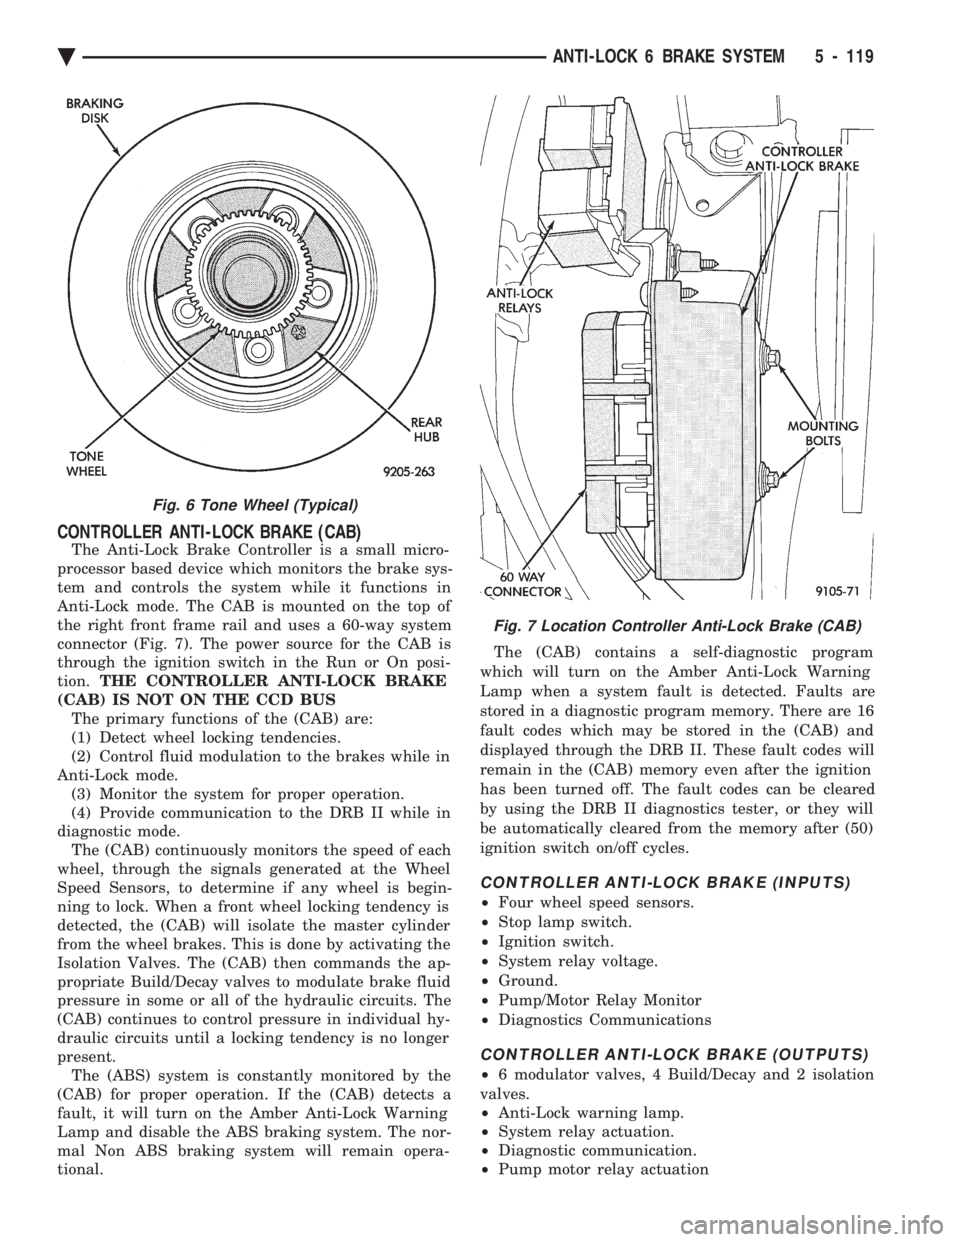
Anti-Lock mode. The CAB is mounted on the top of
the right front frame rail and uses a 60-way system
connector (Fig. 7). The power source for the CAB is
through the ignition switch in the Run or On posi-
tion. THE CONTROLLER ANTI-LOCK BRAKE
(CAB) IS NOT ON THE CCD BUS The primary functions of the (CAB) are:
(1) Detect wheel locking tendencies.
(2) Control fluid modulation to the brakes while in
Anti-Lock mode. (3) Monitor the system for proper operation.
(4) Provide communication to the DRB II while in
diagnostic mode. The (CAB) continuously monitors the speed of each
wheel, through the signals generated at the Wheel
Speed Sensors, to determine if any wheel is begin-
ning to lock. When a front wheel locking tendency is
detected, the (CAB) will isolate the master cylinder
from the wheel brakes. This is done by activating the
Isolation Valves. The (CAB) then commands the ap-
propriate Build/Decay valves to modulate brake fluid
pressure in some or all of the hydraulic circuits. The
(CAB) continues to control pressure in individual hy-
draulic circuits until a locking tendency is no longer
present. The (ABS) system is constantly monitored by the
(CAB) for proper operation. If the (CAB) detects a
fault, it will turn on the Amber Anti-Lock Warning
Lamp and disable the ABS braking system. The nor-
mal Non ABS braking system will remain opera-
tional. The (CAB) contains a self-diagnostic program
which will turn on the Amber Anti-Lock Warning
Lamp when a system fault is detected. Faults are
stored in a diagnostic program memory. There are 16
fault codes which may be stored in the (CAB) and
displayed through the DRB II. These fault codes will
remain in the (CAB) memory even after the ignition
has been turned off. The fault codes can be cleared
by using the DRB II diagnostics tester, or they will
be automatically cleared from the memory after (50)
ignition switch on/off cycles.
CONTROLLER ANTI-LOCK BRAKE (INPUTS)
² Four wheel speed sensors.
² Stop lamp switch.
² Ignition switch.
² System relay voltage.
² Ground.
² Pump/Motor Relay Monitor
² Diagnostics Communications
CONTROLLER ANTI-LOCK BRAKE (OUTPUTS)
²6 modulator valves, 4 Build/Decay and 2 isolation
valves.
² Anti-Lock warning lamp.
² System relay actuation.
² Diagnostic communication.
² Pump motor relay actuation
Fig. 6 Tone Wheel (Typical)
Fig. 7 Location Controller Anti-Lock Brake (CAB)
Ä ANTI-LOCK 6 BRAKE SYSTEM 5 - 119
Page 271 of 2438
Lamp Relay opens the Anti-Lock Warning Lamp Re-
lay switch. This breaks the ground path to the Am-
ber Anti-Lock Warning Lamp and the light is turned
off. The (CAB) by itself, also has the ability to turn on
the Amber Anti-Lock Warning Lamp. The (CAB) can
turn on the Amber Anti-Lock Warning Lamp by pro-
viding a ground at pin 15.
ANTI-LOCK WARNING LAMP ON
System Relay and Anti-Lock Warning Lamp
Relay De-Energized. When the Amber Anti-Lock Warning Lamp is on,
there is no electrical current flow from the (CAB) at
pin 57. The System Relay coil is NOT energized. No
electrical current flows to pin 47 and 41 (modulator
valve power), or to the Anti-Lock Warning Lamp Re-
lay coil. Thus, the Amber Anti-Lock Warning Lamp
is not energized. The Amber Anti-Lock Warning Lamp is grounded through the Anti-Lock Warning
Lamp Relay contacts. The Amber Anti-Lock Warning
Lamp is turned on.
HYDRAULIC CIRCUITS AND VALVE OPERATION
Through the following operation descriptions and
diagrams. The function of the various hydraulic con-
trol valves in the ABS system will be described. The
fluid control valves mentioned below, control the flow
of pressurized brake fluid to the wheel brakes during
the different modes of Anti-Lock braking. For explanation purposes we will assume all speed
sensors are sending the same wheel speed informa-
tion, requiring the same hydraulic fluid modulation
at the same rate.
NORMAL BRAKING
ISOLATION VALVES
Open to primary and secondary master cylinder
fluid supply (Fig. 1)
BUILD/DECAY VALVES Closed (Fig. 1)
The brake pedal is applied. The travel of the brake
pedal closes primary and secondary circuits from the
master cylinder fluid supply. Brake fluid from the
primary and secondary circuits flows through the
open isolation valves, through the build/decay valves
to the wheel brakes.
ABS BRAKING-BUILD PRESSURE
ISOLATION VALVES
Closed, isolating wheel brakes from master cylin-
der primary and secondary fluid supply. Through
open build valves (Fig. 2).
BUILD/DECAY VALVES Open (Fig. 2)
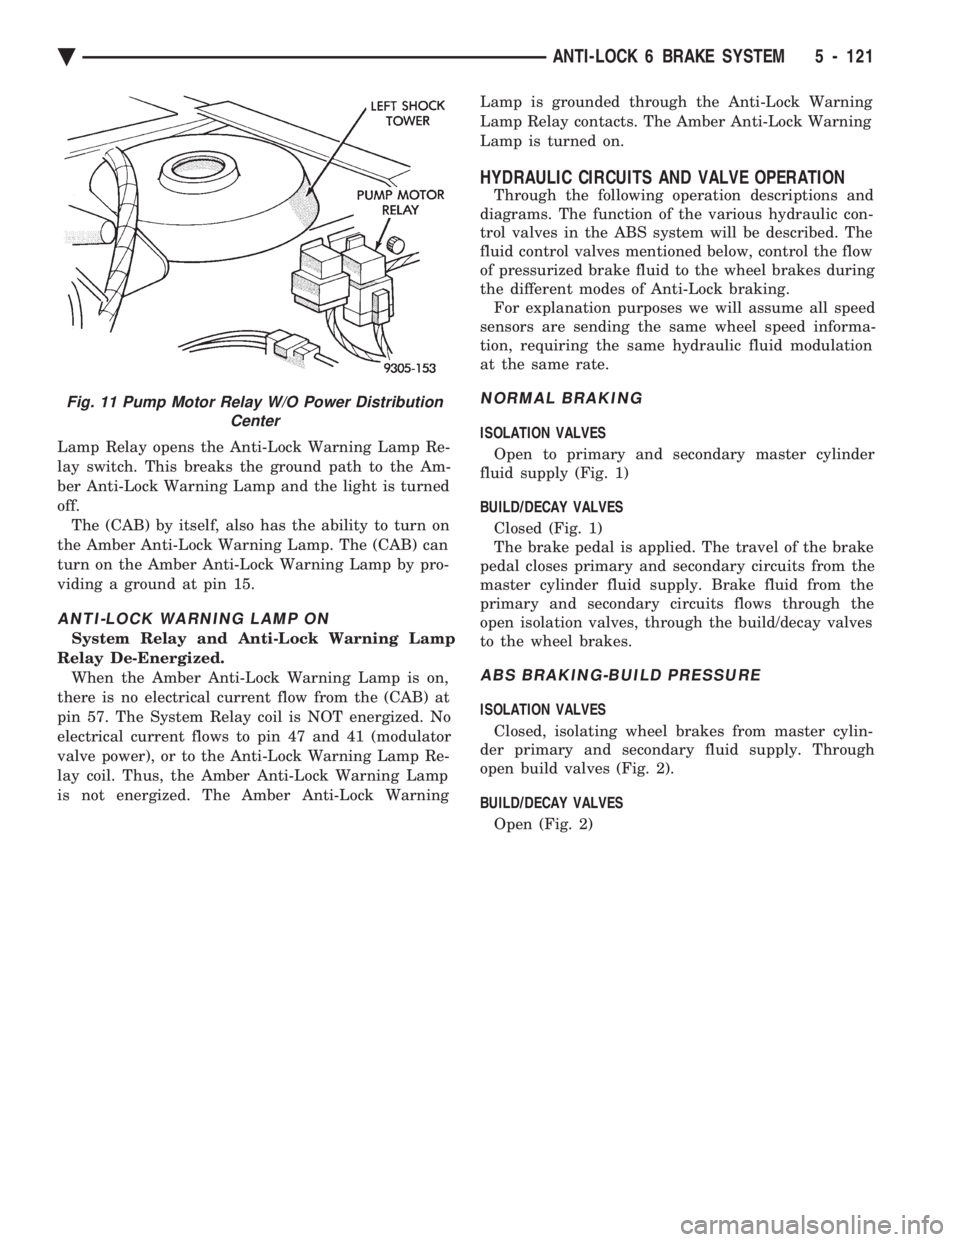
Fig. 11 Pump Motor Relay W/O Power Distribution Center
Ä ANTI-LOCK 6 BRAKE SYSTEM 5 - 121
Page 273 of 2438
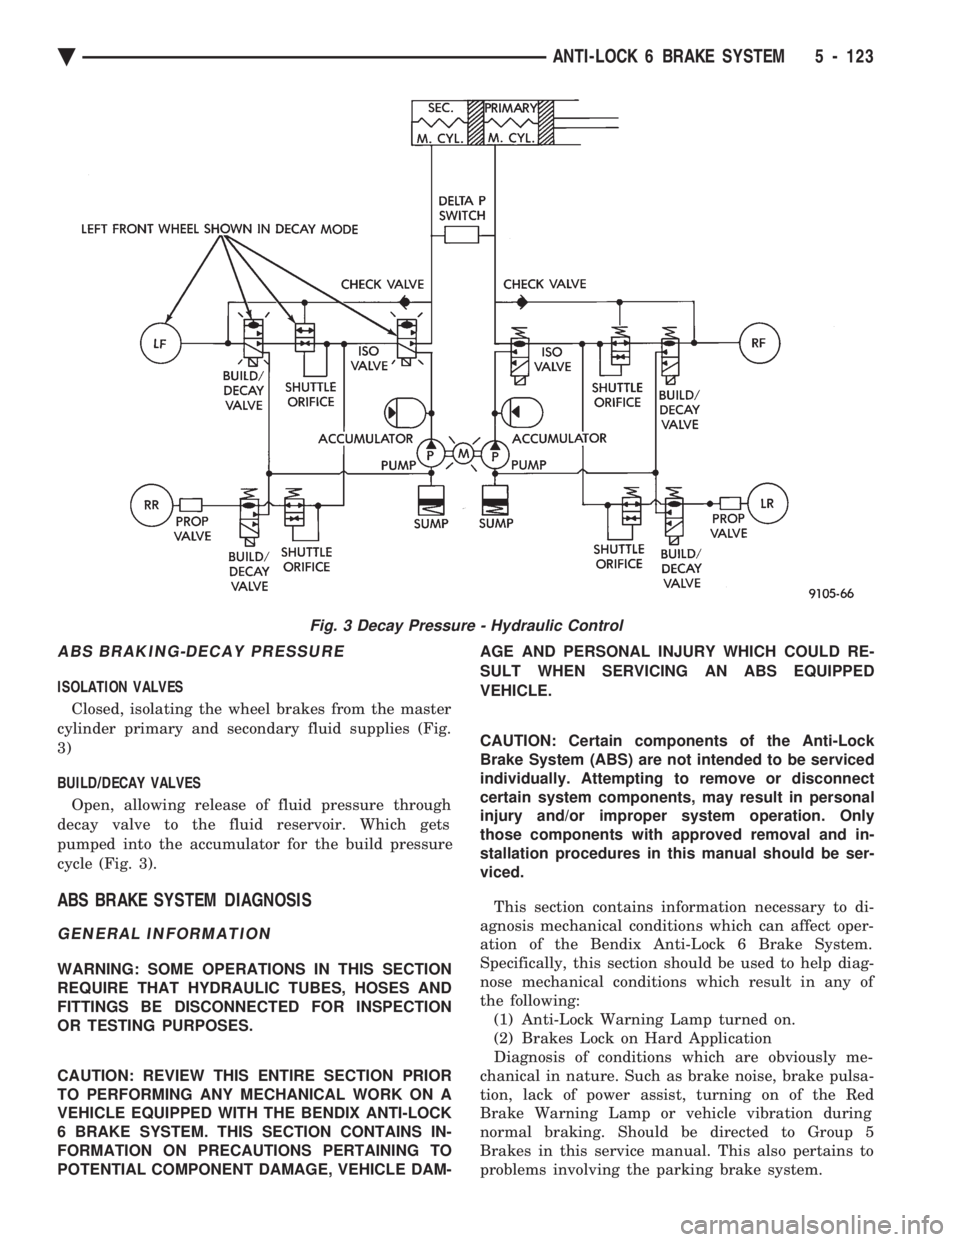
ABS BRAKING-DECAY PRESSURE
ISOLATION VALVES Closed, isolating the wheel brakes from the master
cylinder primary and secondary fluid supplies (Fig.
3)
BUILD/DECAY VALVES
Open, allowing release of fluid pressure through
decay valve to the fluid reservoir. Which gets
pumped into the accumulator for the build pressure
cycle (Fig. 3).
ABS BRAKE SYSTEM DIAGNOSIS
GENERAL INFORMATION
WARNING: SOME OPERATIONS IN THIS SECTION
REQUIRE THAT HYDRAULIC TUBES, HOSES AND
FITTINGS BE DISCONNECTED FOR INSPECTION
OR TESTING PURPOSES.
CAUTION: REVIEW THIS ENTIRE SECTION PRIOR
TO PERFORMING ANY MECHANICAL WORK ON A
VEHICLE EQUIPPED WITH THE BENDIX ANTI-LOCK
6 BRAKE SYSTEM. THIS SECTION CONTAINS IN-
FORMATION ON PRECAUTIONS PERTAINING TO
POTENTIAL COMPONENT DAMAGE, VEHICLE DAM- AGE AND PERSONAL INJURY WHICH COULD RE-
SULT WHEN SERVICING AN ABS EQUIPPED
VEHICLE.
CAUTION: Certain components of the Anti-Lock
Brake System (ABS) are not intended to be serviced
individually. Attempting to remove or disconnect
certain system components, may result in personal
injury and/or improper system operation. Only
those components with approved removal and in-
stallation procedures in this manual should be ser-
viced.
This section contains information necessary to di-
agnosis mechanical conditions which can affect oper-
ation of the Bendix Anti-Lock 6 Brake System.
Specifically, this section should be used to help diag-
nose mechanical conditions which result in any of
the following: (1) Anti-Lock Warning Lamp turned on.
(2) Brakes Lock on Hard Application
Diagnosis of conditions which are obviously me-
chanical in nature. Such as brake noise, brake pulsa-
tion, lack of power assist, turning on of the Red
Brake Warning Lamp or vehicle vibration during
normal braking. Should be directed to Group 5
Brakes in this service manual. This also pertains to
problems involving the parking brake system.
Fig. 3 Decay Pressure - Hydraulic Control
Ä ANTI-LOCK 6 BRAKE SYSTEM 5 - 123
Page 274 of 2438
In order to effectively diagnose an Anti-Lock Brake
System (ABS) condition. It is important to read Anti-
Lock Brake System Description. And to follow the
diagnostic procedures outlined in this section. Many conditions that generate customer complaints
may be normal operating conditions, but are judged to
be a problem due to not being familiar with the ABS
system. These conditions can be recognized without
performing extensive diagnostic work. Given adequate
understanding of the operating principles and perfor-
mance characteristics of the ABS system. See Section 1
of this manual to familiarize yourself with the operat-
ing principles of the ABS system.
DEFINITIONS
Several abbreviations are used in this manual. They
are presented here for reference.
² CABÐController Anti-Lock Brake
² ABSÐAnti-Lock Brake System
² PSIÐPounds per Square Inch (pressure)
² WSSÐWheel Speed Sensor
ABS COMPUTER SYSTEM SERVICE PRECAUTIONS
The ABS system uses an electronic control module,
the (CAB). This module is designed to withstand nor-
mal current draws associated with vehicle operation.
However care must be taken to avoid overloading the
(CAB) circuits. In testing for open or short circuits,
do not ground or apply voltage to any of the
circuits unless instructed to do so by the appro-
priate diagnostic procedure. These circuits should
only be tested using a high impedance multi-meter,
special tools or the DRB II tester as described in this
section. Power should never be removed or applied to
any control module with the ignition in the ON posi-
tion. Before removing or connecting battery cables,
fuses, or connectors, always turn the ignition to the
OFF position.
ABS GENERAL SERVICE PRECAUTIONS
TEST DRIVING ABS COMPLAINT VEHICLES
Most ABS complaints will require a test drive as a
part of the diagnostic procedure. The purpose of the
test drive is to duplicate the condition. Remember conditions that result in the turn-
ing on of the Red Brake Warning Lamp may
indicate reduced braking ability. The following
procedure should be used to test drive an ABS
complaint vehicle. Before test driving a brake complaint vehicle, note
whether the Red or Amber Brake Warning Lamp is
turned on. If it is the Red Brake Warning Lamp, refer
to the standard brake, Control Valves Section in the
brake group of this manual. If the Amber Anti-Lock
Warning light was/is on, read record and erase the
fault. While the Amber ABS Warning Lamp is on the
ABS system is not functional. When the Am- ber Anti-Lock Warning Lamp is on only the Anti-Lock
function of the brake system if affected. The standard
brake system and the ability to stop the car is not be
affected if only the Amber Anti-Lock Warning Lamp is
on. (1) Turn the key to the off position and then back to
the on position. Note whether the Amber ABS Warning
Lamp continues to stay on. If it does refer to the 1993
M.Y. Bendix Anti-Lock 6 Diagnostic Manual for the
required test procedures. (2) If the Amber ABS Warning Lamp goes out, shift
into gear and drive the car to a speed of 5 mph to
complete the ABS start up cycle. If at this time the
Amber ABS Warning Lamp goes on refer to the Bendix
Anti-Lock 6 Diagnostic Manual. (3) If the Amber ABS Warning Lamp remains OUT,
drive the vehicle a short distance. During this test
drive be sure that the vehicle achieves at least 25 mph.
Brake to at least one complete stop and again acceler-
ate to 25 mph. (4) If a functional problem with the A.B.S. system is
determined while test driving a vehicle. Refer to the
Bendix Anti-Lock 6 Diagnostics Manual for required
test procedures and proper use of the DRB II tester.
ABS BRAKE SYSTEM ON VEHICLE SERVICE
The following are general precautions which
should be observed when servicing and diagnos-
ing the ABS system and/or other vehicle systems.
Failure to observe these precautions may result
in ABS system damage. (1) If welding work is to be performed on a vehicle
using an arc welder, the (CAB) should be disconnected
before the welding operation begins. (2) The (CAB) and modulator assembly 10 way con-
nector should never be connected or disconnected with
the ignition in the on position. (3) Some components of the ABS system are not
serviced separately and must be serviced as complete
assemblies. Do not disassemble any component which
is designated as non-serviceable.
CAUTION: Brake fluid will damage painted surfaces.
If brake fluid is spilled on any painted surfaces, wash
off with water immediately.
WHEEL SPEED SENSOR CABLES
Proper installation of the Wheel Speed Sensor Cables
is critical to continued system operation. Be sure that
cables are installed, routed and clipped properly. Fail-
ure to install speed sensor cables as shown in the on
car service section of this manual. May result in
contact with moving parts or over extension of cables,
resulting in component failure and an open circuit.
5 - 124 ANTI-LOCK 6 BRAKE SYSTEM Ä
Page 276 of 2438
As soon as the condition goes away, the Anti-Lock
Warning Light is turned off. Although a fault code
will be set in most cases.
BENDIX ABS SYSTEMS DIAGNOSTICS
Bendix Anti-Lock 6 Brake System Diagnostics, be-
yond basic mechanical diagnostics, covered earlier in
this section. Are accomplished by using the DRB II
scan tool. See testing procedures outlined in the Ben-
dix Anti-Lock 6 Diagnostics Manual for the 1992
M.Y. vehicles. Please refer to the above mentioned manual for
any further electronic diagnostics and service proce-
dures that are required on the Bendix Anti-Lock 6
Brake System.
ON-CAR ABS BRAKE SYSTEM SERVICE
GENERAL SERVICE PRECAUTIONS
The following are general cautions which should be
observed when servicing the Anti-Lock brake system
and/or other vehicle systems. Failure to observe
these precautions may result in Anti-Lock Brake
System component damage. If welding work is to be performed on the vehicle,
using an electric arc welder, the (CAB) connector
should be disconnected during the welding operation. The (CAB) connector should never be connected or
disconnected with the ignition switch in the ON po-
sition. Many components of the Anti-Lock Brake System
are not serviceable and must be replaced as an as-
sembly. Do not disassemble any component which is
not designed to be serviced.
CHECKING BRAKE FLUID LEVEL
CAUTION: Only use brake fluid conforming to DOT
3 specifications, such as Mopar or Equivalent. Do
not use any fluid which contains a petroleum base.
Do not use a container which has been used for pe-
troleum based fluids or a container which is wet
with water. Petroleum based fluids will cause swell-
ing and distortion of rubber parts in the hydraulic
brake system. Water will mix with brake fluid, low-
ering the fluid boiling point. Keep all brake fluid
containers capped to prevent contamination. Re-
move the front cap of the master cylinder reservoir
and fill to the bottom of the split ring.
For the specific procedure for the inspection of
brake fluid level and adding of brake to the reser-
voir. Refer to the Service Adjustments Section in this
group of the service manual.
BLEEDING BENDIX ANTI-LOCK 6 BRAKE SYSTEM
The Anti-Lock Brake System must be bled anytime
air is permitted to enter the hydraulic system, due to
disconnection of brake lines, hoses of components. If the Modulator Assembly is removed from the ve-
hicle, both the Base Brake System and the Anti-Lock
Brake System must be bled using the appropriate
procedures. It is important to note that excessive air
in the brake system will cause a soft or spongy feel-
ing brake pedal. During bleeding operations, be sure that the brake
fluid level remains close to the FULL level in the
reservoir. Check the fluid level periodically during
the bleeding procedure and add DOT 3 brake fluid as
required. The Bendix Anti-Lock 6 Brake System must be
bled as two independent braking systems. The non
ABS portion of the brake system is to be bled the
same as any non ABS system. Refer to the Service
Adjustments section in this manual for the proper
bleeding procedure to be used. This brake system can
be either pressure bled or manually bled. The Anti-Lock portion of brake system MUST be
bled separately. This bleeding procedure requires the
use of the DRB II Diagnostic tester and the bleeding
sequence procedure outlined below.
ABS BLEEDING PROCEDURE (FIG. 1)
(1) Assemble and install all brake system compo-
nents on vehicle making sure all hydraulic fluid
lines are installed and properly torqued. (2) Bleed the base brake system. Using the stan-
dard pressure or manual bleeding procedure as out-
lined in the Service Adjustments section of this
service manual. To perform the bleeding procedure on the ABS
unit. The battery and acid shield must be removed
from the vehicle. Reconnect the vehicles battery, to
the vehicles positive and negative battery cables us-
ing jumper cables. This is necessary to allow access
to the 4 bleeder screws located on the top of the Mod-
ulator assembly. (3) Connect the DRB II Diagnostics Tester to the
diagnostics connector. Located behind the Fuse Panel
access cover on the lower section of the dash panel to
the left of the steering column. (It is a blue 6 way
connector). (4) Using the DRB II check to make sure the
(CAB) does not have any fault codes stored. If it does
remove them using the DRB II.
5 - 126 ANTI-LOCK 6 BRAKE SYSTEM Ä
Page 277 of 2438
WARNING: WHEN BLEEDING THE MODULATOR
ASSEMBLY WEAR SAFETY GLASSES. A CLEAR
BLEED TUBE MUST BE ATTACHED TO THE
BLEEDER SCREWS AND SUBMERGED IN A CLEAR
CONTAINER FILLED PART WAY WITH CLEAN
BRAKE FLUID. DIRECT THE FLOW OF BRAKE
FLUID AWAY FROM THE PAINTED SURFACES OF
THE VEHICLE. BRAKE FLUID AT HIGH PRESSURE
MAY COME OUT OF THE BLEEDER SCREWS,
WHEN OPENED.
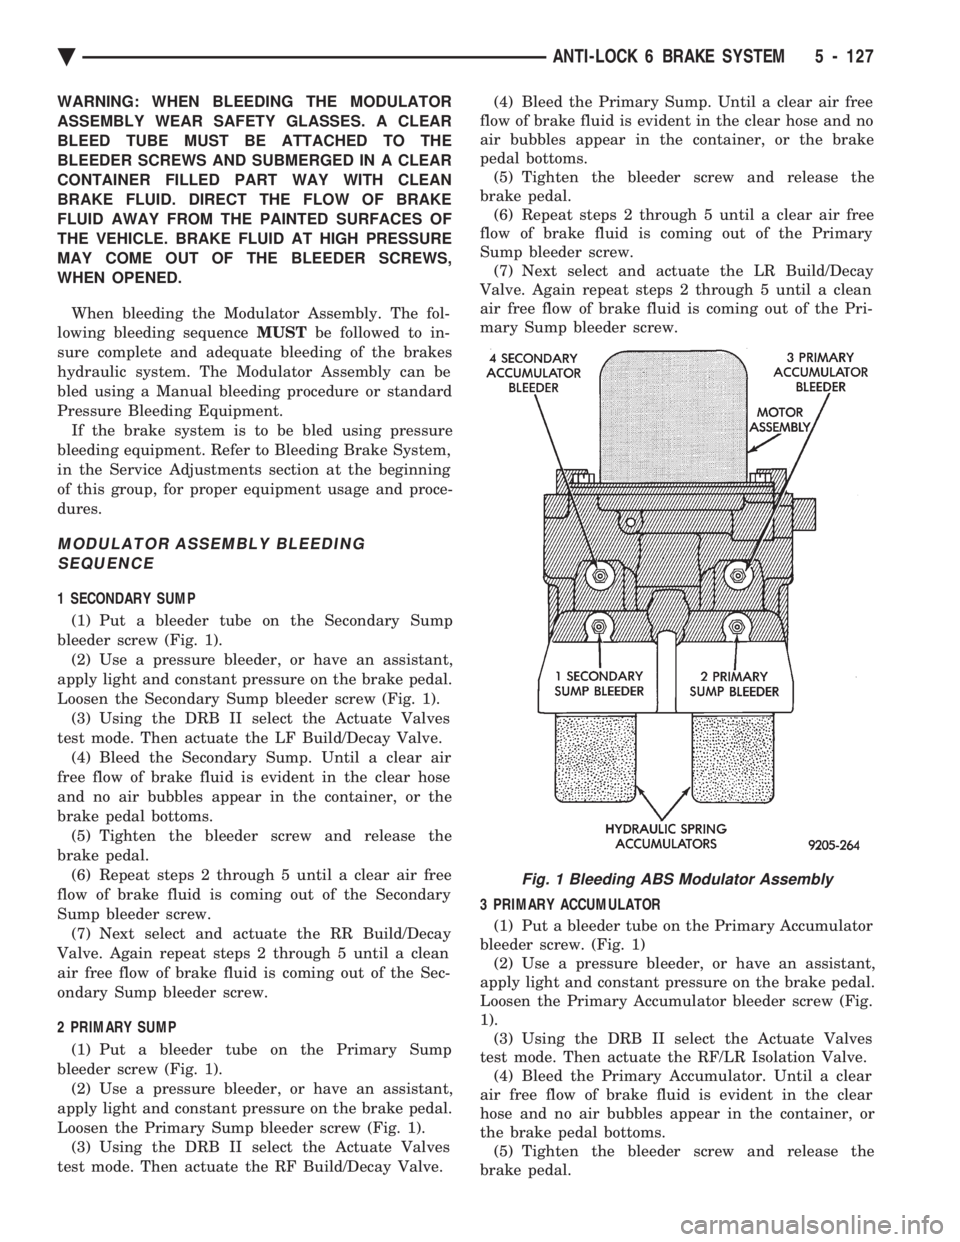
When bleeding the Modulator Assembly. The fol-
lowing bleeding sequence MUSTbe followed to in-
sure complete and adequate bleeding of the brakes
hydraulic system. The Modulator Assembly can be
bled using a Manual bleeding procedure or standard
Pressure Bleeding Equipment. If the brake system is to be bled using pressure
bleeding equipment. Refer to Bleeding Brake System,
in the Service Adjustments section at the beginning
of this group, for proper equipment usage and proce-
dures.
MODULATOR ASSEMBLY BLEEDING SEQUENCE
1 SECONDARY SUMP
(1) Put a bleeder tube on the Secondary Sump
bleeder screw (Fig. 1). (2) Use a pressure bleeder, or have an assistant,
apply light and constant pressure on the brake pedal.
Loosen the Secondary Sump bleeder screw (Fig. 1). (3) Using the DRB II select the Actuate Valves
test mode. Then actuate the LF Build/Decay Valve. (4) Bleed the Secondary Sump. Until a clear air
free flow of brake fluid is evident in the clear hose
and no air bubbles appear in the container, or the
brake pedal bottoms. (5) Tighten the bleeder screw and release the
brake pedal. (6) Repeat steps 2 through 5 until a clear air free
flow of brake fluid is coming out of the Secondary
Sump bleeder screw. (7) Next select and actuate the RR Build/Decay
Valve. Again repeat steps 2 through 5 until a clean
air free flow of brake fluid is coming out of the Sec-
ondary Sump bleeder screw.
2 PRIMARY SUMP
(1) Put a bleeder tube on the Primary Sump
bleeder screw (Fig. 1). (2) Use a pressure bleeder, or have an assistant,
apply light and constant pressure on the brake pedal.
Loosen the Primary Sump bleeder screw (Fig. 1). (3) Using the DRB II select the Actuate Valves
test mode. Then actuate the RF Build/Decay Valve. (4) Bleed the Primary Sump. Until a clear air free
flow of brake fluid is evident in the clear hose and no
air bubbles appear in the container, or the brake
pedal bottoms. (5) Tighten the bleeder screw and release the
brake pedal. (6) Repeat steps 2 through 5 until a clear air free
flow of brake fluid is coming out of the Primary
Sump bleeder screw. (7) Next select and actuate the LR Build/Decay
Valve. Again repeat steps 2 through 5 until a clean
air free flow of brake fluid is coming out of the Pri-
mary Sump bleeder screw.
3 PRIMARY ACCUMULATOR
(1) Put a bleeder tube on the Primary Accumulator
bleeder screw. (Fig. 1) (2) Use a pressure bleeder, or have an assistant,
apply light and constant pressure on the brake pedal.
Loosen the Primary Accumulator bleeder screw (Fig.
1). (3) Using the DRB II select the Actuate Valves
test mode. Then actuate the RF/LR Isolation Valve. (4) Bleed the Primary Accumulator. Until a clear
air free flow of brake fluid is evident in the clear
hose and no air bubbles appear in the container, or
the brake pedal bottoms. (5) Tighten the bleeder screw and release the
brake pedal.
Fig. 1 Bleeding ABS Modulator Assembly
Ä ANTI-LOCK 6 BRAKE SYSTEM 5 - 127
Page 278 of 2438
(6) Repeat steps 2 through 5 until a clear air free
flow of brake fluid is coming out of the Primary Ac-
cumulator bleeder screw. (7) Next select and actuate the RF Build/Decay
Valve. Again repeat steps 2 through 5 until a clean
air free flow of brake fluid is coming out of the Pri-
mary Accumulator bleeder screw.
4 SECONDARY ACCUMULATOR (1) Put a bleeder tube on the Secondary Accumu-
lator bleeder screw. (Fig. 1) (2) Use a pressure bleeder, or have an assistant,
apply light and constant pressure on the brake pedal.
Loosen the Secondary Accumulator bleeder screw
(Fig. 1). (3) Using the DRB II select the Actuate Valves
test mode. Then actuate the LF/RR Isolation Valve. (4) Bleed the Secondary Accumulator. Until a clear
air free flow of brake fluid is evident in the clear
hose and no air bubbles appear in the container, or
the brake pedal bottoms. (5) Tighten the bleeder screw and release the
brake pedal. (6) Repeat steps 2 through 5 until a clear air free
flow of brake fluid is coming out of the Secondary
Accumulator bleeder screw. (7) Next select and actuate the LF Build/Decay
Valve. Again repeat steps 2 through 5 until a clean
air free flow of brake fluid is coming out of the Pri-
mary Accumulator bleeder screw.PUMP/MOTOR SERVICE
On the Bendix Anti-Lock 6 Brake System the
Pump/Motor assembly can only be serviced as part of
Modulator Assembly.
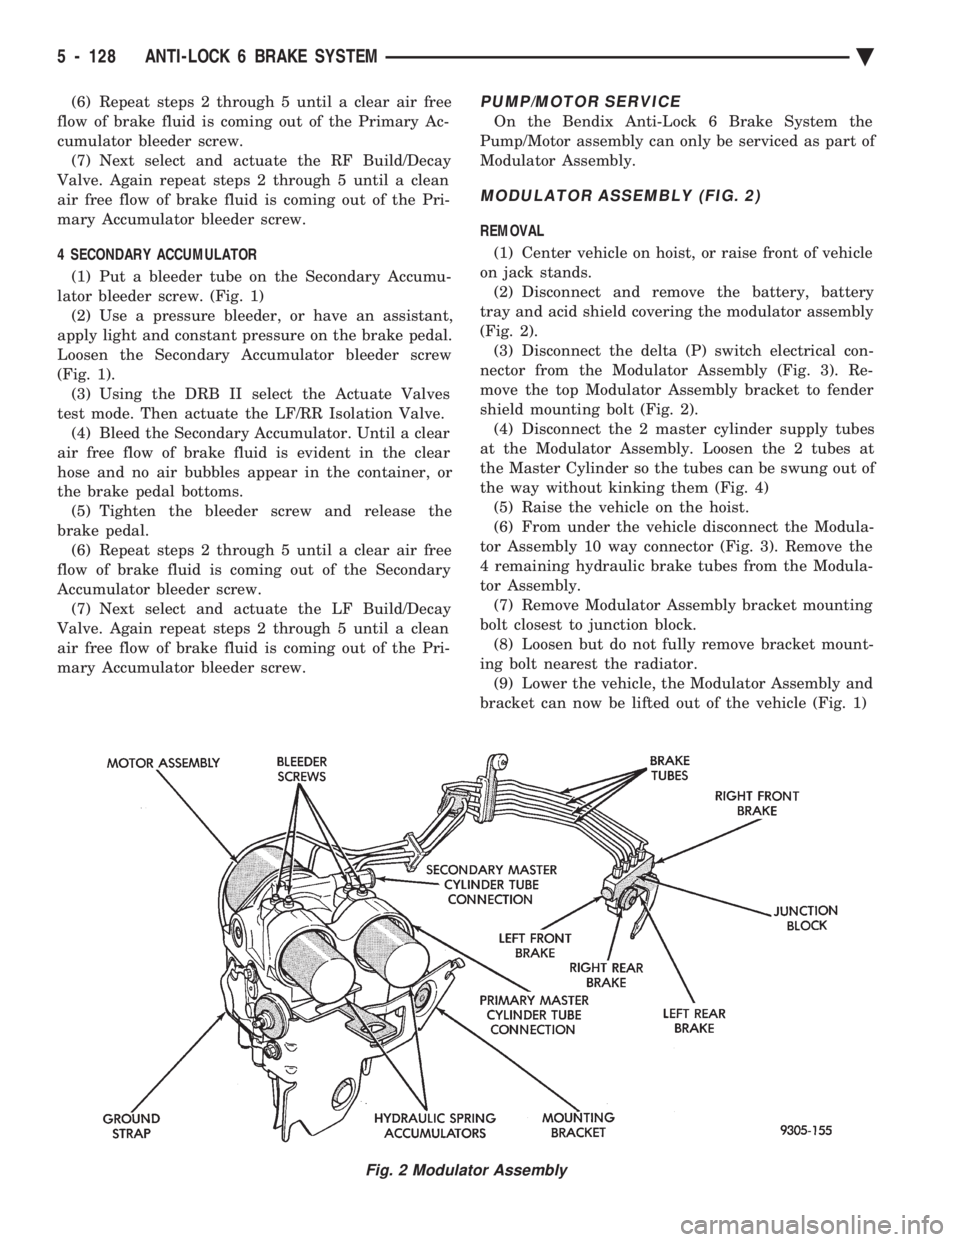
MODULATOR ASSEMBLY (FIG. 2)
REMOVAL
(1) Center vehicle on hoist, or raise front of vehicle
on jack stands. (2) Disconnect and remove the battery, battery
tray and acid shield covering the modulator assembly
(Fig. 2). (3) Disconnect the delta (P) switch electrical con-
nector from the Modulator Assembly (Fig. 3). Re-
move the top Modulator Assembly bracket to fender
shield mounting bolt (Fig. 2). (4) Disconnect the 2 master cylinder supply tubes
at the Modulator Assembly. Loosen the 2 tubes at
the Master Cylinder so the tubes can be swung out of
the way without kinking them (Fig. 4) (5) Raise the vehicle on the hoist.
(6) From under the vehicle disconnect the Modula-
tor Assembly 10 way connector (Fig. 3). Remove the
4 remaining hydraulic brake tubes from the Modula-
tor Assembly. (7) Remove Modulator Assembly bracket mounting
bolt closest to junction block. (8) Loosen but do not fully remove bracket mount-
ing bolt nearest the radiator. (9) Lower the vehicle, the Modulator Assembly and
bracket can now be lifted out of the vehicle (Fig. 1)
Fig. 2 Modulator Assembly
5 - 128 ANTI-LOCK 6 BRAKE SYSTEM Ä
Page 289 of 2438
SERVICE ADJUSTMENTS INDEX
page page
Bleeding Bendix Antilock 4 Brake System ....... 3
Master Cylinder Fluid Level .................. 3 Testing for Fluid Contamination
............... 4
MASTER CYLINDER FLUID LEVEL
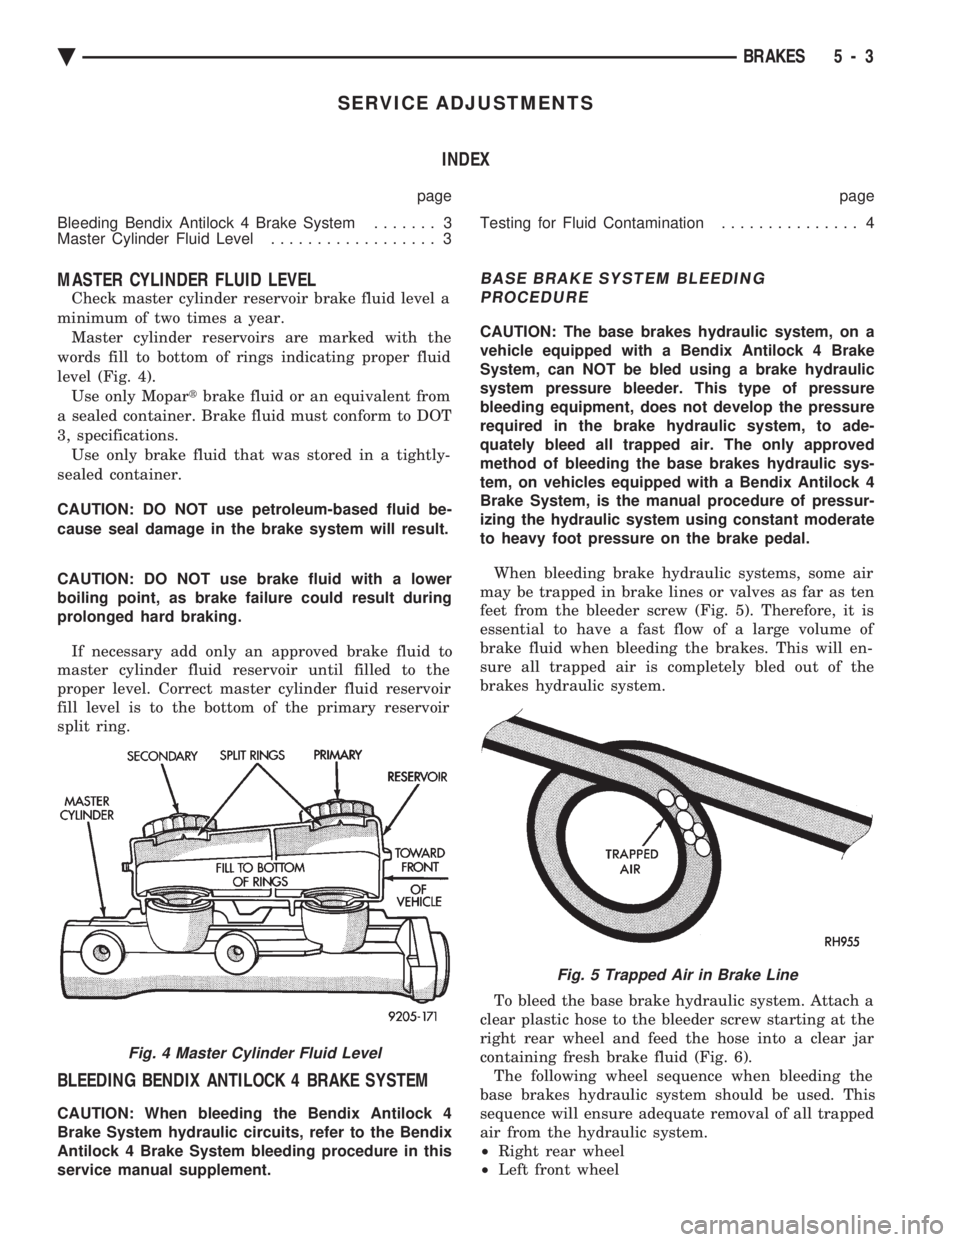
Check master cylinder reservoir brake fluid level a
minimum of two times a year. Master cylinder reservoirs are marked with the
words fill to bottom of rings indicating proper fluid
level (Fig. 4). Use only Mopar tbrake fluid or an equivalent from
a sealed container. Brake fluid must conform to DOT
3, specifications. Use only brake fluid that was stored in a tightly-
sealed container.
CAUTION: DO NOT use petroleum-based fluid be-
cause seal damage in the brake system will result.
CAUTION: DO NOT use brake fluid with a lower
boiling point, as brake failure could result during
prolonged hard braking.
If necessary add only an approved brake fluid to
master cylinder fluid reservoir until filled to the
proper level. Correct master cylinder fluid reservoir
fill level is to the bottom of the primary reservoir
split ring.
BLEEDING BENDIX ANTILOCK 4 BRAKE SYSTEM
CAUTION: When bleeding the Bendix Antilock 4
Brake System hydraulic circuits, refer to the Bendix
Antilock 4 Brake System bleeding procedure in this
service manual supplement.
BASE BRAKE SYSTEM BLEEDING PROCEDURE
CAUTION: The base brakes hydraulic system, on a
vehicle equipped with a Bendix Antilock 4 Brake
System, can NOT be bled using a brake hydraulic
system pressure bleeder. This type of pressure
bleeding equipment, does not develop the pressure
required in the brake hydraulic system, to ade-
quately bleed all trapped air. The only approved
method of bleeding the base brakes hydraulic sys-
tem, on vehicles equipped with a Bendix Antilock 4
Brake System, is the manual procedure of pressur-
izing the hydraulic system using constant moderate
to heavy foot pressure on the brake pedal.
When bleeding brake hydraulic systems, some air
may be trapped in brake lines or valves as far as ten
feet from the bleeder screw (Fig. 5). Therefore, it is
essential to have a fast flow of a large volume of
brake fluid when bleeding the brakes. This will en-
sure all trapped air is completely bled out of the
brakes hydraulic system.
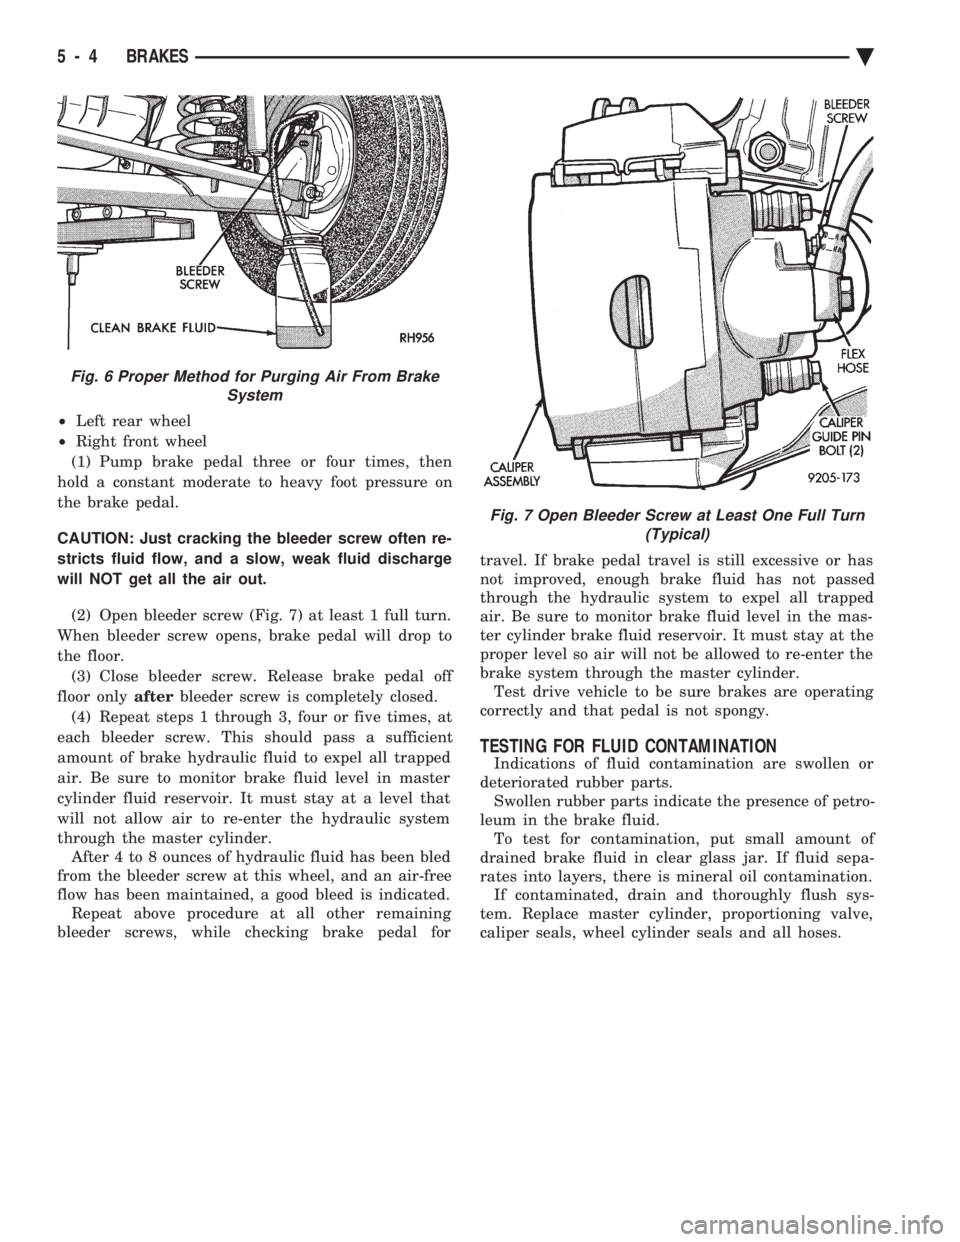
To bleed the base brake hydraulic system. Attach a
clear plastic hose to the bleeder screw starting at the
right rear wheel and feed the hose into a clear jar
containing fresh brake fluid (Fig. 6). The following wheel sequence when bleeding the
base brakes hydraulic system should be used. This
sequence will ensure adequate removal of all trapped
air from the hydraulic system.
² Right rear wheel
² Left front wheel
Fig. 4 Master Cylinder Fluid Level
Fig. 5 Trapped Air in Brake Line
Ä BRAKES 5 - 3
Page 290 of 2438
² Left rear wheel
² Right front wheel
(1) Pump brake pedal three or four times, then
hold a constant moderate to heavy foot pressure on
the brake pedal.
CAUTION: Just cracking the bleeder screw often re-
stricts fluid flow, and a slow, weak fluid discharge
will NOT get all the air out.
(2) Open bleeder screw (Fig. 7) at least 1 full turn.
When bleeder screw opens, brake pedal will drop to
the floor. (3) Close bleeder screw. Release brake pedal off
floor only afterbleeder screw is completely closed.
(4) Repeat steps 1 through 3, four or five times, at
each bleeder screw. This should pass a sufficient
amount of brake hydraulic fluid to expel all trapped
air. Be sure to monitor brake fluid level in master
cylinder fluid reservoir. It must stay at a level that
will not allow air to re-enter the hydraulic system
through the master cylinder. After 4 to 8 ounces of hydraulic fluid has been bled
from the bleeder screw at this wheel, and an air-free
flow has been maintained, a good bleed is indicated. Repeat above procedure at all other remaining
bleeder screws, while checking brake pedal for travel. If brake pedal travel is still excessive or has
not improved, enough brake fluid has not passed
through the hydraulic system to expel all trapped
air. Be sure to monitor brake fluid level in the mas-
ter cylinder brake fluid reservoir. It must stay at the
proper level so air will not be allowed to re-enter the
brake system through the master cylinder. Test drive vehicle to be sure brakes are operating
correctly and that pedal is not spongy.
TESTING FOR FLUID CONTAMINATION
Indications of fluid contamination are swollen or
deteriorated rubber parts. Swollen rubber parts indicate the presence of petro-
leum in the brake fluid. To test for contamination, put small amount of
drained brake fluid in clear glass jar. If fluid sepa-
rates into layers, there is mineral oil contamination. If contaminated, drain and thoroughly flush sys-
tem. Replace master cylinder, proportioning valve,
caliper seals, wheel cylinder seals and all hoses.
Fig. 6 Proper Method for Purging Air From Brake System
Fig. 7 Open Bleeder Screw at Least One Full Turn(Typical)
5 - 4 BRAKES Ä
Page 297 of 2438
The instrument panel bulb can be checked each
time the ignition switch is turned to the start posi-
tion or the parking brake is set.
HYDRAULIC SYSTEM SERVICE PROCEDURES
BRAKE WARNING SYSTEM
CHECKING BRAKE WARNING SWITCH UNIT
The Red Brake Warning light will come on when the
parking brake is applied with the ignition key turned
ON. The same light will also illuminate should one of
the two service brake hydraulic systems fail.
CAUTION:Make sure air does not enter the hydraulic
system during this test procedure. See bleeding with-
out a pressure bleeder at the beginning of this section
for master cylinder fluid level checking procedures.
To test the service brake warning system lamp.
Raise vehicle on a hoist and open a wheel cylinder
bleeder while a helper depresses the brake pedal and
observes the warning light.
If light fails to come on, inspect for a burned out bulb,
disconnected socket, or a broken or disconnected wire at
the switch. If the bulb is not burned out and the wire
continuity is not interrupted. Check the service brake
warning switch operation with a test lamp between the
switch terminal and a known good ground. Be sure to
fill master cylinder and bleed brake system after correc-
tion has been made, if necessary.
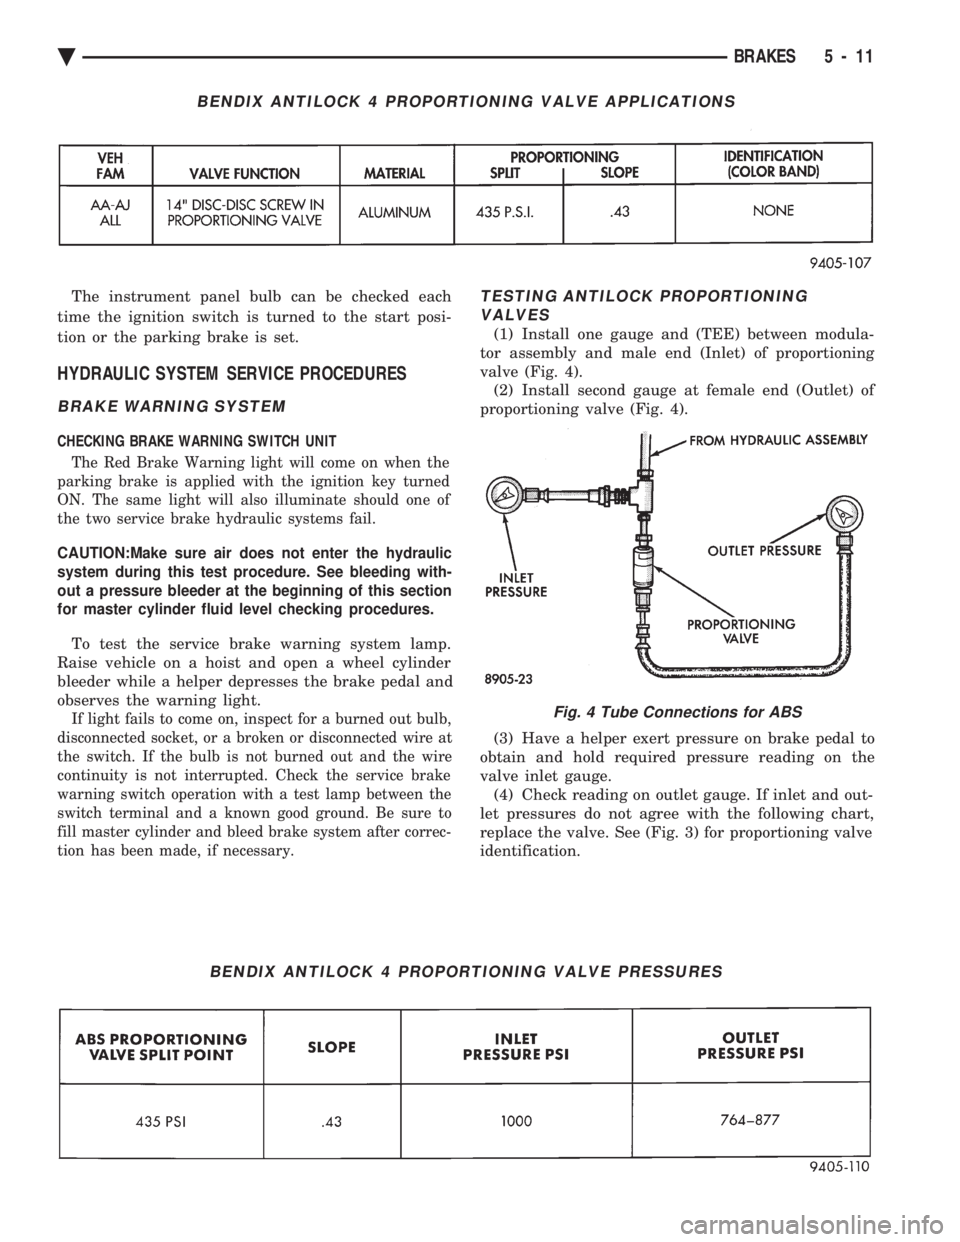
TESTING ANTILOCK PROPORTIONING VALVES
(1) Install one gauge and (TEE) between modula-
tor assembly and male end (Inlet) of proportioning
valve (Fig. 4). (2) Install second gauge at female end (Outlet) of
proportioning valve (Fig. 4).
(3) Have a helper exert pressure on brake pedal to
obtain and hold required pressure reading on the
valve inlet gauge. (4) Check reading on outlet gauge. If inlet and out-
let pressures do not agree with the following chart,
replace the valve. See (Fig. 3) for proportioning valve
identification.
BENDIX ANTILOCK 4 PROPORTIONING VALVE APPLICATIONS
BENDIX ANTILOCK 4 PROPORTIONING VALVE PRESSURES
Fig. 4 Tube Connections for ABS
Ä BRAKES 5 - 11