check transmission fluid CHEVROLET S10 2003 2.G Owners Manual
[x] Cancel search | Manufacturer: CHEVROLET, Model Year: 2003, Model line: S10, Model: CHEVROLET S10 2003 2.GPages: 432, PDF Size: 2.82 MB
Page 267 of 432

Service............................................................5-3
Doing Your Own Service Work.........................5-3
Adding Equipment to the Outside of Your
Vehicle......................................................5-4
Fuel................................................................5-4
Gasoline Octane............................................5-4
Gasoline Speci®cations....................................5-5
California Fuel...............................................5-5
Additives.......................................................5-6
Fuels in Foreign Countries...............................5-6
Filling Your Tank............................................5-7
Filling a Portable Fuel Container.......................5-9
Checking Things Under
the Hood....................................................5-10
Hood Release..............................................5-10
Engine Compartment Overview.......................5-12
Engine Oil...................................................5-15
Engine Air Cleaner/Filter................................5-19
Automatic Transmission Fluid.........................5-22
Manual Transmission Fluid.............................5-25
Hydraulic Clutch...........................................5-26
Engine Coolant.............................................5-27Radiator Pressure Cap..................................5-29
Engine Overheating.......................................5-30
Cooling System............................................5-32
Engine Fan Noise.........................................5-39
Power Steering Fluid.....................................5-39
Windshield Washer Fluid................................5-40
Brakes........................................................5-41
Battery........................................................5-45
Jump Starting...............................................5-46
Rear Axle.......................................................5-51
Four-Wheel Drive............................................5-52
Front Axle......................................................5-53
Bulb Replacement..........................................5-54
Halogen Bulbs..............................................5-54
Headlamps..................................................5-54
One-Piece Front Turn Signal Lamps................5-56
Two-Piece Front Turn Signal Lamps................5-57
Center High-Mounted Stoplamp (CHMSL).........5-58
Taillamps.....................................................5-59
Replacement Bulbs.......................................5-59
Windshield Wiper Blade Replacement..............5-60
Section 5 Service and Appearance Care
5-1
Page 281 of 432

A. Battery
B. Coolant Recovery Tank
C. Engine Oil Dipstick
D. Engine Oil Fill
E. Automatic Transmission Dipstick (If Equipped)
F. Power Steering Reservoir
G. Brake Master Cylinder Reservoir
H. Engine Air Cleaner/Filter
I. Engine Compartment Fuse Block
J. Windshield Washer Fluid ReservoirEngine Oil
Checking Engine Oil
It's a good idea to check your engine oil every time you
get fuel. In order to get an accurate reading, the oil
must be warm and the vehicle must be on level ground.
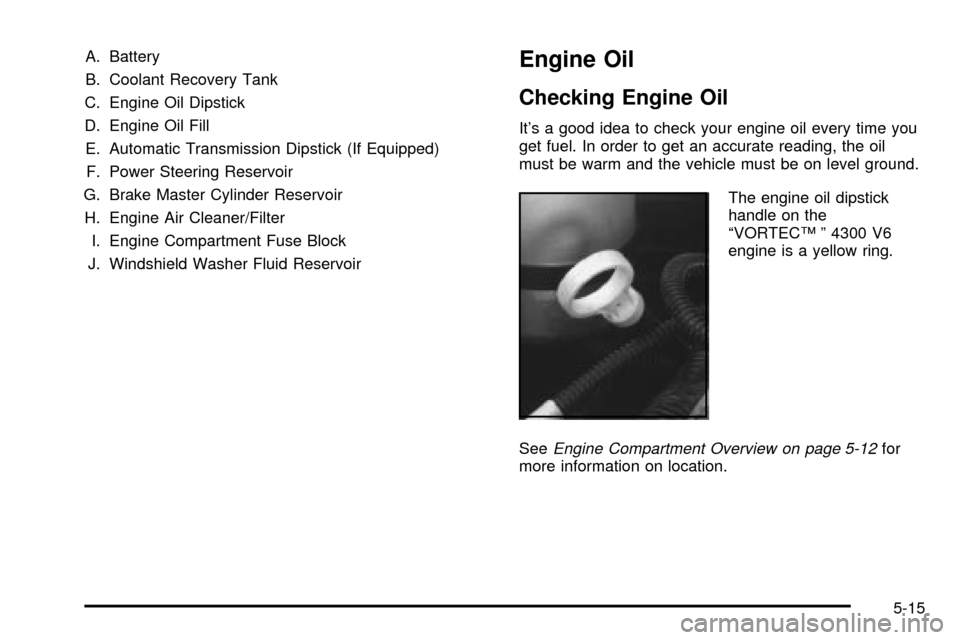
The engine oil dipstick
handle on the
ªVORTECŸ º 4300 V6
engine is a yellow ring.
See
Engine Compartment Overview on page 5-12for
more information on location.
5-15
Page 288 of 432

Automatic Transmission Fluid
When to Check and Change
A good time to check your automatic transmission ¯uid
level is when the engine oil is changed.
Change both the ¯uid and ®lter every 15,000 miles
(25 000 km) if the vehicle is mainly driven under one or
more of these conditions:
·In heavy city traffic where the outside temperature
regularly reaches 90ÉF (32ÉC) or higher.
·In hilly or mountainous terrain.
·When doing frequent trailer towing.
·Uses such as found in taxi, police or delivery
service.
If you do not use your vehicle under any of these
conditions, change the ¯uid and ®lter every
50,000 miles (83 000 km).
See
Part A: Scheduled Maintenance Services on
page 6-4.
How to Check
Because this operation can be a little difficult, you may
choose to have this done at the dealership service
department.
If you do it yourself, be sure to follow all the instructions
here, or you could get a false reading on the dipstick.
Notice:Too much or too little ¯uid can damage
your transmission. Too much can mean that some
of the ¯uid could come out and fall on hot engine
part or exhaust system parts, starting a ®re.
Too little ¯uid could cause the transmission to
overheat. Be sure to get an accurate reading if you
check your transmission ¯uid.
Wait at least 30 minutes before checking the
transmission ¯uid level if you have been driving:
·When outside temperatures are above 90ÉF (32ÉC).
·At high speed for quite a while.
·In heavy traffic±especially in hot weather.
·While pulling a trailer.
5-22
Page 289 of 432

To get the right reading, the ¯uid should be at normal
operating temperature, which is 180ÉF to 200ÉF
(82ÉC to 93ÉC)
Get the vehicle warmed up by driving about 15 miles
(24 km) when outside temperatures are above
50ÉF (10ÉC). If it's colder than 50ÉF (10ÉC), drive the
vehicle in THIRD (3) until the engine temperature gage
moves and then remains steady for 10 minutes.
A cold ¯uid check can be made after the vehicle has
been sitting for eight hours or more with the engine off,
but this is used only as a reference. Let the engine
run at idle for ®ve minutes if outside temperatures are
50ÉF (10ÉC) or more. If it's colder than 50ÉF (10ÉC), you
may have to idle the engine longer. Should the ¯uid
level be low during this cold check, you must check the
¯uid hot before adding ¯uid. Checking the ¯uid hot
will give you a more accurate reading of the ¯uid level.Checking the Fluid Level
Prepare your vehicle as follows:
·Park your vehicle on a level place. Keep the engine
running.
·With the parking brake applied, place the shift lever
in PARK (P).
·With your foot on the brake pedal, move the shift
lever through each gear range, pausing for about
three seconds in each range. Then, position the shift
lever in PARK (P).
·Let the engine run at idle for three minutes or more.
Then, without shutting off the engine, follow these
steps:
The transmission dipstick
handle has this symbol
on it.
The transmission dipstick is located near the center of
the engine compartment. See
Engine Compartment
Overview on page 5-12for more information on location.
5-23
Page 290 of 432

1. Flip the handle up and then pull out the dipstick
and wipe it with a clean rag or paper towel.
2. Push it back in all the way, wait three seconds and
then pull it back out again.
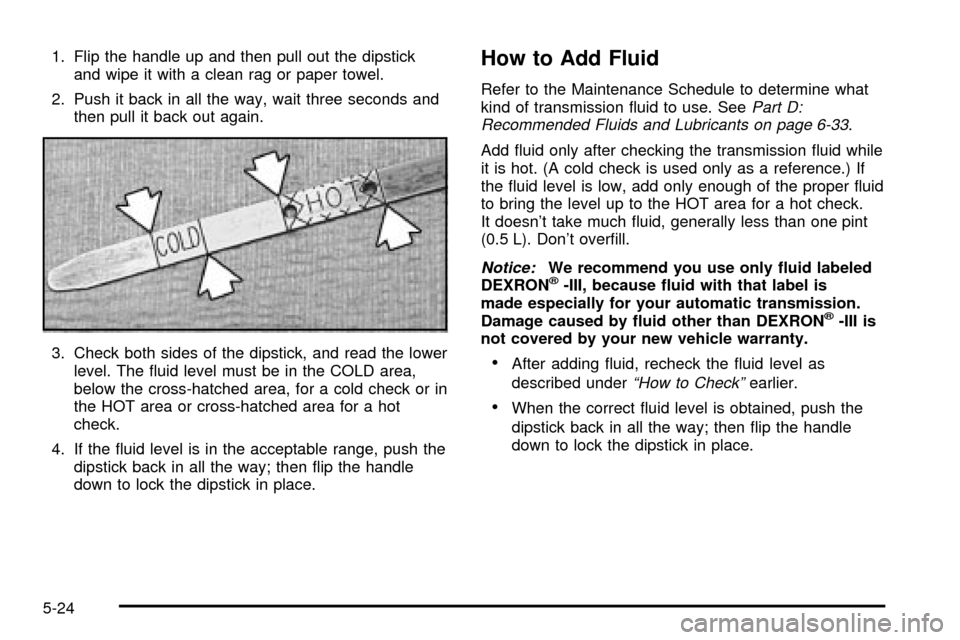
3. Check both sides of the dipstick, and read the lower
level. The ¯uid level must be in the COLD area,
below the cross-hatched area, for a cold check or in
the HOT area or cross-hatched area for a hot
check.
4. If the ¯uid level is in the acceptable range, push the
dipstick back in all the way; then ¯ip the handle
down to lock the dipstick in place.How to Add Fluid
Refer to the Maintenance Schedule to determine what
kind of transmission ¯uid to use. SeePart D:
Recommended Fluids and Lubricants on page 6-33.
Add ¯uid only after checking the transmission ¯uid while
it is hot. (A cold check is used only as a reference.) If
the ¯uid level is low, add only enough of the proper ¯uid
to bring the level up to the HOT area for a hot check.
It doesn't take much ¯uid, generally less than one pint
(0.5 L). Don't over®ll.
Notice:We recommend you use only ¯uid labeled
DEXRONž-III, because ¯uid with that label is
made especially for your automatic transmission.
Damage caused by ¯uid other than DEXRON
ž-III is
not covered by your new vehicle warranty.
·After adding ¯uid, recheck the ¯uid level as
described under
ªHow to Checkºearlier.
·When the correct ¯uid level is obtained, push the
dipstick back in all the way; then ¯ip the handle
down to lock the dipstick in place.
5-24
Page 291 of 432

Manual Transmission Fluid
When to Check
A good time to have it checked is when the engine oil is
changed. However, the ¯uid in your manual transmission
doesn't require changing.
How to Check
Because this operation can be a little difficult, you may
choose to have this done at your GM dealership
service department.
If you do it yourself, be sure to follow all the instructions
here, or you could get a false reading.
Notice:Too much or too little ¯uid can damage
your transmission. Too much can mean that some
of the ¯uid could come out and fall on hot engine
part or exhaust system parts, starting a ®re.
Too little ¯uid could cause the transmission to
overheat. Be sure to get an accurate reading if you
check your transmission ¯uid.
Check the ¯uid level only when your engine is off, the
vehicle is parked on a level place and the transmission
is cool enough for you to rest your ®ngers on the
transmission case.Then, follow these steps:
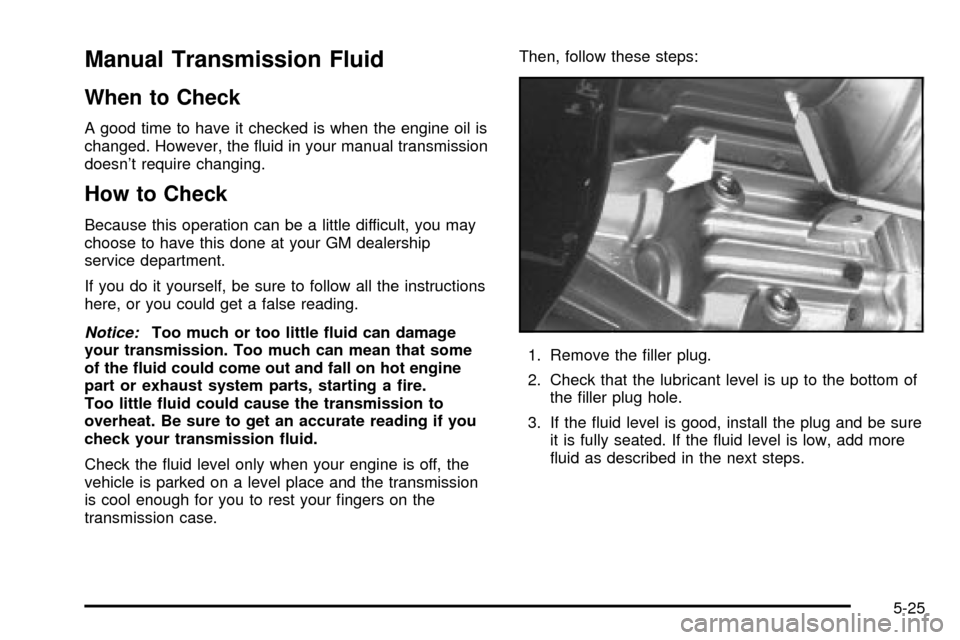
1. Remove the ®ller plug.
2. Check that the lubricant level is up to the bottom of
the ®ller plug hole.
3. If the ¯uid level is good, install the plug and be sure
it is fully seated. If the ¯uid level is low, add more
¯uid as described in the next steps.
5-25
Page 366 of 432

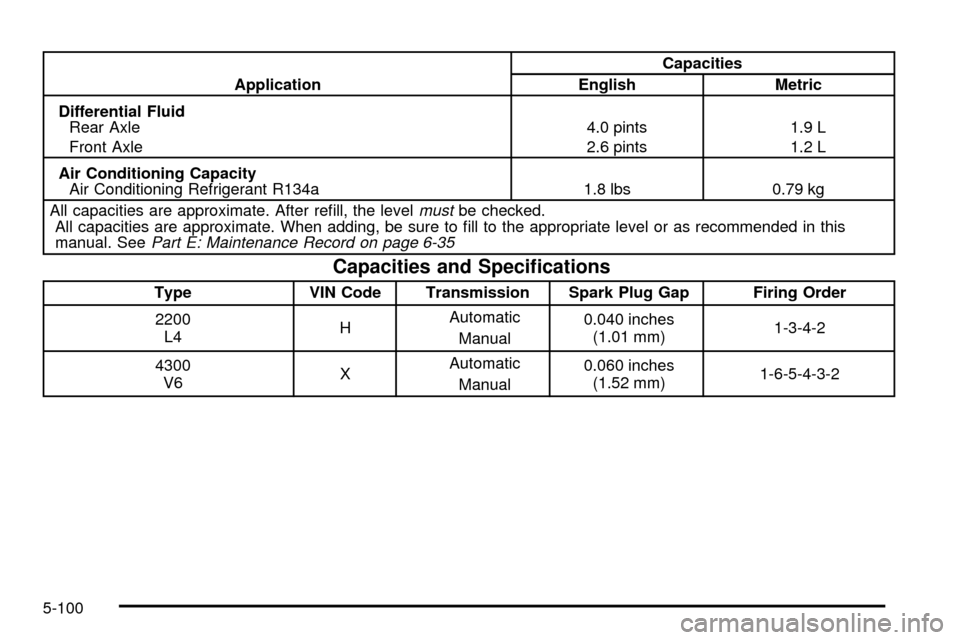
ApplicationCapacities
English Metric
Differential Fluid
Rear Axle
Front Axle4.0 pints
2.6 pints1.9 L
1.2 L
Air Conditioning Capacity
Air Conditioning Refrigerant R134a 1.8 lbs 0.79 kg
All capacities are approximate. After re®ll, the level
mustbe checked.
All capacities are approximate. When adding, be sure to ®ll to the appropriate level or as recommended in this
manual. See
Part E: Maintenance Record on page 6-35
Capacities and Speci®cations
Type VIN Code Transmission Spark Plug Gap Firing Order
2200
L4HAutomatic
Manual0.040 inches
(1.01 mm)1-3-4-2
4300
V6XAutomatic
Manual0.060 inches
(1.52 mm)1-6-5-4-3-2
5-100
Page 395 of 432

At Least Twice a Year
Restraint System Check
Make sure the safety belt reminder light and all your
belts, buckles, latch plates, retractors and anchorages
are working properly. Look for any other loose or
damaged safety belt system parts. If you see anything
that might keep a safety belt system from doing its
job, have it repaired. Have any torn or frayed safety belts
replaced.
Also look for any opened or broken air bag coverings,
and have them repaired or replaced. (The air bag
system does not need regular maintenance.)
Wiper Blade Check
Inspect wiper blades for wear or cracking. Replace
blade inserts that appear worn or damaged or that
streak or miss areas of the windshield. Also see
Cleaning the Outside of Your Vehicle on page 5-87.
Spare Tire Check
At least twice a year, after the monthly in¯ation check of
the spare tire determines that the spare is in¯ated to
the correct tire in¯ation pressure, make sure that
the spare tire is stored securely. Push, pull, and then try
to rotate or turn the tire. If it moves, use the wheel
wrench to tighten the cable. See
Changing a Flat Tire
on page 5-72.
Weatherstrip Lubrication
Silicone grease on weatherstrips will make them last
longer, seal better, and not stick or squeak. Apply
silicone grease with a clean cloth. During very cold,
damp weather more frequent application may be
required. See
Part D: Recommended Fluids and
Lubricants on page 6-33.
Manual Transmission Check
Check the transmission ¯uid level; add if needed. SeeManual Transmission Fluid on page 5-25. Check
for leaks. A ¯uid leak is the only reason for ¯uid loss.
Have the system inspected and repaired if needed.
6-27
Page 396 of 432

Automatic Transmission Check
Check the transmission ¯uid level; add if needed. SeeAutomatic Transmission Fluid on page 5-22. A ¯uid loss
may indicate a problem. Check the system and repair
if needed.
Hydraulic Clutch System Check
Check the ¯uid level in the clutch reservoir. SeeHydraulic Clutch on page 5-26.
A ¯uid loss in this system could indicate a problem.
Have the system inspected and repaired at once.
At Least Four Times a Year
Tailgate Lubrication Service
Lubricate tailgate latch bolt, handle assembly pivot
points, and hinges with lubricant recommended
in Part D.
At Least Once a Year
Key Lock Cylinders Service
Lubricate the key lock cylinders with the lubricant
speci®ed in Part D.
Body Lubrication Service
Lubricate all body door and fuel door hinges, latches
and locks, including the glove box and console
doors, the body hood, secondary latch, pivots, spring
anchor, release pawl and any moving seat hardware.
Lubricate the hood safety lever pivot and prop rod pivot.
Part D tells you what to use. More frequent lubrication
may be required when exposed to a corrosive
environment.
6-28
Page 418 of 432

Audio System(s) (cont.)
Automatic Headlamp System............................3-12
Automatic Transmission Check..........................6-28
Automatic Transmission Shift Lock Control
System Check.............................................6-29
Automatic Transmission...................................2-22
Fluid..........................................................5-22
Operation...................................................2-25
B
Backing Up....................................................4-61
Battery Replacement......................................... 2-7
Battery Rundown Protection.............................3-17
Battery..........................................................5-45
Bed Rails......................................................2-50
Before Leaving on a Long Trip.........................4-35
Before You Go Off-Roading..............................4-15
Body Lubrication Service..................................6-28
Brake Adjustment............................................5-45
Brake Fluid....................................................5-41
Brake Pedal Travel.........................................5-44
Brake Wear...................................................5-44
Brake............................................................2-32
Parking......................................................2-32
System Inspection.......................................6-32
System Warning Light..................................3-31
Brakes..........................................................5-41
Braking in Emergencies..................................... 4-9Braking........................................................... 4-6
Break-In, New Vehicle.....................................2-19
Bulb Replacement...........................................5-54
Center High-Mounted Stoplamp (CHMSL)........5-58
Halogen Bulbs............................................5-54
Headlamps.................................................5-54
One-Piece Front Turn Signal Lamps...............5-56
Replacement Bulbs......................................5-59
Taillamps....................................................5-59
Two-Piece Front Turn Signal Lamps...............5-57
Buying New Tires...........................................5-66
C
California Fuel.................................................. 5-5
Canada ± Customer Assistance.......................... 7-4
Canadian Owners................................................ ii
Canadian Roadside Assistance........................... 7-7
Capacities and Speci®cations............................5-99
Carbon Monoxide...................4-38, 4-54, 2-13, 2-37
Care of.........................................................5-86
Safety Belts................................................5-86
Your Cassette Tape Player............................3-75
Your CD Player...........................................3-76
Your CDs ...................................................3-76
Cassette Tape Messages.................................3-60
Cassette Tape Player Service...........................6-26
Center High-Mounted Stoplamp (CHMSL)...........5-58
Center Passenger Position, Safety Belts.............1-23
2