Additional CHEVROLET SILVERADO 1500 2018 Owner's Manual
[x] Cancel search | Manufacturer: CHEVROLET, Model Year: 2018, Model line: SILVERADO 1500, Model: CHEVROLET SILVERADO 1500 2018Pages: 501, PDF Size: 6.69 MB
Page 157 of 501
Chevrolet Silverado Owner Manual (GMNA-Localizing-U.S./Canada/Mexico-
11349200) - 2018 - CRC - 2/27/18
156 Instruments and Controls
Remaining Oil Life
Turn the trip odometer reset stem
until REMAINING OIL LIFE
displays. An estimate of the oil's
remaining useful life is shown.
REMAINING OIL LIFE 99% means
99% of the current oil life remains.
When the remaining oil life is low,
the CHANGE ENGINE OIL SOON
message will appear on the display.
The oil should be changed as soon
as possible. SeeEngine Oil0343.
In addition to the engine oil life
system monitoring the oil life,
additional maintenance is
recommended in the Maintenance
Schedule. See Maintenance
Schedule 0443.
The Oil Life display must be reset
after each oil change. It will not
reset itself. Do not reset the Oil Life
display at any time other than when
the oil has just been changed.
It cannot be reset accurately until
the next oil change. To reset the
engine oil life system, see Engine
Oil Life System 0346. Transmission Fluid Temperature
The temperature of the automatic
transmission fluid displays in either
degrees Celsius (°C) or degrees
Fahrenheit (°F).
Trailer Brake
On vehicles with the Integrated
Trailer Brake Control (ITBC) system,
turn the trip odometer reset stem
until TRAILER GAIN and TRAILER
OUTPUT displays.
TRAILER GAIN shows the Trailer
Gain setting. This setting can be
adjusted from 0.0 to 10.0 with either
a trailer connected or disconnected.
TRAILER OUTPUT shows the
power output to the trailer anytime a
trailer with electric brakes is
connected. Output is displayed as a
bar graph. Dashes may appear in
the TRAILER OUTPUT display if a
trailer is not connected.
Hourmeter
This display shows the total number
of hours the engine has run.
Unit
This will change the displays on the
instrument cluster and DIC to either
metric or English (US)
measurements. To change the units,
press the trip odometer reset stem
when UNITS is displayed to enter
the Unit menu. Turn the trip
odometer reset stem to switch
between English and metric. Press
the trip odometer reset stem when
the desired setting is displayed.
Compass
The vehicle may have a compass in
the Driver Information Center (DIC).
See
Compass 0131.
Driver Information Center
(DIC) (Uplevel)
The DIC displays are shown in the
center of the instrument cluster in
the Info app. See Instrument Cluster
0 137. The displays show the status
of many vehicle systems. The
controls for the DIC are on the right
steering wheel control.
Page 159 of 501
Chevrolet Silverado Owner Manual (GMNA-Localizing-U.S./Canada/Mexico-
11349200) - 2018 - CRC - 2/27/18
158 Instruments and Controls
Fuel Range :Shows the
approximate distance the vehicle
can be driven without refueling.
LOW will be displayed when the
vehicle is low on fuel. The fuel
range estimate is based on an
average of the vehicle's fuel
economy over recent driving history
and the amount of fuel remaining in
the fuel tank.
Oil Life : Shows an estimate of the
oil's remaining useful life.
If REMAINING OIL LIFE 99% is
displayed, that means 99% of the
current oil life remains.
When the remaining oil life is low,
the CHANGE ENGINE OIL SOON
message will appear on the display.
The oil should be changed as soon
as possible. See Engine Oil0343.
In addition to the engine oil life
system monitoring the oil life,
additional maintenance is
recommended in the Maintenance
Schedule. See Maintenance
Schedule 0443.
The Oil Life display must be reset
after each oil change. It will not
reset itself. Do not reset the Oil Life display at any time other than when
the oil has just been changed.
It cannot be reset accurately until
the next oil change. To reset the
engine oil life system, press and
hold
Vfor several seconds while
the Oil Life display is active. See
Engine Oil Life System 0346.
Tire Pressure : Shows the
approximate pressures of all four
tires. Tire pressure is displayed in
either kilopascal (kPa) or in pounds
per square inch (psi). If the pressure
is low, the value for that tire is
shown in amber. See Tire Pressure
Monitor System 0394 andTire
Pressure Monitor Operation 0395.
Fuel Economy : The center
displays the approximate
instantaneous fuel economy as a
number and bar graph. Displayed
above the bar graph is a running
average of fuel economy for the
most recently traveled selected
distance. Displayed below the bar
graph is the best average fuel
economy that has been achieved for
the selected distance. The selected
distance is displayed at the top of the page as
“last xxx mi/km.” Next
to the odometer, the Active Fuel
Management displays the number of
cylinders the vehicle is running on.
See Active Fuel Management
0 256.
Press
pto select the distance or
reset best value. Use
wandxto
choose the distance and press
V.
Press
wandxto select “Reset
Best Score.” Press
Vto reset the
best average fuel economy. After
reset, the momentary average fuel
economy will display.
The display provides information on
how current driving behavior affects
the running average and how well
recent driving compares to the best
that has been achieved for the
selected distance.
Timer : This display can be used as
a timer. To start the timer, press
V
while this display is active. The
display will show the amount of time
that has passed since the timer was
last reset. To stop the timer, press
V
briefly while this display is active
Page 173 of 501
Chevrolet Silverado Owner Manual (GMNA-Localizing-U.S./Canada/Mexico-
11349200) - 2018 - CRC - 2/27/18
172 Lighting
AUTO :Automatically turns on the
headlamps, parking lamps,
taillamps, instrument panel lights,
roof marker lamps (if equipped),
front/rear sidemarker lamps, and
license plate lamps.
When the vehicle is turned off and
the headlamps are in AUTO, the
headlamps turn off. When the key is
removed, they automatically turn on
for a set time. The time of the delay
can be changed using the DIC.
See Driver Information Center (DIC)
(Base Level) 0155 orDriver
Information Center (DIC) (Uplevel)
0 156.
;:Turns on the parking lamps
including all lamps, except the
headlamps.
2: Turns on the headlamps
together with the parking lamps and
instrument panel lights.
When the headlamps are turned on
while the vehicle is on, the
headlamps turn off automatically
10 minutes after the ignition is
turned off. When the headlamps are
turned on while the vehicle is off, the headlamps will stay on for
10 minutes before turning off to
prevent the battery from being
drained. Turn the headlamp control
off and then back to the headlamp
on position to make the headlamps
stay on for an additional 10 minutes.
To keep the lamps on for more than
10 minutes, the ignition must be on
or in ACC/ACCESSORY.
#:
If equipped, turns on the fog
lamps. See Fog Lamps0176.
IntelliBeam System
If equipped, this system turns the
vehicle's high-beam headlamps on
and off according to surrounding
traffic conditions.
The system turns the high-beam
headlamps on when it is dark
enough and there is no other traffic
present.
This light comes on in the
instrument cluster when the
IntelliBeam system is enabled.
Turning On and Enabling
IntelliBeam
To enable the IntelliBeam system,
with the turn signal lever in the
neutral position, turn the exterior
lamp control to AUTO. The blue
high-beam on light appears on the
instrument cluster when the high
beams are on.
Driving with IntelliBeam
The system only activates the high
beams when driving over 40 km/h
(25 mph).
There is a sensor near the top
center of the windshield that
automatically controls the system.
Keep this area of the windshield
clear of debris to allow for best
system performance.
The high-beam headlamps remain
on, under the automatic control,
until one of the following situations
occurs:
Page 201 of 501
Chevrolet Silverado Owner Manual (GMNA-Localizing-U.S./Canada/Mexico-
11349200) - 2018 - CRC - 2/27/18
200 Infotainment System
plays the prompt“Make your
selection from the list using the
manual controls or press the Back
button to try again.”
If manual selection takes more than
15 seconds, the session terminates
and prompts that it has timed out.
The screen returns back to the
screen where voice recognition was
initiated.
The Back Command
Say “Back” or press the Back button
to go to the previous screen.
If in voice recognition, and “Back”is
stated all the way through to the
initial screen, then “Back”is stated
one more time, the voice recognition
session will cancel.
Help
Say “Help” on any voice recognition
screen and the help prompt for the
screen is played. Additionally, a
pop-up displays a text version of the
help prompt. Depending on how
voice recognition was initiated, the
Help pop-up will either display on
the instrument cluster or the infotainment display. Press the
Dismiss button to make the pop-up
go away.
Pressing
gwhile the help prompt is
playing will terminate the prompt
and a beep will be heard. Doing this
will stop the help prompt so that a
voice command can be used.
Voice Recognition for the
Radio
Select thegscreen button to
launch audio voice recognition.
If the voice button is pressed in a
radio screen, the voice commands
for radio and media features are
available.
“Switch to AM” :Switch bands to
AM and tune to the last AM radio
station.
“Switch to FM” :Switch bands to
FM and tune to the last FM radio
station.
“Switch to SXM” :Switch bands to
SiriusXM (if equipped) and tune to
the last SiriusXM channel. “Tune to
:
Tune to the radio station whose
frequency is identified in the
command (like “nine fifty”).
“Tune to
Tune to the radio station whose
frequency is identified in the
command (like “one o one
point one”).
“Tune to SXM
equipped) radio station whose
channel number is identified in the
command.
“Tune to SXM
equipped) radio station whose
channel name is identified in the
command.
Voice Recognition for Audio
My Media
If browsing My Media when the
voice button is selected, the voice
recognition commands for My Media
features are available.
“Play Artist” :Begin a dialog to
enter a specific Artist name.
Page 214 of 501
Chevrolet Silverado Owner Manual (GMNA-Localizing-U.S./Canada/Mexico-
11349200) - 2018 - CRC - 2/27/18
Infotainment System 213
warranty is made that the Gracenote
Software or Gracenote Servers are
error-free or that functioning of
Gracenote Software or Gracenote
Servers will be uninterrupted.
Gracenote is not obligated to
provide you with new enhanced or
additional data types or categories
that Gracenote may provide in the
future and is free to discontinue its
services at any time.
GRACENOTE DISCLAIMS ALL
WARRANTIES EXPRESS OR
IMPLIED, INCLUDING, BUT NOT
LIMITED TO, IMPLIED
WARRANTIES OF
MERCHANTABILITY, FITNESS
FOR A PARTICULAR PURPOSE,
TITLE, AND NON-INFRINGEMENT.
GRACENOTE DOES NOT
WARRANT THE RESULTS THAT
WILL BE OBTAINED BY YOUR
USE OF THE GRACENOTE
SOFTWARE OR ANY
GRACENOTE SERVER. IN NO
CASE WILL GRACENOTE BE
LIABLE FOR ANY
CONSEQUENTIAL ORINCIDENTAL DAMAGES OR FOR
ANY LOST PROFITS OR LOST
REVENUES.
Copyright 2013. Gracenote, Inc. All
Rights Reserved.
Unicode
Copyright 1991-2013 Unicode, Inc.
All rights reserved. Distributed
under the Terms of Use in
http://www.unicode.org/
copyright.html.
Free Type Project
Portions of this software are
copyright 2013 The FreeType
Project (http://www.freetype.org). All
rights reserved.
iType
iType is a trademark of Monotype
Imaging Inc. registered in the U.S.
Patent & Trademark Office and may
be registered in certain other
jurisdictions.
Open Source SW
The open source code used in this
device can be downloaded at the
webpage shown in the informationat the center stack display. Further
information concerning the OSS
licenses is shown in the center
stack display.
QNX
Portions of this software are
copyright 2008-2013, QNX Software
Systems. All rights reserved.
Part C
–EULA
Copyright 2013, Software Systems
GmbH & Co. KG. All Rights
Reserved.
The product you have purchased
("Product") contains Software
(Runtime Configuration No. 505962;
"Software") which is distributed by
or on behalf of the Product
manufacturer "Manufacturer") under
license from Software Systems Co.
("QSSC"). You may only use the
Software in the Product and in
compliance with the license terms
below.
Subject to the terms and conditions
of this License, QSSC hereby
grants you a limited, non-exclusive,
non-transferable license to use the
Page 225 of 501
Chevrolet Silverado Owner Manual (GMNA-Localizing-U.S./Canada/Mexico-
11349200) - 2018 - CRC - 2/27/18
224 Climate Controls
Maintenance
Passenger Compartment
Air Filter
The filter reduces the dust, pollen,
and other airborne irritants from
outside air that is pulled into the
vehicle.
The filter should be replaced as part
of routine scheduled maintenance.
SeeMaintenance Schedule 0443.
To find out what type of filter to use,
see Maintenance Replacement
Parts 0453.
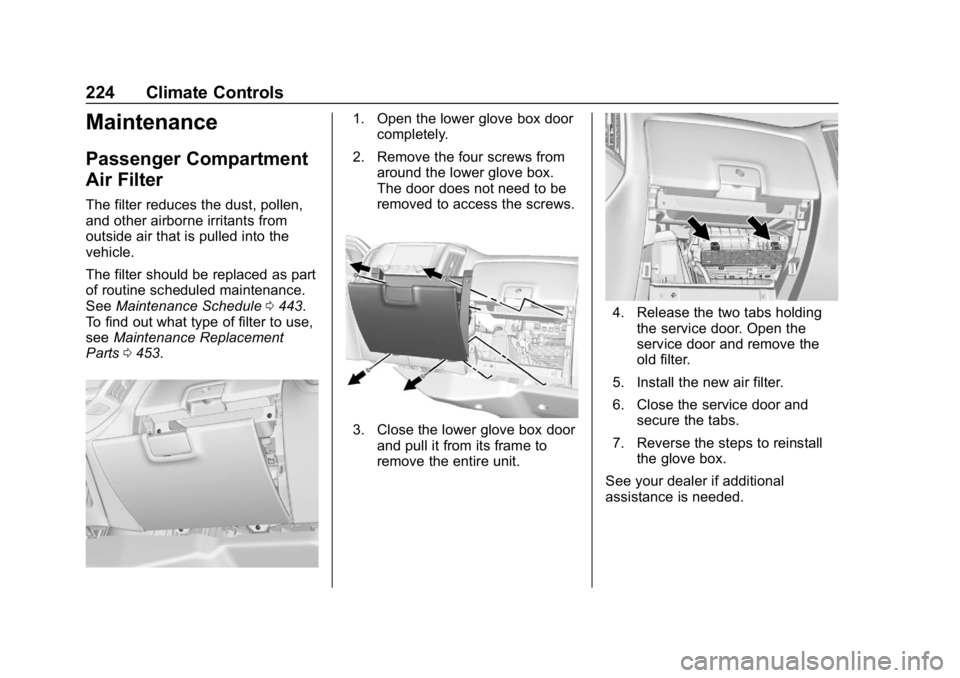
1. Open the lower glove box door
completely.
2. Remove the four screws from around the lower glove box.
The door does not need to be
removed to access the screws.
3. Close the lower glove box doorand pull it from its frame to
remove the entire unit.
4. Release the two tabs holding
the service door. Open the
service door and remove the
old filter.
5. Install the new air filter.
6. Close the service door and secure the tabs.
7. Reverse the steps to reinstall the glove box.
See your dealer if additional
assistance is needed.
Page 246 of 501
Chevrolet Silverado Owner Manual (GMNA-Localizing-U.S./Canada/Mexico-
11349200) - 2018 - CRC - 2/27/18
Driving and Operating 245
Loading Points
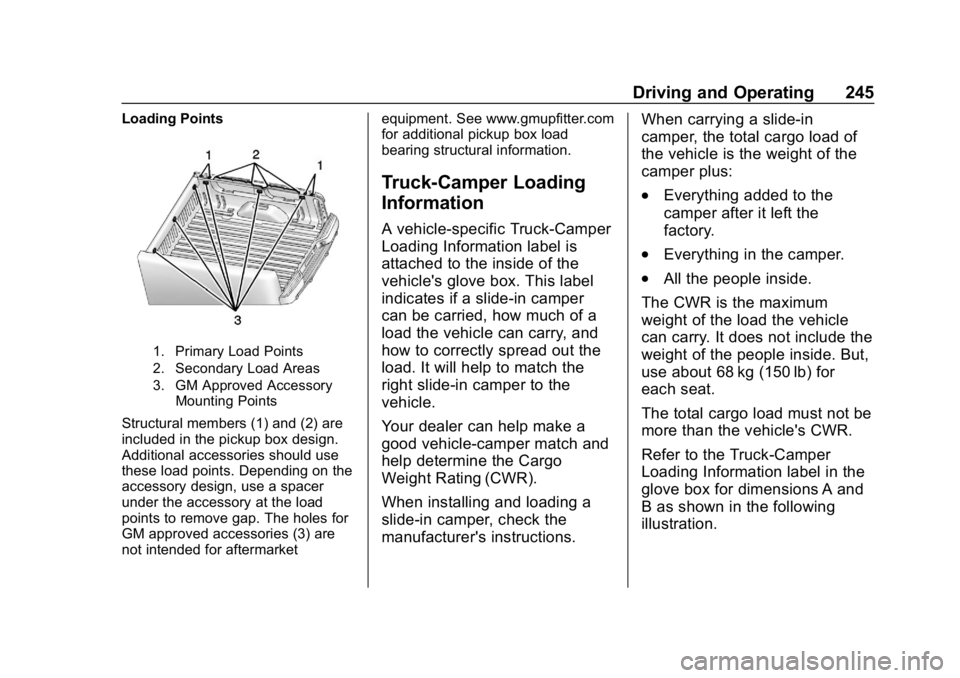
1. Primary Load Points
2. Secondary Load Areas
3. GM Approved AccessoryMounting Points
Structural members (1) and (2) are
included in the pickup box design.
Additional accessories should use
these load points. Depending on the
accessory design, use a spacer
under the accessory at the load
points to remove gap. The holes for
GM approved accessories (3) are
not intended for aftermarket equipment. See www.gmupfitter.com
for additional pickup box load
bearing structural information.
Truck-Camper Loading
Information
A vehicle-specific Truck-Camper
Loading Information label is
attached to the inside of the
vehicle's glove box. This label
indicates if a slide-in camper
can be carried, how much of a
load the vehicle can carry, and
how to correctly spread out the
load. It will help to match the
right slide-in camper to the
vehicle.
Your dealer can help make a
good vehicle-camper match and
help determine the Cargo
Weight Rating (CWR).
When installing and loading a
slide-in camper, check the
manufacturer's instructions.
When carrying a slide-in
camper, the total cargo load of
the vehicle is the weight of the
camper plus:
.Everything added to the
camper after it left the
factory.
.Everything in the camper.
.All the people inside.
The CWR is the maximum
weight of the load the vehicle
can carry. It does not include the
weight of the people inside. But,
use about 68 kg (150 lb) for
each seat.
The total cargo load must not be
more than the vehicle's CWR.
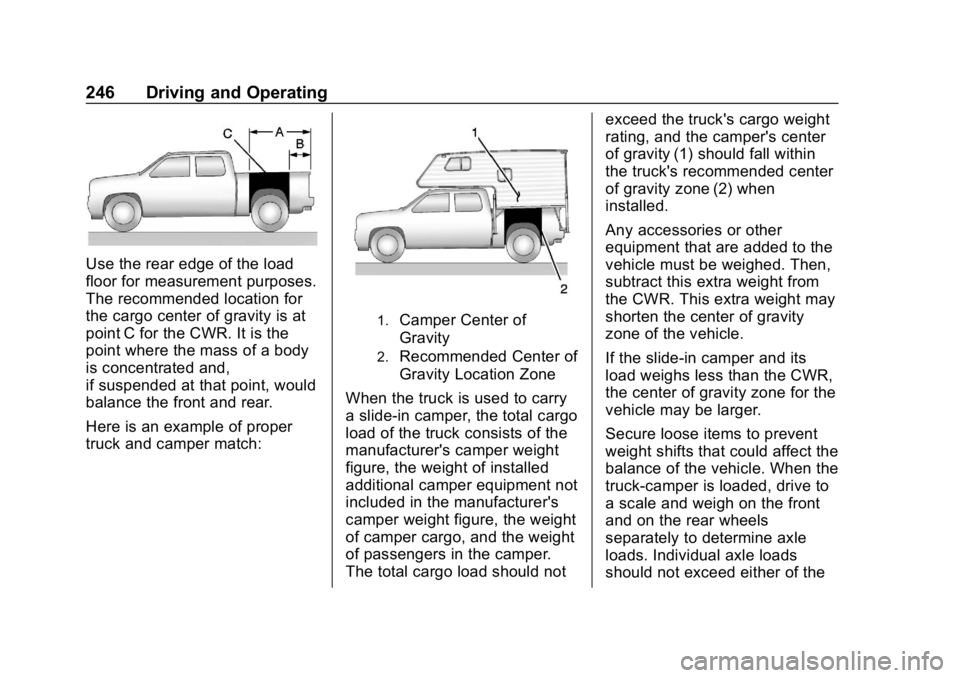
Refer to the Truck-Camper
Loading Information label in the
glove box for dimensions A and
B as shown in the following
illustration.
Page 247 of 501
Chevrolet Silverado Owner Manual (GMNA-Localizing-U.S./Canada/Mexico-
11349200) - 2018 - CRC - 2/27/18
246 Driving and Operating
Use the rear edge of the load
floor for measurement purposes.
The recommended location for
the cargo center of gravity is at
point C for the CWR. It is the
point where the mass of a body
is concentrated and,
if suspended at that point, would
balance the front and rear.
Here is an example of proper
truck and camper match:
1.Camper Center of
Gravity
2.Recommended Center of
Gravity Location Zone
When the truck is used to carry
a slide-in camper, the total cargo
load of the truck consists of the
manufacturer's camper weight
figure, the weight of installed
additional camper equipment not
included in the manufacturer's
camper weight figure, the weight
of camper cargo, and the weight
of passengers in the camper.
The total cargo load should not exceed the truck's cargo weight
rating, and the camper's center
of gravity (1) should fall within
the truck's recommended center
of gravity zone (2) when
installed.
Any accessories or other
equipment that are added to the
vehicle must be weighed. Then,
subtract this extra weight from
the CWR. This extra weight may
shorten the center of gravity
zone of the vehicle.
If the slide-in camper and its
load weighs less than the CWR,
the center of gravity zone for the
vehicle may be larger.
Secure loose items to prevent
weight shifts that could affect the
balance of the vehicle. When the
truck-camper is loaded, drive to
a scale and weigh on the front
and on the rear wheels
separately to determine axle
loads. Individual axle loads
should not exceed either of the
Page 261 of 501
Chevrolet Silverado Owner Manual (GMNA-Localizing-U.S./Canada/Mexico-
11349200) - 2018 - CRC - 2/27/18
260 Driving and Operating
Caution (Continued)
When stopping on a hill, use the
brakes to hold the vehicle in
place.
Normal Mode Grade Braking
If equipped with a gasoline engine
and an automatic transmission,
Normal Mode Grade Braking is
enabled when the vehicle is started,
but is not enabled in Range
Selection Mode. It assists in
maintaining desired vehicle speeds
when driving on downhill grades by
using the engine and transmission
to slow the vehicle. The first time
the system engages for each
ignition key cycle, a DIC message
will be displayed.
To disable or enable Normal Mode
Grade Braking within the current
ignition key cycle, press and hold
the Tow/Haul button for
five seconds. When the button is
released, the requested mode
change is made. A DIC message
displays.For other forms of grade braking,
see
Tow/Haul Mode 0262 and
Cruise Control 0279.
Kickdown Mode
If equipped, the accelerator pedal
provides an additional downshift
after pressing through the kickdown
feature.
It requires extra pedal pressure near
the end of its travel to engage.
Manual Mode
Range Selection Mode
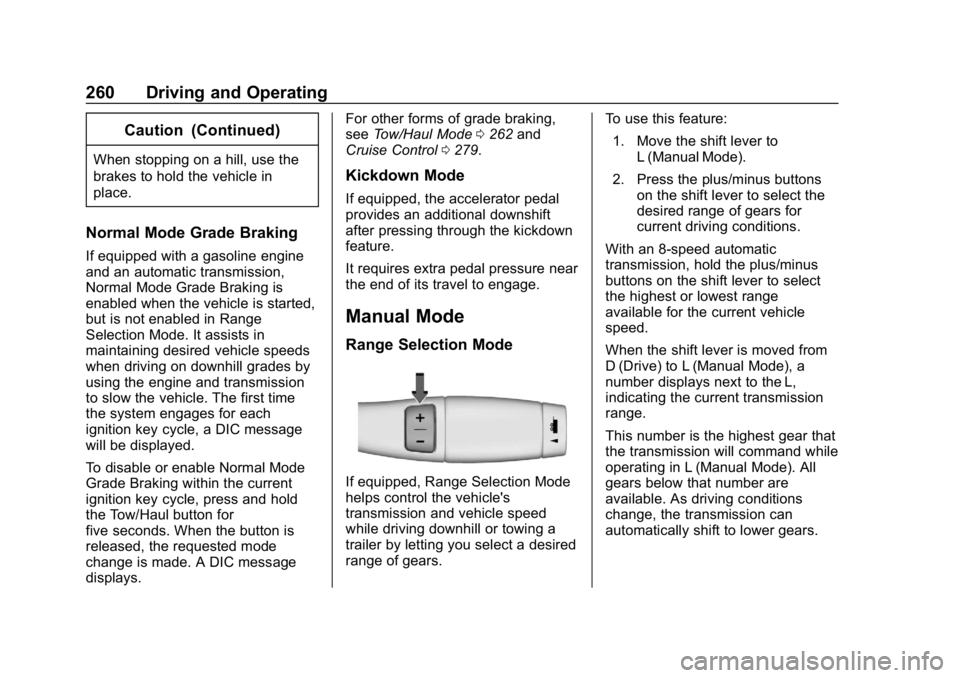
If equipped, Range Selection Mode
helps control the vehicle's
transmission and vehicle speed
while driving downhill or towing a
trailer by letting you select a desired
range of gears. To use this feature:
1. Move the shift lever to L (Manual Mode).
2. Press the plus/minus buttons on the shift lever to select the
desired range of gears for
current driving conditions.
With an 8-speed automatic
transmission, hold the plus/minus
buttons on the shift lever to select
the highest or lowest range
available for the current vehicle
speed.
When the shift lever is moved from
D (Drive) to L (Manual Mode), a
number displays next to the L,
indicating the current transmission
range.
This number is the highest gear that
the transmission will command while
operating in L (Manual Mode). All
gears below that number are
available. As driving conditions
change, the transmission can
automatically shift to lower gears.
Page 287 of 501
Chevrolet Silverado Owner Manual (GMNA-Localizing-U.S./Canada/Mexico-
11349200) - 2018 - CRC - 2/27/18
286 Driving and Operating
Warning (Continued)
or ice, or if the windshield is
damaged. It may also not detect a
vehicle on winding or hilly roads,
or in conditions that can limit
visibility such as fog, rain,
or snow, or if the headlamps or
windshield are not cleaned or in
proper condition. Keep the
windshield, headlamps, and FCA
sensors clean and in good repair.
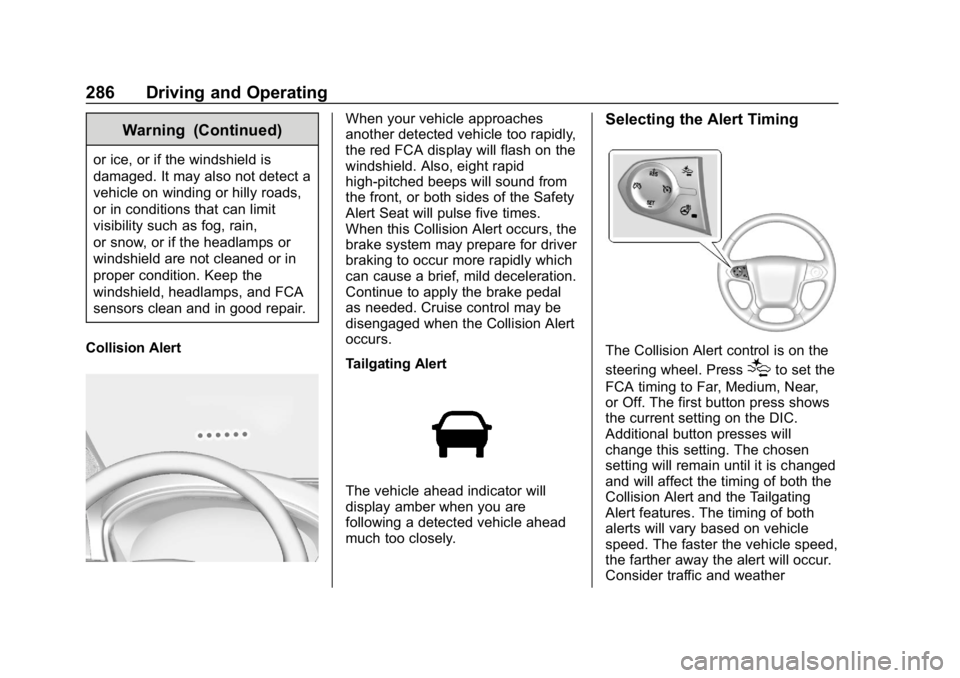
Collision Alert
When your vehicle approaches
another detected vehicle too rapidly,
the red FCA display will flash on the
windshield. Also, eight rapid
high-pitched beeps will sound from
the front, or both sides of the Safety
Alert Seat will pulse five times.
When this Collision Alert occurs, the
brake system may prepare for driver
braking to occur more rapidly which
can cause a brief, mild deceleration.
Continue to apply the brake pedal
as needed. Cruise control may be
disengaged when the Collision Alert
occurs.
Tailgating Alert
The vehicle ahead indicator will
display amber when you are
following a detected vehicle ahead
much too closely.
Selecting the Alert Timing
The Collision Alert control is on the
steering wheel. Press
[to set the
FCA timing to Far, Medium, Near,
or Off. The first button press shows
the current setting on the DIC.
Additional button presses will
change this setting. The chosen
setting will remain until it is changed
and will affect the timing of both the
Collision Alert and the Tailgating
Alert features. The timing of both
alerts will vary based on vehicle
speed. The faster the vehicle speed,
the farther away the alert will occur.
Consider traffic and weather