turn signal CHEVROLET SILVERADO 1500 2018 Owner's Manual
[x] Cancel search | Manufacturer: CHEVROLET, Model Year: 2018, Model line: SILVERADO 1500, Model: CHEVROLET SILVERADO 1500 2018Pages: 501, PDF Size: 6.69 MB
Page 238 of 501
Chevrolet Silverado Owner Manual (GMNA-Localizing-U.S./Canada/Mexico-
11349200) - 2018 - CRC - 2/27/18
Driving and Operating 237
{Warning
Coasting downhill in N (Neutral)
or with the ignition off is
dangerous. This can cause
overheating of the brakes and
loss of steering assist. Always
have the engine running and the
vehicle in gear.
. Drive at speeds that keep the
vehicle in its own lane. Do not
swing wide or cross the
center line.
. Be alert on top of hills;
something could be in your lane
(e.g., stalled car, accident).
. Pay attention to special road
signs (e.g., falling rocks area,
winding roads, long grades,
passing or no-passing zones)
and take appropriate action.
Winter Driving
Driving on Snow or Ice
Snow or ice between the tires and
the road creates less traction or
grip, so drive carefully. Wet ice can
occur at about 0 °C (32 °F) when
freezing rain begins to fall. Avoid
driving on wet ice or in freezing rain
until roads can be treated.
For Slippery Road Driving:
.Accelerate gently. Accelerating
too quickly causes the wheels to
spin and makes the surface
under the tires slick.
. Turn on Traction Control. See
Traction Control/Electronic
Stability Control 0276.
. The Antilock Brake System
(ABS) improves vehicle stability
during hard stops, but the
brakes should be applied sooner
than when on dry pavement.
See Antilock Brake System
(ABS) 0273. .
Allow greater following distance
and watch for slippery spots. Icy
patches can occur on otherwise
clear roads in shaded areas.
The surface of a curve or an
overpass can remain icy when
the surrounding roads are clear.
Avoid sudden steering
maneuvers and braking while
on ice.
. Turn off cruise control.
Blizzard Conditions
Stop the vehicle in a safe place and
signal for help. Stay with the vehicle
unless there is help nearby.
If possible, use Roadside
Assistance. See Roadside
Assistance Program 0465. To get
help and keep everyone in the
vehicle safe:
. Turn on the hazard warning
flashers.
. Tie a red cloth to an outside
mirror.
Page 289 of 501
Chevrolet Silverado Owner Manual (GMNA-Localizing-U.S./Canada/Mexico-
11349200) - 2018 - CRC - 2/27/18
288 Driving and Operating
Warning (Continued)
Complete attention is always
required while driving, and you
should be ready to take action
and apply the brakes and/or steer
the vehicle to avoid crashes.
FAB may slow the vehicle to a
complete stop to try to avoid a
potential crash. The vehicle will only
hold at a stop briefly. A firm press of
the accelerator pedal will
release FAB.
{Warning
FAB may automatically brake the
vehicle suddenly in situations
where it is unexpected and
undesired. It could respond to a
turning vehicle ahead, guardrails,
signs, and other non-moving
objects. To override FAB, firmly
press the accelerator pedal, if it is
safe to do so.
Intelligent Brake Assist (IBA)
IBA may activate when the brake
pedal is applied quickly by providing
a boost to braking based on the
speed of approach and distance to
a vehicle ahead.
Minor brake pedal pulsations or
pedal movement during this time is
normal and the brake pedal should
continue to be applied as needed.
IBA will automatically disengage
only when the brake pedal is
released.
{Warning
IBA may increase vehicle braking
in situations when it may not be
necessary. You could block the
flow of traffic. If this occurs, take
your foot off the brake pedal and
then apply the brakes as needed.
FAB and IBA can be disabled
through vehicle personalization. See
“Collision/Detection Systems” under
Vehicle Personalization 0160.
{Warning
Using FAB or IBA while towing a
trailer could cause you to lose
control of the vehicle and crash.
Turn the system to Alert or Off
when towing a trailer.
Lane Departure Warning
(LDW) (2500/3500 Series)
If equipped, LDW may help avoid
crashes due to unintentional lane
departures. It may provide an alert if
the vehicle is crossing a lane
marking without using a turn signal
in that direction. LDW uses a
camera sensor to detect the lane
markings at speeds of 56 km/h
(35 mph) or greater.
{Warning
The LDW system does not steer
the vehicle. The LDW system
may not:
(Continued)
Page 290 of 501
Chevrolet Silverado Owner Manual (GMNA-Localizing-U.S./Canada/Mexico-
11349200) - 2018 - CRC - 2/27/18
Driving and Operating 289
Warning (Continued)
.Provide enough time to
avoid a crash.
. Detect lane markings under
poor weather or visibility
conditions. This can occur if
the windshield or
headlamps are blocked by
dirt, snow, or ice; if they are
not in proper condition; or if
the sun shines directly into
the camera.
. Detect road edges.
. Detect lanes on winding or
hilly roads.
If LDW only detects lane
markings on one side of the road,
it will only warn you when
departing the lane on the side
where it has detected a lane
marking. Always keep your
attention on the road and
maintain proper vehicle position
within the lane, or vehicle
damage, injury, or death could (Continued)
Warning (Continued)
occur. Always keep the
windshield, headlamps, and
camera sensors clean and in
good repair. Do not use LDW in
bad weather conditions.
How the System Works
The LDW camera sensor is on the
windshield ahead of the rearview
mirror.
To turn LDW on and off, press
@on
the center stack. The control
indicator will light when LDW is on.
When LDW is on,@is green if
LDW is available to warn of a lane
departure. If the vehicle crosses a
detected lane marking without using
the turn signal in that direction,
@
changes to amber and flashes.
Additionally, there may be three
beeps, or the driver seat may pulse
three times on the right or left,
depending on the lane departure
direction.
When the System Does Not
Seem to Work Properly
The system may not detect lanes as
well when there are:
. Close vehicles ahead.
. Sudden lighting changes, such
as when driving through tunnels.
. Banked roads.
If the LDW system is not functioning
properly when lane markings are
clearly visible, cleaning the
windshield may help.
LDW alerts may occur due to tar
marks, shadows, cracks in the road,
temporary or construction lane
markings, or other road
imperfections. This is normal system
operation; the vehicle does not need
service. Turn LDW off if these
conditions continue.
Page 291 of 501
Chevrolet Silverado Owner Manual (GMNA-Localizing-U.S./Canada/Mexico-
11349200) - 2018 - CRC - 2/27/18
290 Driving and Operating
Lane Keep Assist (LKA)
(1500 Series)
If equipped, LKA may help avoid
crashes due to unintentional lane
departures. It may assist by gently
turning the steering wheel if the
vehicle approaches a detected lane
marking without using a turn signal
in that direction. It may also provide
a Lane Departure Warning (LDW)
system alert as the lane marking is
crossed. The LKA system will not
assist or provide an LDW alert if it
detects that you are actively
steering. Override LKA by turning
the steering wheel. LKA uses a
camera to detect lane markings
between 60 km/h (37 mph) and
180 km/h (112 mph).
{Warning
The LKA system does not
continuously steer the vehicle.
It may not keep the vehicle in the(Continued)
Warning (Continued)
lane or give a Lane Departure
Warning (LDW) alert, even if a
lane marking is detected.
The LKA and LDW systems
may not:
. Provide an alert or enough
steering assist to avoid a
lane departure or crash.
. Detect lane markings under
poor weather or visibility
conditions. This can occur if
the windshield or
headlamps are blocked by
dirt, snow, or ice, if they are
not in proper condition, or if
the sun shines directly into
the camera.
. Detect road edges.
. Detect lanes on winding or
hilly roads.
If LKA only detects lane markings
on one side of the road, it will
only assist or provide an LDW (Continued)
Warning (Continued)
alert when approaching the lane
on the side where it has detected
a lane marking. Even with LKA
and LDW, you must steer the
vehicle. Always keep your
attention on the road and
maintain proper vehicle position
within the lane, or vehicle
damage, injury, or death could
occur. Always keep the
windshield, headlamps, and
camera sensors clean and in
good repair. Do not use LKA in
bad weather conditions.
{Warning
Using LKA while towing a trailer
or on slippery roads could cause
loss of control of the vehicle and
a crash. Turn the system off.
Page 292 of 501
Chevrolet Silverado Owner Manual (GMNA-Localizing-U.S./Canada/Mexico-
11349200) - 2018 - CRC - 2/27/18
Driving and Operating 291
How the System Works
The LKA camera sensor is on the
windshield ahead of the rearview
mirror.
To turn LKA on and off, press
A
on the center stack.
When on,
Ais green if LKA is
available to assist and provide LDW
alerts. It may assist by gently
turning the steering wheel and
display
Aas amber if the vehicle
approaches a detected lane marking
without using a turn signal in that
direction. It may also provide an
LDW alert by flashing
Aamber
as the lane marking is crossed.
Additionally, there may be three
beeps, or the driver seat may pulse
three times, on the right or left,
depending on the lane departure
direction. Take Steering
The LKA system does not
continuously steer the vehicle.
If LKA does not detect active driver
steering, an alert, chime, or DIC
message may be provided. Move
the steering wheel to dismiss.
When the System Does Not
Seem to Work Properly
The system performance may be
affected by:
.
Close vehicles ahead.
. Sudden lighting changes, such
as when driving through tunnels.
. Banked roads.
. Roads with poor lane markings,
such as two-lane roads.
If the LKA system is not functioning
properly when lane markings are
clearly visible, cleaning the
windshield may help. A camera blocked message may
display if the camera is blocked.
Cleaning the outside of the
windshield behind the rearview
mirror may correct the issue. Some
driver assistance systems may have
reduced performance or not work at
all. An LKA or LDW unavailable
message may display if the systems
are temporarily unavailable. This
message could be due to a blocked
camera. The LKA system does not
need service. Clean the outside of
the windshield behind the rearview
mirror.
LKA assistance and/or LDW alerts
may occur due to tar marks,
shadows, cracks in the road,
temporary or construction lane
markings, or other road
imperfections. This is normal system
operation; the vehicle does not need
service. Turn LKA off if these
conditions continue.
Page 299 of 501
Chevrolet Silverado Owner Manual (GMNA-Localizing-U.S./Canada/Mexico-
11349200) - 2018 - CRC - 2/27/18
298 Driving and Operating
The structure, tires, and brakes of
the trailer must be rated to carry the
load. Inadequate trailer equipment
can cause the combination to
operate in an unexpected or unsafe
manner.
Before starting, check all trailer hitch
parts and attachments, safety
chains, electrical connectors, lamps,
tires, and mirrors. Get familiar with
the handling and braking of the rig.
If the trailer has electric brakes, start
the combination moving and then
apply the trailer brake controller by
hand to be sure the brakes work.
During the trip, check occasionally
to be sure that the load is secure
and the lamps and any trailer
brakes still work.
Following Distance
Stay at least twice as far behind the
vehicle ahead as you would when
driving the vehicle without a trailer.
This can help to avoid heavy
braking and sudden turns.
Passing
More passing distance is needed
when towing a trailer. The
combination will not accelerate as
quickly and is longer so it is
necessary to go much farther
beyond the passed vehicle before
returning to the lane.
Backing Up
Hold the bottom of the steering
wheel with one hand. To move the
trailer to the left, move that hand to
the left. To move the trailer to the
right, move your hand to the right.
Always back up slowly and,
if possible, have someone
guide you.
Making TurnsCaution
Making very sharp turns while
trailering could cause the trailer to
come in contact with the vehicle.
The vehicle could be damaged.
Avoid making very sharp turns
while trailering. When turning with a trailer, make
wider turns than normal. Do this so
the trailer will not strike soft
shoulders, curbs, road signs, trees,
or other objects. Avoid jerky or
sudden maneuvers. Signal well in
advance.
If the trailer turn signal bulbs burn
out, the arrows on the instrument
cluster will still flash for turns. It is
important to check occasionally to
be sure the trailer bulbs are still
working.
Turn Signals When Towing a
Trailer
The turn signal indicators on the
instrument cluster flash whenever
signaling a turn or lane change.
Properly hooked up, the trailer
lamps also flash, telling other
drivers the vehicle is turning,
changing lanes, or stopping. When
towing a trailer, the arrows on the
instrument cluster flash for turns
even if the bulbs on the trailer are
burned out.
Page 322 of 501
Chevrolet Silverado Owner Manual (GMNA-Localizing-U.S./Canada/Mexico-
11349200) - 2018 - CRC - 2/27/18
Driving and Operating 321
Trailer Wiring Harness
The vehicle is equipped with one of
the following wiring harnesses for
towing a trailer or hauling a slide-in
camper.
Basic Trailer Wiring
All regular, double cab, and crew
cab pickups have a seven-wire
trailer towing harness.
For vehicles not equipped with
heavy-duty trailering, the harness is
secured to the vehicle's frame
behind the spare tire mount. The
harness requires the installation of a
trailer connector, which is available
through your dealer.
Use only a round, seven-wire
connector with flat blade terminals
meeting SAE J2863 specifications
for proper electrical connectivity.
The seven-wire harness contains
the following trailer circuits:
.Green/Violet: Right Stop/Turn
Signal
. Yellow/Gray: Left Stop/Turn
Signal .
Gray/Brown: Taillamps/Parking
Lamps
. White/Green: Back-up Lamps
. Red/Green: Battery Feed
. White: Ground
. Blue: Electric Trailer Brake
The fuse for the electric trailer brake
circuit is installed in the underhood
electrical center, but the wires may
not be connected. They should be
connected by your dealer or a
qualified service center. To control
electric trailer brakes, a trailer brake
controller needs to be installed on
the vehicle by your dealer or a
qualified service center, see
“Electric Brake Control Wiring
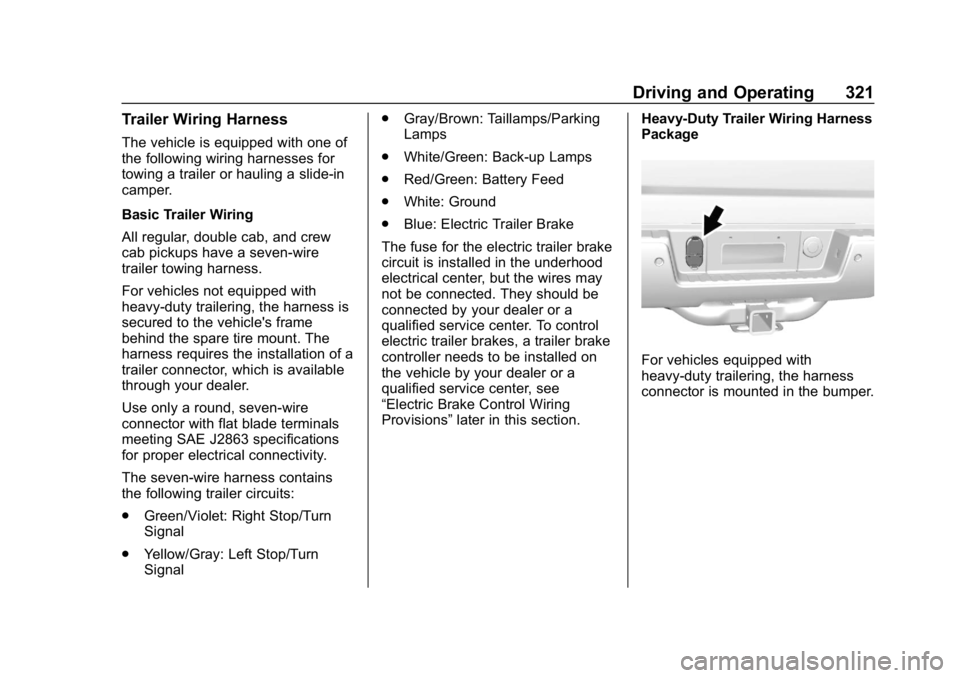
Provisions” later in this section. Heavy-Duty Trailer Wiring Harness
Package
For vehicles equipped with
heavy-duty trailering, the harness
connector is mounted in the bumper.
Page 323 of 501
Chevrolet Silverado Owner Manual (GMNA-Localizing-U.S./Canada/Mexico-
11349200) - 2018 - CRC - 2/27/18
322 Driving and Operating
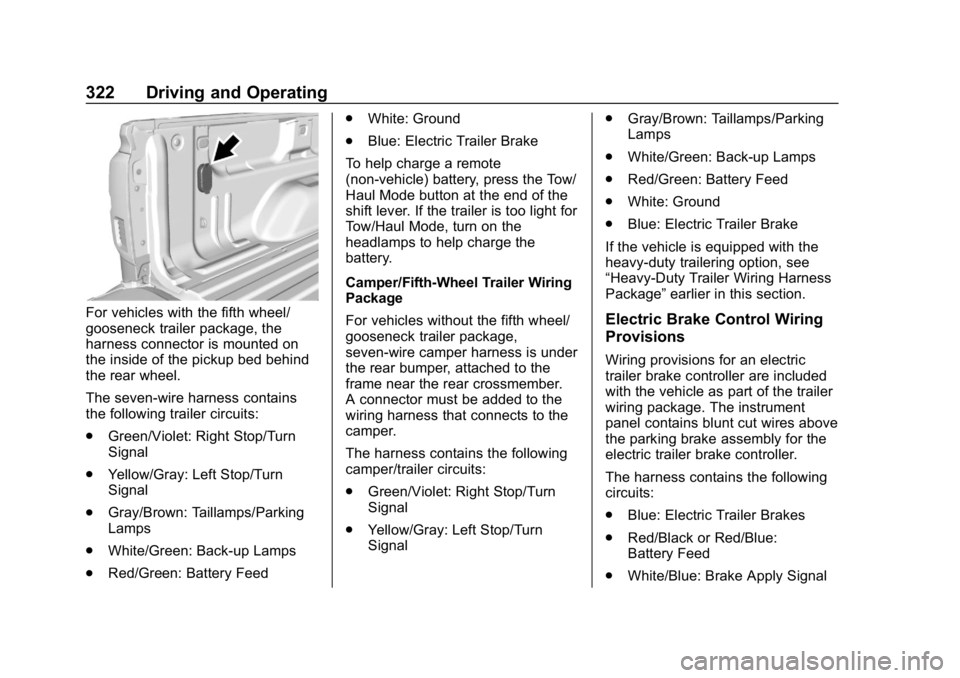
For vehicles with the fifth wheel/
gooseneck trailer package, the
harness connector is mounted on
the inside of the pickup bed behind
the rear wheel.
The seven-wire harness contains
the following trailer circuits:
.Green/Violet: Right Stop/Turn
Signal
. Yellow/Gray: Left Stop/Turn
Signal
. Gray/Brown: Taillamps/Parking
Lamps
. White/Green: Back-up Lamps
. Red/Green: Battery Feed .
White: Ground
. Blue: Electric Trailer Brake
To help charge a remote
(non-vehicle) battery, press the Tow/
Haul Mode button at the end of the
shift lever. If the trailer is too light for
Tow/Haul Mode, turn on the
headlamps to help charge the
battery.
Camper/Fifth-Wheel Trailer Wiring
Package
For vehicles without the fifth wheel/
gooseneck trailer package,
seven-wire camper harness is under
the rear bumper, attached to the
frame near the rear crossmember.
A connector must be added to the
wiring harness that connects to the
camper.
The harness contains the following
camper/trailer circuits:
. Green/Violet: Right Stop/Turn
Signal
. Yellow/Gray: Left Stop/Turn
Signal .
Gray/Brown: Taillamps/Parking
Lamps
. White/Green: Back-up Lamps
. Red/Green: Battery Feed
. White: Ground
. Blue: Electric Trailer Brake
If the vehicle is equipped with the
heavy-duty trailering option, see
“Heavy-Duty Trailer Wiring Harness
Package” earlier in this section.Electric Brake Control Wiring
Provisions
Wiring provisions for an electric
trailer brake controller are included
with the vehicle as part of the trailer
wiring package. The instrument
panel contains blunt cut wires above
the parking brake assembly for the
electric trailer brake controller.
The harness contains the following
circuits:
.
Blue: Electric Trailer Brakes
. Red/Black or Red/Blue:
Battery Feed
. White/Blue: Brake Apply Signal
Page 335 of 501
Chevrolet Silverado Owner Manual (GMNA-Localizing-U.S./Canada/Mexico-
11349200) - 2018 - CRC - 2/27/18
334 Vehicle Care
Vehicle Care
General Information
General Information . . . . . . . . . . 335
California Proposition65 Warning . . . . . . . . . . . . . . . . . 336
California Perchlorate Materials Requirements . . . . . 336
Accessories and Modifications . . . . . . . . . . . . . . . . 336
Vehicle Checks
Doing Your OwnService Work . . . . . . . . . . . . . . . 337
Hood . . . . . . . . . . . . . . . . . . . . . . . . . 337
Engine Compartment Overview . . . . . . . . . . . . . . . . . . . . 338
Engine Oil . . . . . . . . . . . . . . . . . . . . 343
Engine Oil Life System . . . . . . . 346
Automatic Transmission Fluid (6-Speed Transmission) . . . . . 347
Automatic Transmission Fluid (8-Speed Transmission) . . . . . 350
Manual Transmission Fluid . . . 350
Hydraulic Clutch . . . . . . . . . . . . . . 351
Engine Air Cleaner/Filter . . . . . . 351
Cooling System . . . . . . . . . . . . . . 352
Engine Overheating . . . . . . . . . . 356 Overheated Engine Protection
Operating Mode . . . . . . . . . . . . . 358
Engine Fan . . . . . . . . . . . . . . . . . . . 358
Power Steering Fluid (1500 Series) . . . . . . . . . . . . . . . . . . . . . . 359
Power Steering Fluid (2500/ 3500 Series) . . . . . . . . . . . . . . . . 359
Washer Fluid . . . . . . . . . . . . . . . . . 359
Brakes . . . . . . . . . . . . . . . . . . . . . . . 360
Brake Fluid . . . . . . . . . . . . . . . . . . . 361
Battery - North America . . . . . . 362
Four-Wheel Drive . . . . . . . . . . . . . 363
Front Axle . . . . . . . . . . . . . . . . . . . . 364
Rear Axle . . . . . . . . . . . . . . . . . . . . 365
Noise Control System . . . . . . . . 366
Starter Switch Check . . . . . . . . . 367
Automatic Transmission Shift Lock Control Function
Check . . . . . . . . . . . . . . . . . . . . . . . 368
Ignition Transmission Lock Check . . . . . . . . . . . . . . . . . . . . . . . 368
Park Brake and P (Park) Mechanism Check . . . . . . . . . . 368
Wiper Blade Replacement . . . . 369
Windshield Replacement . . . . . 369
Gas Strut(s) . . . . . . . . . . . . . . . . . . 370
Headlamp Aiming
Headlamp Aiming . . . . . . . . . . . . 371
Bulb Replacement
Bulb Replacement . . . . . . . . . . . . 371
Halogen Bulbs . . . . . . . . . . . . . . . . 371
High Intensity Discharge (HID) Lighting . . . . . . . . . . . . . . . . . . . . . 371
LED Lighting . . . . . . . . . . . . . . . . . 371
Headlamps, Front Turn Signal,
Sidemarker, and Parking
Lamps . . . . . . . . . . . . . . . . . . . . . . 372
Fog Lamps . . . . . . . . . . . . . . . . . . . 373
Taillamps (Chassis Cab Models) . . . . . . . . . . . . . . . . . . . . . 373
Taillamps, Turn Signal, Stoplamps, and Back-Up
Lamps . . . . . . . . . . . . . . . . . . . . . . 373
Center High-Mounted Stoplamp (CHMSL) and
Cargo Lamp . . . . . . . . . . . . . . . . . 375
Electrical System
High Voltage Devices andWiring . . . . . . . . . . . . . . . . . . . . . . . 375
Electrical System Overload . . . 375
Fuses and Circuit Breakers . . . 376
Engine Compartment Fuse Block . . . . . . . . . . . . . . . . . . . . . . . . 376
Instrument Panel Fuse Block (Right) . . . . . . . . . . . . . . . . . . . . . . 380
Instrument Panel Fuse Block (Left) . . . . . . . . . . . . . . . . . 381
Page 373 of 501
Chevrolet Silverado Owner Manual (GMNA-Localizing-U.S./Canada/Mexico-
11349200) - 2018 - CRC - 2/27/18
372 Vehicle Care
Headlamps, Front Turn
Signal, Sidemarker, and
Parking Lamps
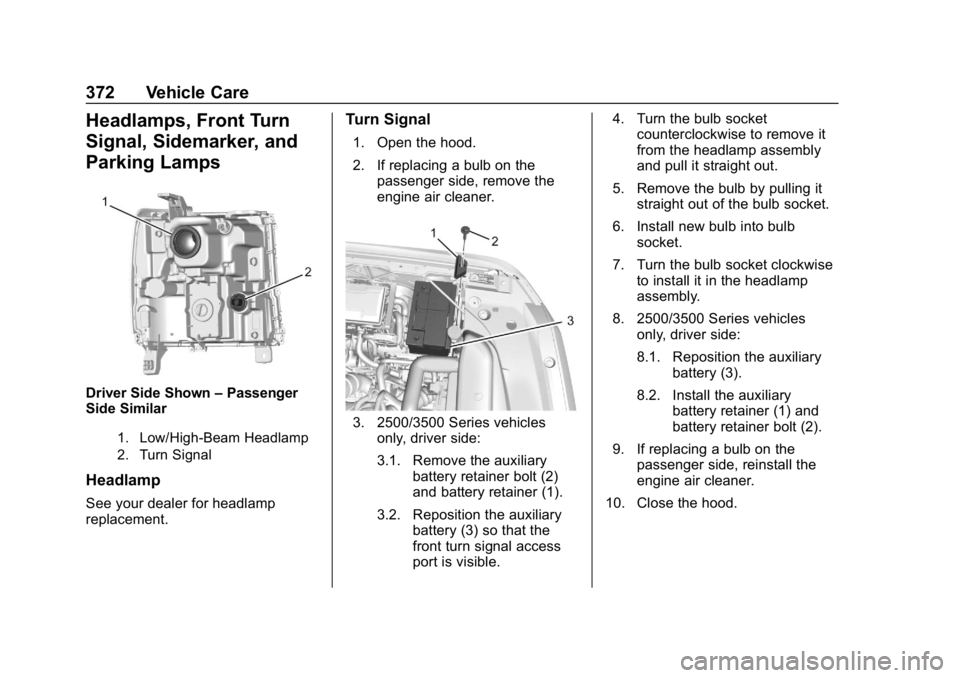
Driver Side Shown–Passenger
Side Similar
1. Low/High-Beam Headlamp
2. Turn Signal
Headlamp
See your dealer for headlamp
replacement.
Turn Signal
1. Open the hood.
2. If replacing a bulb on the
passenger side, remove the
engine air cleaner.
3. 2500/3500 Series vehicles
only, driver side:
3.1. Remove the auxiliary battery retainer bolt (2)
and battery retainer (1).
3.2. Reposition the auxiliary battery (3) so that the
front turn signal access
port is visible. 4. Turn the bulb socket
counterclockwise to remove it
from the headlamp assembly
and pull it straight out.
5. Remove the bulb by pulling it straight out of the bulb socket.
6. Install new bulb into bulb socket.
7. Turn the bulb socket clockwise to install it in the headlamp
assembly.
8. 2500/3500 Series vehicles only, driver side:
8.1. Reposition the auxiliary
battery (3).
8.2. Install the auxiliary battery retainer (1) and
battery retainer bolt (2).
9. If replacing a bulb on the passenger side, reinstall the
engine air cleaner.
10. Close the hood.