maintenance schedule CHEVROLET SILVERADO 1500 2022 User Guide
[x] Cancel search | Manufacturer: CHEVROLET, Model Year: 2022, Model line: SILVERADO 1500, Model: CHEVROLET SILVERADO 1500 2022Pages: 461, PDF Size: 11.09 MB
Page 293 of 461
 - 2021 - CRC - 11/9/20
292 Driving and Operating
5. Gradually release the brake pedal toallow the chocks t")
Chevrolet Silverado 1500 Owner Manual (GMNA-Localizing-U.S./Canada/
Mexico/Paraguay-14632303) - 2021 - CRC - 11/9/20
292 Driving and Operating
5. Gradually release the brake pedal toallow the chocks to absorb the load of
the trailer.
6. Reapply the brake pedal. Then apply the parking brake and shift into P (Park).
7. Release the brake pedal.
Pulling the Trailer from the Water
To pull the trailer out of the water: 1. Press and hold the brake pedal.
2. Start the engine and shift into gear.
3. Release the parking brake.
4. Let up on the brake pedal.
5. Drive slowly until the tires are clear of the chocks.
6. Stop and have someone pick up and store the chocks.
7. Slowly pull the trailer from the water.
8. Once the vehicle and trailer have been driven from the sloped part of the boat
ramp, the vehicle can be shifted from
four-wheel-drive high. Shift into the drive
mode that is appropriate for the road
conditions.Caution
If the vehicle tires begin to spin and the
vehicle begins to slide toward the water,
remove your foot from the accelerator
pedal and apply the brake pedal. Seek
help to have the vehicle towed up
the ramp.
Maintenance when Trailer Towing
The vehicle needs service more often when
used to tow trailers. See Maintenance
Schedule 0409. It is especially important to
check the engine oil, axle lubricant, belts,
cooling system, and brake system before
and during each trip.
Check periodically to see that all nuts and
bolts on the trailer hitch are tight.
Engine Cooling When Trailer Towing
The cooling system may temporarily
overheat during severe operating conditions.
See Engine Overheating 0337.
Trailer Towing
If equipped with a diesel engine, see the
Duramax diesel supplement.
Caution
Towing a trailer improperly can damage
the vehicle and result in costly repairs
not covered by the vehicle warranty. To
tow a trailer correctly, follow the
directions in this section and see your
dealer for important information about
towing a trailer with the vehicle.
Trailering is different than just driving the
vehicle by itself. Trailering means changes in
handling, acceleration, braking, durability,
and fuel economy. Successful, safe trailering
takes correct equipment, and it has to be
used properly.
The following information has many
time-tested, important trailering tips and
safety rules. Many of these are important
for your safety and that of your passengers.
Read this section carefully before pulling a
trailer.
Trailer Weight
{Warning
Never exceed the towing capacity for
your vehicle.
Page 333 of 461
 - 2021 - CRC - 11/9/20
332 Vehicle Care
The oil life system can also be reset as
follows:1. Display the oi")
Chevrolet Silverado 1500 Owner Manual (GMNA-Localizing-U.S./Canada/
Mexico/Paraguay-14632303) - 2021 - CRC - 11/9/20
332 Vehicle Care
The oil life system can also be reset as
follows:1. Display the oil life percentage on the DIC. See Driver Information Center (DIC)
(Base Level) 0124 or
Driver Information Center (DIC) (Midlevel
and Uplevel) 0125.
2. Fully press the accelerator pedal slowly three times within five seconds.
3. If the display changes to 100%, the system is reset.
If the vehicle has a CHANGE ENGINE OIL
SOON message and it comes back on when
the vehicle is started and/or the oil
life percentage is near 0%, the engine oil
life system has not been reset. Repeat the
procedure.
Automatic Transmission Fluid
When to Check and Change Automatic
Transmission Fluid
It is usually not necessary to check the
transmission fluid level. The only reason for
fluid loss is a transmission leak or
overheated transmission. This vehicle is not
equipped with a transmission fluid level
dipstick. There is a special procedure for
checking and changing the transmission fluid in these vehicles. Because this procedure is
difficult, this should be done at the dealer.
Contact the dealer for additional information
or the procedure can be found in the service
manual. See
Publication Ordering
Information 0436.
Caution
Use of the incorrect automatic
transmission fluid may damage the
vehicle, and the damage may not be
covered by the vehicle warranty. Always
use the correct automatic transmission
fluid. See Recommended Fluids and
Lubricants 0418.
Change the fluid and filter at the scheduled
maintenance intervals listed in Maintenance
Schedule 0409. Be sure to use the
transmission fluid listed in Recommended
Fluids and Lubricants 0418.
Engine Air Filter Life System
If equipped, this feature provides the engine
air filter’s remaining life and best timing for
a change. The timing to change an engine
air filter depends on driving and
environmental conditions.
When to Change the Engine Air Filter
When the Driver Information Center (DIC)
displays a message to replace the engine air
filter at the next oil change, follow this
timing.
When the DIC displays a message to replace
the engine air filter soon, replace the engine
air filter at the earliest convenience.
The system must be reset after the engine
air filter is changed.
If the DIC displays a message to check the
engine air filter system, see your dealer.
How to Reset the Engine Air Filter Life
System
To reset:
1. Place the vehicle in P (Park).
2. Display the Air Filter Life on the DIC. See Driver Information Center (DIC) (Base
Level) 0124 or
Driver Information Center (DIC) (Midlevel
and Uplevel) 0125.
3. Press
Ton the steering wheel, or press
the trip odometer reset stem if the
vehicle does not have DIC controls, to
move to the Reset/Disable display area.
Page 334 of 461
 - 2021 - CRC - 11/9/20
Vehicle Care 333
Select Reset then press the thumbwheel
or press the reset stem for")
Chevrolet Silverado 1500 Owner Manual (GMNA-Localizing-U.S./Canada/
Mexico/Paraguay-14632303) - 2021 - CRC - 11/9/20
Vehicle Care 333
Select Reset then press the thumbwheel
or press the reset stem for several
seconds.
4. Press the thumbwheel or the reset stem to confirm the reset.
Engine Air Cleaner/Filter
The engine air cleaner/filter is on the driver
side of the engine compartment. See Engine
Compartment Overview 0324.
When to Inspect the Engine Air Cleaner/
Filter
If the vehicle is not equipped with the
engine air filter life system see Maintenance
Schedule 0409 for intervals on inspecting
and replacing the engine air cleaner filter.
How to Inspect/Replace the Engine Air
Cleaner/Filter
Do not start the engine or have the engine
running with the engine air cleaner/filter
housing open. Before removing the engine
air cleaner/filter, make sure that the engine
air cleaner/filter housing and nearby
components are free of dirt and debris. Do
not clean the engine air cleaner/filter or
components with water or compressed air. To inspect or replace the engine air cleaner/
filter:
5.3L V8 Engine (L84) Shown, 2.7L L4 Engine
(L3B), 4.3L V6 Engine (LV3), 5.3L V8 Engine (L82), and 6.2L V8 Engine (L87) Similar
1. Air Duct Clamp
2. Electrical Harness Connector
3. Screws
1. Locate the air cleaner/filter assembly. See Engine Compartment Overview
0 324.
2. Disconnect the outlet duct by loosening the air duct clamp (1).
3. Disconnect the electrical harness connector (2) from the cover. 4. Remove the three screws on top of the
cover of the housing, then slide and lift
the cover.
5. Lift and remove the engine air cleaner/ filter.
{Warning
If part replacement is necessary, the part
must be replaced with one of the same
part number or with an equivalent part.
Use of a replacement part without the
same fit, form, and function may result
in personal injury or damage to the
vehicle.
6. Lightly tap and shake the engine air cleaner/filter, away from the vehicle, to
release loose dust and dirt. Replace the
engine air filter if damaged.
7. Reverse steps 2–5 to reinstall the engine air cleaner/filter cover housing.
8. If equipped, reset the engine air filter life system after replacing the engine air
filter. See Engine Air Filter Life System
0 332.
Page 343 of 461
 - 2021 - CRC - 11/9/20
342 Vehicle Care
Brake Fluid
The brake master cylinder reservoir is filled
with GM")
Chevrolet Silverado 1500 Owner Manual (GMNA-Localizing-U.S./Canada/
Mexico/Paraguay-14632303) - 2021 - CRC - 11/9/20
342 Vehicle Care
Brake Fluid
The brake master cylinder reservoir is filled
with GM approved DOT 4 brake fluid as
indicated on the reservoir cap. SeeEngine
Compartment Overview 0324 for the
location of the reservoir.
Checking Brake Fluid
With the vehicle in P (Park) on a level
surface, the brake fluid level should be
between the minimum and maximum marks
on the brake fluid reservoir.
There are only two reasons why the brake
fluid level in the reservoir may go down:
.Normal brake lining wear. When new
linings are installed, the fluid level goes
back up.
.A fluid leak in the brake hydraulic system.
Have the brake hydraulic system fixed.
With a leak, the brakes will not
work well. Always clean the brake fluid reservoir cap
and the area around the cap before
removing it.
Do not top off the brake fluid. Adding fluid
does not correct a leak. If fluid is added
when the linings are worn, there will be too
much fluid when new brake linings are
installed. Add or remove fluid, as necessary,
only when work is done on the brake
hydraulic system.
{Warning
If too much brake fluid is added, it can
spill on the engine and burn, if the
engine is hot enough. You or others could
be burned, and the vehicle could be
damaged. Add brake fluid only when
work is done on the brake hydraulic
system.
When the brake fluid falls to a low level,
the brake warning light comes on. See Brake
System Warning Light 0117.
Brake fluid absorbs water over time which
degrades the effectiveness of the brake fluid.
Replace brake fluid at the specified intervals
to prevent increased stopping distance. See
Maintenance Schedule 0409. What to Add
Use only GM approved DOT 4 brake fluid
from a clean, sealed container. See
Recommended Fluids and Lubricants
0418.
{Warning
The wrong or contaminated brake fluid
could result in damage to the brake
system. This could result in the loss of
braking leading to a possible injury.
Always use the proper GM approved
brake fluid.
Caution
If brake fluid is spilled on the vehicle's
painted surfaces, the paint finish can be
damaged. Immediately wash off any
painted surface.
Battery - North America
The original equipment battery is
maintenance free. Do not remove the cap
and do not add fluid.
Refer to the replacement number shown on
the original battery label when a new
battery is needed. See Engine Compartment
Overview 0324 for battery location.
Page 346 of 461
 - 2021 - CRC - 11/9/20
Vehicle Care 345
3. Turn the ignition on.
For vehicles not equipped with the Stop/")
Chevrolet Silverado 1500 Owner Manual (GMNA-Localizing-U.S./Canada/
Mexico/Paraguay-14632303) - 2021 - CRC - 11/9/20
Vehicle Care 345
3. Turn the ignition on.
For vehicles not equipped with the Stop/
Start system: 1. Install the negative battery cable clamp to the negative battery post.
2. Tighten the negative battery cable nut.
3. Turn the ignition on.
Four-Wheel Drive
Transfer Case
When to Check Lubricant
Refer to Maintenance Schedule 0409 to
determine when to check the lubricant.
1. Fill Plug
2. Drain Plug
To get an accurate reading, the vehicle
should be on a level surface.
If the level is below the bottom of the fill
plug (1) hole, located on the transfer case,
some lubricant will need to be added. Add
enough lubricant to raise the level to the
bottom of the fill plug (1) hole. Use care not
to overtighten the plug.
When to Change Lubricant
Refer to Maintenance Schedule 0409 to
determine how often to change the
lubricant.
What to Use
Refer to Recommended Fluids and Lubricants
0 418 to determine what kind of lubricant
to use.
Front Axle
When to Check Lubricant
It is not necessary to regularly check the
front axle fluid unless a leak is suspected or
an unusual noise is heard. A fluid loss could
indicate a problem. Have it inspected and
repaired. This service can be complex. See
your dealer. Do not directly power wash the transfer
case and/or front/rear axle output seals.
High pressure water can overcome the seals
and contaminate the fluid. Contaminated
fluid will decrease the life of the transfer
case and/or drive axles and should be
replaced.
Rear Axle
When to Check Lubricant
It is not necessary to regularly check the
rear axle fluid unless a leak is suspected or
an unusual noise is heard. A fluid loss could
indicate a problem. Have it inspected and
repaired. This service can be complex. See
your dealer.
Do not directly power wash the transfer
case and/or front/rear axle output seals.
High pressure water can overcome the seals
and contaminate the fluid. Contaminated
fluid will decrease the life of the transfer
case and/or drive axles and should be
replaced.
Page 348 of 461
 - 2021 - CRC - 11/9/20
Vehicle Care 347
.To check the parking brake's holding
ability: With the engine")
Chevrolet Silverado 1500 Owner Manual (GMNA-Localizing-U.S./Canada/
Mexico/Paraguay-14632303) - 2021 - CRC - 11/9/20
Vehicle Care 347
.To check the parking brake's holding
ability: With the engine running and the
transmission in N (Neutral), slowly remove
foot pressure from the regular brake
pedal. Do this until the vehicle is held by
the parking brake only.
.To check the P (Park) mechanism's holding
ability: With the engine running, shift to
P (Park). Then release the parking brake
followed by the regular brake.
Contact your dealer if service is required.
Wiper Blade Replacement
Windshield wiper blades should be replaced
periodically. See Maintenance Schedule
0 409.
Replacement blades come in different types
and are removed in different ways. For
proper type and length, see Maintenance
Replacement Parts 0419.
Caution
Allowing the wiper arm to touch the
windshield when no wiper blade is
installed could damage the windshield.
Any damage that occurs would not be
(Continued)
Caution (Continued)
covered by the vehicle warranty. Do not
allow the wiper arm to touch the
windshield.
Front Wiper Blade Replacement
To replace the wiper blade:
1. Pull the wiper assembly away from the windshield.
2. Lift up on the latch in the middle of the
wiper blade where the wiper arm
attaches. 3. With the latch open, pull the wiper blade
down toward the windshield far enough
to release it from the J-hooked end of
the wiper arm.
4. Remove the wiper blade.
5. Reverse Steps 1–3 for wiper blade replacement.
Glass Replacement
If the windshield or front side glass must be
replaced, see your dealer to determine the
correct replacement glass.
Windshield Replacement
HUD System
If equipped, the windshield is part of the
HUD system. If the windshield must be
replaced, get one that is designed for HUD
or the HUD image may look out of focus.
Driver Assistance Systems
If the windshield needs to be replaced and
the vehicle is equipped with a front camera
sensor for the Driver Assistance Systems, a
GM replacement windshield is
recommended. The replacement windshield
must be installed according to GM
specifications for proper alignment. If it is
Page 349 of 461
 - 2021 - CRC - 11/9/20
348 Vehicle Care
not, these systems may not work properly,
they may display message")
Chevrolet Silverado 1500 Owner Manual (GMNA-Localizing-U.S./Canada/
Mexico/Paraguay-14632303) - 2021 - CRC - 11/9/20
348 Vehicle Care
not, these systems may not work properly,
they may display messages, or they may
not work at all. See your dealer for proper
windshield replacement.
Gas Strut(s)
This vehicle is equipped with gas strut(s) to
provide assistance in lifting and holding
open the hood/trunk/liftgate system in full
open position.
{Warning
If the gas struts that hold open the hood,
trunk, and/or liftgate fail, you or others
could be seriously injured. Take the
vehicle to your dealer for service
immediately. Visually inspect the gas
struts for signs of wear, cracks, or other
damage periodically. Check to make sure
the hood/trunk/liftgate is held open with
enough force. If struts are failing to hold
the hood/trunk/liftgate, do not operate.
Have the vehicle serviced.
Caution
Do not apply tape or hang any objects
from gas struts. Also do not push down
or pull on gas struts. This may cause
damage to the vehicle.
See Maintenance Schedule 0409.
Hood
Trunk
Liftgate
Page 375 of 461
Chevrolet Silverado 1500 Owner Manual (GMNA-Localizing-U.S./Canada/
Mexico/Paraguay-14632303) - 2021 - CRC - 11/9/20
374 Vehicle Care
and the sensor learning process is
performed successfully. See "TTPMS
Sensor Learning Process" underTrailering
App 0306.
.Operating electronic devices or being near
facilities using radio wave frequencies
similar to the TTPMS could cause
interference to the TTPMS which could
cause loss of signal reception from the
sensor.
.If the system does not receive the signal
from an individual sensor, an error
message may not occur until the vehicle
has been driver for a period of time.
If the TTPMS is not functioning properly, it
cannot detect or signal a low tire condition.
See your dealer for service if the DIC
message comes on and stays on when the
trailer tire pressures have been checked and
determined to be correct.
Tire Inspection
We recommend that the tires, including
the spare tire, if the vehicle has one, be
inspected for signs of wear or damage
at least once a month. Replace the tire if:
.The indicators at three or more
places around the tire can be seen.
.There is cord or fabric showing
through the tire's rubber.
.The tread or sidewall is cracked, cut,
or snagged deep enough to show
cord or fabric.
.The tire has a bump, bulge, or split.
.The tire has a puncture, cut, or other
damage that cannot be repaired well
because of the size or location of the
damage.
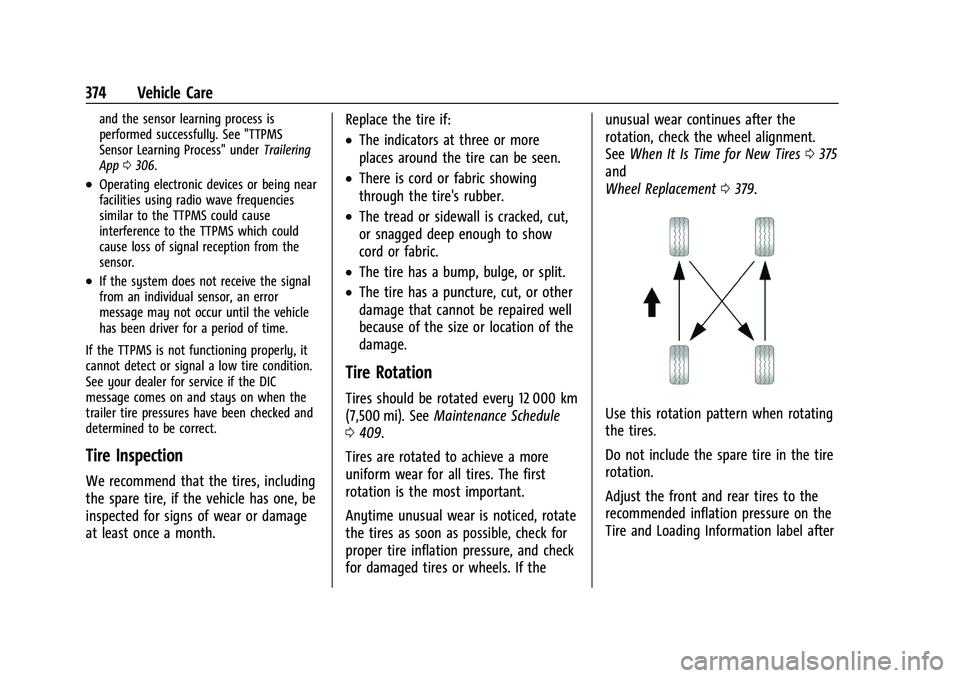
Tire Rotation
Tires should be rotated every 12 000 km
(7,500 mi). See
Maintenance Schedule
0 409.
Tires are rotated to achieve a more
uniform wear for all tires. The first
rotation is the most important.
Anytime unusual wear is noticed, rotate
the tires as soon as possible, check for
proper tire inflation pressure, and check
for damaged tires or wheels. If the unusual wear continues after the
rotation, check the wheel alignment.
See
When It Is Time for New Tires 0375
and
Wheel Replacement 0379.Use this rotation pattern when rotating
the tires.
Do not include the spare tire in the tire
rotation.
Adjust the front and rear tires to the
recommended inflation pressure on the
Tire and Loading Information label after
Page 391 of 461
 - 2021 - CRC - 11/9/20
390 Vehicle Care
9. Make sure the tire is stored securely.Push, pull, and then try")
Chevrolet Silverado 1500 Owner Manual (GMNA-Localizing-U.S./Canada/
Mexico/Paraguay-14632303) - 2021 - CRC - 11/9/20
390 Vehicle Care
9. Make sure the tire is stored securely.Push, pull, and then try to turn the tire.
If the tire moves, use the wheel wrench
to tighten the cable.
If equipped with a spare tire cable,
reattach the clip to the frame
attachment bracket. Note that there may
be slack in the cable.
Repeat this tightness check procedure
when checking the spare tire pressure
according to the scheduled maintenance
information or any time the spare tire is
handled due to service of other
components.
Correctly Stored
Incorrectly Stored
10. Reinstall the spare tire lock, if the vehicle has one.
Return the jack and tools to their original
location in the vehicle. See “Removing the
Spare Tire and Tools.”
Page 409 of 461
 - 2021 - CRC - 11/9/20
408 Service and Maintenance
Service and Maintenance
General Information
General Inf")
Chevrolet Silverado 1500 Owner Manual (GMNA-Localizing-U.S./Canada/
Mexico/Paraguay-14632303) - 2021 - CRC - 11/9/20
408 Service and Maintenance
Service and Maintenance
General Information
General Information . . . . . . . . . . . . . . . . . . 408
Maintenance Schedule
Maintenance Schedule . . . . . . . . . . . . . . . . 409
Special Application Services
Special Application Services . . . . . . . . . . . . 415
Additional Maintenance and Care
Additional Maintenance and Care . . . . . . 415
Recommended Fluids, Lubricants, and
Parts
Recommended Fluids andLubricants . . . . . . . . . . . . . . . . . . . . . . . . . . . 418
Maintenance Replacement Parts . . . . . . . 419
Maintenance Records
Maintenance Records . . . . . . . . . . . . . . . . . . 422
General Information
This maintenance section applies to vehicles
with a gasoline engine. For diesel engine
vehicles, see "Maintenance Schedule" in the
Duramax diesel supplement.
Your vehicle is an important investment.
This section describes the required
maintenance for the vehicle. Follow this
schedule to help protect against major repair
expenses resulting from neglect or
inadequate maintenance. It may also help to
maintain the value of the vehicle if it is
sold. It is the responsibility of the owner to
have all required maintenance performed.
Your dealer has trained technicians who can
perform required maintenance using genuine
replacement parts. They have up-to-date
tools and equipment for fast and accurate
diagnostics. Many dealers have extended
evening and Saturday hours, courtesy
transportation, and online scheduling to
assist with service needs.
Your dealer recognizes the importance of
providing competitively priced maintenance
and repair services. With trained technicians,
the dealer is the place for routine maintenance such as oil changes and tire
rotations and additional maintenance items
like tires, brakes, batteries, and wiper blades.
Caution
Damage caused by improper maintenance
can lead to costly repairs and may not be
covered by the vehicle warranty.
Maintenance intervals, checks,
inspections, recommended fluids, and
lubricants are important to keep the
vehicle in good working condition.
Do not have chemical flushes that are not
approved by GM performed on the
vehicle. The use of flushes, solvents,
cleaners, or lubricants that are not
approved by GM could damage the
vehicle, requiring expensive repairs that
are not covered by the vehicle warranty.
The Tire Rotation and Required Services are
the responsibility of the vehicle owner. It is
recommended to have your dealer perform
these services every 12 000 km/7,500 mi.
Proper vehicle maintenance helps to keep
the vehicle in good working condition,
improves fuel economy, and reduces vehicle
emissions.